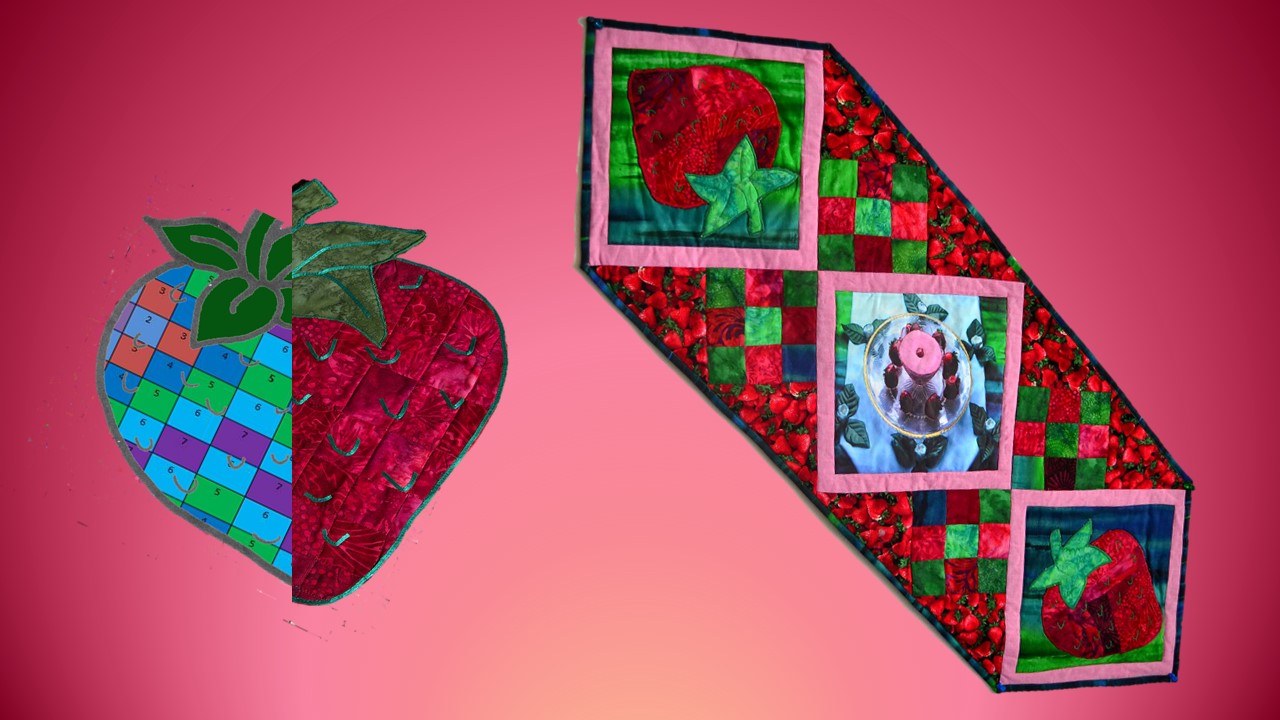
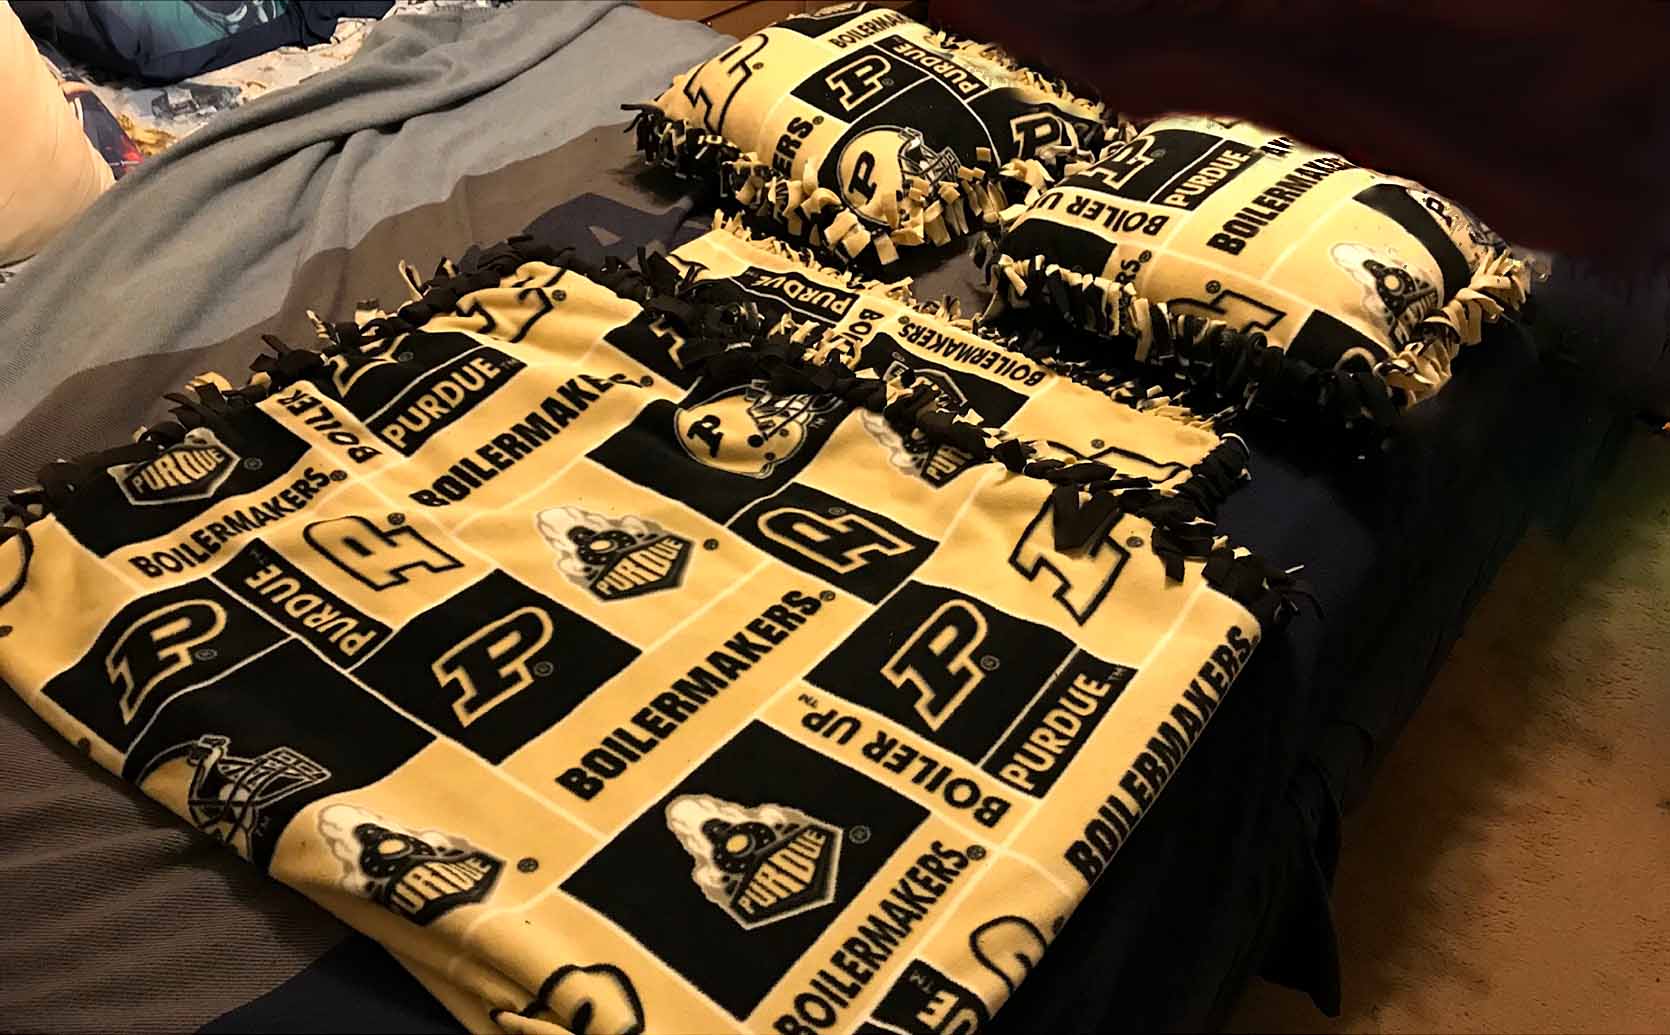
How the Princess YellowBelly team accepted our own challenge and transformed a Bargello table-topper into a stunning (if we do say so ourselves) farm-to-table runner.
We’ve heard the most dangerous words in the world are “we’ve always done it this way.”
Here at Princess YellowBelly Designs we take a certain amount of pride in the fact that we don’t allow traditional quilting “rules” to define the limits of possibility. Just because quilters have always done it one way in the past doesn’t mean that we won’t try doing something completely crazy just because it might be:
Easier
Faster
More beautiful
More unique
…Or all of those things at once!
Thinking outside the box is a lifelong challenge, and recently we found ourselves challenged to get out of a box we hadn’t even realized we were in.
When one artist wanted to re-imagine one of our favorite original quilting patterns as a more traditional quilt, it kind of shocked us. Somehow we’d gotten into the habit of believing that we were creatively stretching our limits just because we were making new patterns.
What we weren’t asking ourselves was, “are we taking these original patterns to their full potential?”
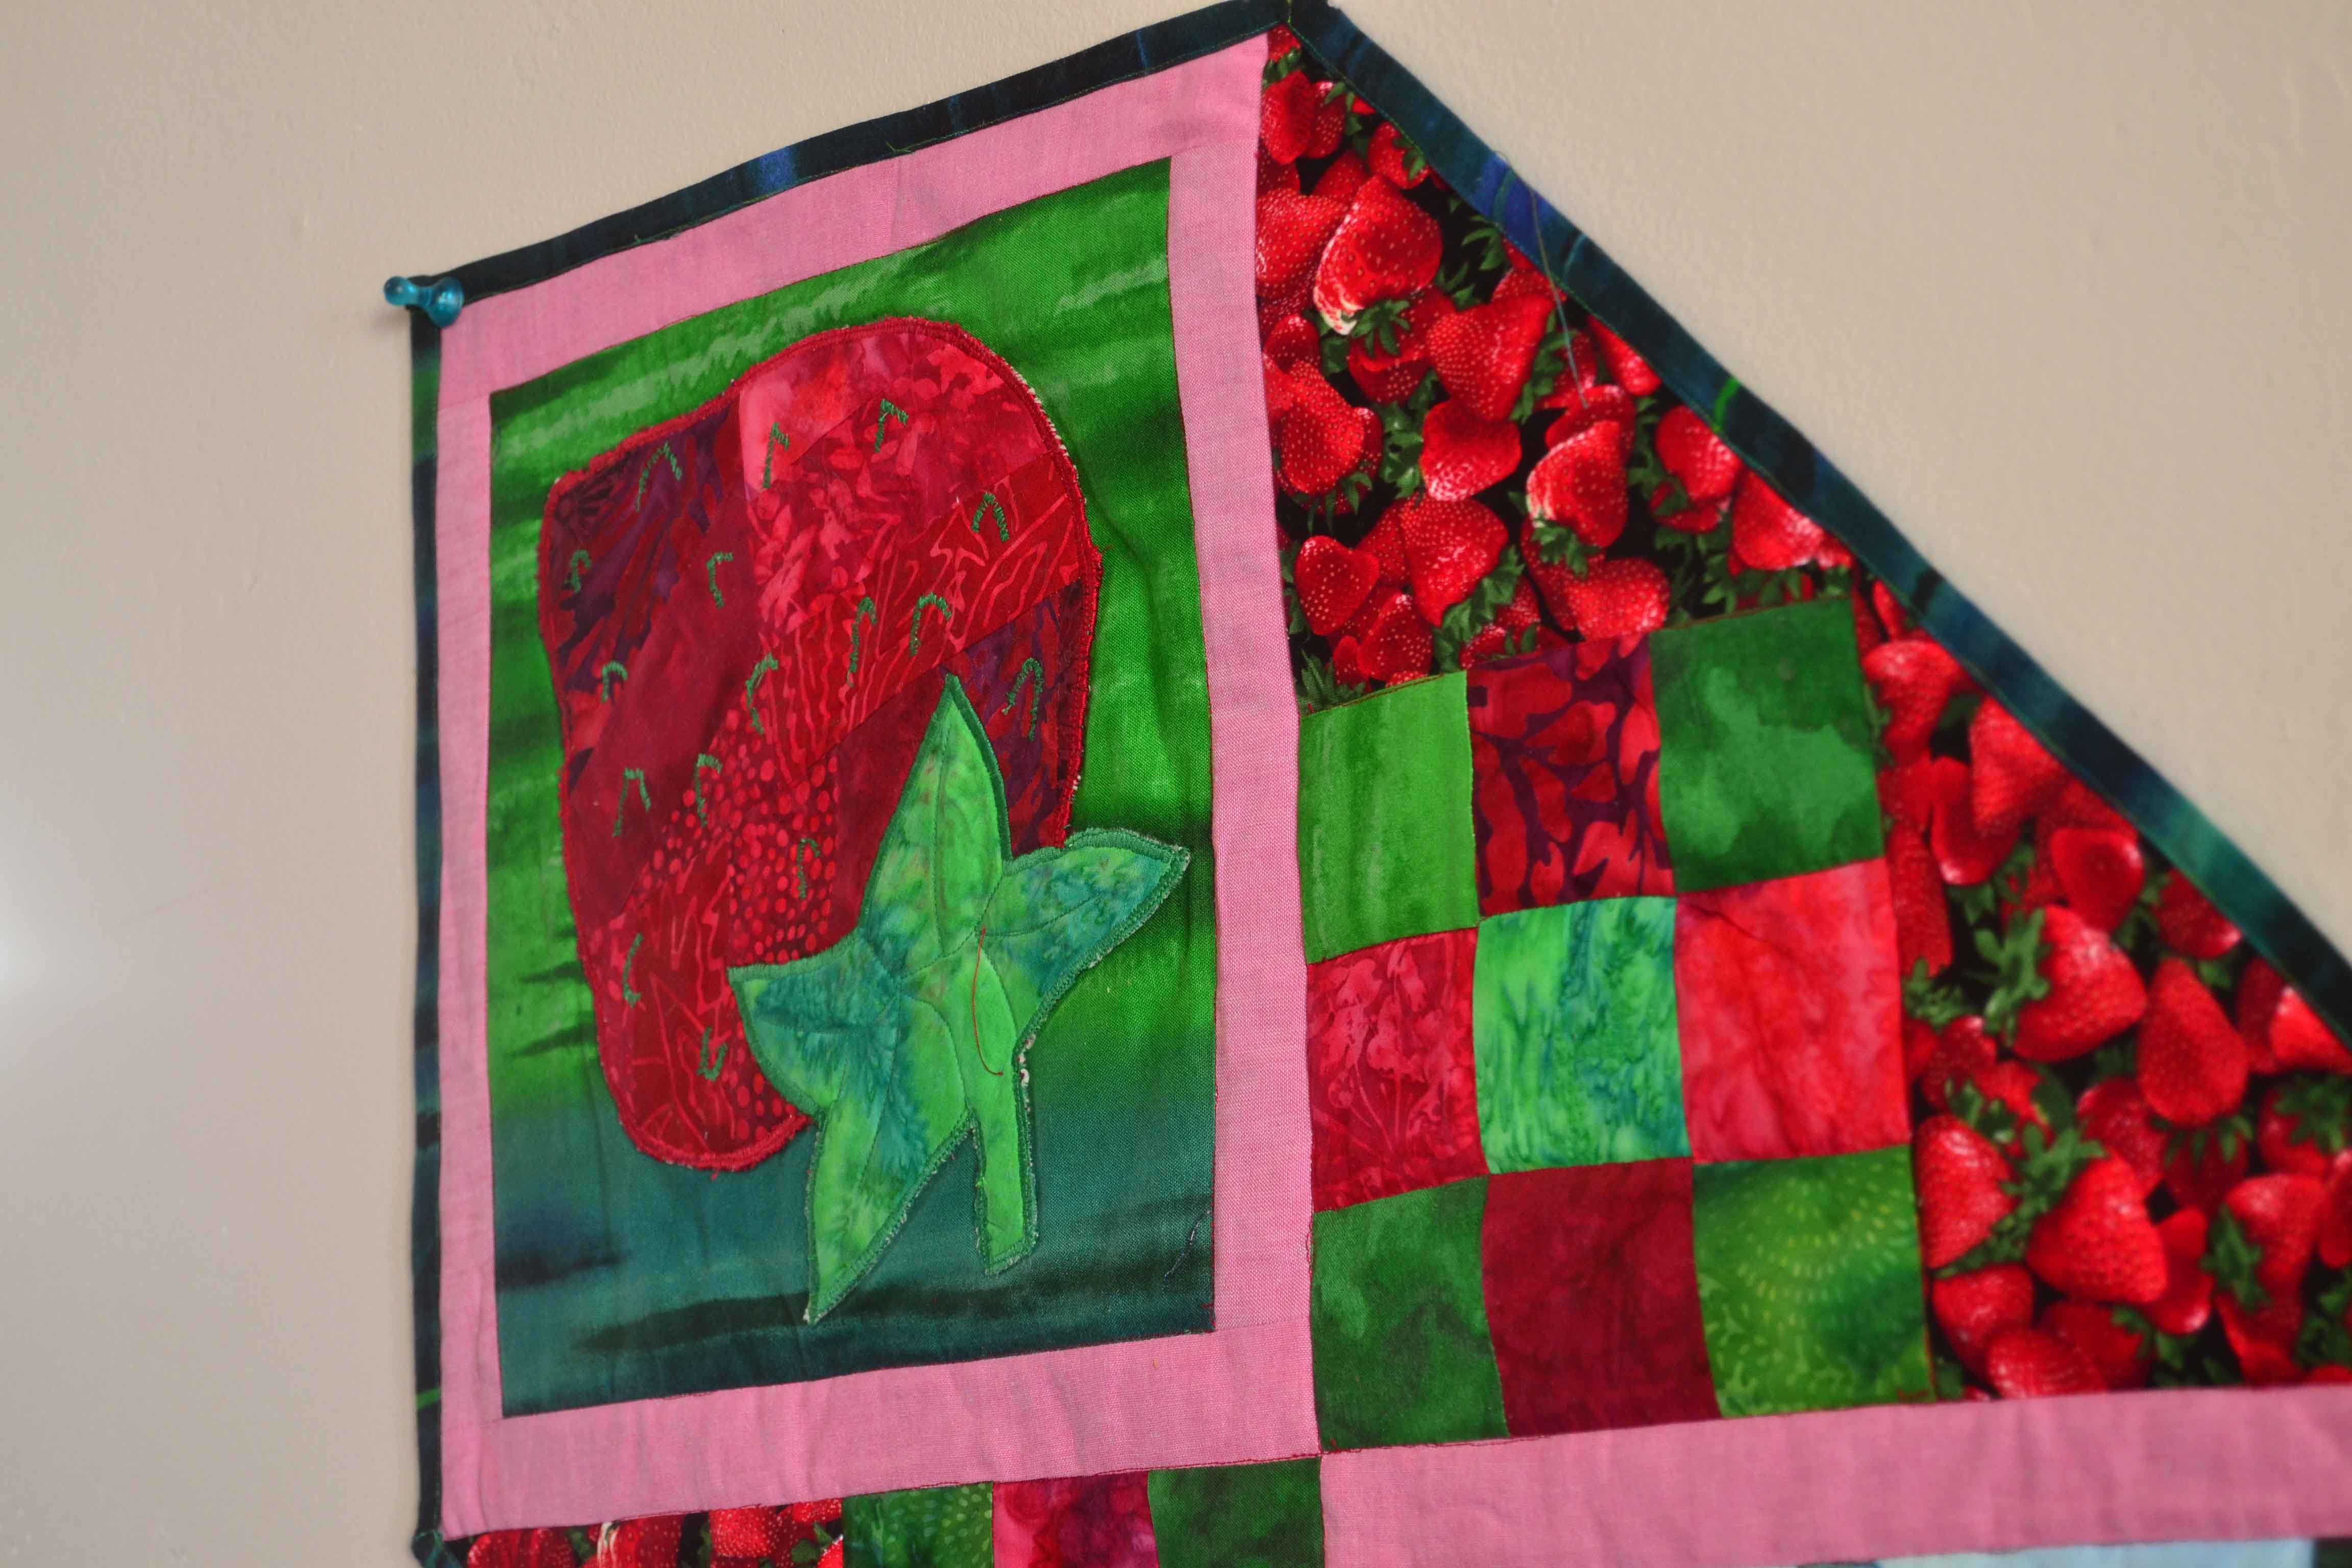
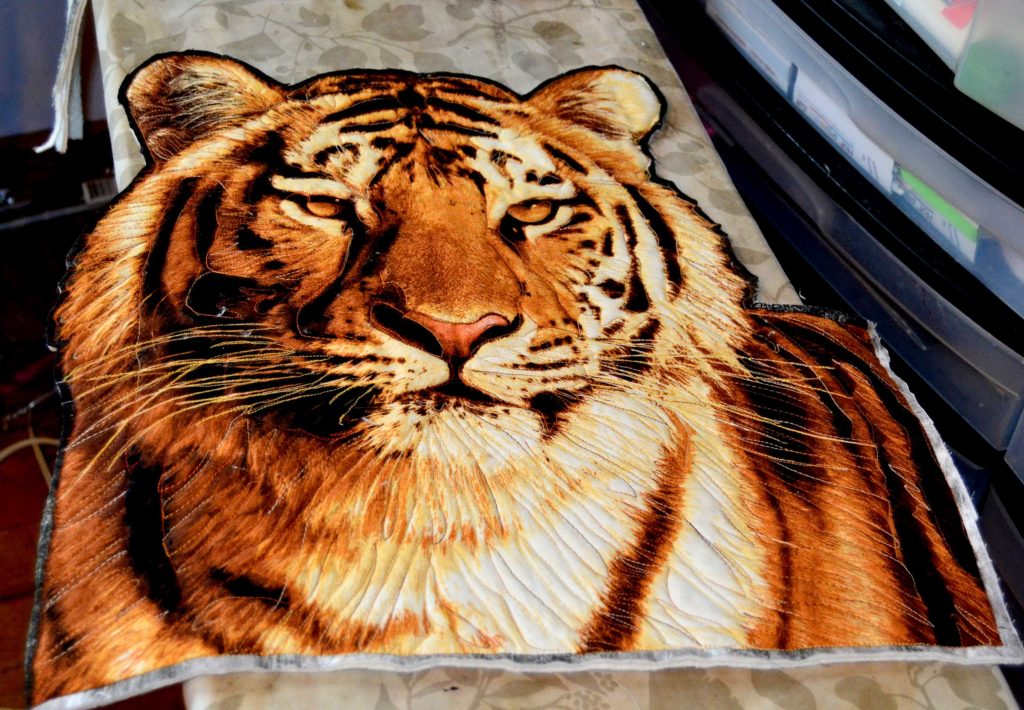
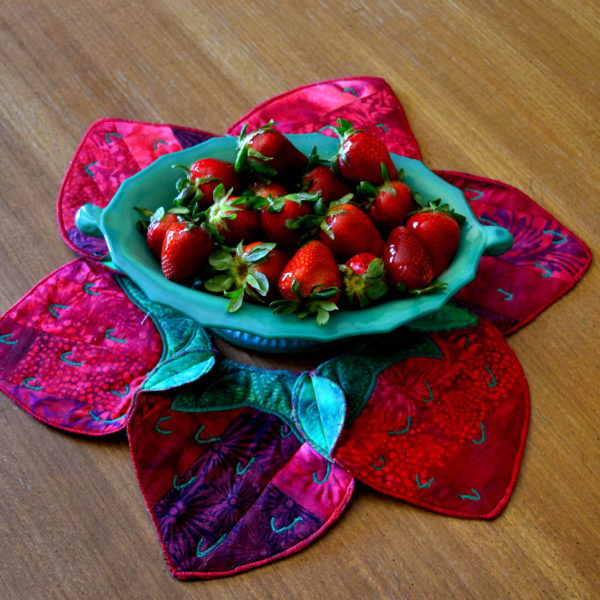
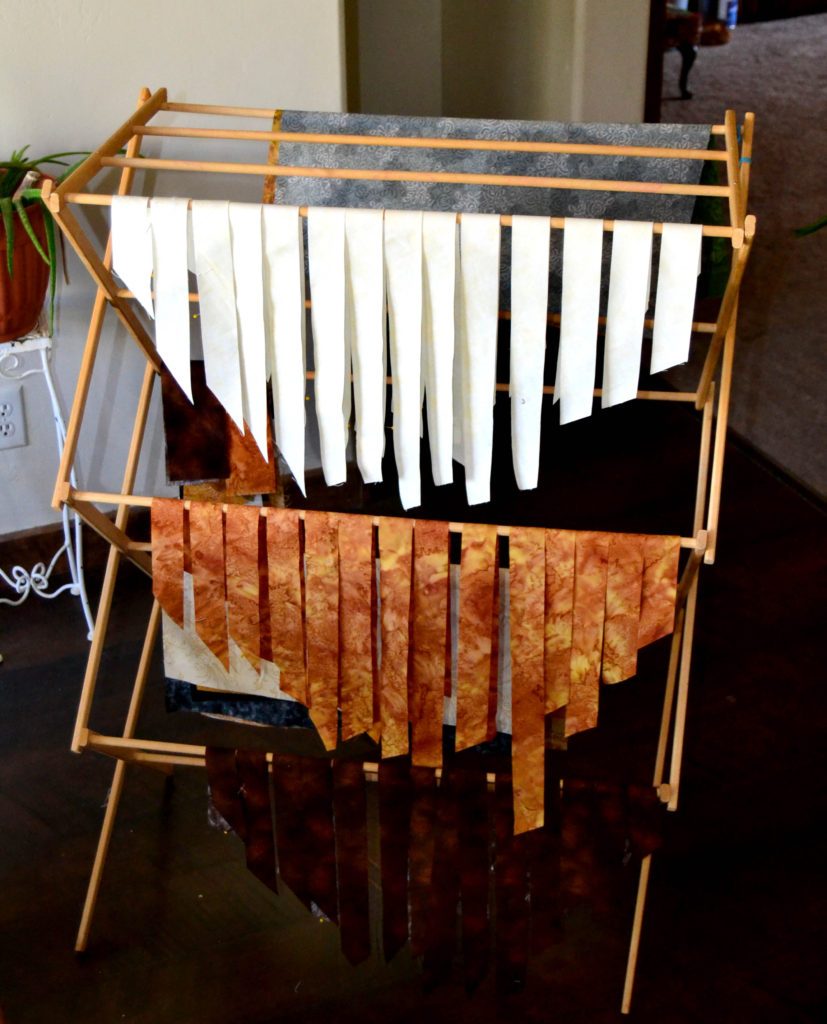
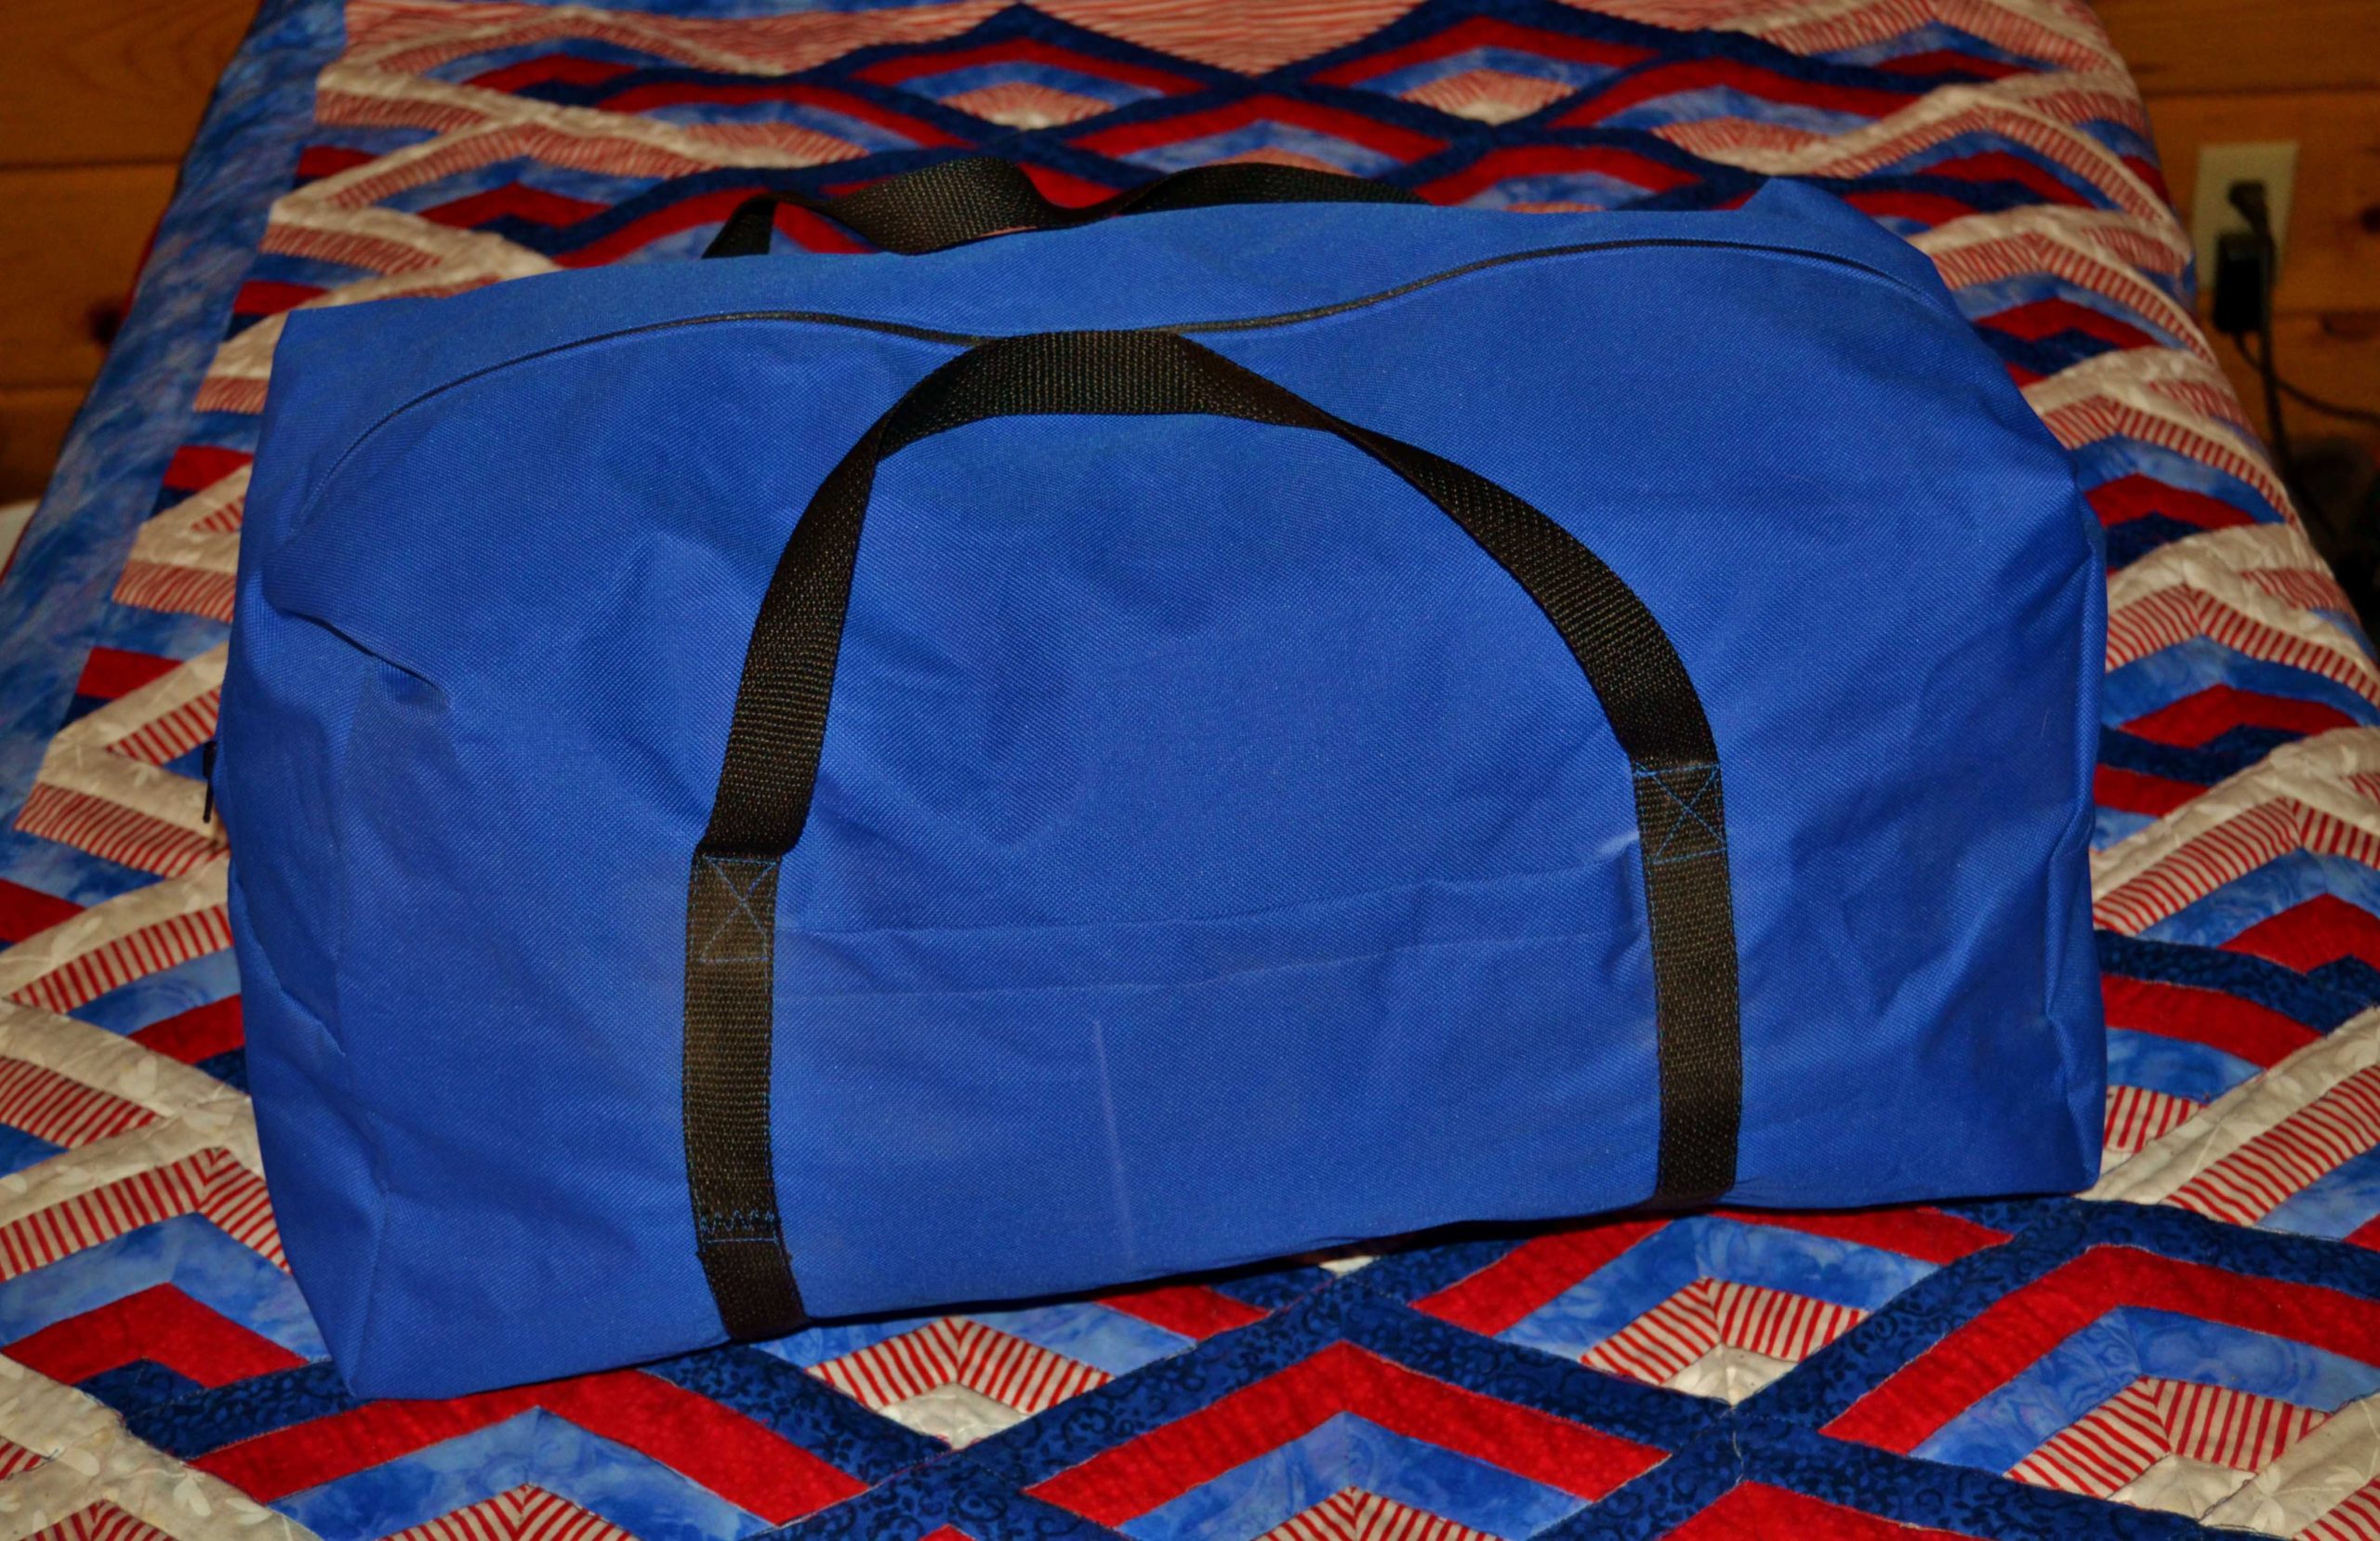
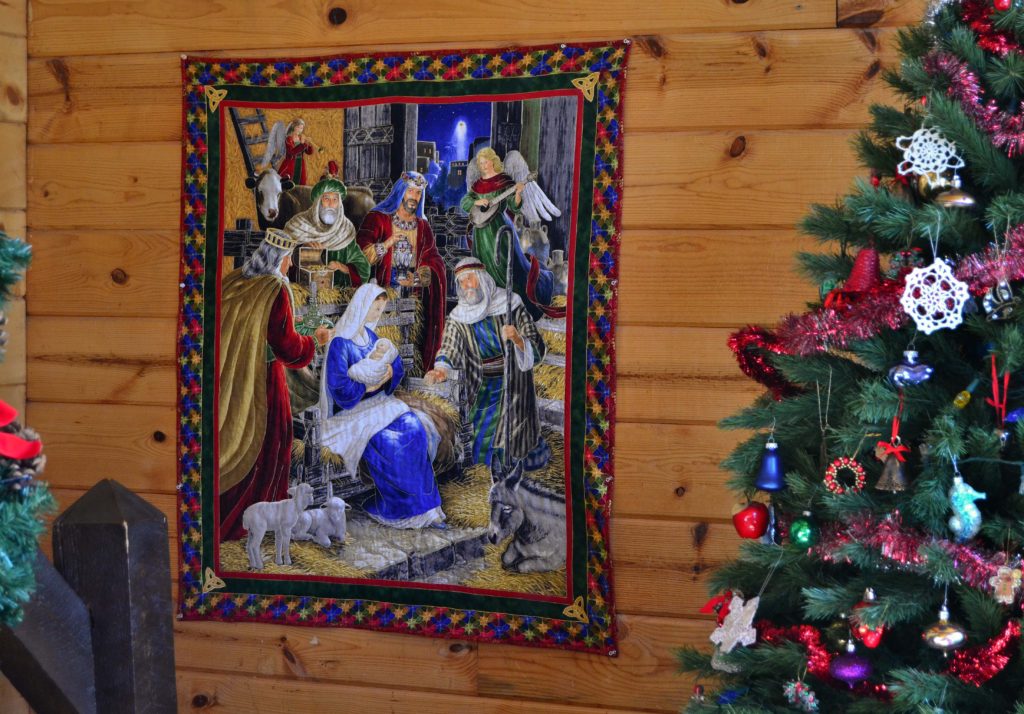
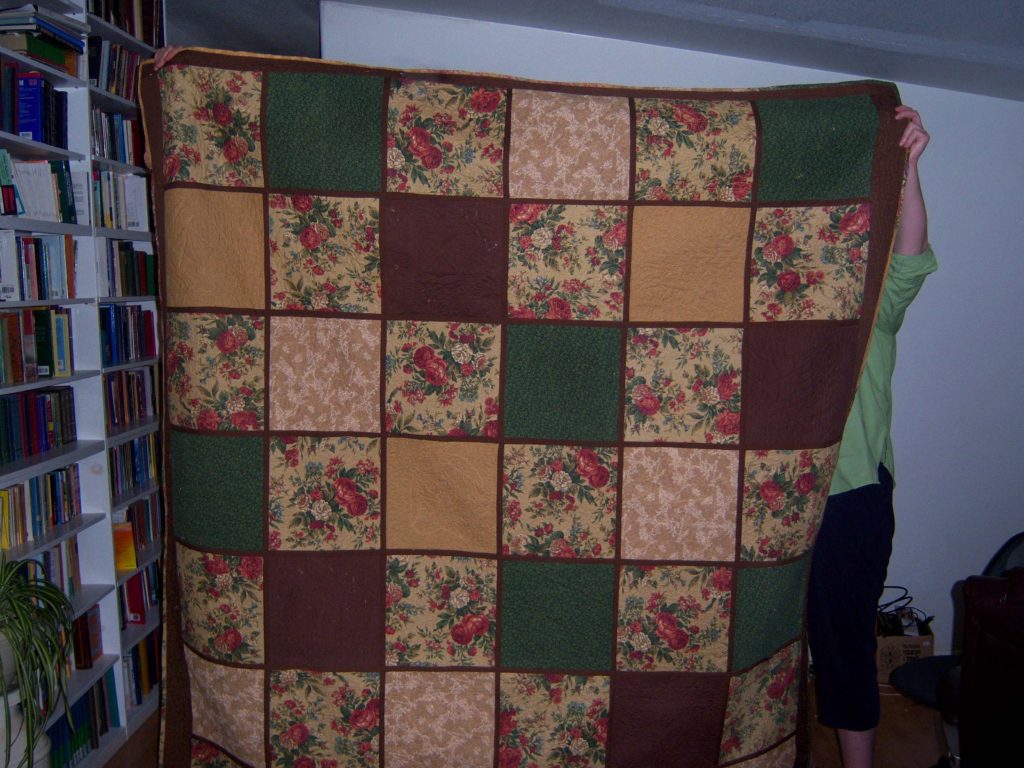
Taking a Strawberry from Farm-to-Table Runner
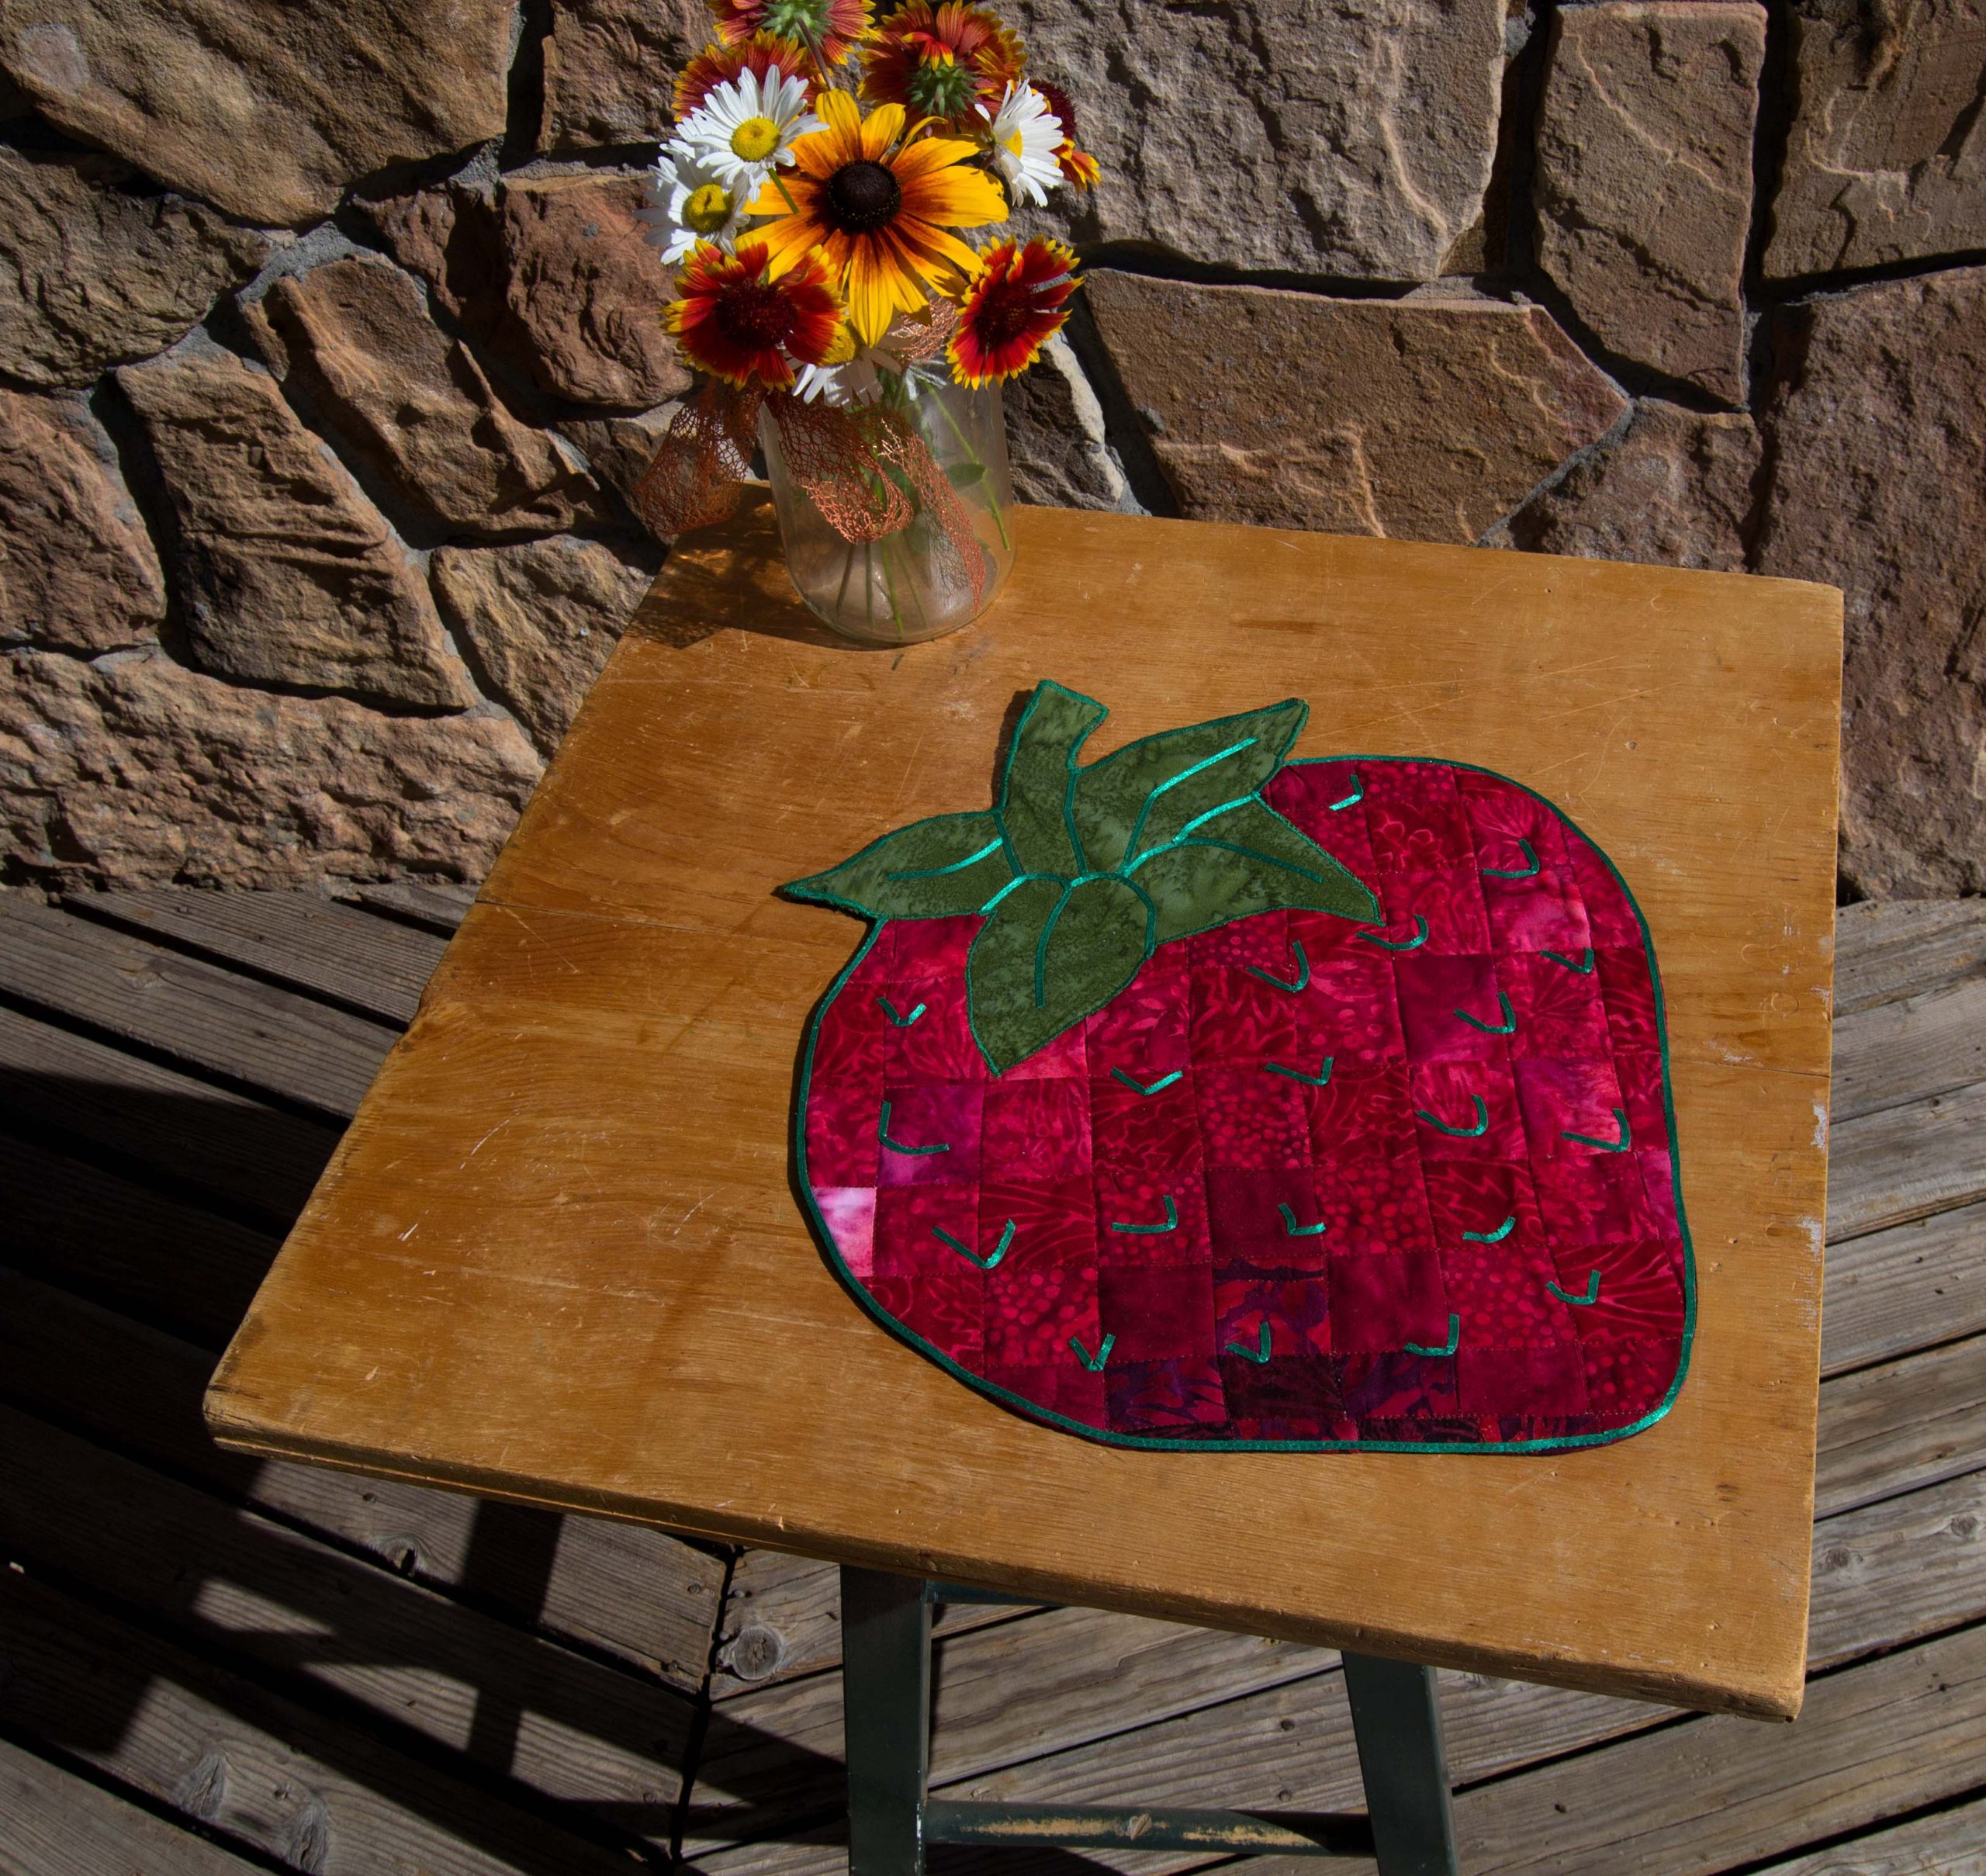
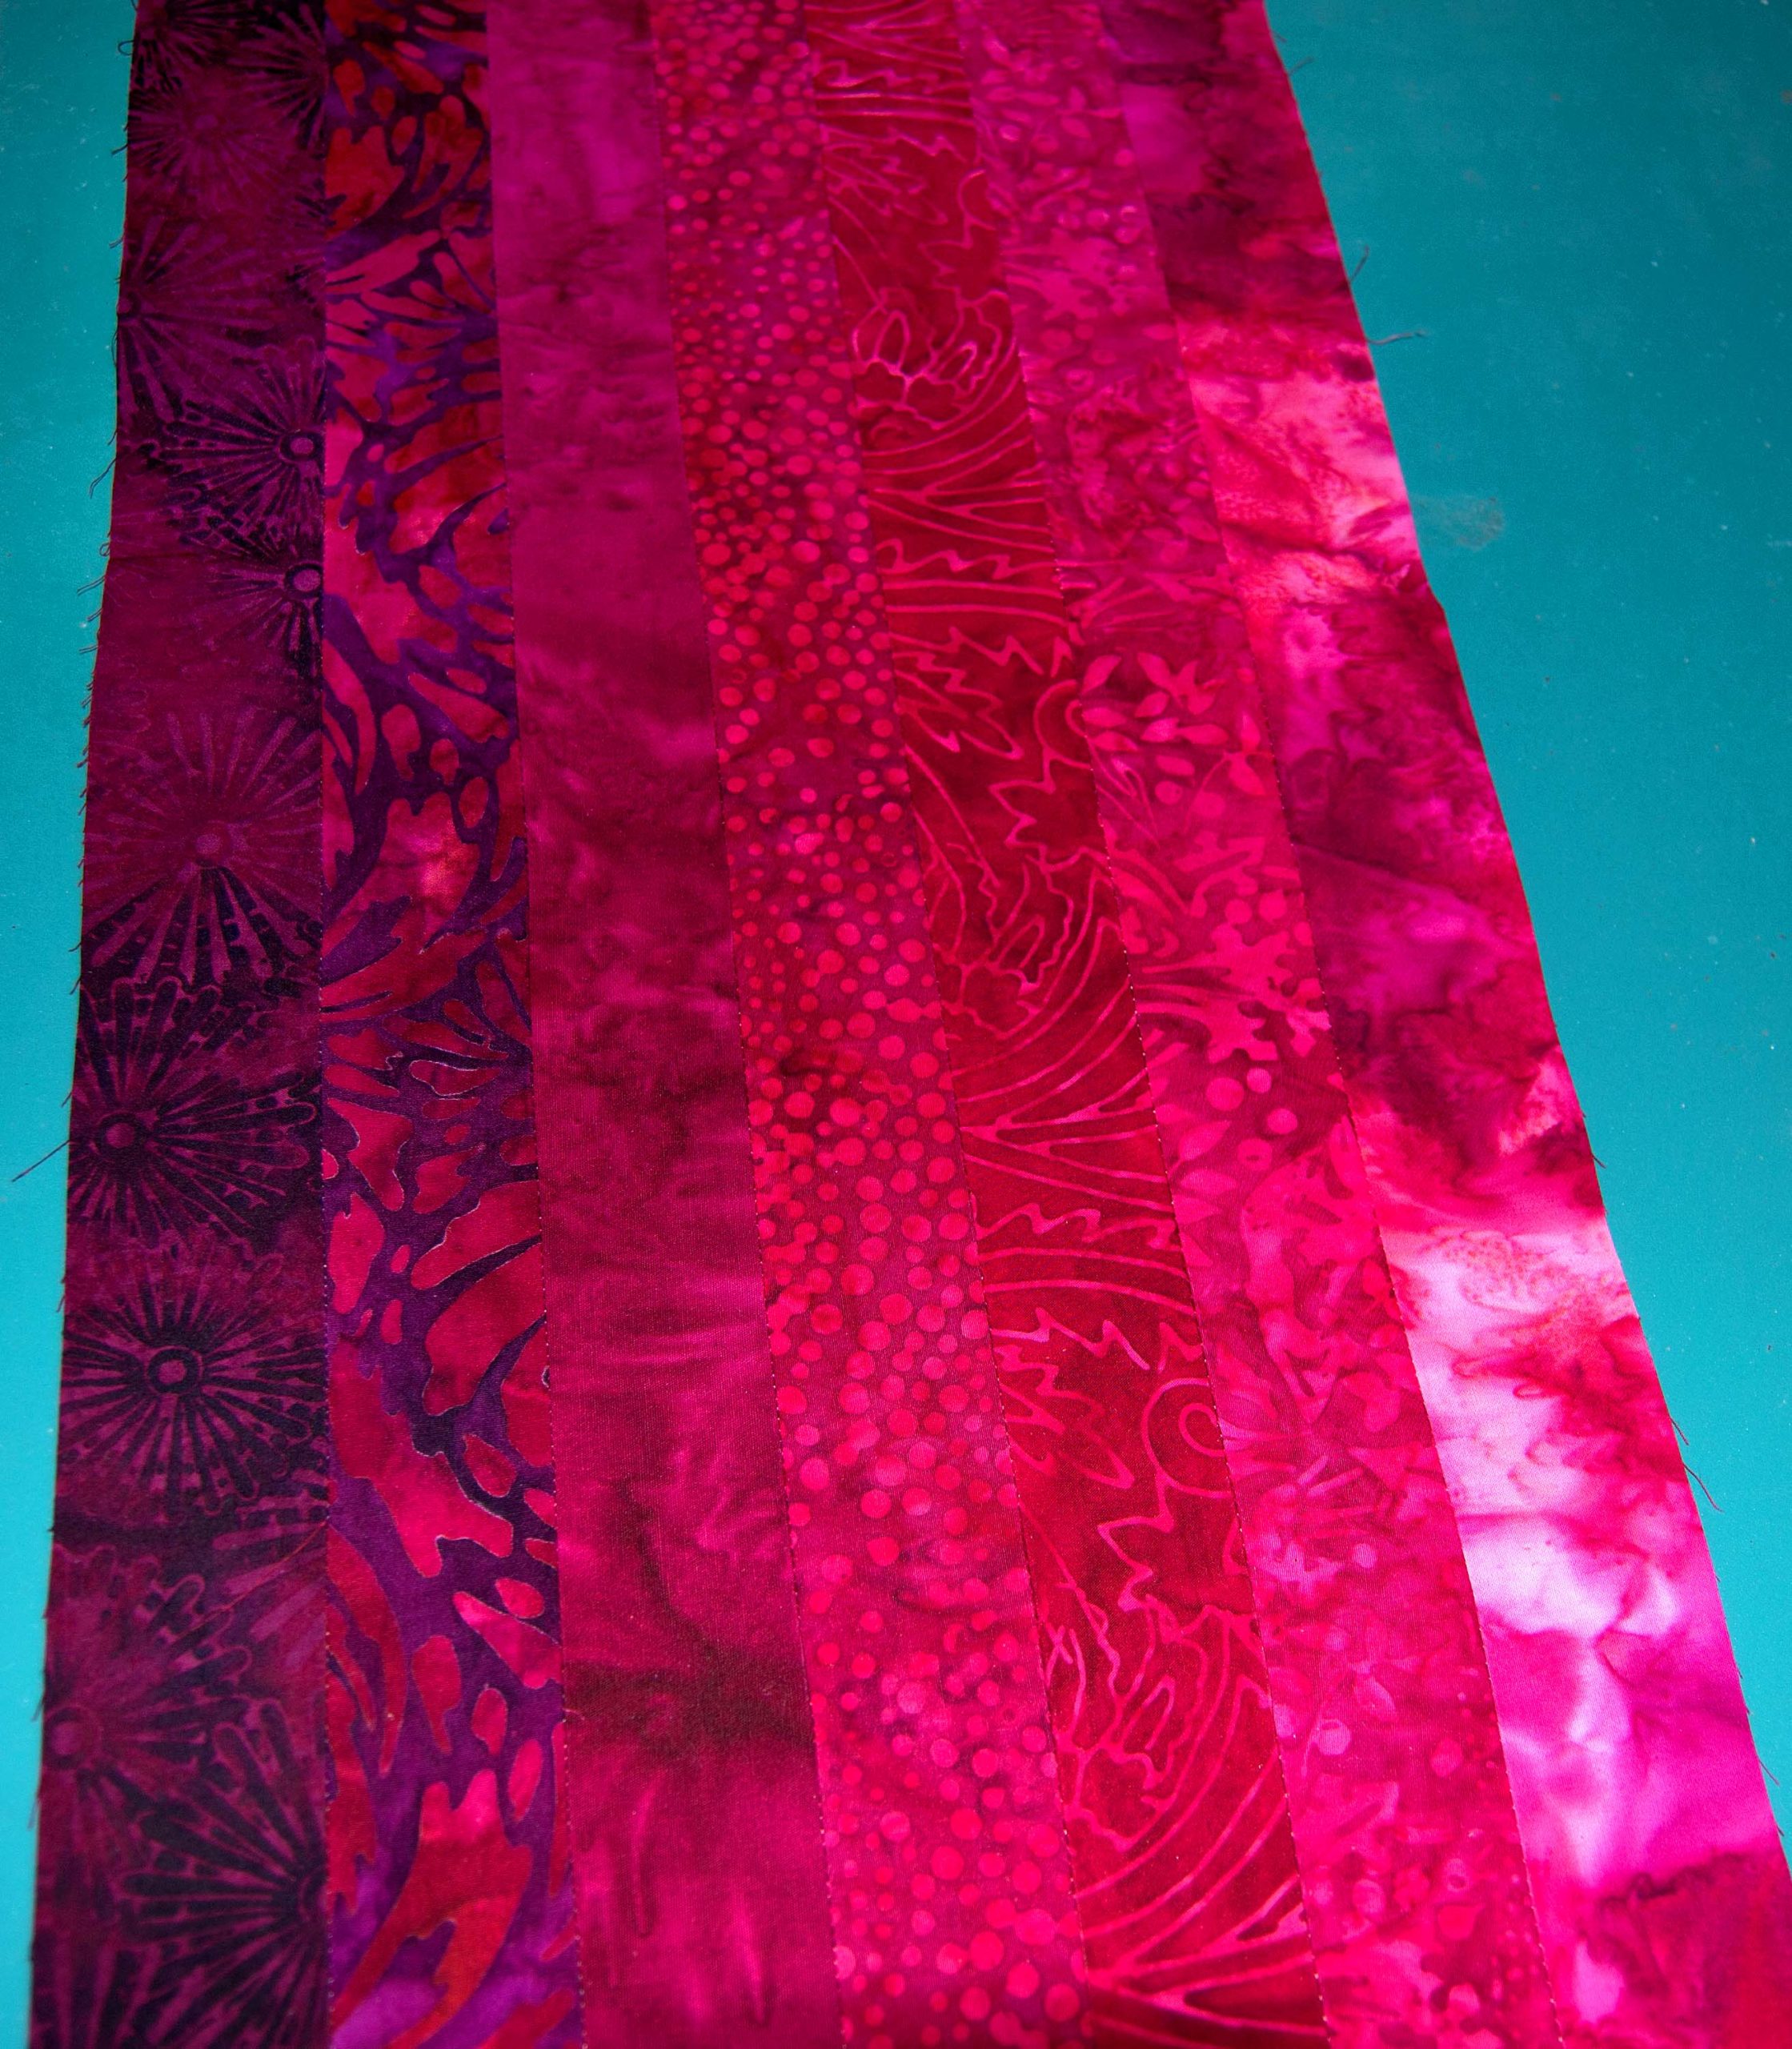
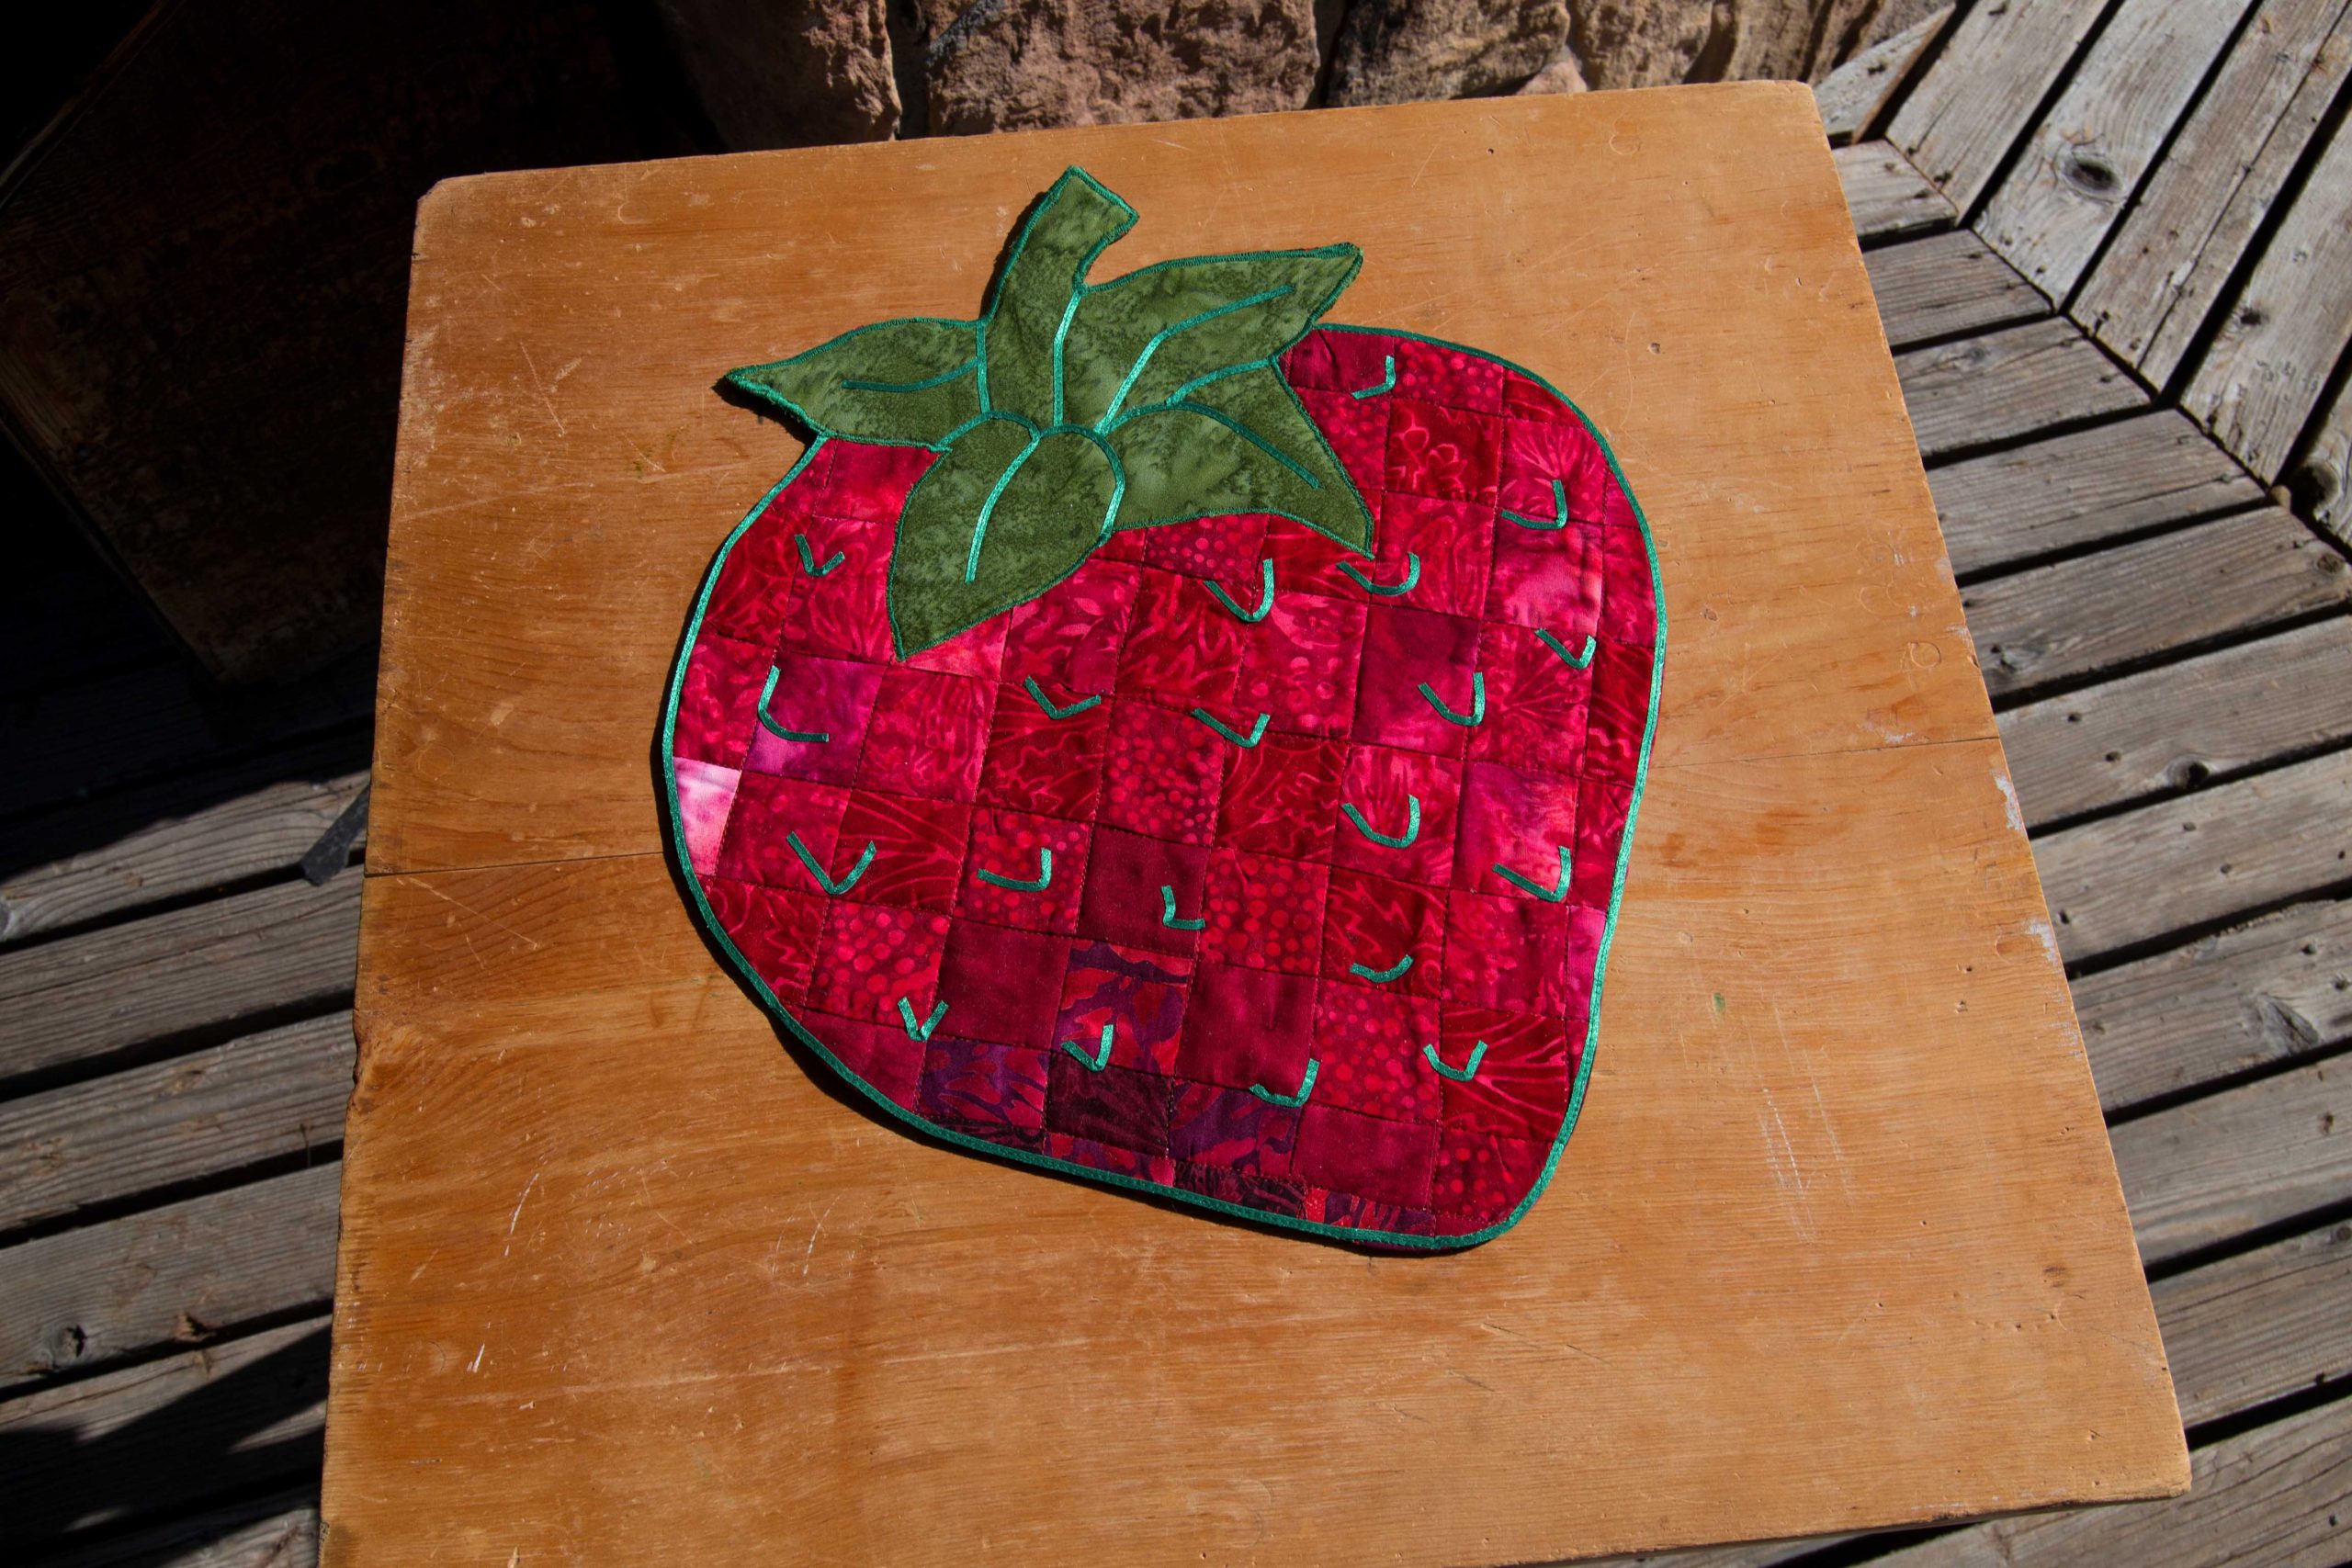
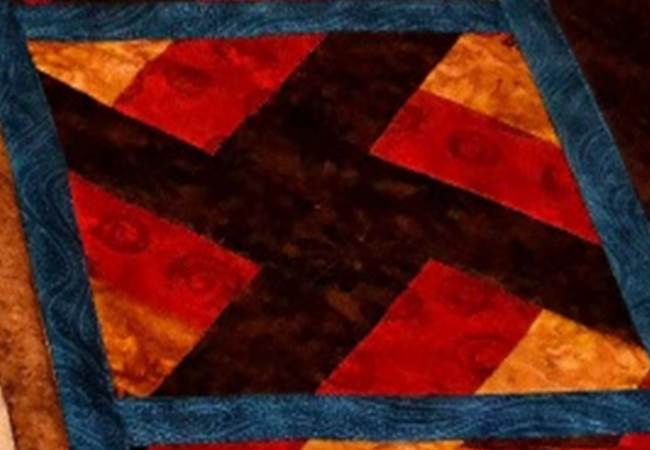
One original PYB quilting pattern that we’re very fond of is the “Bargello Strawberry Table Topper.” That one was a lot of work in terms of figuring and technical difficulty – pretty standard for any Bargello design.
It came out beautifully, and we love hanging it on our wall every spring and summer.
After taking a second look at many of our patterns through the lens of “could we do this a different way,” the strawberry stood out to us as one that would be fairly easy to adapt, and possibly mixed with other patterns.
Questions to Help Guide Change
If you’re a fabric artist who likes to adapt and change patterns to serve your own purposes, here’re some of the questions that it’s good to ask yourself before setting out to change a pattern:
What are the elements?
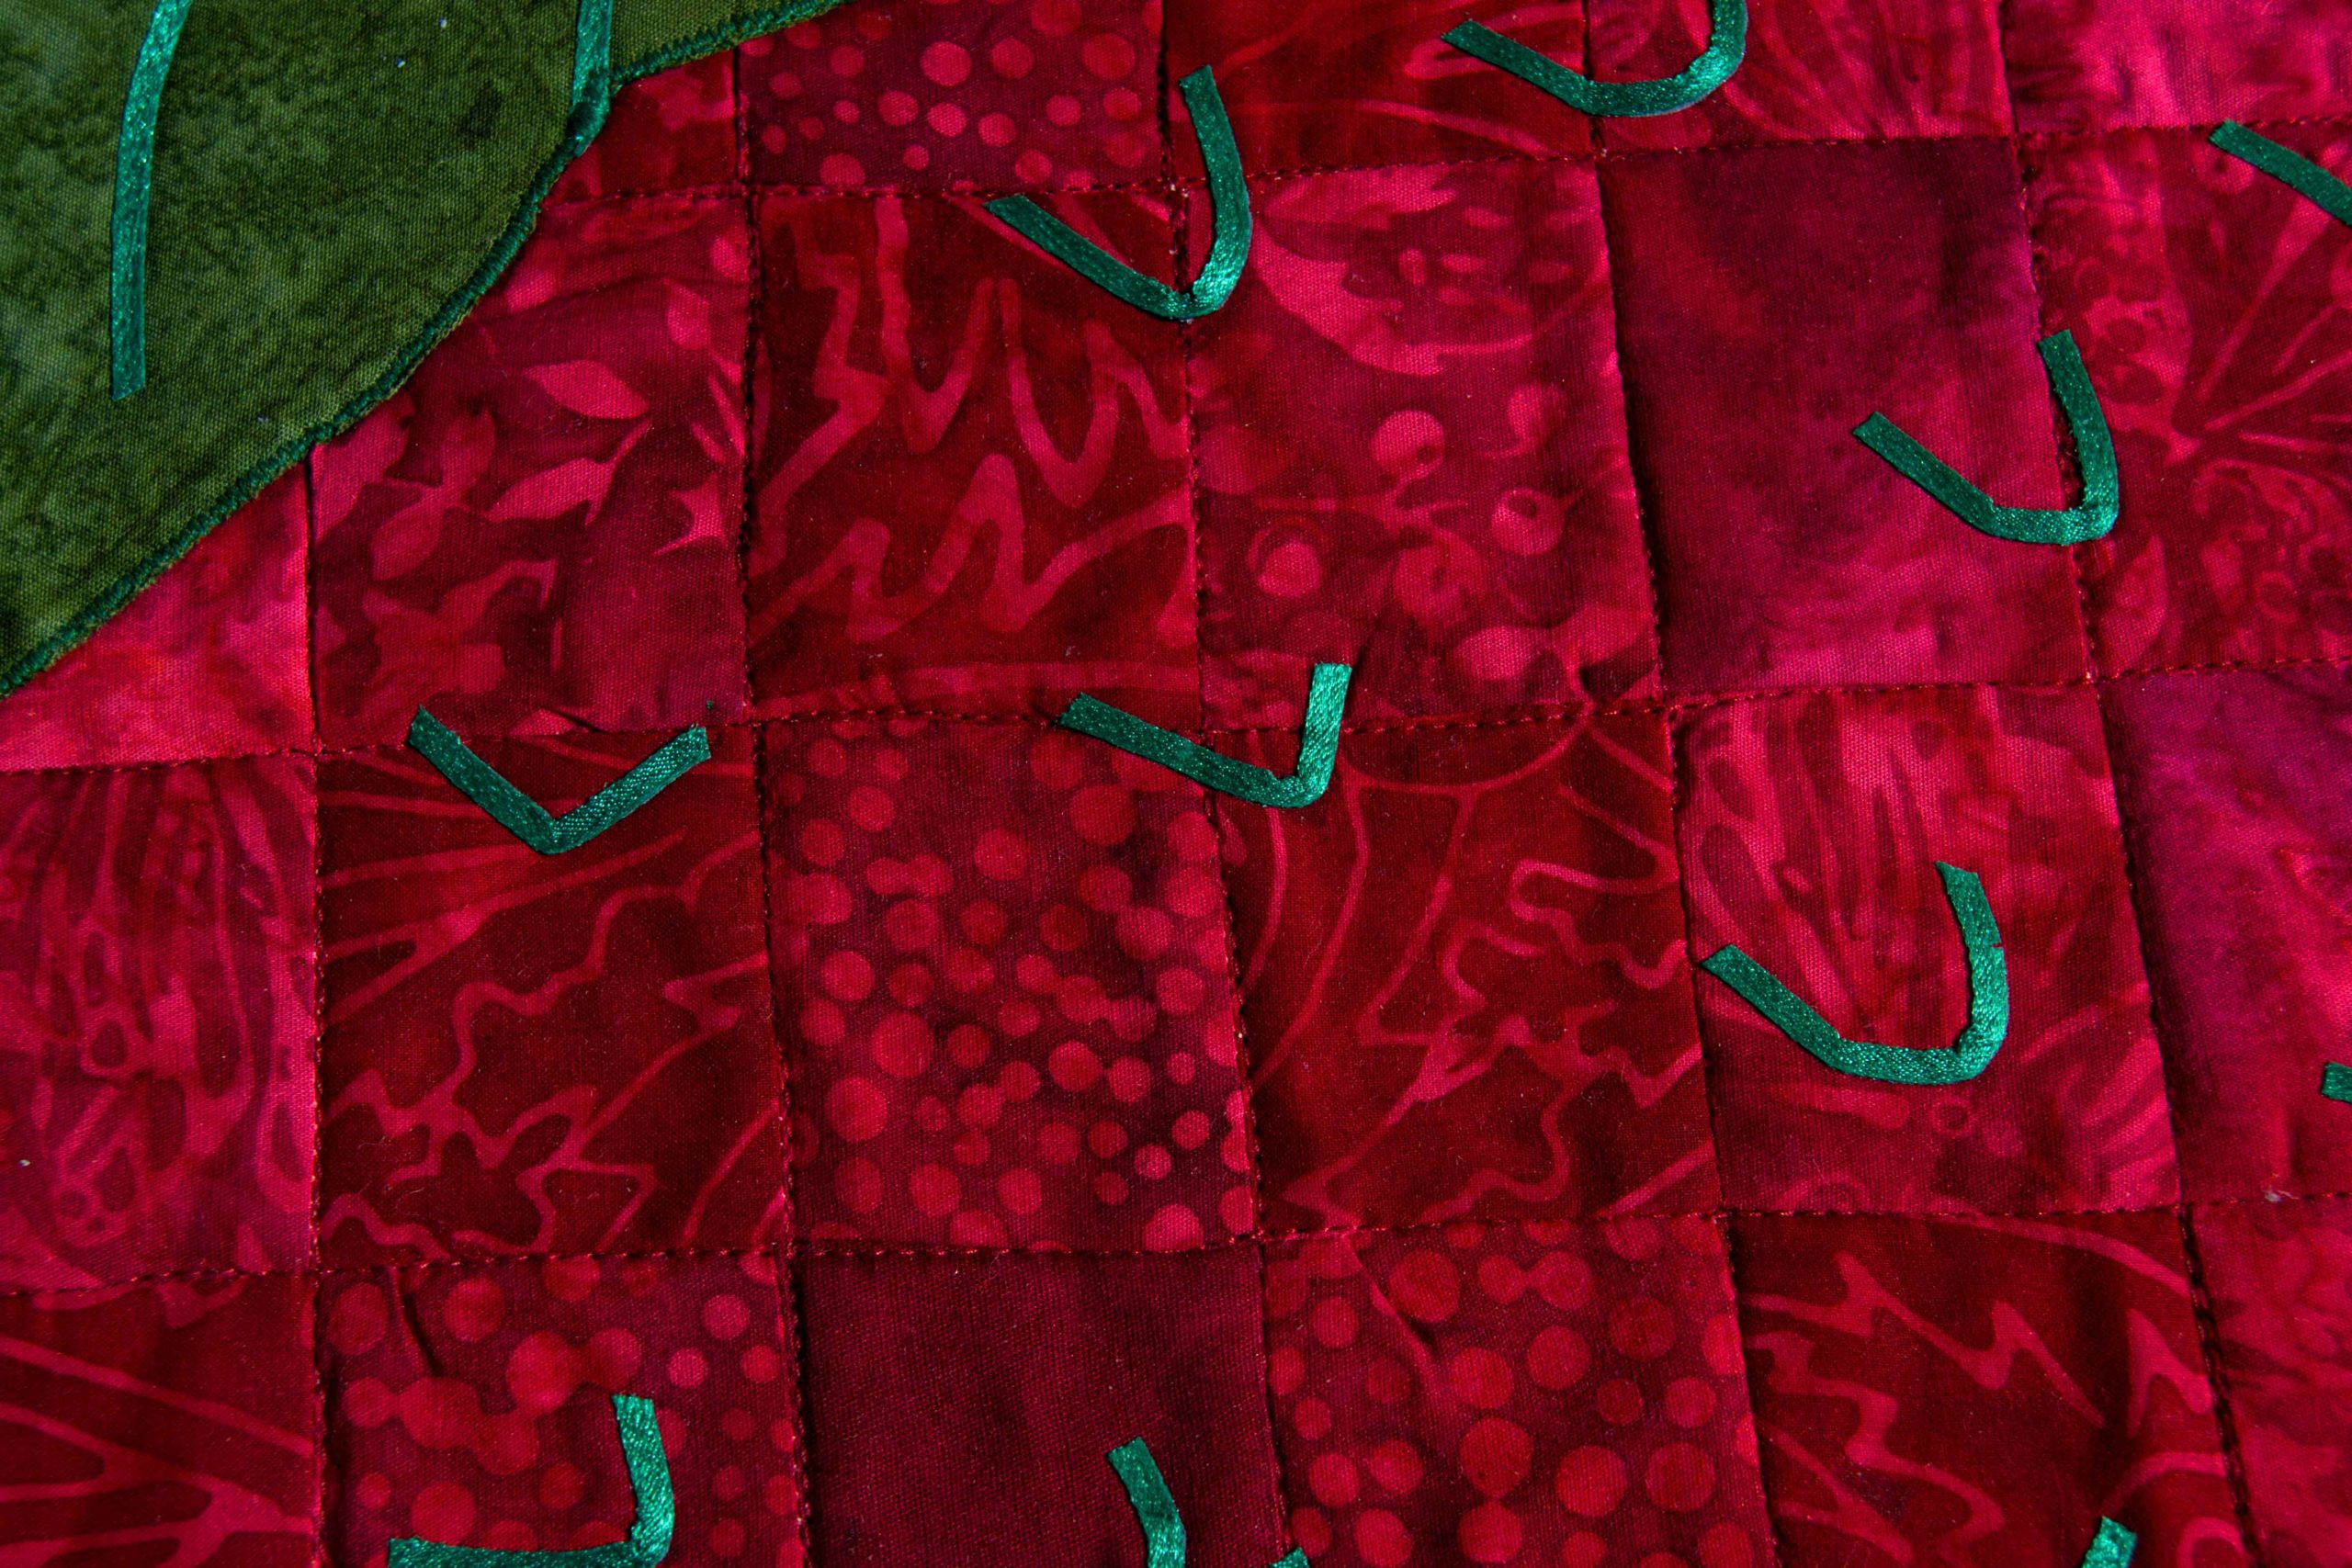
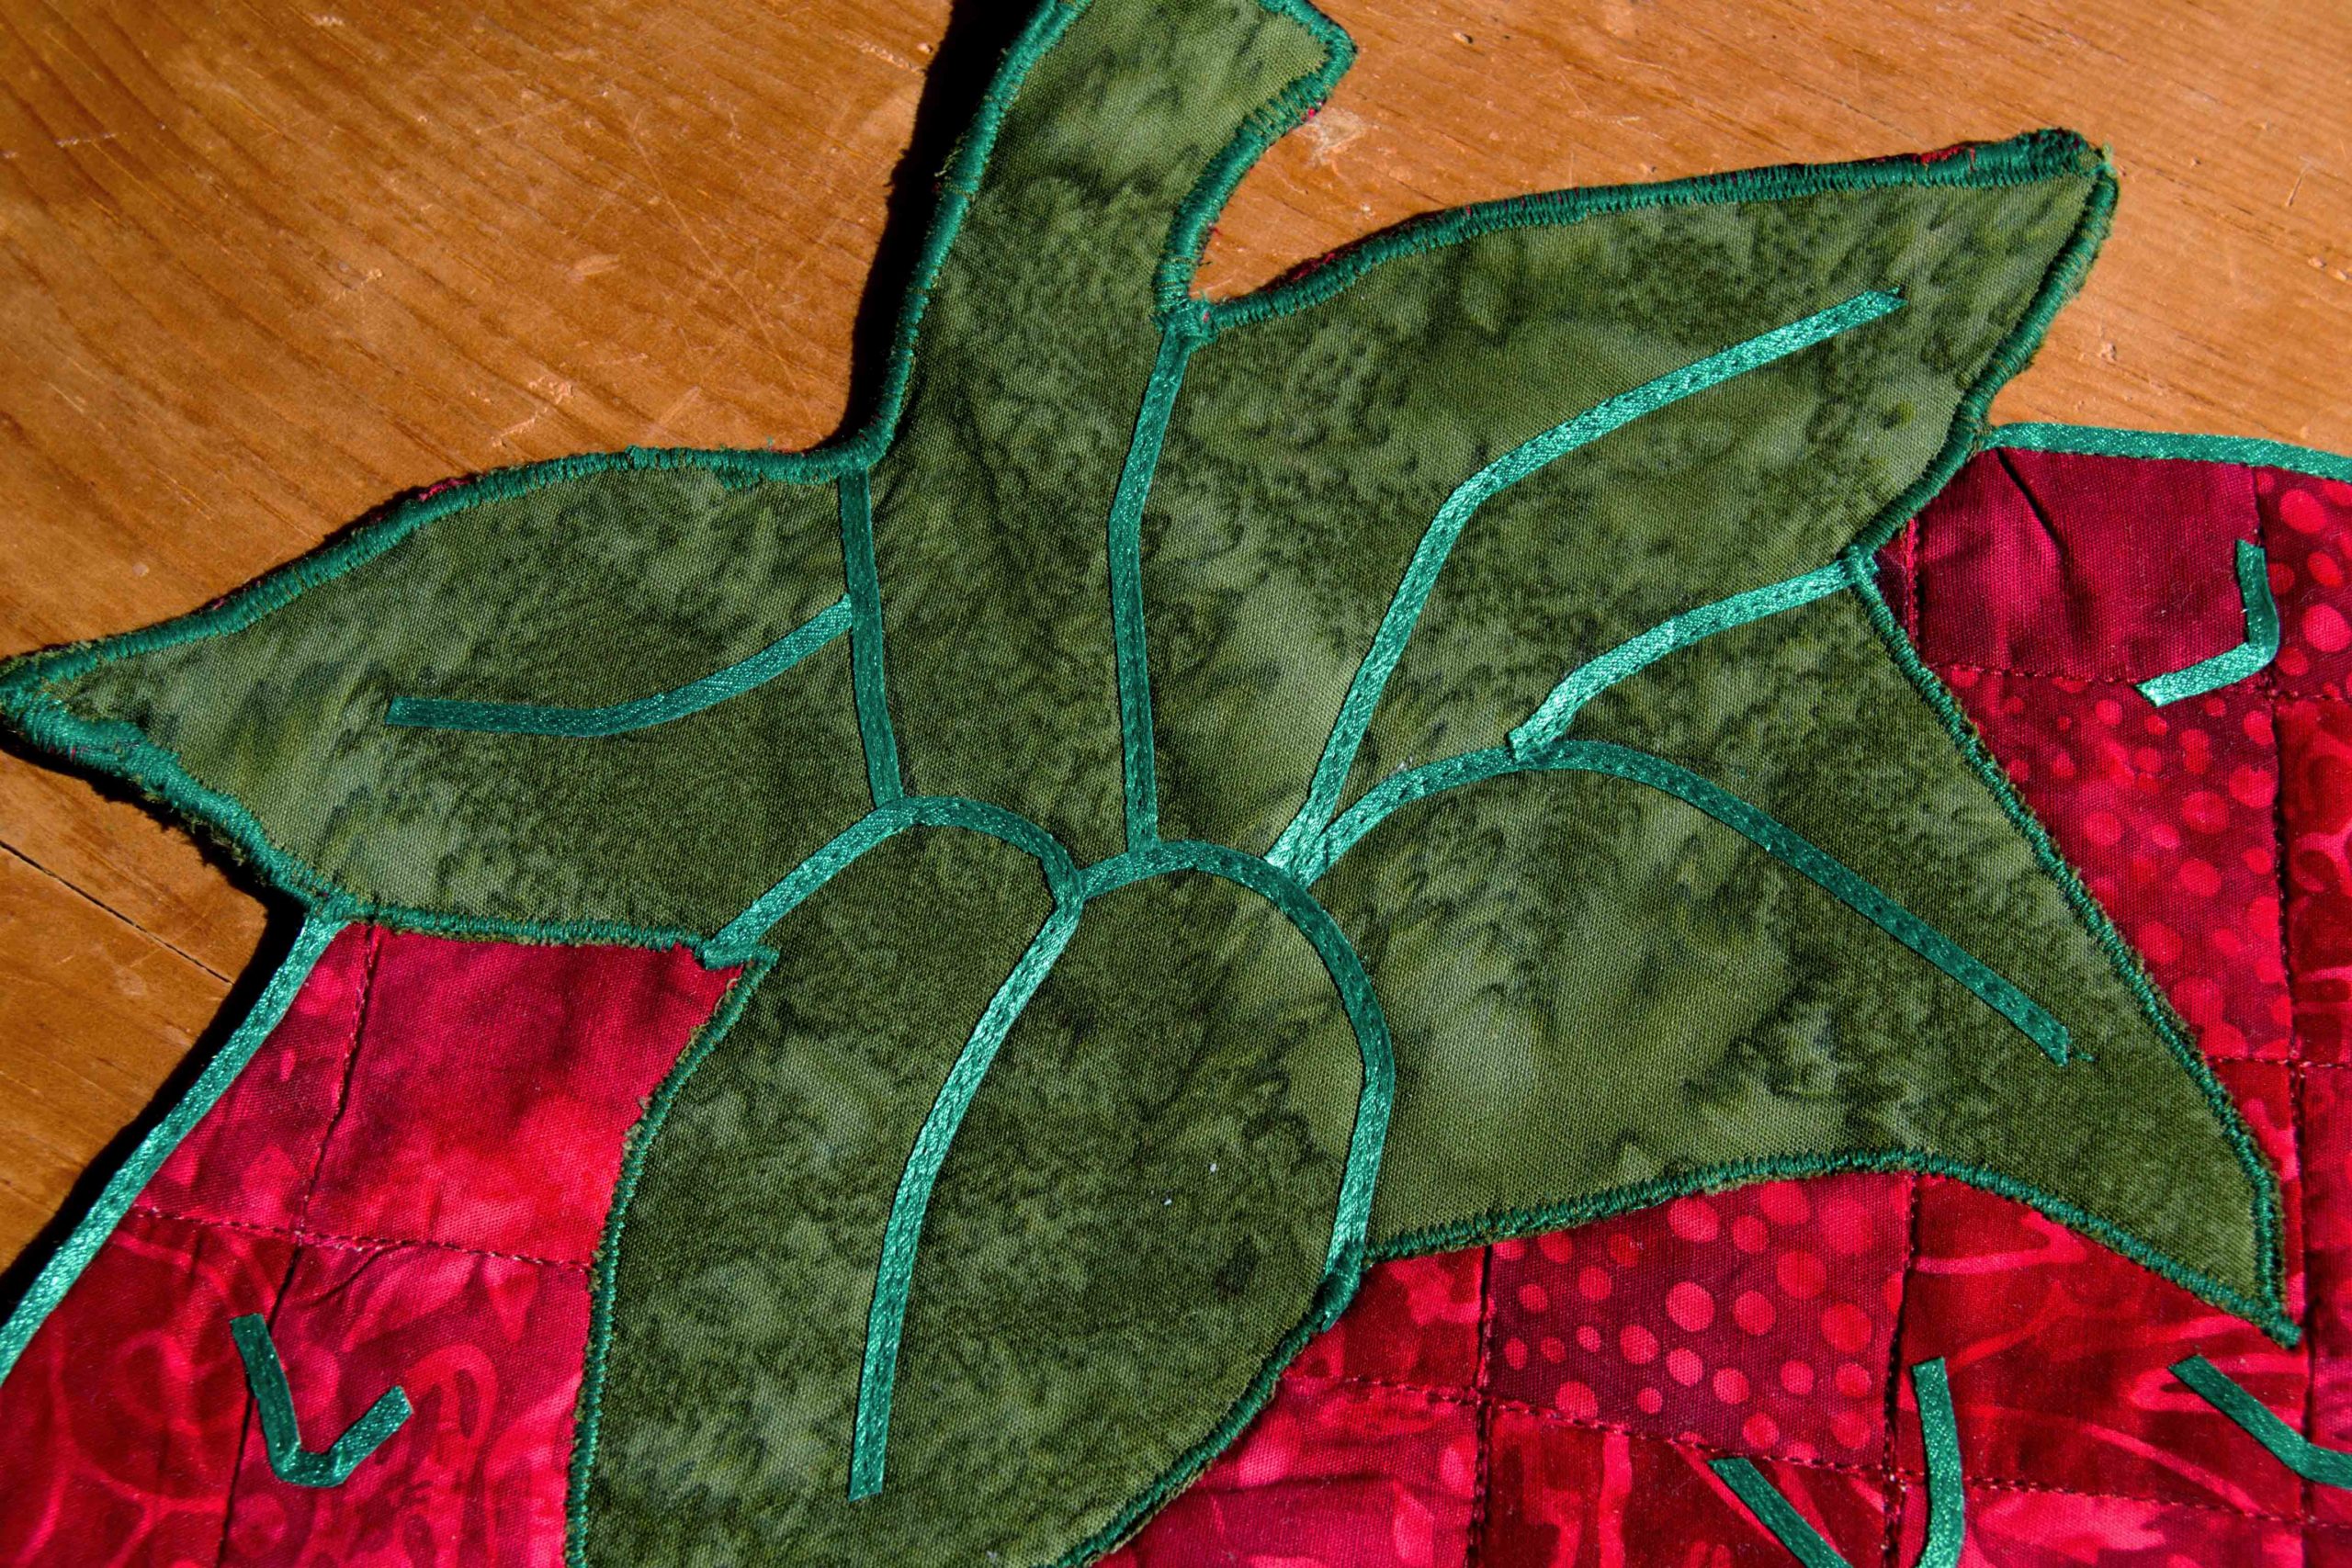
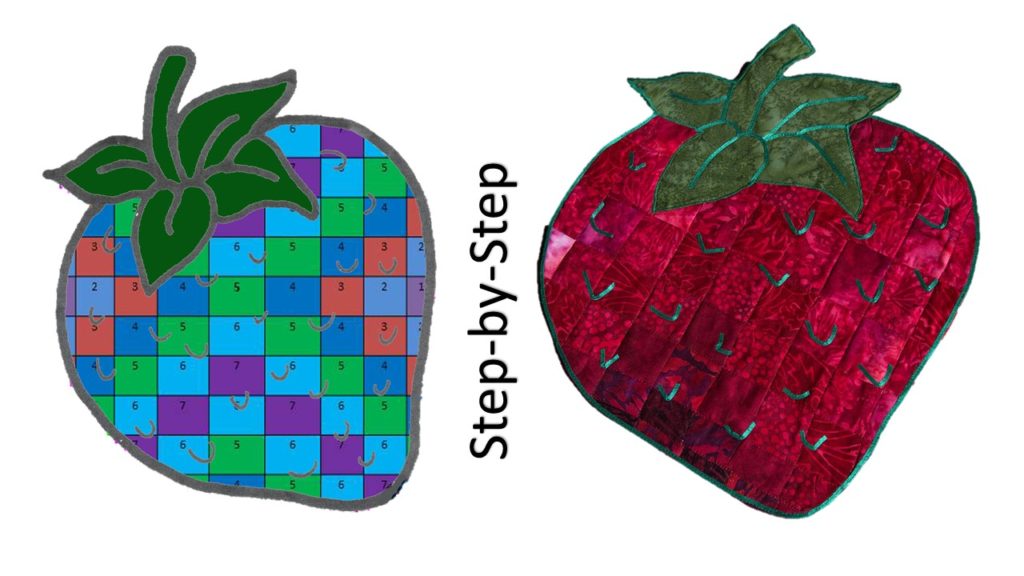
Like a tasty recipe, every pattern is composed of a variety of materials, techniques, and steps. If you want to go about altering a pattern, you need to understand all the different elements in order to understand what needs to be changed, or not. For something as apparently simple as our Bargello Strawberry Table Topper, for example, there’re 4 distinct elements involved:
A Bargello pattern
A shaped outline
Inside-out turn over style
Appliqued (leaves and seed pips)
What – if any – elements are changeable?
Some elements can be altered with barely any thought or effort, and others are extremely precise in terms of measurements and outcome.
A Bargello pattern is one of the hardest to make any individual adaptations to because the size, width, and color layering is extremely precise and creates incredibly distinct optical illusions.
On the other hand a simple shape – strawberry outline – can be shrunk or enlarged, flipped, and adapted in dozens of ways without too much figuring.
How much do I want to change this?
If you’re starting with something like a quilting pattern – a rail-fence or pinwheel for example – it’s not too terribly hard to think of shrinking it. We make all different sizes of pinwheel blocks for backgrounds, borders, and table runners.
On the other hand, changing a small, contained pattern – like a shaped wall-hanging – into a full-size quilt requires quite a bit of creativity.
What do I have that would look good with this?
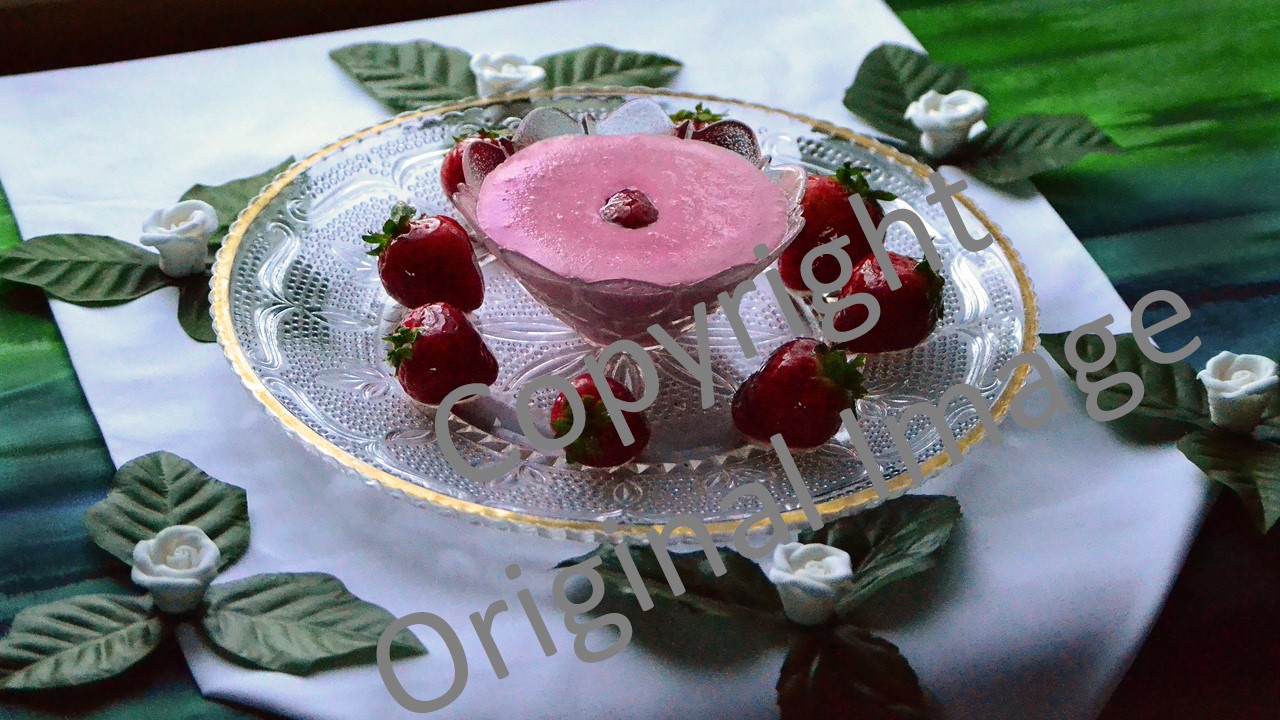
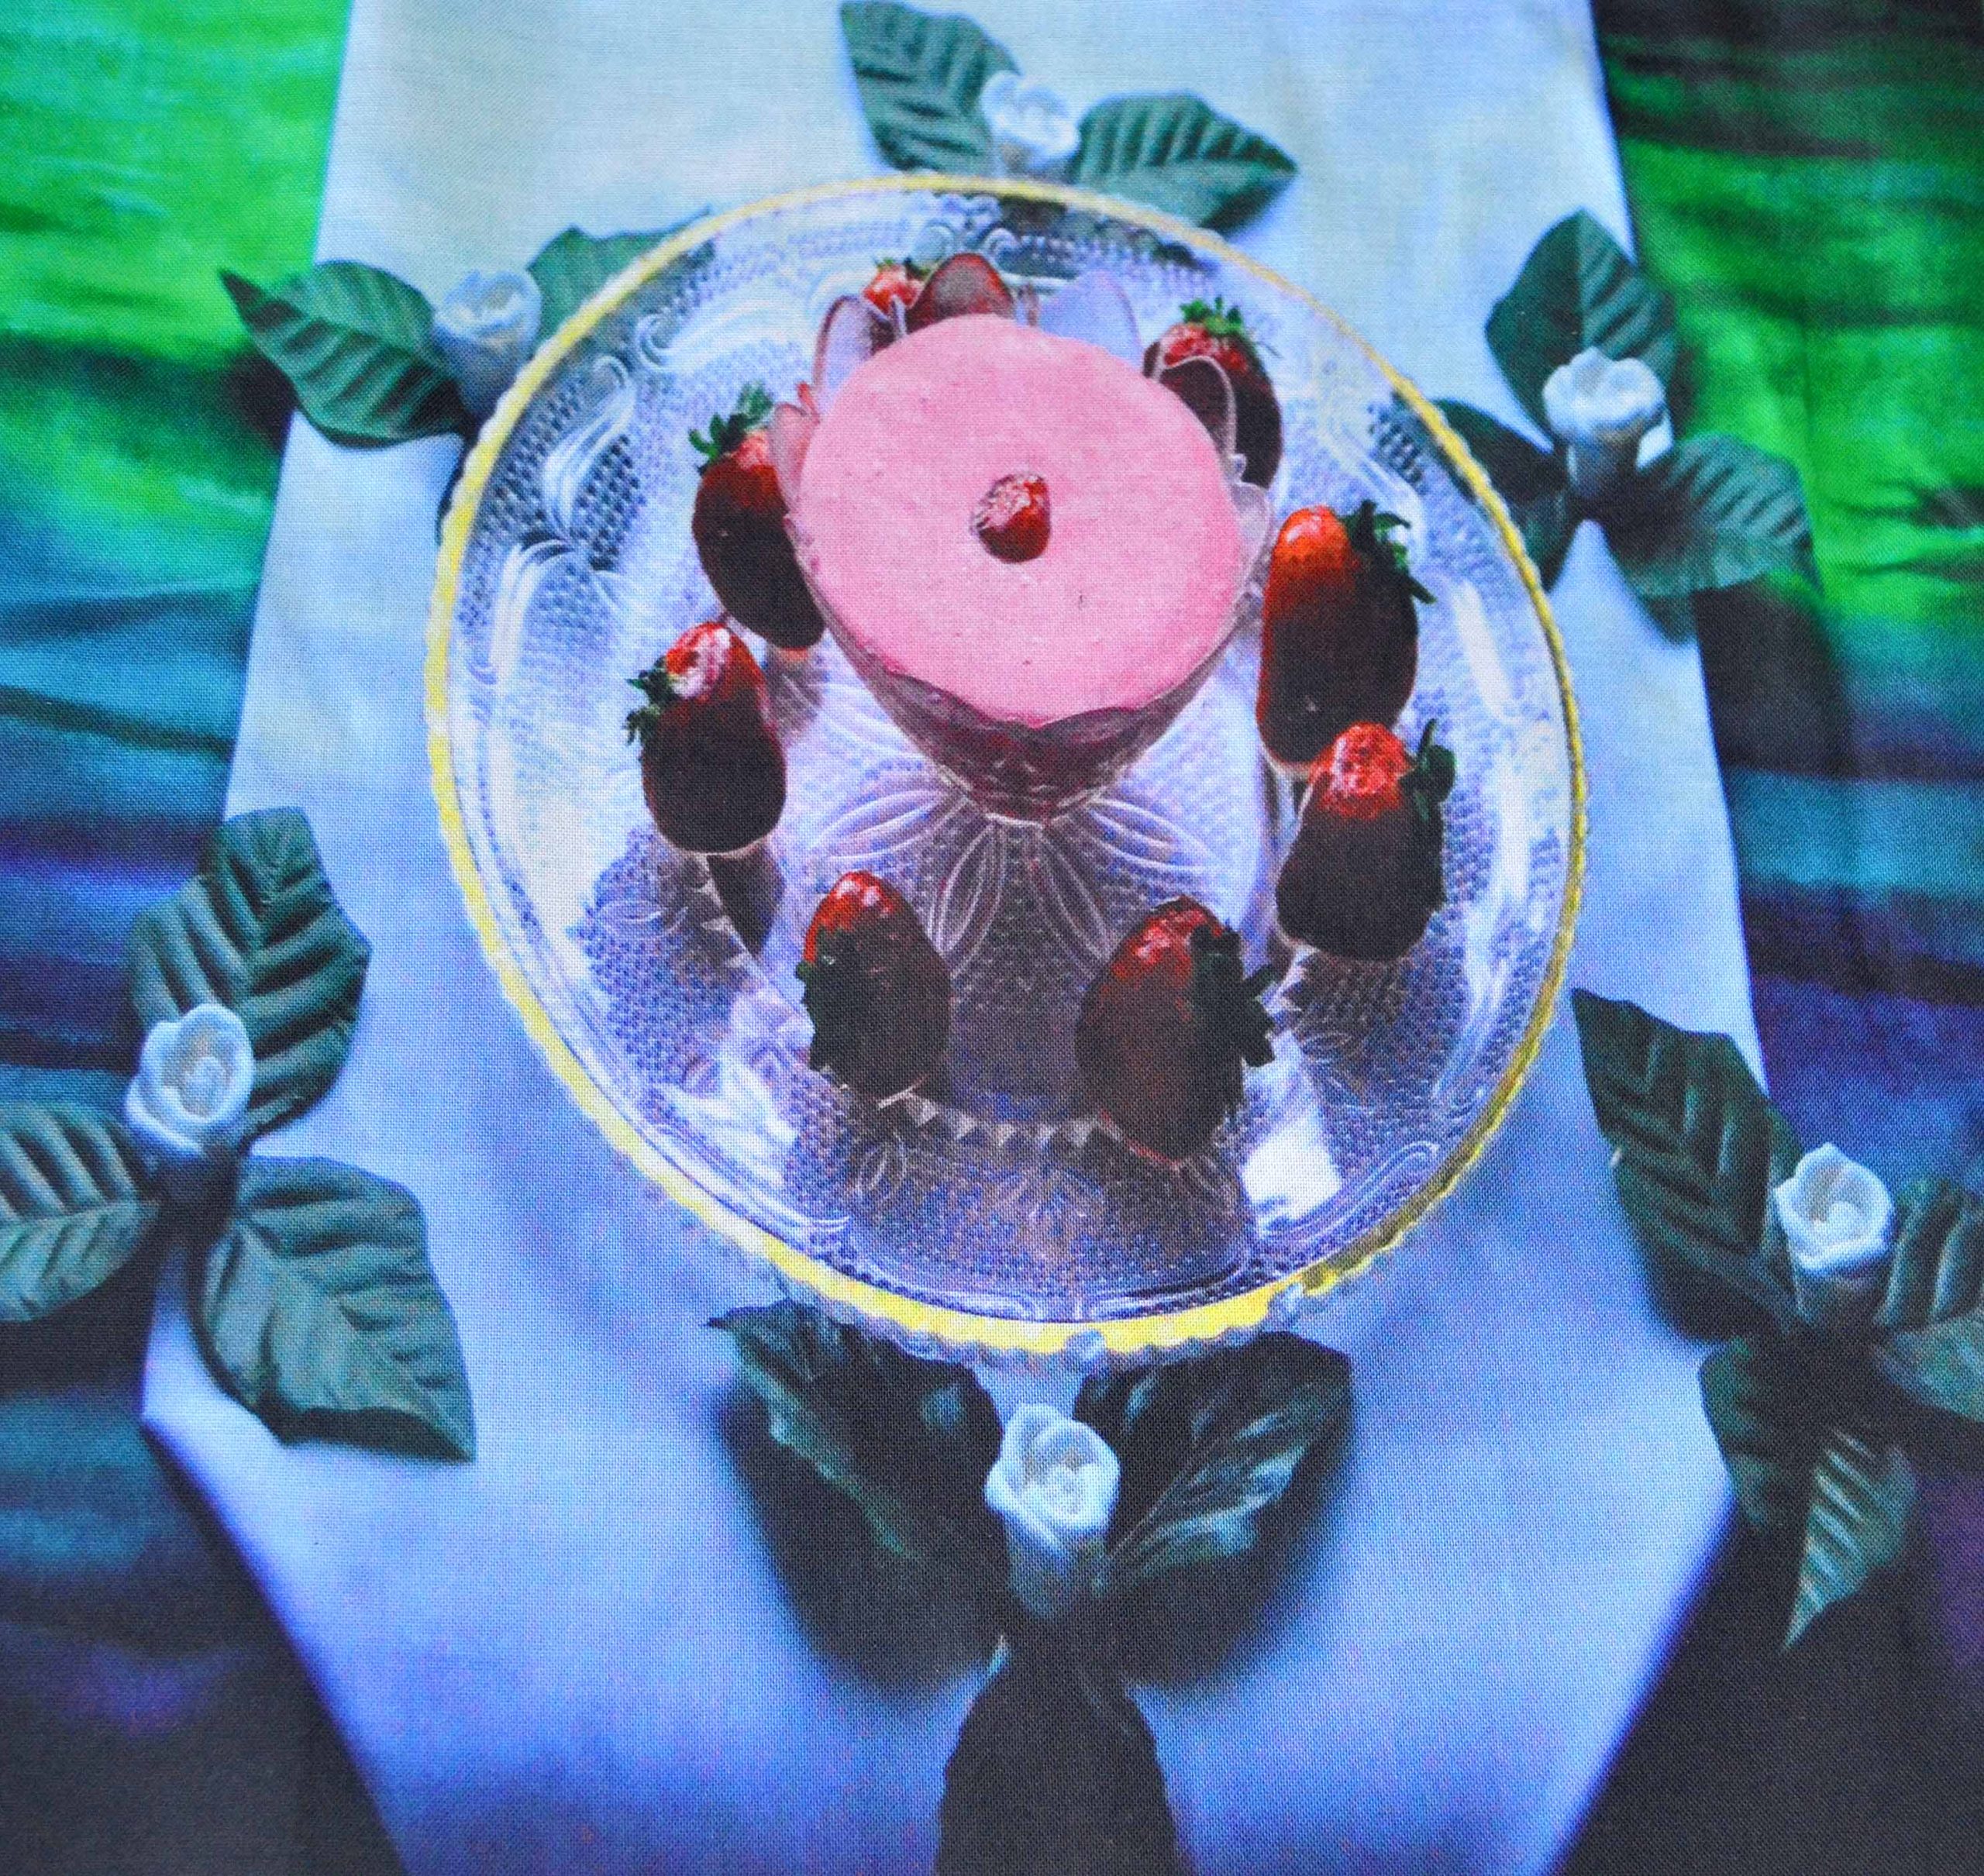
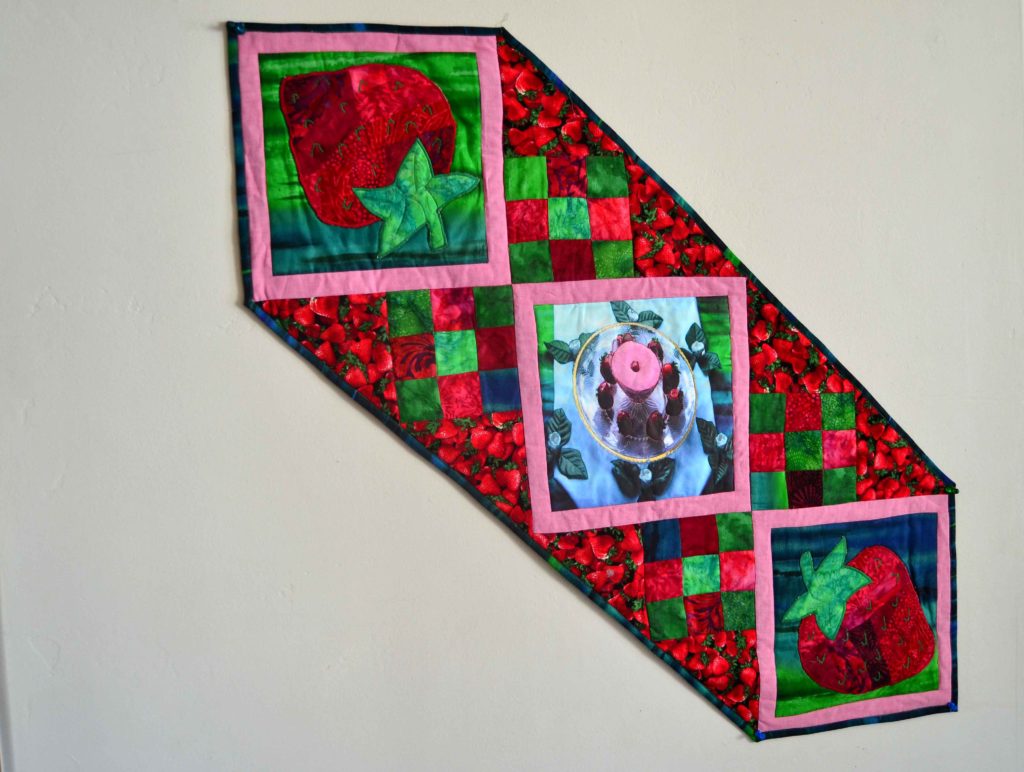
In our case, we had a printed panel of an original photo that we’d had made up for our shop. The strawberry fruit smoothie in a fine-dining setting makes for an eye-catching piece, and we’ve always wanted to do something more with it.
How well do the new elements match up?
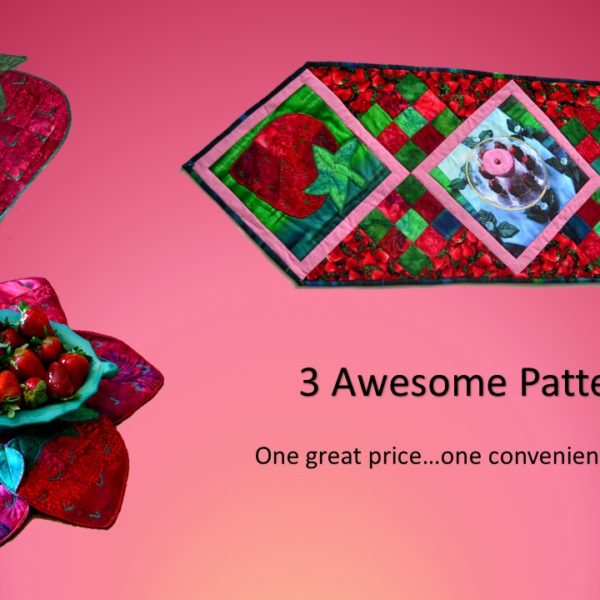
We realized that the sizing of the two elements we had that were easily adaptable – the strawberry outline and the printed photo panel – were very close in size already. So we decided not to get too crazy and make a whole quilt, just a table runner.
How much time do I want to spend?
Making a big quilt takes time. Making a super-complicated wall hanging takes time. Making a table runner / table topper / baby quilt doesn’t take nearly as long – usually. We’ve got a lot of big projects already planned out this year, and we didn’t feel like adding a whole other quilt – and the 1-4 months investment in time.
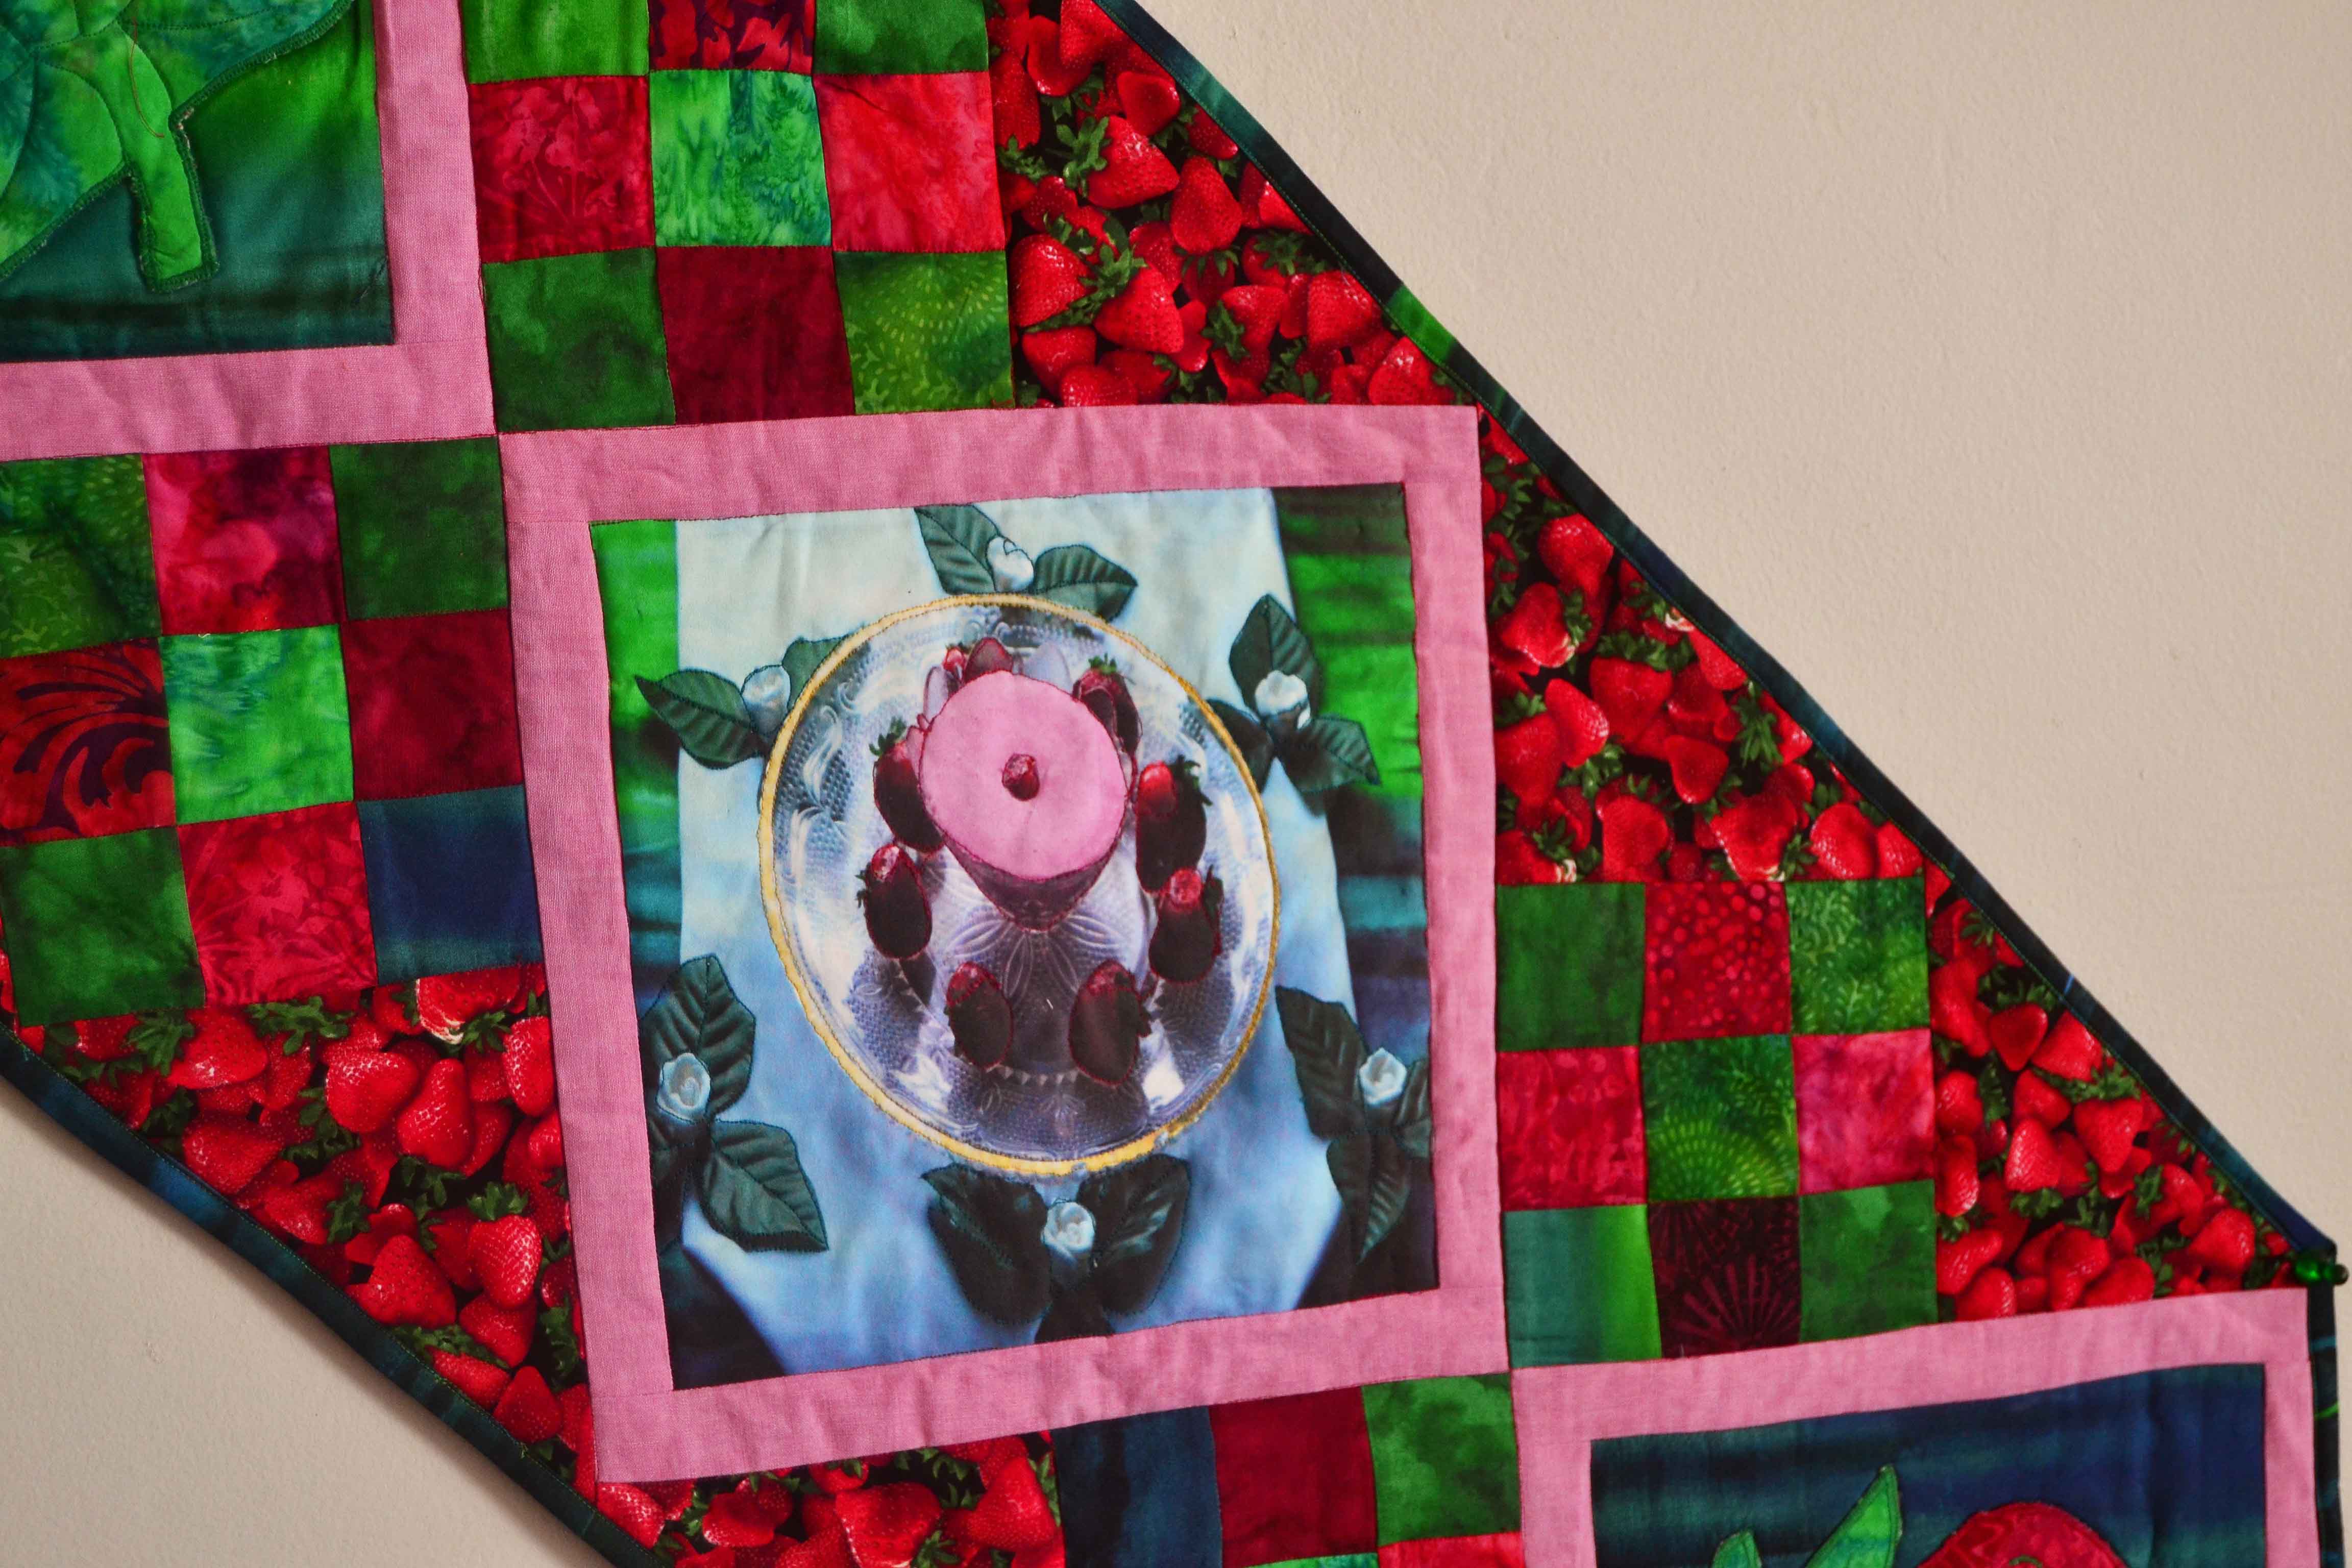
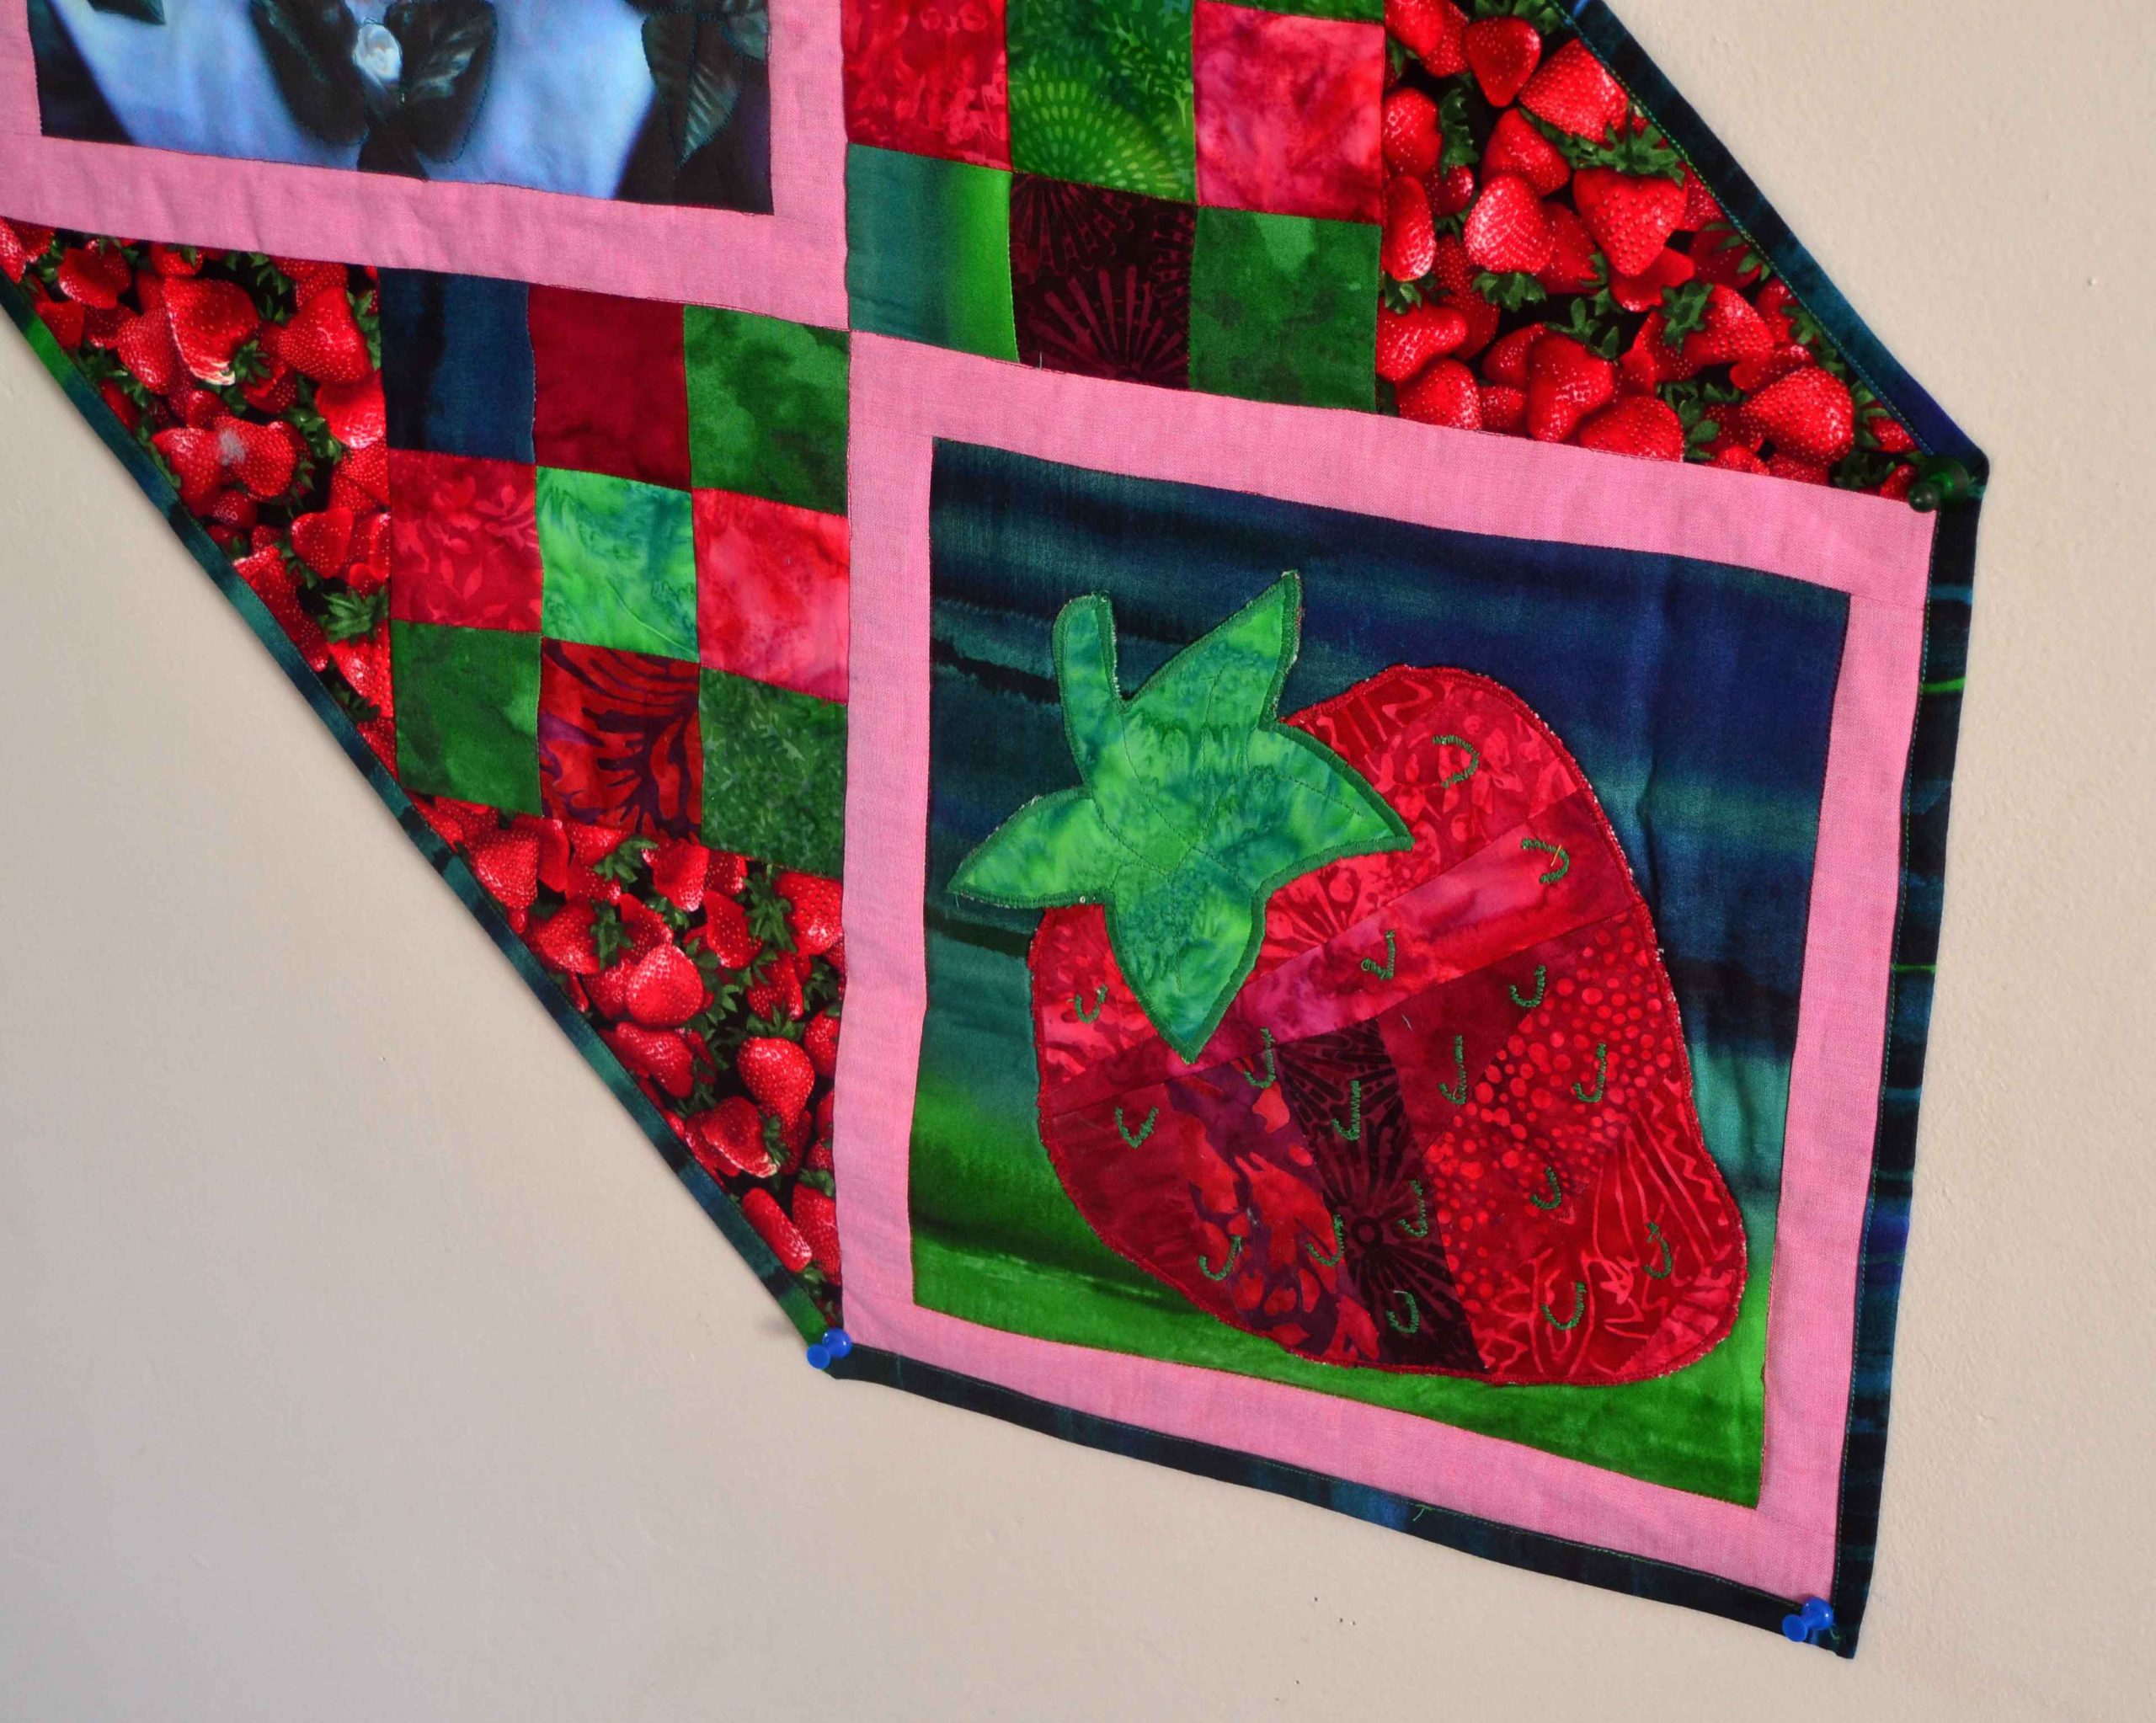
So, we decided to change the Bargello Strawberry pattern from a single large table topper to a printed photo panel & shaped applique table runner.
What do I not have to figure out on my own?
As quilters and fabric artists we have a tendency to collect patterns. We’re especially fond of those that come in the little baggies at the quilt store, with a unique pattern and a simple style with as few specialty rulers as possible.
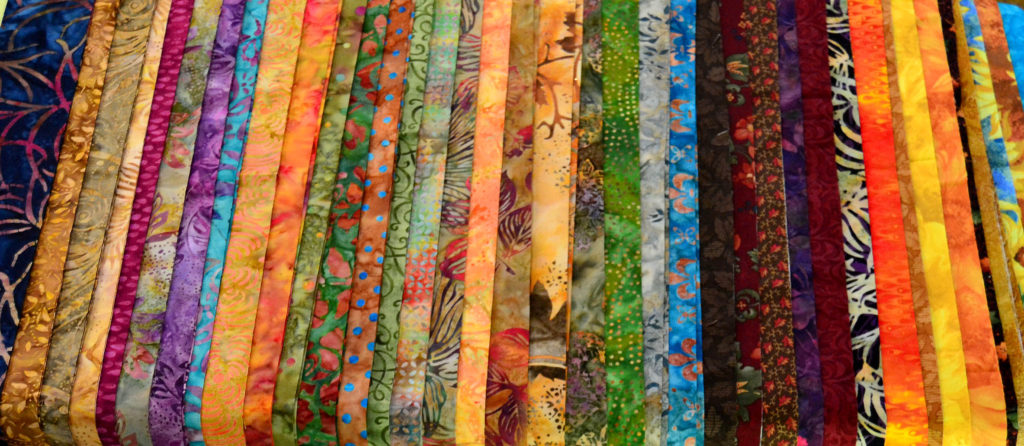
Lo-and-behold, we had a table runner pattern that was very generic, diamonds, triangles, 9-patch squares, and half-square triangles, that fit the measurements of our printed photo panel nicely.
Bringing the Strawberries from Farm-to-Table
It took us about a week of mornings, an average of 4 hours a morning for 5 days, to figure out how we wanted to transform the pattern to our own design.
Some of the challenges we faced included:
“Cropping” the strawberry smoothie printed photo panel to the right size (without losing any of the detailing that makes it so special)
Re-sizing the strawberry outline to fit the same size background panel as the strawberry smoothie block
Changing the Bargello pattern on the interior of the shaped strawberries to be reasonably easy and quick without sacrificing the visual effect (the whole point of using the Bargello pattern in the first place was to create the illusion of a “real” strawberry)
Figuring the 9-patch blocks to best fit in with the colors of the strawberry printed fabric we used for the outer triangles
Finding the right color big-block sashing strips to separate the jewel-tone greens and reds of all the different strawberry elements.
Overall, it was a simple and entertaining project. The result was better than we’d originally envisioned, and we discovered a much, much simpler way of creating the optical illusion effect on the shaped strawberries alone!
Once we were done tweaking our strawberry pattern, the table runner pattern, and our original printed photo panel, nothing looked much like it had to start with.
The result was – if we may be allowed a bit of a brag – stunning!
Want to Know How to Make Your Own “Farm-to-Table” Runner?
We took careful pictures and videos of every step of the process of creating this beautiful, strawberry farm-to-table runner, and we’ve turned it into an easy-to-follow video.
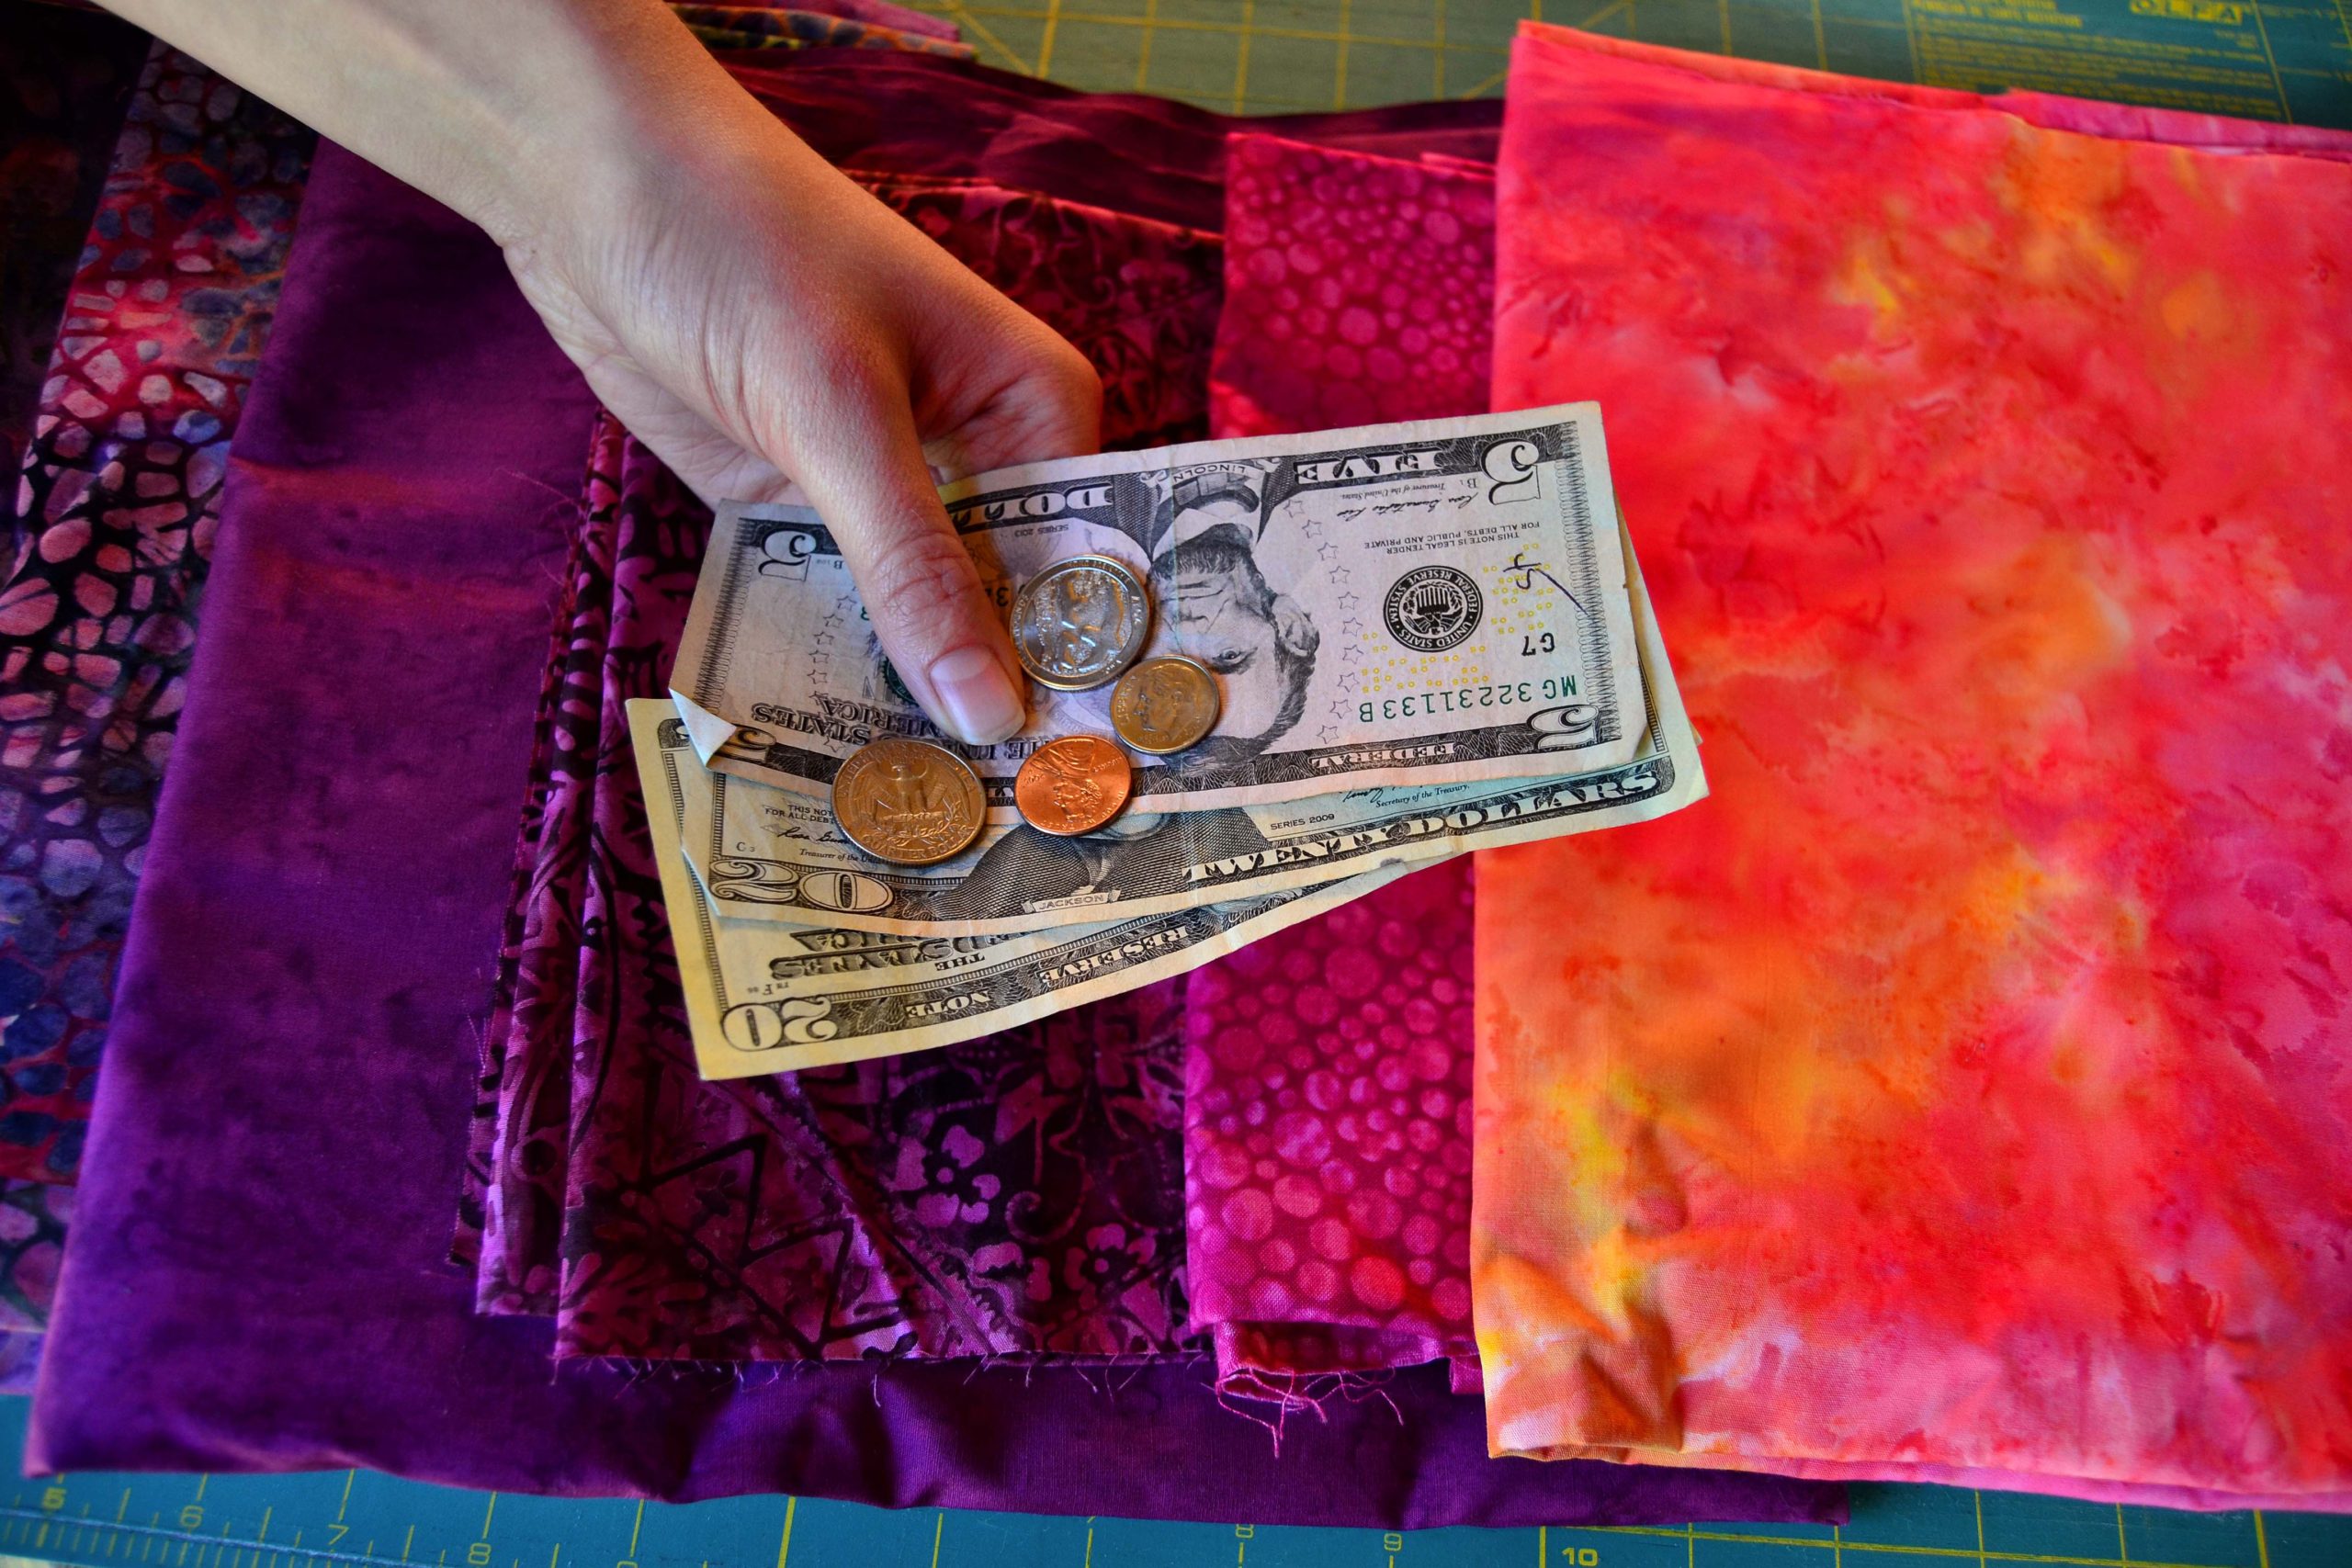
Quilting can be an expensive hobby. Any kind of DIY art – from crocheting to photography to model building – can get expensive.
The good news is that there are a lot of ways to save money on your quilting and fabric art projects without compromising the quality and beauty of the finished projects. And one of those ways is art salvage.
You Missed the Live Event – but don’t worry! You can watch the full replay NOW!
Art Salvage Mindset for Quilting & Fabric Art
Earlier this year a great writer and fabric artist with an art salvage mindset shared her story with us.
She’s back!
We’re going to be hosting Susan Rusie for an exclusive Zoom interview on how to develop a salvaging mindset while creating fabric art.
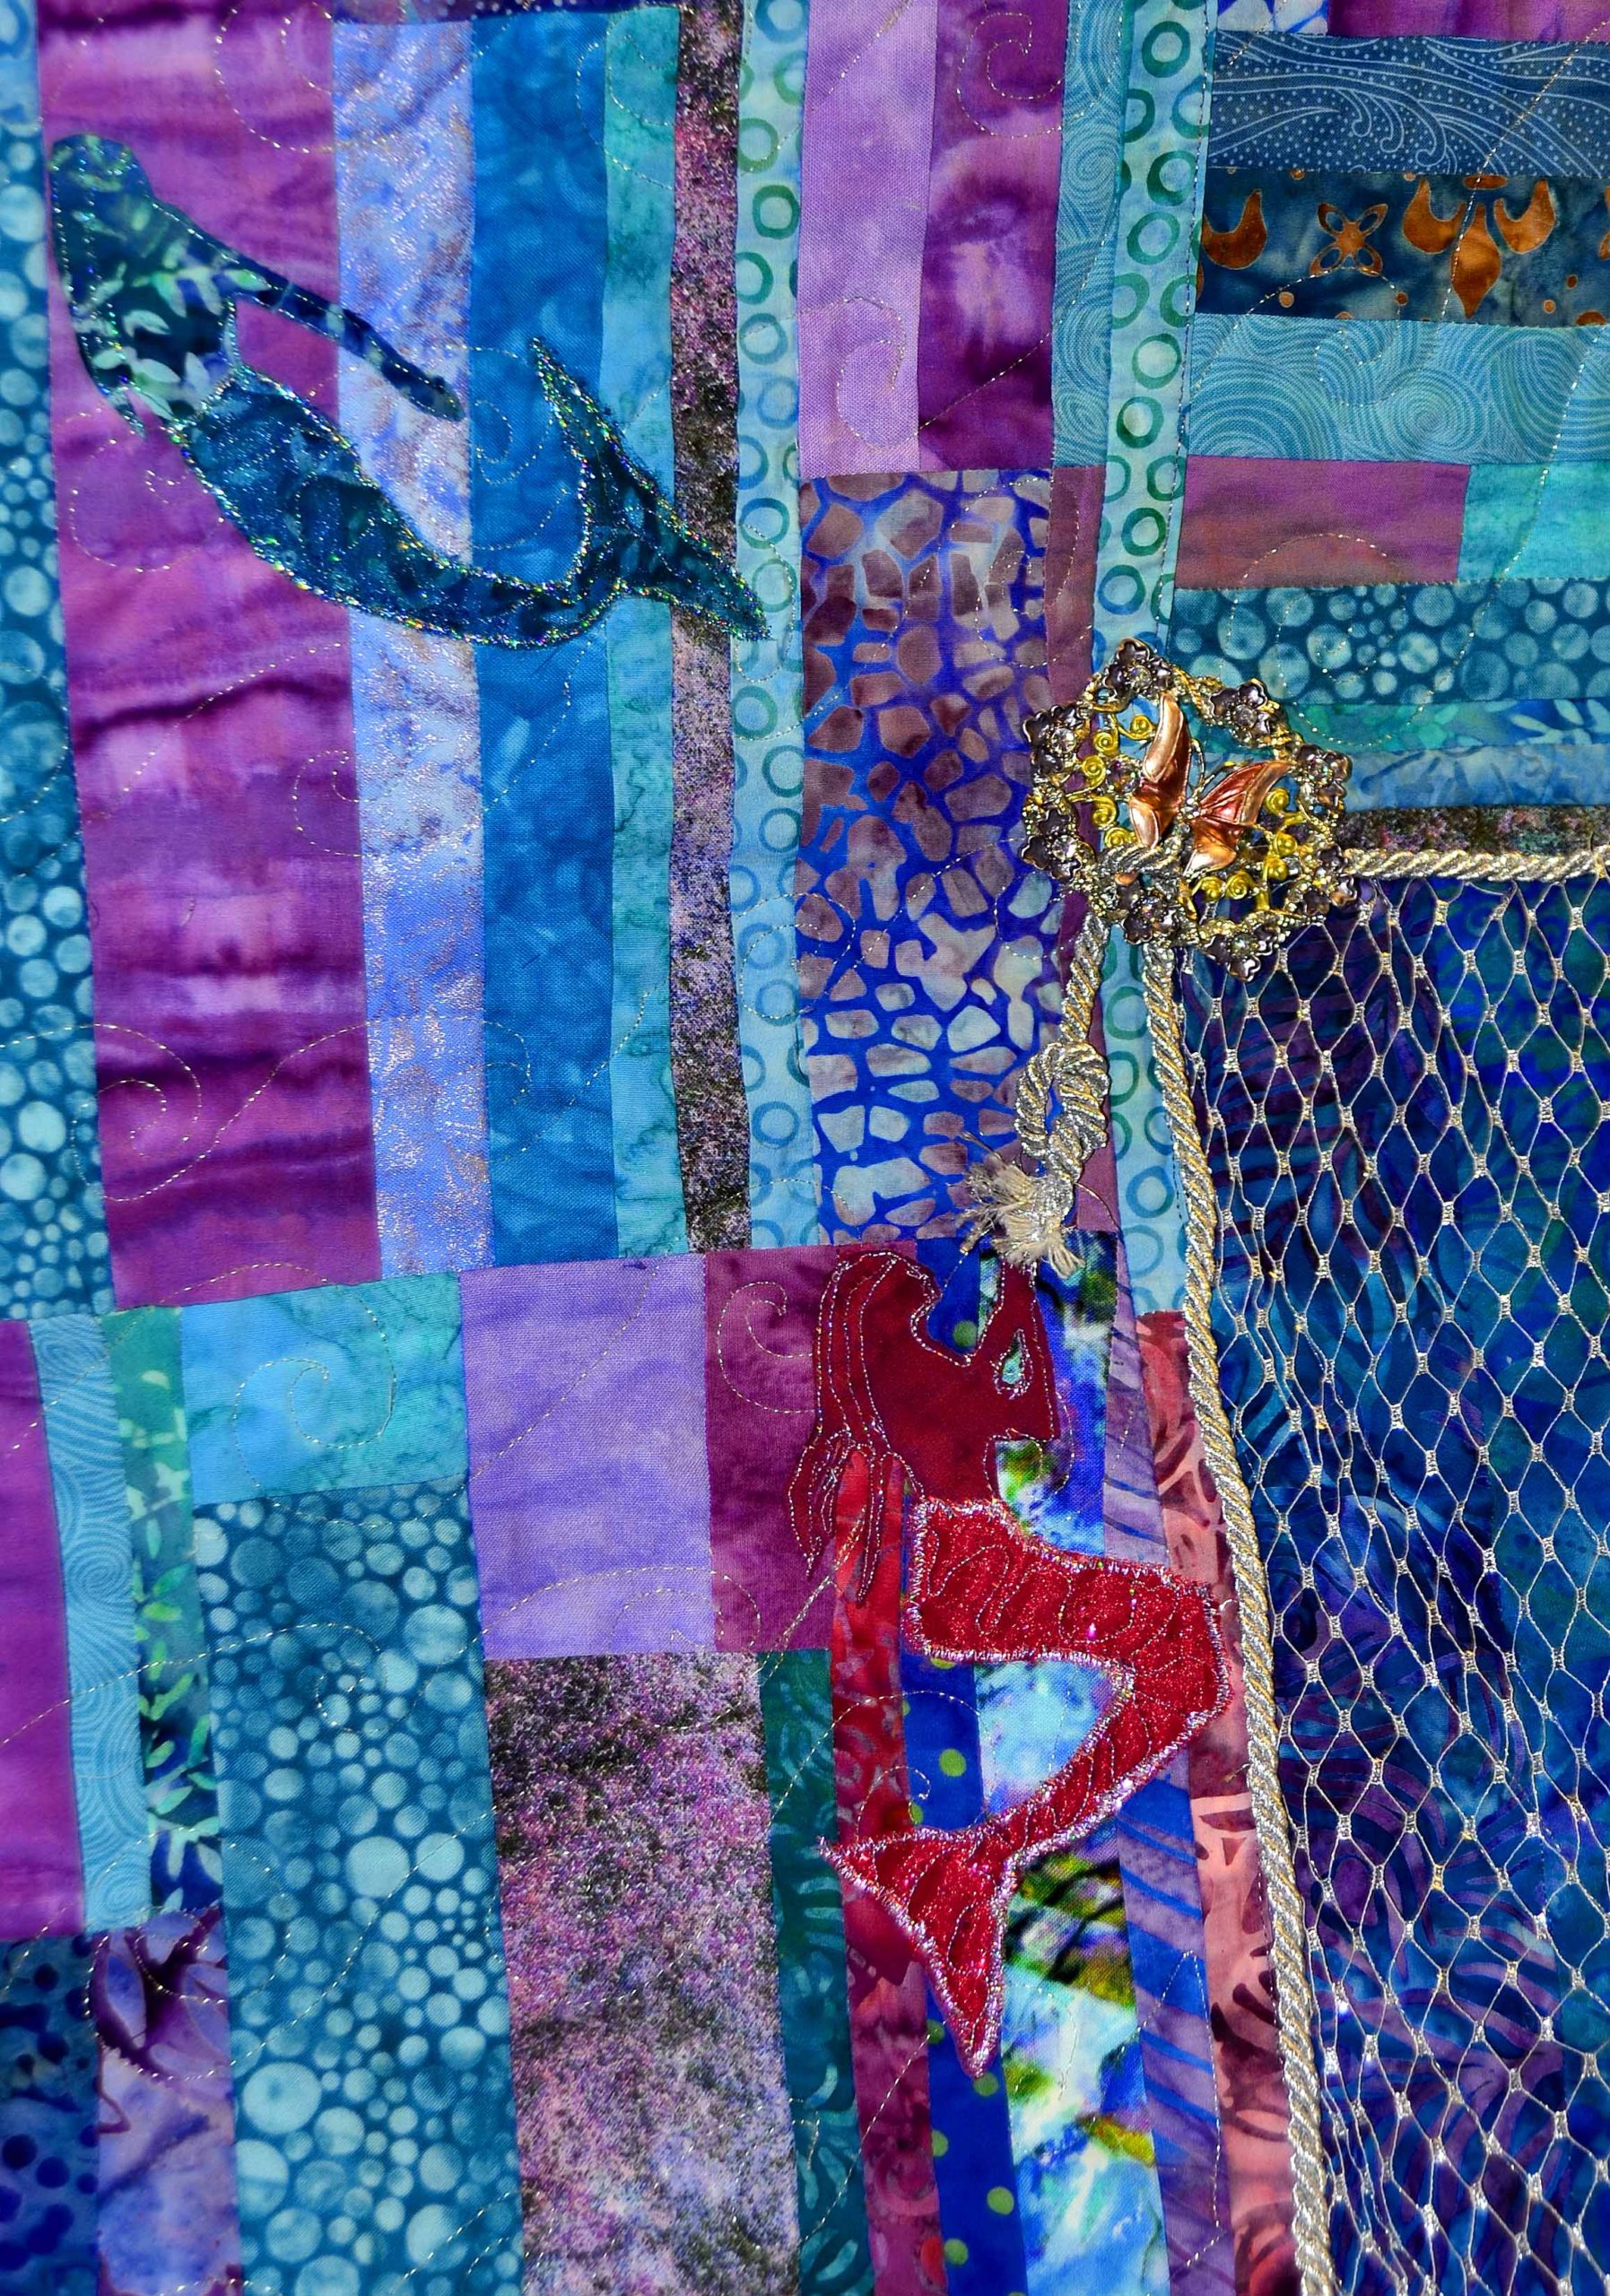
Karyl (our premier seamstress) will also be sharing some of our Princess YellowBelly secrets to salvaging the most unexpected materials to help create and enhance our original quilting designs, like how a broken, 10-year-old bracelet can add to a mermaid quilt!
If you’re interested in learning how to save money quilting with an art salvage mindset from two pros, please RSVP today!
And if you can’t make it, for any reason, please let us know. This is a limited seating event, and if you can’t attend, we’d like to be able to open up your spot for another quilting artist.
Here at Princess YellowBelly Designs we’re all about quilts and every type of related quilting project, but driving all of our passion and interest in these types of fabric art is a deep love for a quilting life.
Like everything else in life, and in fact, life itself, quilting is a journey.
And that journey takes us through so many techniques and pursuits of joy and creativity, passion and struggle, hard work and results that it really becomes a totally consuming lifestyle. Or at least, that’s how it’s been for me. What started as a part-time hobby has become a whole business, and as I look at the art on every wall and every bed in my house, I can honestly say I’m on the path of living a quilting life.
The Imperfections of a Quilting Life
There is no way you can simply sit down at your sewing machine one day and sew a beautifully crafted quilt. It takes a lot of learning and practicing to get it right.
And by ‘right’, I don’t mean perfect.
Not Perfect – But it’s not bad…
You know how in recipe books the pictures of the dishes of food are always so beautiful and perfect? I have been cooking for decades and my finished dishes rarely look like those perfect pictures!! But they do taste great!
This is because the dishes in those pictures had to be made inedible in order to look that great. Suzanna took a college photography course once where she learned all about how to completely yuckify normal good food in order to perfect it:
How to replace ice cream with Styrofoam
How to glue hamburgers together
And how to paint dewdrops on with more glue and a glitter gun
Just like those food pictures, the photos on the quilting patterns are taken to create the illusion of perfection – which is unachievable for the vast majority of us.
Note: Not that I’m blaming anyone. I’ve watched Suzanna create “perfection” out of my admittedly beautiful, but definitely imperfect, quilts using the right camera angles, carefully staged rooms, and an almost freakish attention to detail.
My Top Tips to Living a More Productive & Fulfilling Quilting Life
But, I have discovered that the more time you take to do things right, the more amazing a project will look and the happier you will be with the finished result. And let’s face it fellow quilters, we walk this way on a quilting life path because it fills a need we have to create and the way we accomplish this is through quilting.
So, just like life, let’s strive to quilt the best we can – not perfectly – but as close as humanly possible.
We do this by doing each step as right as we can and the end product will be great!
Give Yourself Time to Do Each Step Right
Make a promise to yourself that you will take the time to perform each step and task in the quilting process to the very best of your ability.
Set your mind to it and remind yourself of it firmly whenever you are tempted to fudge, skip or ignore something. It always helps me to remind myself that whatever I’m making will likely –hopefully – outlive me, and I really don’t want the posthumous humiliation of my descendants being so underwhelmed or even embarrassed by my quilts that they sell them in garage sales!
Learn New Techniques Continually
Many things that look hard or impossible in many patterns aren’t really. I’ve found that one of the redeeming graces of most quilters is that they love to share their knowledge. You can find the know-how you need in quilting friends, quilting books and patterns and quilting videos. Isn’t YouTube a beautiful thing?! I have found that there is a YouTube video for almost any technique I want to learn and watching someone else explain it helps a WHOLE LOT!
And it’s free – which quilting books and patterns are not, and YouTube doesn’t take up any space on your shelves!
And, if you like our unique and original patterns and designs – you’re more than welcome to browse our shop of original printed photo panels and quilting patterns.
Don’t Be Afraid To Strike Out and Create Your Own Path to a Quilting Life
A lot of the patterns I’ve created have started with a common enough technique and then, as I think about what I want to achieve, my brain supplies alternate routes for getting there. If it doesn’t work, no one will ever know, and if it does, people will declare you a genius – or at least your family will.
Before using a new technique on a large project such as a quilt, try it out on something smaller instead so that you can practice and tear out and practice and tear out repeatedly if you have to without struggling with a large quilt or ruining it.
Time Is Your Friend!
Nothing has to be completed today, or even this week. The carefuller you are – I just made that word up – the more time it will take, so don’t rush. Enjoy the process instead. Remember, it’s all about the journey.
And speaking about time being on your side – it’s on my side to.
I have a whole other article about practical tips that will help you grow in a quilting life and lifestyle, and I’ll publish it, in good time. If you want to be sure not to miss that article – and all the other great exclusive content and reminders that you’ll get in our newsletter, please subscribe today, 100% FREE.
When you put in your name and email address you’ll also receive instant access to our 52 Fabric Art Success Tips report, a $22.95 value!
Subscribe today. It’s risk free, SPAM free, money free – and value packed.
Every quilt must be finished off with an edge, or what quilters call “binding.” The trick is in knowing how to sew binding on a quilt, or a quilting project. Getting a beautiful, project-relevant, and most importantly flat binding onto the edge of your quilt is not as simple as it sounds.
It may not surprise my fellow rebelliously creative quilting artists to know that the first thing I did in learning how to sew binding on a quilt was to throw out the majority of “expert” advice.
It did take some trial and error, but I’ve been using my “Flat and Smooth Every Time” Binding Process for the last thirty or so projects I’ve done, and I get flat binding every time.
The idea of traditional binding is really pretty simple, you make binding by cutting your fabric into strips and sewing them together in one long strip.
The Hidden Binding Catch
Most quilt books and quilting patterns will tell you to cut your binding strips 2 ½” wide. You then sew your strips together on the bias, and then sew the strips around the edges of your nearly complete quilt sandwich.
There are, of course, a number of different techniques and instructions for how to sew binding on a quilt – some go fast and some are seriously time-consuming – but all of them will get an edge on your quilt.
They just won’t get your binding to look smoothly flat and professional.
Tricks & Tips to Get Your Quilt Binding to Lay Flat & Look Smooth Every Time
When I was new to quilting I tried a number of different techniques, line-by-line out of the quilting books, but I was not truly happy with any of them. And if you go back through some of my earlier projects and look closely at the bindings, you will see that my bindings didn’t lay perfectly flat.
Princess YellowBelly’s “Flat and Smooth Every Time” Binding Process
The true difference between our technique and every other quilt binding process is the strip widths. After that you can pretty much use any sewing technique you like, although our way of knowing how to sew binding on a quilt goes quickly and requires the least amount of nitty-picky work.
Step 1 – Pick the Right Binding Fabric
When you’re at the beginning of figuring out how to sew binding on a quilt; take a good look at your project and decide if you want your binding to fade away, to make a contrasting statement, or to be a frame for your project.
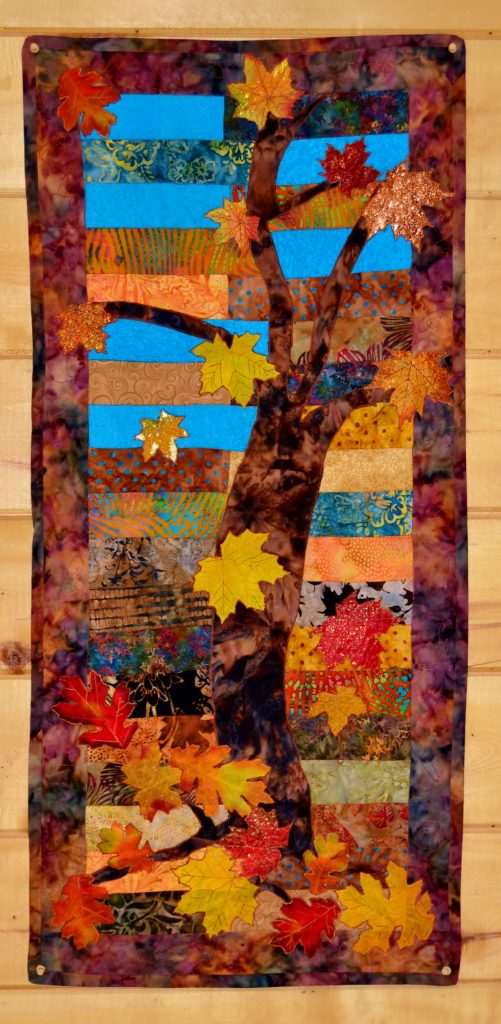
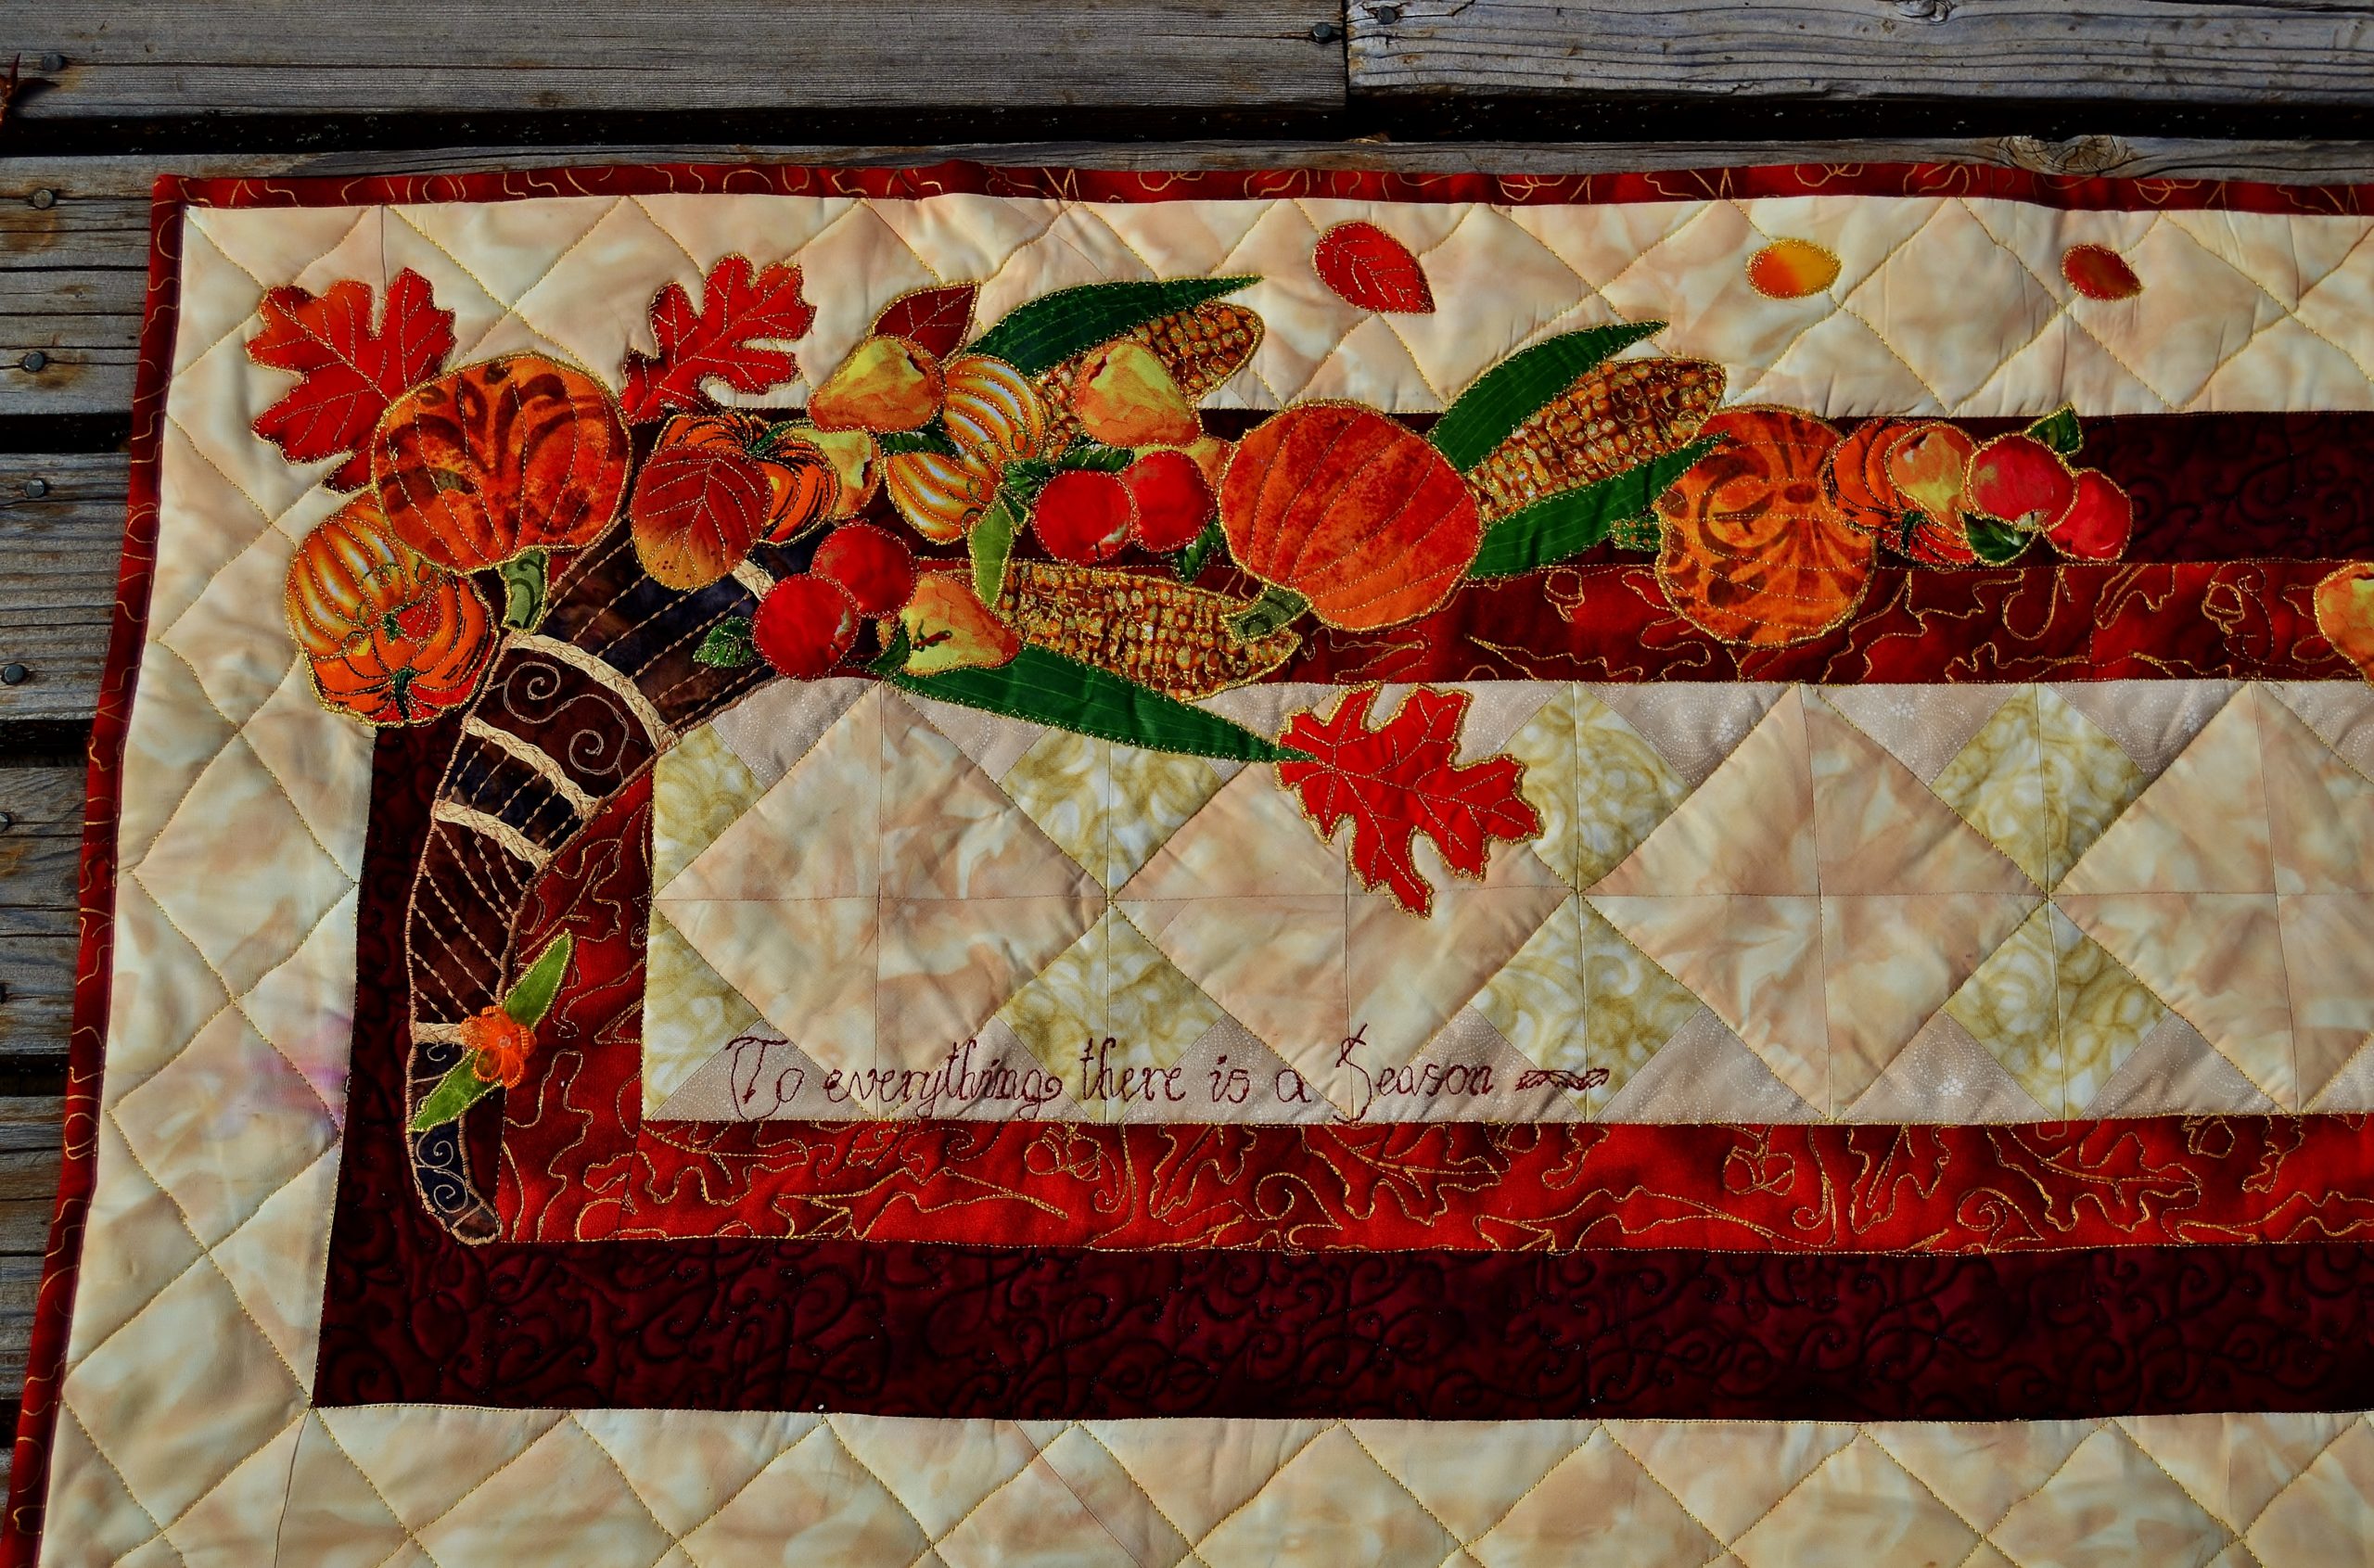
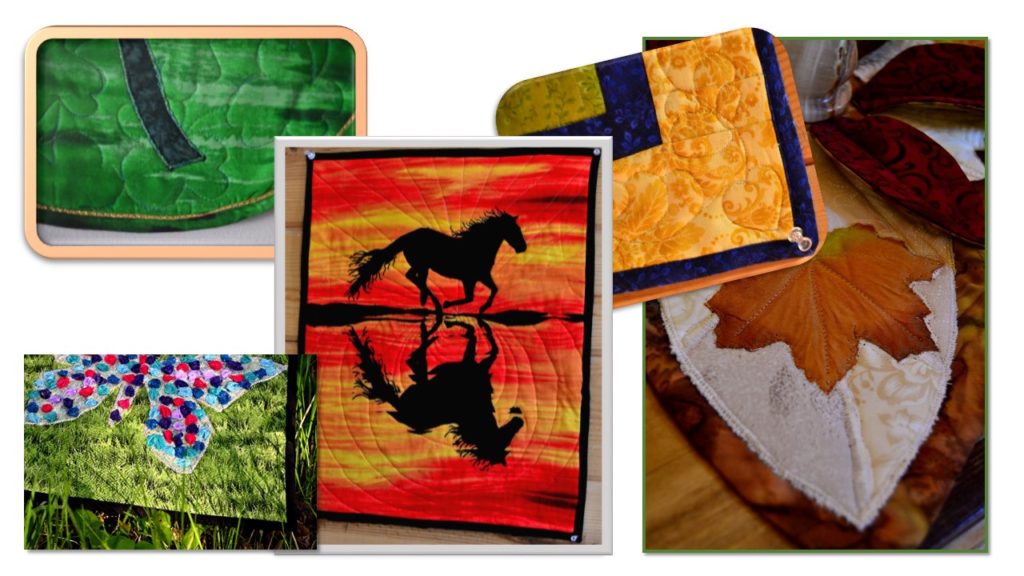
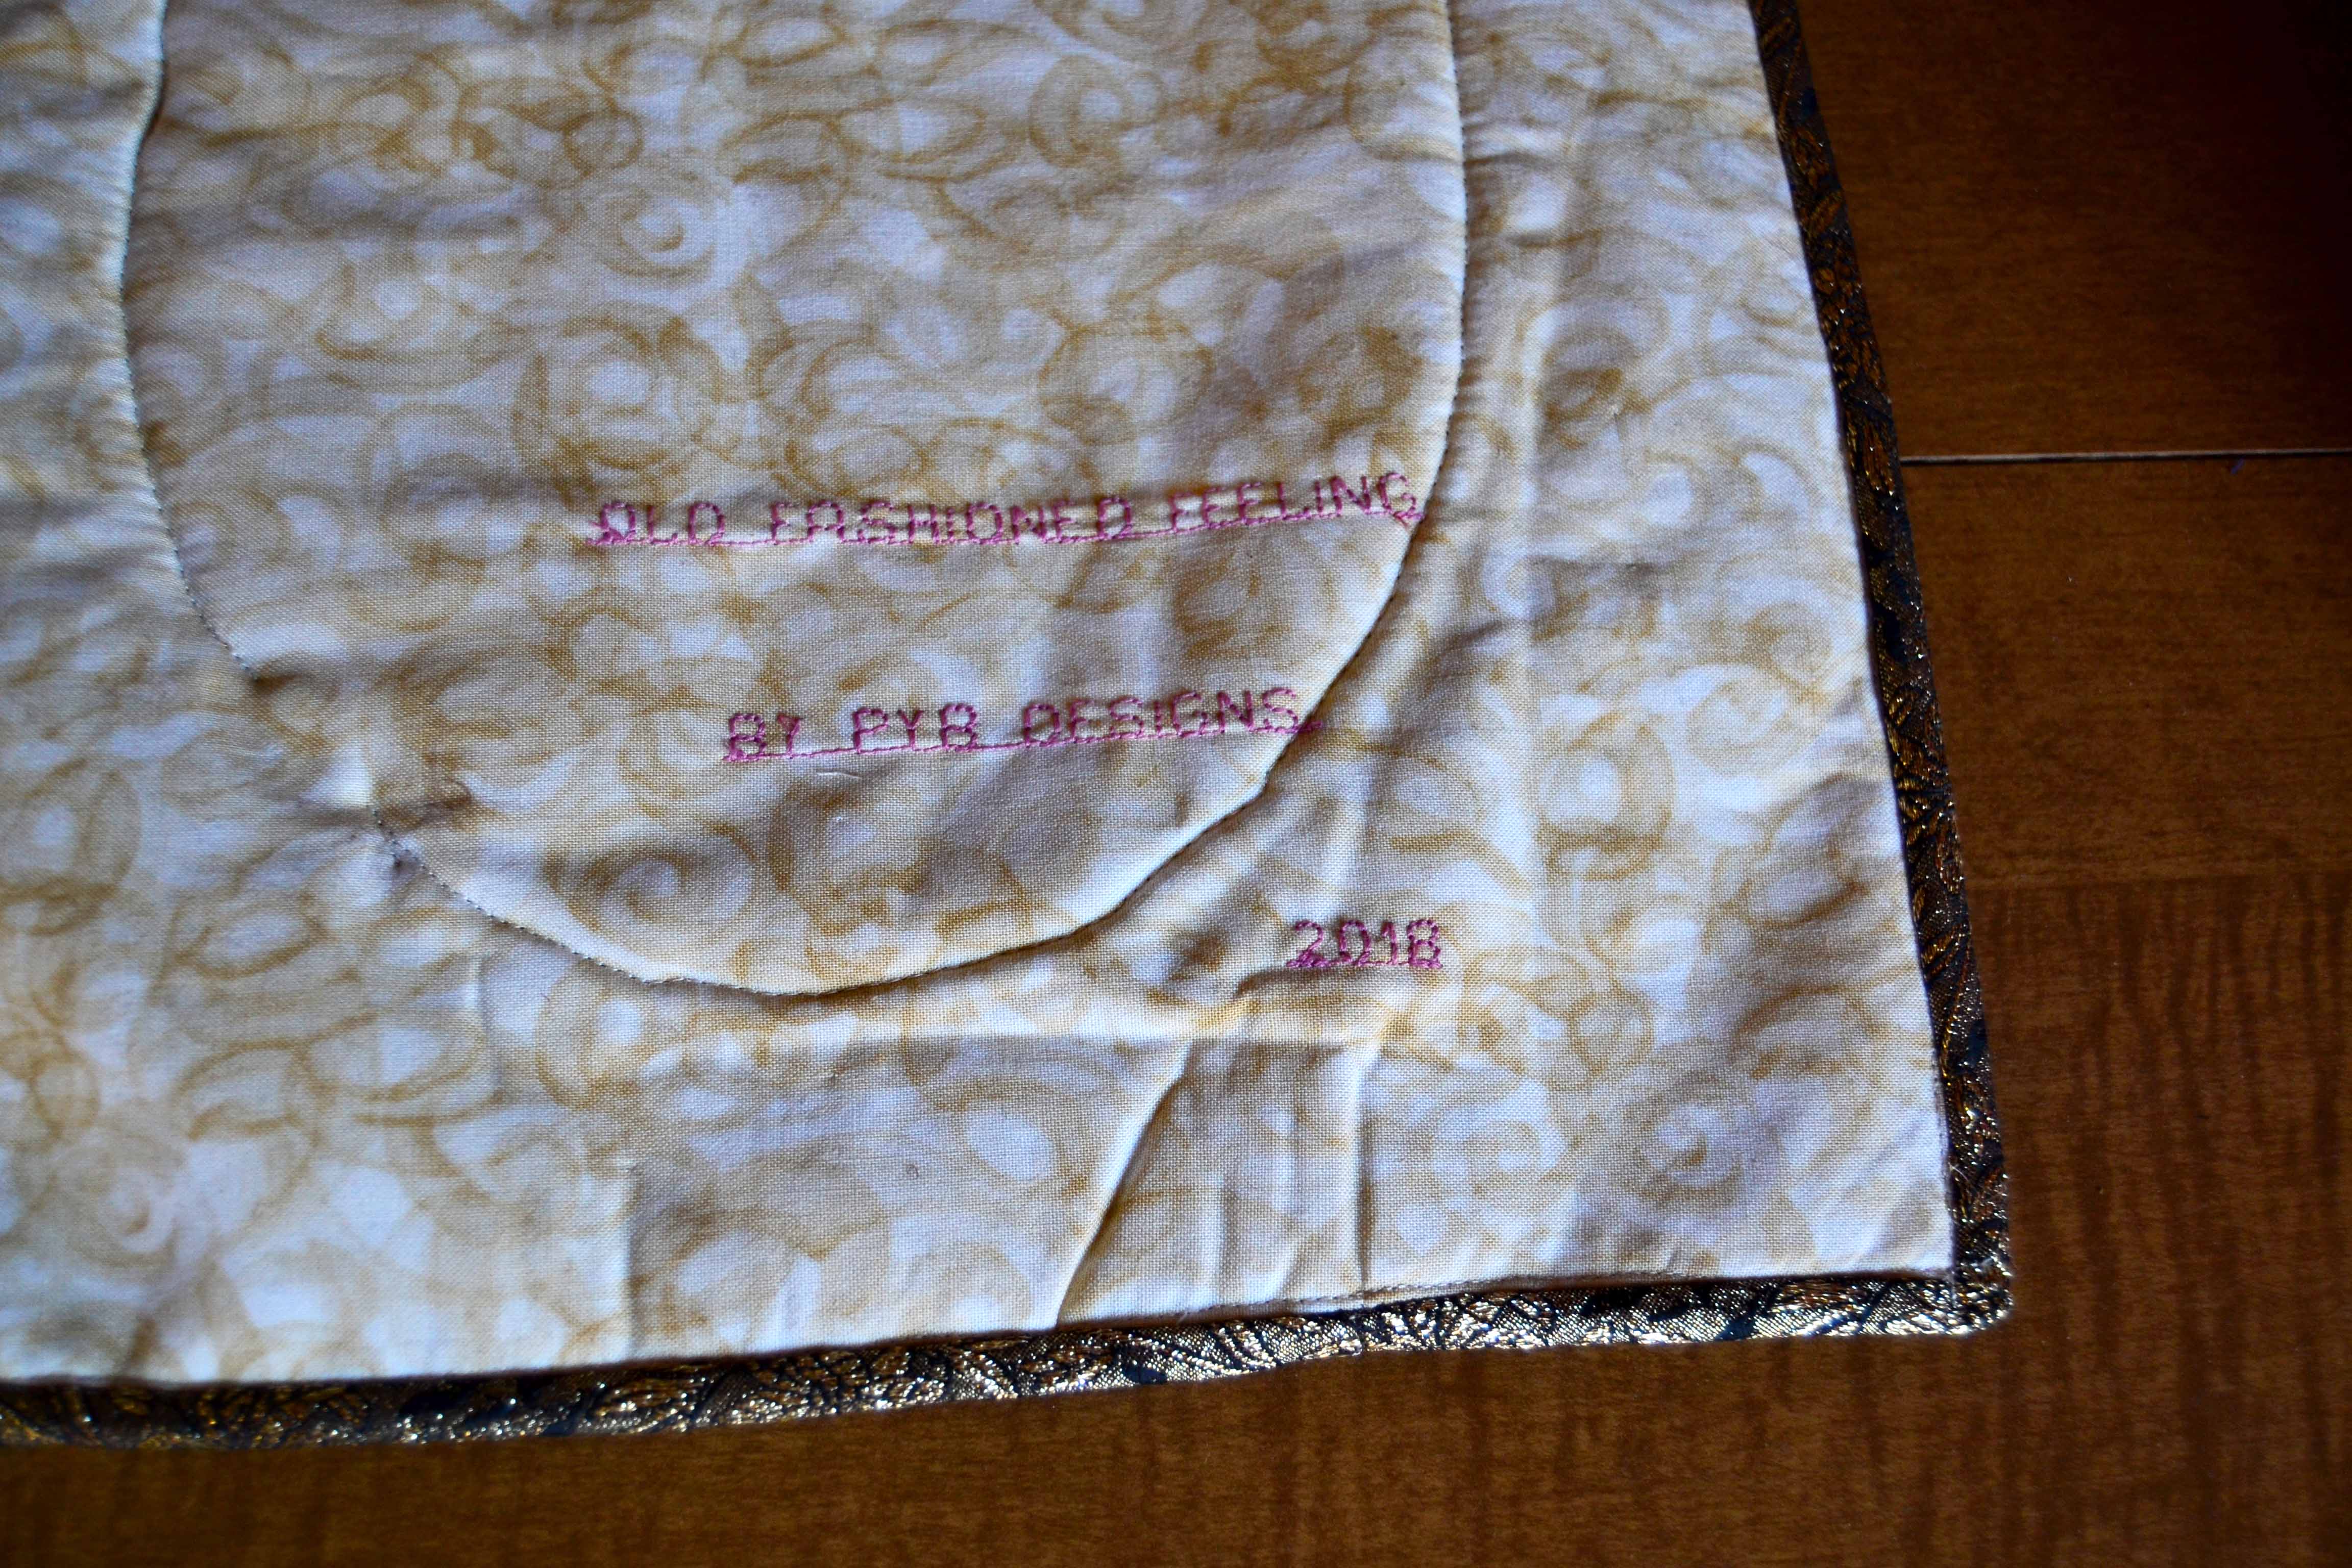
On my ‘Autumn Daze’ panels I used a mottled brown-green-gold batik fabric that I also used in the project itself. This binding is a great example of “fading away.” It simply finishes my fall-themed wall-hanging without drawing the eye away from the landscape scene.
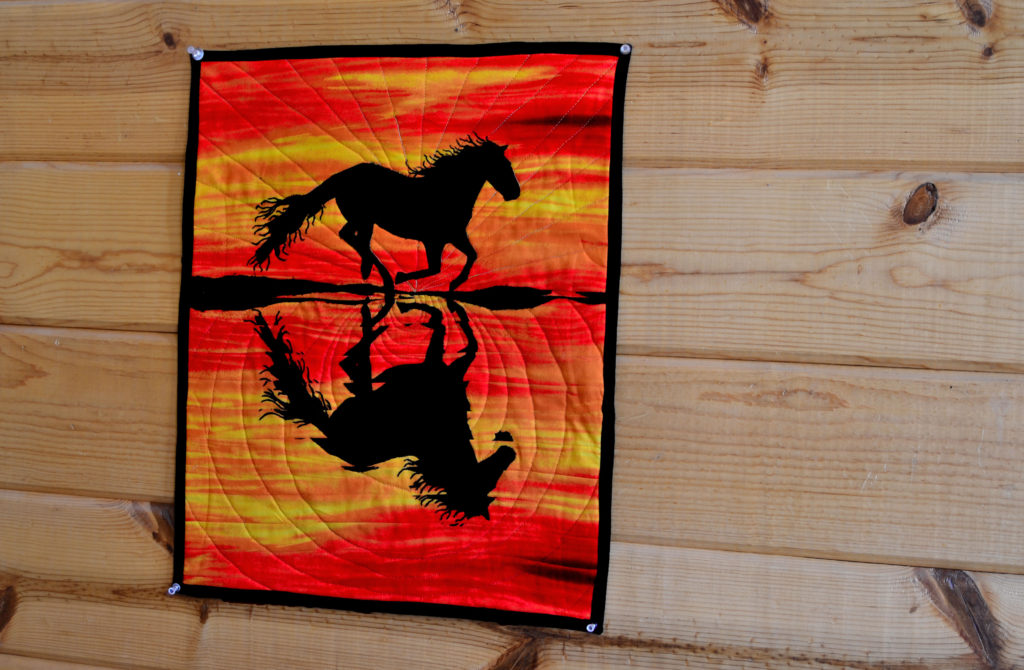
However, when I’m doing a silhouette such as ‘Running Wild,’ I bind it with black. This makes for a dramatic binding without distracting from the overall effect of my image, since the black binding picks up the black of the silhouette and nicely frames the panel.
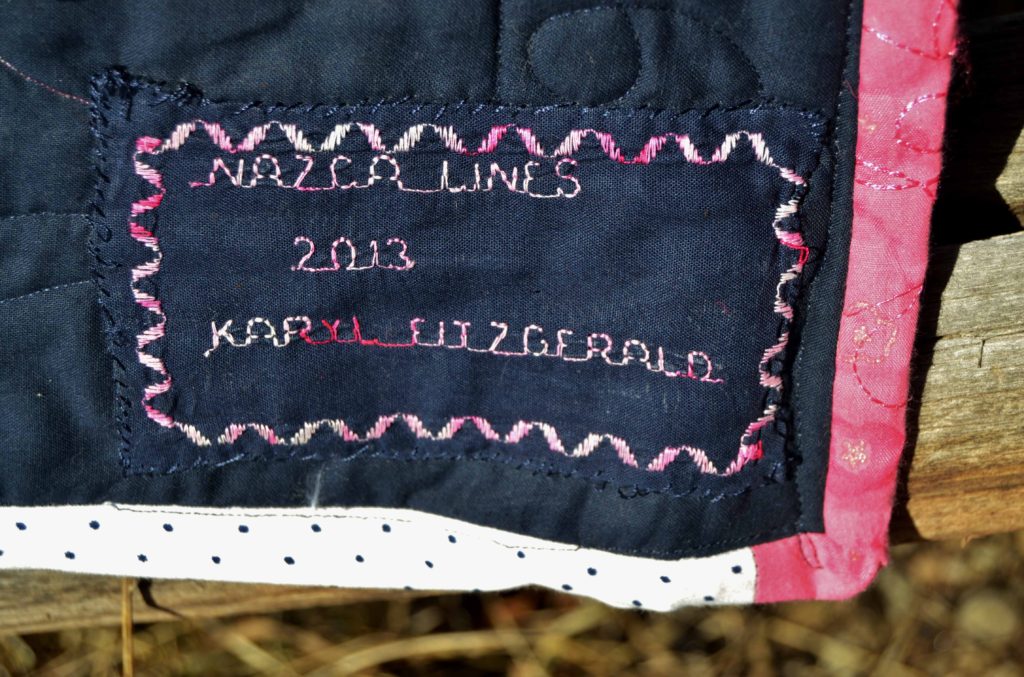
Sometimes, though, nothing will blend in – or you don’t want it to. Sometimes the binding itself needs to make a strong statement. This was the case with my ‘Nazca Lines’ quilt, where I used a candy-striped binding to finish off this crazy quilt with a definite statement.
I always pick out a choice of fabrics that I think might work for a certain project and lay them out alongside my quilt.
It often surprises me which fabric looks best.
However, I do most often choose a fabric that I’ve already used in my project because it helps keep the flow going.
Step 2 – Cut Narrower Binding Strips
This is my biggest secret, and it’s so terribly simple I’d feel guilty about writing such a long article about it…if this one simple technique hadn’t saved me so much frustration.
Cut your binding strips 2 inches wide on the bias.
Having the narrower strips to start with means that the binding will have less wiggle room for making pleats. The binding will wrap much tighter around the edge of the quilt, which reduces your risk of getting bubbles, or loose fabric that can make your project look unprofessional.
Step 3 – Find the Grain of Your Binding Fabric
Before cutting, pull gently on your fabric in first one direction and then the other. The fabric will stretch quite a bit one way (this is called the lengthwise grain) and not nearly as much in the other direction (this is the crosswise grain). I have discovered that you ALWAYS want to cut your binding on the crosswise grain because it reduces the stretching and eliminates most of the wrinkles that happen when your fabric is stretching too far.
This means that you need to fold your material and cut it so that your lengthwise grain makes the 2 inches across, and the crosswise grain is the long 20 inches or so.
When you’ve sewn the binding to your quilt, the binding won’t stretch or pull loose with time, because the stitching will pin the stretchiness of the fabric into place forever. Cutting your fabric on the cross-wise grain usually requires re-folding and re-figuring but it is well worth your while.
Step 4 – Cut Extra Strips
Always Cut More than You Think You Need
It’d be easy to think that you need to cut the same length of binding strips as your quilt is around. But that’s not how it works – and don’t ask me why.
Once you have your fabric folded right, measure the length that each strip you cut will be. This will differ with each project depending on how you have to fold the fabric so that you can cut it on the cross-wise grain.
To figure out how many strips you’ll need to cut, simply divide the total circumference of your quilt by the length of each strip you will cut. For example, if your project is 157” around, add 15” for starting and finishing. This gives you 172” total. If your fabric strips will be 45” long each, simply divide 172 by 45 = 3.82, which means you cut 4 strips of 45” long each.
That total is the number of strips you’ll have to cut to make enough binding to finish your project.
Always remember to add approximately 10” – 15” to the total circumference of your quilt. Otherwise you’ll run short, and have to cut another strip or two and try to add them on while you’ve got most of your binding attached to the quilt – which is a major pain-in-the-neck.
Step Five – Creating Binding on the Bias
Once you have your strips cut, you’ll need to sew them back together again to make one long strip. When I started I simply joined each strip to the next one with a straight seam, but I gradually discovered that I didn’t like that look (it’s really obvious). Other problems with this method of how to sew binding on a quilt were:
The seams were very thick and made a lump in the binding
And they also didn’t go around corners or curves smoothly
So I learned how to sew them like a bias strip is sewn and that has made all the difference.
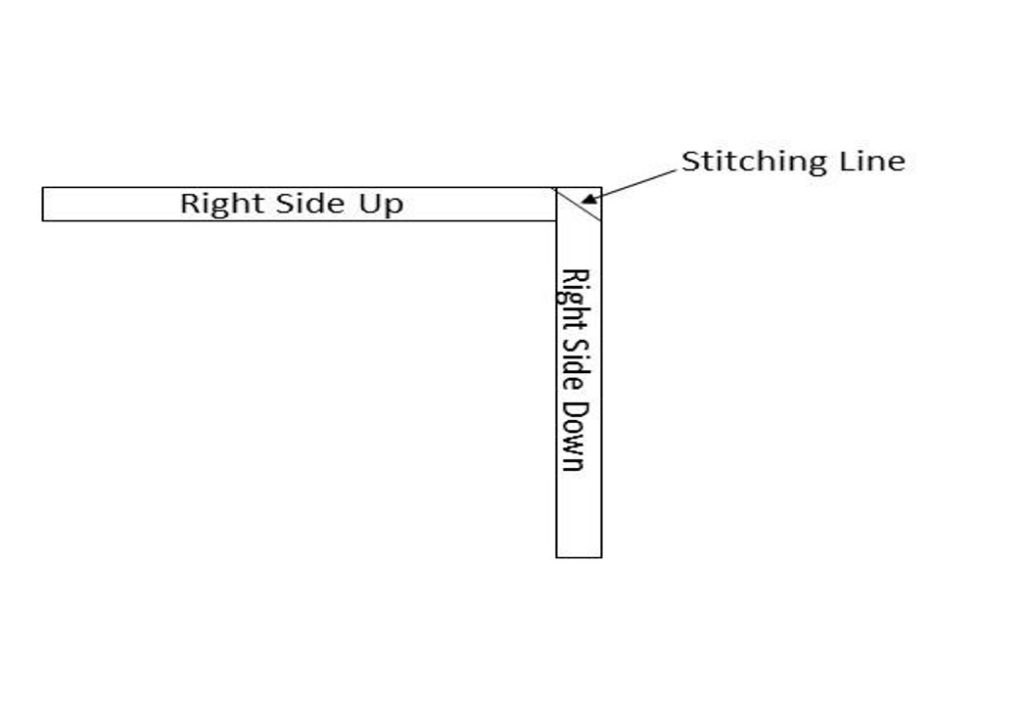
Sewing Bias Seams
Lay your strips end to end with right sides up.
Lay the 2nd strip on top of the 1st at right angles so that the 2 ends make a square. Pin this, and then sew a diagonal seam from one corner to the other.
Trim the excess down to ¼” and iron flat.
Turn to the right side. You should now have one long strip with a diagonal seam joining them together.
Repeat for as many strips as necessary.
Always check before you sew the next strip together that you are joining the right sides. With bias it’s not always easy to tell and then like me you’ll end up with a couple of strips sewn backwards right in the middle somewhere.
One of the great advantages of sewing your strips together with a bias seam is that your seam starts and ends at a different place so when you know how to sew binding on a quilt, you don’t sew through 2 seams at once. Much less bulk!
In fact, I often can’t find the joining seams on the binding when my project is finished!
Step 6 – Folding & Ironing
Iron your binding strip by laying out your binding strip wrong side up on your ironing board and spray starch. Before ironing, fold your binding strip in half, being careful to line up your edges, then iron down.
This will give you a long, continuous strip that is 1 inch wide with the right sides out.
Step 7 – How to Sew Binding on a Quilt (Backside First)
Sewing your binding strip to your project. This is one of my favorite steps. Not only is it the last one, but also one of the easiest.
Start by laying your strip on the back side of your project about 2/3rds of the way down one long side. This starting seam will be a straight across one and thus bulkier than the others, so I always try to put it where it will be the least obvious.
Line up the raw edge of your binding strip with the raw edge of your project. Leave approximately 4” loose at the beginning and start sewing a regular ¼” seam from there on. I never bother pinning the binding – I just smooth and gently tug the binding and project edges as I go.
Sew all the way around and stop approximately 4” from where the strip begins.
How To Sew Binding on a Quilt’s Corners – Back
There’s a trick to making your corners flat and smooth – of course there is! Here it is:
Slow down as you come to a corner and stop altogether when you’re ½” – ¼” inch away.
With the needle down, lift your foot and turn your project at a 45 degree angle toward the corner.
Put your foot back down and finish your seam straight into the corner, pull your project completely out, and cut off your threads.
Next, turn your project so that you will be ready to sew down the next side.
Before beginning to sew, lift the long end of your binding strip up and over the side you’ve just sewn.
Then fold it back down, so that is straight and even along both the top and side edges. Start sewing your ¼” seam again straight down from the edge.
Repeat for the 3 remaining corners.
Joining the Ends
Stop sewing when you get within 4” of the beginning of your binding. Overlap the ending strip with the beginning at least 4”. This will give you 8” to get your ending seam sewn and you will need every inch of it.
To mark where to sew your seam, bring both ends together so they meet. Mark this line with chalk at both ends, front and back. Then, open up both ends and with right sides together match up your chalk lines and pin.
Your middle creases should also match.
Baste this seam and then lay the binding down on your project. If the binding lies flat and smooth, then sew the seam with a regular stitch. If it’s too short or too long, simply baste a shallower of deeper stitch line until the binding fits precisely.
Trim off the excess binding, fold the remaining binding back together, and stitch down. Ta da!
Truth be told, joining the binding ends is nitpicky and annoying but necessary, and when you’ve done it a few times, easy.
Your binding should now be sewn down all the way around on the back side of your project with the raw edges even. Using a water spray or steam iron, pull the binding gently away from the backing and press it flat. This is also a very good chance to inspect your binding and make sure you caught both sides of it in your seam.
Step 8 – How to Sew Binding on a Quilt (Finish on the Front)
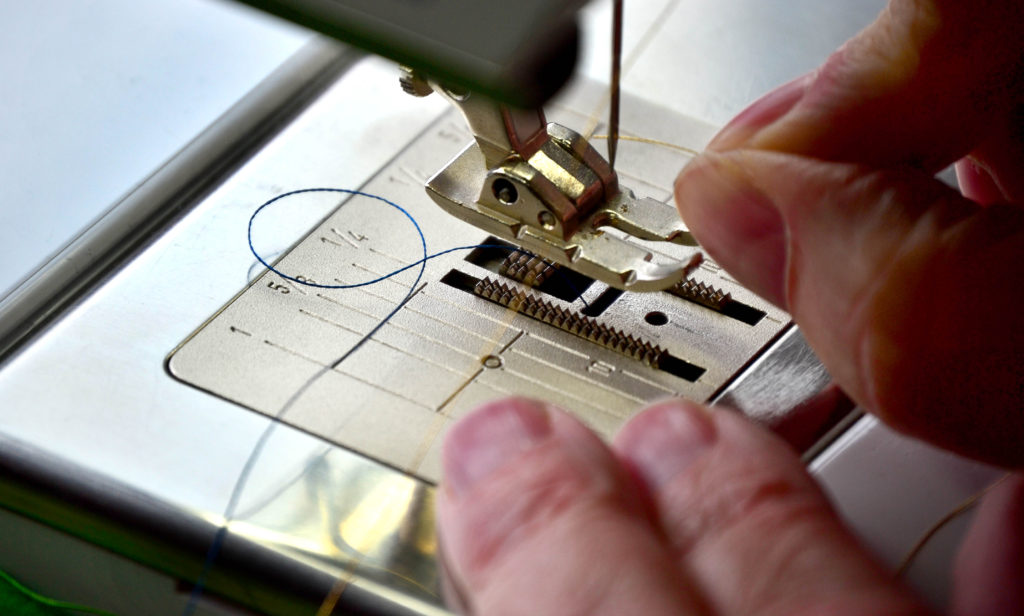
Thread your machine on top with thread that either matches your binding exactly or use invisible thread. This is NOT a place where you want your thread to show. Load your bobbin with thread that matches your backing fabric.
Every machine is different, so on a scrap piece of fabric, practice sewing right on the edge of a line. Note where your foot has to be, so that you don’t sew too shallow or too deep.
We do this because to sew your binding down on the front neatly, you must sew a 1/16” seam or less. Otherwise, the edge of the binding tends to curl up. So pay attention to where this seam line falls on your foot, and then place your foot in that exact same location on your binding.
And sew slowly!!!! If you go too fast, you will wibble wobble and either sew in too deep, or miss the edge altogether. The tendency, when you’re sewing such an exact seam is to watch your needle. I have found that you’ll sew a lot more accurately if you watch your foot. Keep your foot lined up with your fabric and you’ll be fine.
I’m a lot better at this than I used to be – so be patient and fix the wawaws when you’re done.
As you get ready to sew, you will see the seam line along the front where you sewed the binding down on the back. This is your guide. Simply fold the binding over until it just covers this seam and stitch it there.
How To Sew Binding on a Quilt’s Corners – Front
Of course, you must take special care in the corners. As you come to a corner use a pin to hold down the edge and sew far enough into the corner so that binding edge stays down.
Reverse just far enough so that you can overlap the next side over this, and then continue sewing.
When you’re all done, spray starch and iron your entire binding again. This helps to take out any wrikles that may have had the audacity to make an appearance and also leaves your binding looking crisp and perky.
A Final Note on the “Approved” Method of Binding
You will find many quilt books and “professional” quilters who turn their noses up at doing bindings this way. For them, it’s not done right unless you sew it onto the front first, turn it to the back, and then hand stitch it down.
Barb does it this way. It usually takes her a couple of weeks to hand sew the binding of a queen quilt. It takes me a couple of hours.
Choose wisely when you’re deciding how to sew binding on a quilt.
Now that we’ve properly explored how useful and important it is to be able to mend all mendable clothes for your family – let’s check in on the clothes that you’ll mostly be mending, and a few handy tips and tricks on how to mend.
Jeans are the hardest garments to mend because they are the thickest, but also because the pant legs are quite narrow and therefore hard to get under your sewing machine needle.
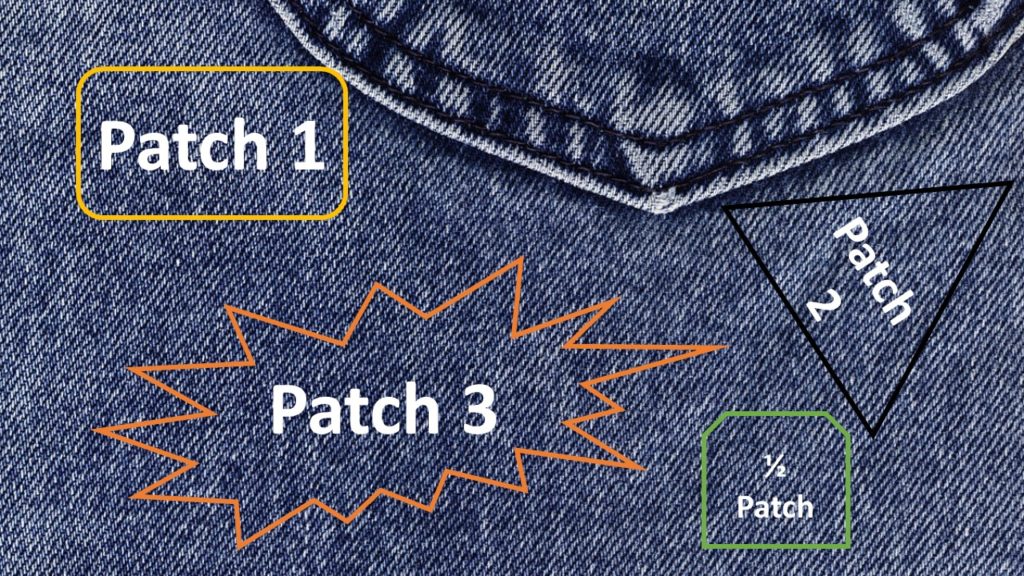
Preparing the Patch
Make a patch out of left-over denim you have in your stash.
Denim comes in all different shades of blue and many different colors as well. Try to find a patch that matches as closely as possible – sometimes the ‘inside’ color of a patch will match the ‘outside’ of the jeans’ color best.
Make the patch big enough to cover the worn part around the hole, not just the hole itself.
If you just make it to cover the existing tear, you will have those same jeans to mend in just a short while with a new tear beside the patch you just put on.
Cut your patch to fit the area it needs to cover – it doesn’t have to be perfectly square.
I just do this free-hand, and then I edge finish it with matching thread all around the outside.
Preparing the Tear
Trim away any frays or white shreds of thread over the tear.
These just draw attention to the rotten spot.
Turn your jeans inside out and pin the patch around 2 sides only.
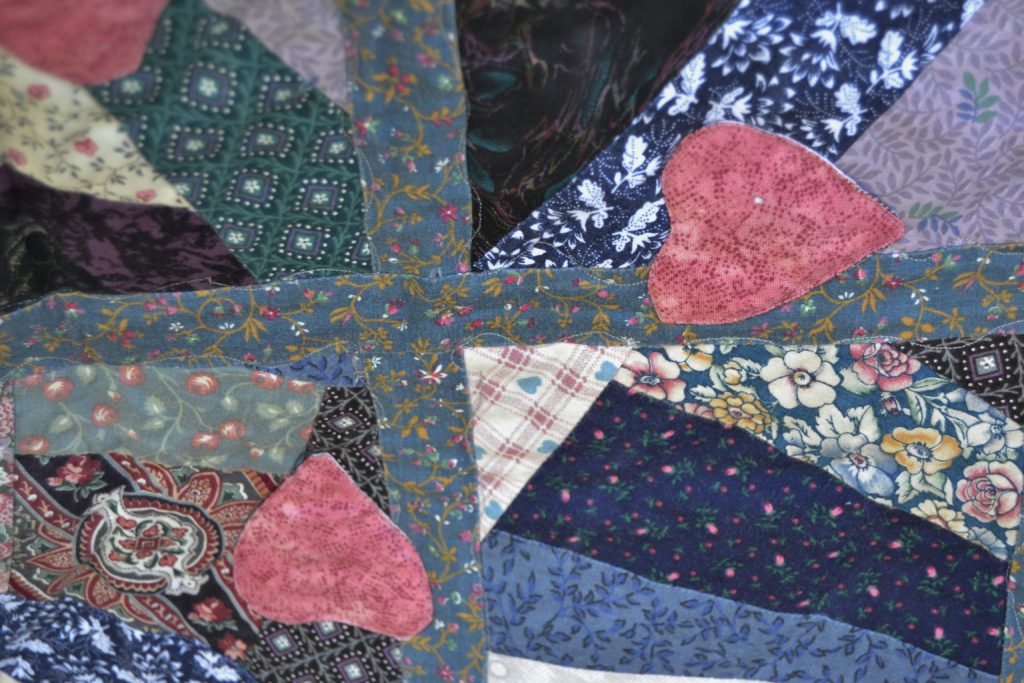
None of these are blue jean patches – but you can see the way patches work, and the different types of fabric that can be useful…
The jeans and the patch will both shift around as you sew and if you pin all 4 sides you will get pleats.
Slide the storage caddy sleeve off of your machine
Doing this will allow you to slide the leg of the jeans over the narrower sleeve so you can sew flat and smooth. This will work for most pant legs and sleeves as well, not just jeans. If the fit is really tight, I will drop the feed dogs so that I can move the fabric more easily. If you find it just too tight and unworkable, sew your patch on by hand using a whip-stitch.
Mending the Hole
Carefully sew a straight stitch all around your patch.
Make sure you have matching thread top and bottom for this part, if it’s close enough you may not even be able to see it once everything’s right side on and being worn.
Double-sew back from the front.
Turn your jeans right-side-out and using a narrow zig-zag stitch around the edge of the tear so that it won’t fray any further. Done!
If you can’t hide the patch – at all – start thinking of the denim like a blank canvas and get creative.
Sometimes I would make fancy patches for the girls’ jeans like hearts, stars or bunny shapes. These patches I would make out of bright, obvious colors and sew over the holes on the outside of their jeans so that everyone could see them.
A Few Extra Ways to Use Denim Patches
If your kids wear house slippers in the winter, chances are that the bottoms will wear through long before they will outgrow them. To extend their life, cut a piece of denim to fit, edge finish it, and sew it to the bottom of the slipper. When that wears through, layer on another patch. I have sometimes put 3 patches onto the bottoms as slippers as the kids passed them down to each other.
Sometimes the buttons on jeans are not sewn down well and will rip out, leaving a large hole behind. Make yourself a patch that fits over the hole and sew it down on the inside of the waist band and then sew the button back on. You have to give that button something solid to hold it so I make this a 2 layered patch.
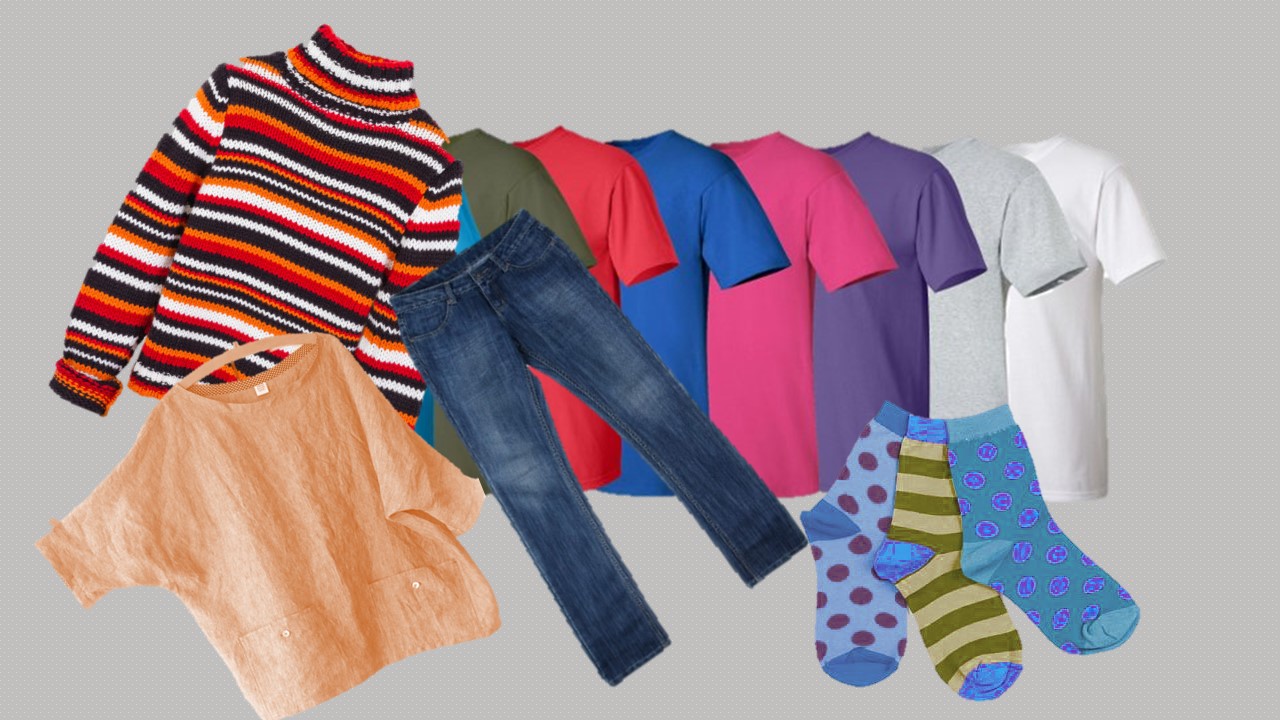
How to Mend Underarm & Side Seams
The most common kind of “tear” that you’ll get in shirts and blouses aren’t tears at all. If the seams haven’t been sewn deep enough, or they get too much rough tear, sometimes the stitches in the seams will pop, and a hole will open.
These are my very favorite things to mend because they are so easy and quick to do and they’re invisible!
If a blouse or t-shirt has opened up along an underarm or side seam, simply align the seams again, zig-zag or serge over the hole extending the stitching ½” past each end and you’re done. If, when you turn the garment right-side-out the seam has a dip or bubble in it, turn it back to the inside and sew a straight stitch along the inside edge of the serge stitch.
This will even out any of those puckers.
If the hole or seam that needs mending is in a sweater do this by hand. If you whip-stitch across the entire hole from the inside and gently draw it tight as you go it will be invisible from the outside.
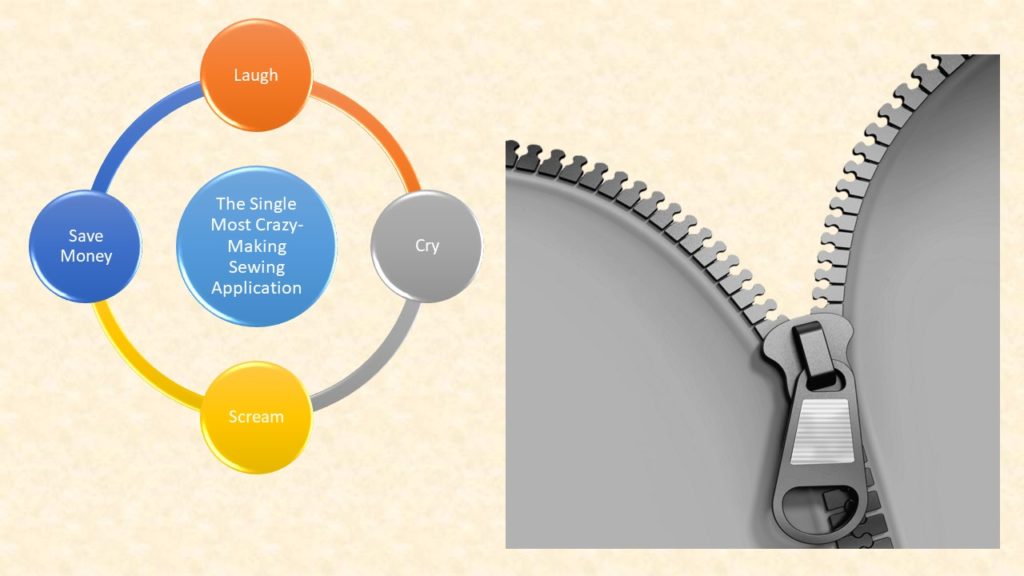
How to Mend the Devil’s Spawn – Zippers
Zippers are the items we hate to replace because they take the longest and are the most intimidating. It’s an illusion! They’re not really that hard once you learn how, but they do take time and care – and if you’re like me the tedious work is annoying – so make sure that the garment is worth it before you start.
Only use jeans zippers for jeans.
They are much heavier and much more durable than the regular zippers.
Try to use the same length zipper as the old one.
If zippers are too long, you can cut off the excess after you sew them in, but jeans zippers are so heavy that they will ruin your scissors if you try this.
Look carefully at how and where the zipper is sewn in – different manufacturer do it differently.
Carefully use a seam ripper to pull out only one side of the old zipper.
Remove all old threads and then pin the new zipper into place on that side.
Use a zipper foot to baste in this first side.
Now, tear out the second side and baste that side in.
When you’re satisfied with the way it looks and fits, sew it down for good. I always like to do this twice because zippers get a lot of use and wear and tear. You’re done!
How to Mend Missing Buttons
If you have the old button all you need to do is thread your hand sewing needle with matching thread and sew it back on. So I’ve trained my family to save all buttons and beads that fall off of clothes.
If you don’t save the garment, or if you don’t have the matching button, you’ll likely be able to match a button from the ones you’ve salvaged over the years.
If you can’t find one semi-identical, find one in the same color and shape category. If the missing button is anywhere from the neck to bellybutton area, then a different button will be extremely obvious. So remove the lowest button on the garment, sew it into the missing slot, and sew the not quite matching one into the lower spot.
No one will ever notice!
I find it a lot faster to do buttons by hand than fooling around taking the old foot off my machine, putting on the button sewing on foot, getting the spacing right, etc. Much simpler and faster to do it the old fashioned way!
I like to double my thread when I sew on buttons because it doubles the strength and halves the time it takes.
Sew through the button holes at least 8 times and then wiggle it. If it’s tight then slide your needle carefully through one of the holes but not through the fabric. Wrap your thread around the bottom of the button at least 3 times before pushing your needle through the fabric to the back.
Wrapping the thread around the underside of the button is the magic trick here – my Mom taught me that neat trick.
On the back slide the needle through the first layer of fabric and then pull the needle twice through the loop before gently pulling it tight. This gives you a double knot. I always do this twice to make sure my knots never come undone, and I can’t think of one instance when one of my buttons have come off.
Today I’d like to take a quick break from our regularly scheduled program and show you how you can make your sewing machine pay for itself hundreds of times over with a few simple mending techniques. Because I’m such a genius and so incredibly quick on the uptake (check it out, I’m winking), it didn’t take me any time at all after I married Michael to realize that I was going to have to learn to mend – and to do it well.
Practical Ways to Save Money with Your Sewing Machine– Mending Techniques Edition
At the time Michael was ranching; consequently he came into frequent contact with objects that were hard, unyielding and sharp. And since Michael is 6’6” tall, it was also incredibly difficult (at that time) to find clothes to fit him. It was either learn to mend or spend thousands of dollars on clothes for him alone.
And once the kids showed up – anyone with children knows that they are ground zero for holes and tears – the ability to mend became even more urgent. Over the years I learned numerous tips and tricks that’ll help stretch your clothing budget farther than the most elastic bungee cord.
Mending Tips
Using these tips will help you make your sewing machine pay for itself, many times over.
Use matching thread when you mend anything!
This one thing alone will make approximately 90% of your mending disappear into the woodwork and people will never see it. I used to be too tired, lazy etc. to do this, thinking that it wouldn’t matter and then forever after it’d scream ‘bad mending job!!!’
So I finally decided to take the extra time and effort to change my thread as often as needed to keep my mending ‘mostly’ invisible.
This is easy to do if you already quilt and have a nice stash of thread available to you. It’s amazing that 99% of the time I have the exact color and shade I need. If you don’t have a large stash of thread colors, try to get a good denim and the primary colors covered.
Mend from the inside.
If you want to mend invisibly then you have to do it from the inside of a garment. It’s much harder to see a single line of stitching around a patch on a pair of jeans when the patch is in the inside of the garment than it is to see the entire patch if you sew it onto the outside of the jeans – especially if you’re using matching thread.
If you’re putting a patch on anywhere – inside or out – edge finish it first.
This mending technique corrals all the frays and makes the patch look much more professional, like you actually planned to put that patch just there all along. Also, if the patch is on the inside the frays won’t tickle you to death.
Use the right size needle when you mend.
If you use the most common size needle – size 14 – to try to mend a chiffon or silk garment you will get big holes everywhere and the garment will get caught up in the feed dogs by the too heavy needle. If you use a size 14 needle when you’re mending jeans, your needle will break. So stock the entire spectrum of needle sizes and change them around as needed.
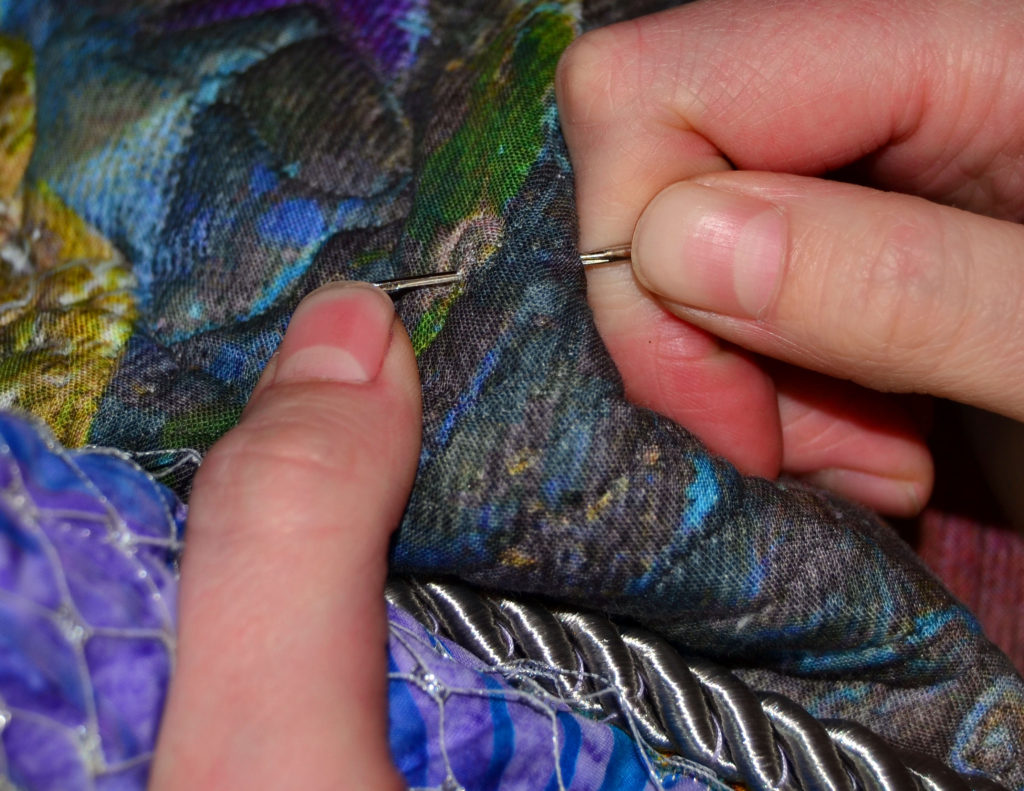
Don’t shy away from hand mending.
There are a lot of instances where mending by hand is not only the most invisible choice, but there are places where even a sewing machine cannot easily go. Just like sewing machine needles, you will need a variety of different sizes, so invest in a multiple-sized pack.
Remember the old adage – a stitch in time saves nine.
This is as true today as when the phrase was coined. As soon as you notice a hole anywhere, a missing button, a catching zipper, etc. train yourself and your family to put that garment straight onto the mending pile.
Even if it takes you awhile to get to your mending, at least the damage will not be getting any worse.
Save up your mending until there are at least 3 things in your pile.
Then, when the mending mood strikes you will have a few things to work on. I get really frustrated if I have to fix one thing every time before I can start on my quilting project, which is what I really want to do.
Consider who you are mending a garment for.
If it’s for Michael I will go to great lengths to fix something because, like I said, it’s hard finding clothes for him and the cost is quite high. If it’s a t-shirt for a 2 year old, depending on how bad it is, I might just chuck it because they’ll outgrow it in no time and you can replace it from the thrift store for 75 cents.
I don’t know about you, but I’m worth more than 75 cents/hour.
Consider fabric glue as a mending medium.
Not everything needs to be sewn. Suzanna has a favorite skirt that’s in perfect shape. It’s the chiffon overskirt that’s developing a few holes and since it’s such light fabric as well as almost sheer any stitching will glare out. So I glued the holes! The glue dries invisibly and Bob’s your uncle! So give that option a think.
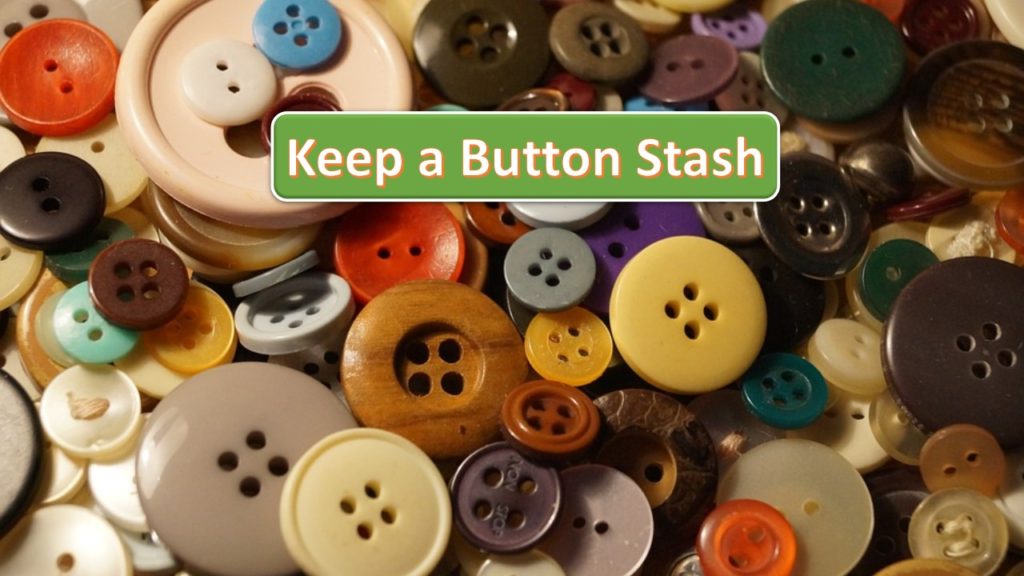
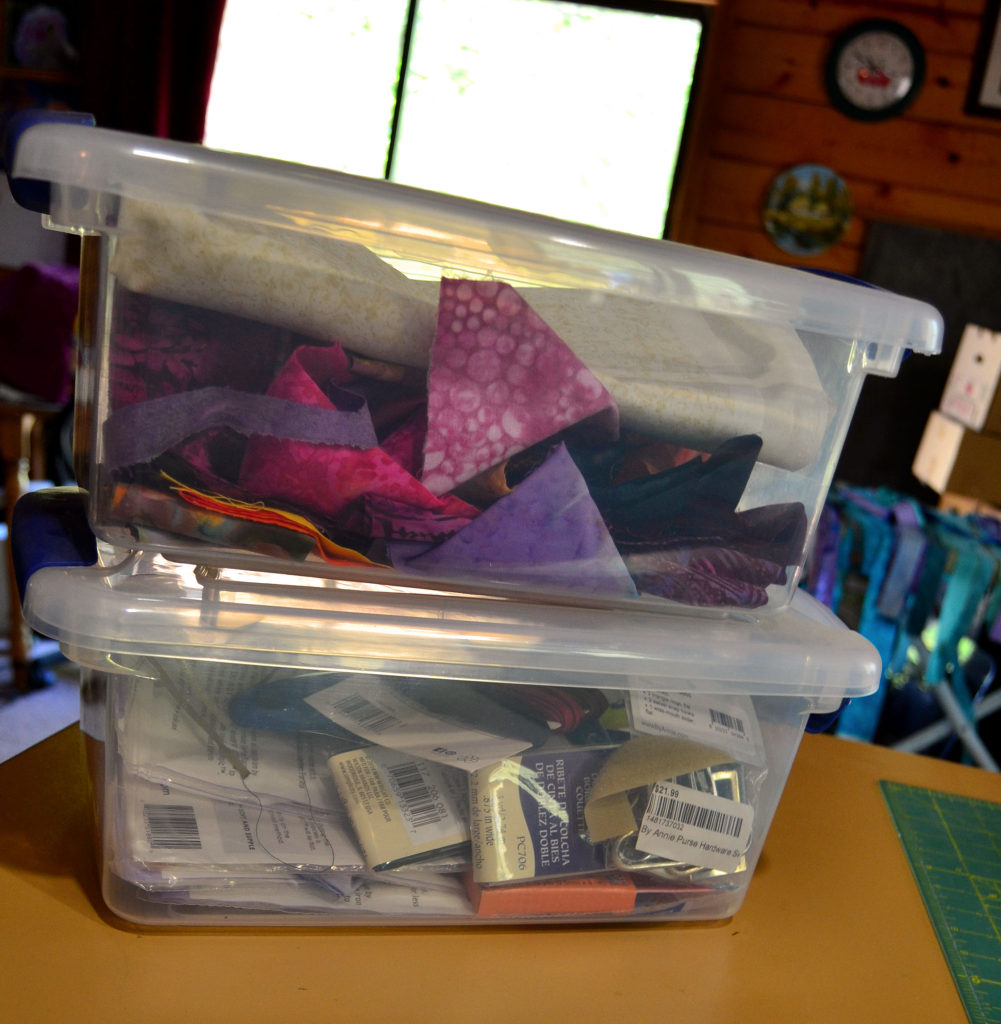
Keep a mending stash.
By this I mean anything that’ll help make mending work better and faster:
A button box
An extra zipper container
Zippers cut out of old jackets
Still good pieces you cut out of otherwise worn out jeans
Old t-shirts
Curtains that are too faded to use (but the fabric’s still good, so why not use it to mend holes in shirts?)
I use all of these things to mend other stuff – no need to waste perfectly good mending materials. The basic mending technique to use in building your mending stash is the basic Salvagers Mindset.
Whenever you’re going to throw out any garment, go over it and cut out anything you think you might could use to mend something else.
I make patches for jeans from the let-over pant legs of old jeans, I cut out any good zippers and rip off all buttons, trim, etc. before I throw anything away. So, whenever I need a patch, I usually have what I need in my stash.
It will save you from my #1 big mistake.
Suzanna needed a new zipper in her green skirt and search as I might, I could not find a matching colored zipper in any store anywhere! So, finally I ordered one off the internet and when it came, not only was it the wrong color (lime green sludge) but I got 50 of them!!! I ended up using a beige zipper I already had.
Building Your Mending Stash Saves $$$
While you’re doing that, keep tuned for the next article, where I’ll share more hands-on mending techniques on various tricky garments, like jeans!
To the greater good of your quiltivity,
Karyl (aka Princess YellowBelly)
P.S. When Mending Techniques Become Quilting Aids
Oftentimes as my quilting has grown to consume 85-90% of my sewing life I’ve found that many of the things I save for mending are also useful and usable in fabric art quilt projects.
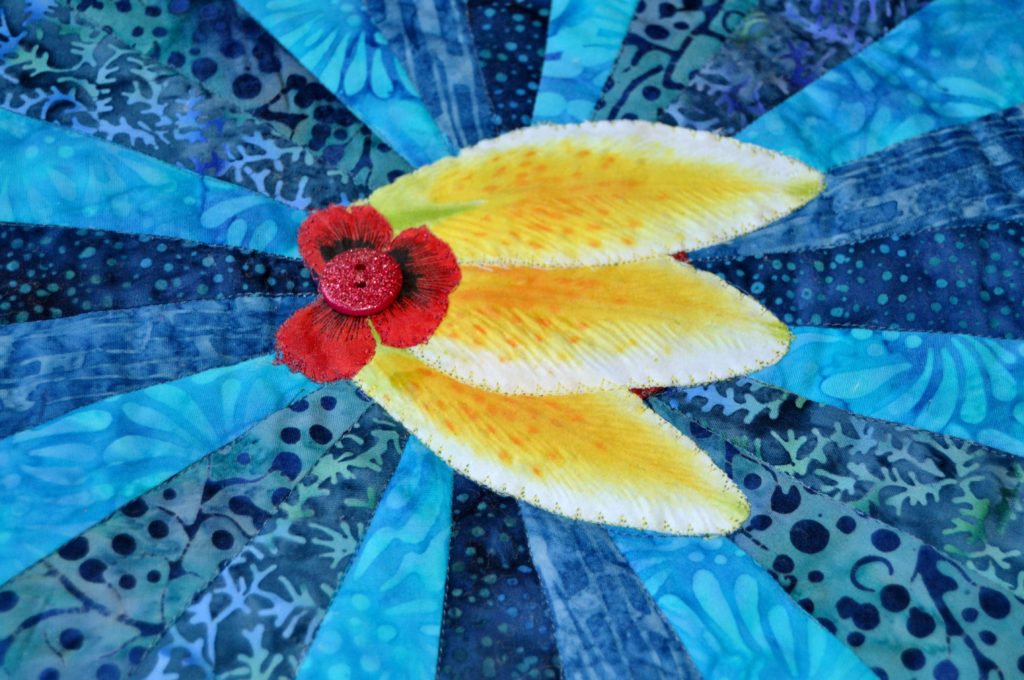
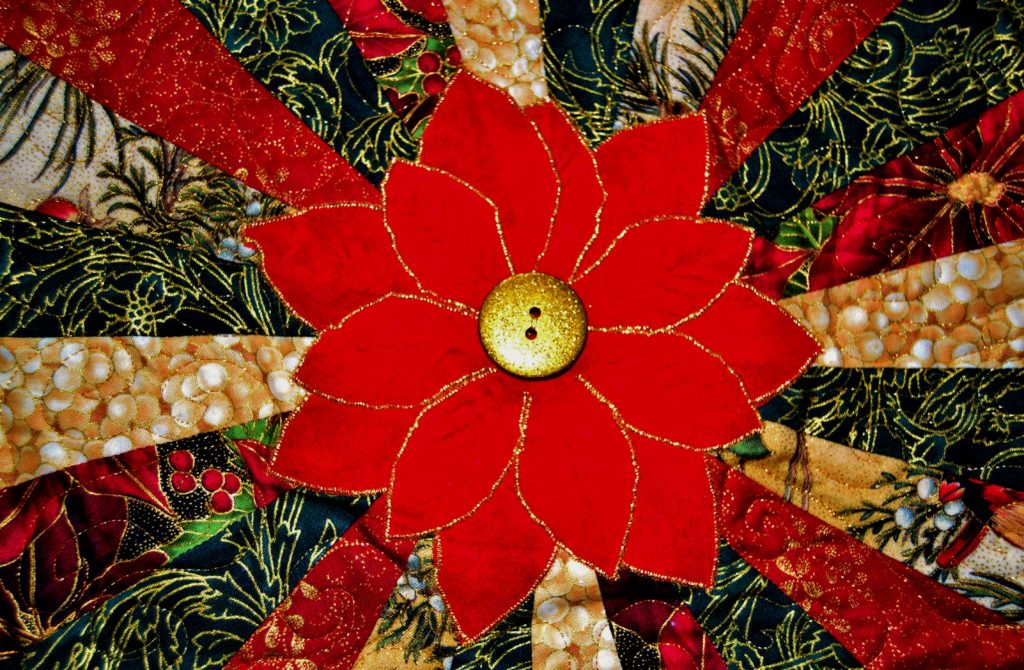
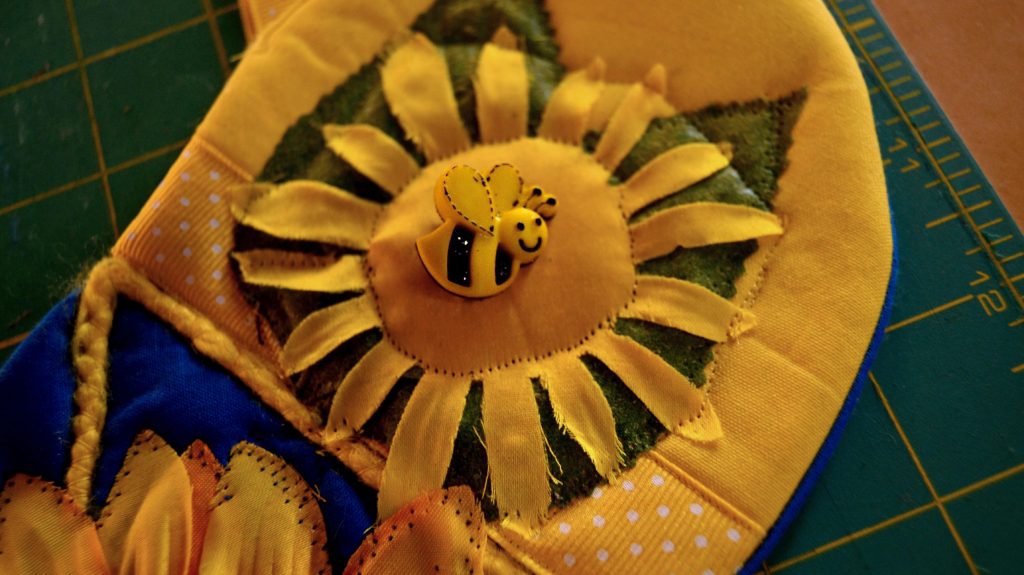
Buttons
Beads
Bows
Trim
Jean patches
And flowery materials
Are all remarkably useful in making quilts just a little bit more special. The only thing I haven’t been able to cross-purpose so far are zippers (the devil’s spawn!) and you never know…
It’s December – again! How’d that happen? We’ve got to start baking, stringing bright lights, and decorating. Of course, that brings up a good question; “how to decorate for Christmas?” We’ve all be decorating for Christmas for years, and sometimes it can feel a little like we’re doing the same things over and over again.
We want to be able to keep Christmas bright and fresh for our families, so we can keep creating those warm connections with everyone – but how many yards of tinsel can you string?
Well, allow me to suggest a new way to decorate for Christmas with quilts!
Why Christmas Decorations Mean So Much
At first glance Christmas decorations don’t seem like such a much. After all, the real meaning of Christmas isn’t about trees and tinsel.
On a deeper level decorations are very important, however, because they help keep the spirit and magic of Christmas alive.
Warmth, Memory, Tradition
Bright lights
Sparkly tinsel
Big trees
And wrapped presents
Are all a part of the glorious golden dream that we keep in hearts year-to-year. The two things that makes Christmas so special to so many are the emotions and the memories.
This is why we have traditions – for the memories that they produce. Good feelings in the moment make for good memories lead to lasting good emotions. We all use traditions to produce this one/two punch because in the end:
‘Good memories are all that matters!’
Think about the memories you have of Christmases growing up and which ones brought you joy. They are invariably the ones that make you feel at home; where you are cozy, safe and happy.
This eternal home is the place we want to create for our friends and loved ones.
The Norman Rockwell Argument to Decorate for Christmas with Quilts
NOTHING says love, home and warmth like a quilted something. A full bed quilt, a wall hanging, a pot holder, really anything that’s been quilted carries with it a feeling of being homemade, of having been crafted with love.
It instantly throws people here in North America straight back into a Norman Rockwell painting.
Norman Rockwell was so popular because he painted the magic and longing for love and home into his works of art (never mind that the reality was quite different) and you can achieve the same effect with your quilted creations.
Young children especially long for the magic, mystery and warmth that Christmas should bring and the good news is that you don’t have to spend a great deal of time or money to achieve this.
While presents are exciting in the moment, children will quickly forget what they got for Christmas. What seeps into their hearts and bones is the emotions and love that come with it. If you have ever watched that greatest of Christmas movies ‘A Christmas Story’ you will know what I mean.
When Less Is More
However, most of us don’t have the time and resources to do wall-to-wall decorating like you see in those Hallmark Christmas movies.
And really, in some ways that kind of decorating – while visually pleasing – is kind of cold. It’s so perfect it’s unbelievable, and it doesn’t spark the same feelings of warmth that you get from Grandma’s hand-crocheted tea cozies.
So, less can and often is more. You can do a lot with a single tree and a few well-chosen and beautiful smaller pieces that are a part of your family tradition, or tie into your tradition in some way.
With homemade Christmas panels and decorations this is very easy to achieve.
6 Easy Ways to Use Quilted Items to Decorate for Christmas
I always like to do things as quickly and simply as possible. So I have for you here my top six tips for using quilted items to help bring the magic of Christmas right into your home.
#1 – Start with a wall that is a focal point in your house.
At my place, it’s one of my dining room walls. Here I hang my favorite large piece of Christmassy fabric art that I have. Sometimes it’s a panel, sometimes a lap quilt, sometimes a large quilt.
It draws all eyes and the fact that the piece is Christmas themed instantly kicks the Norman Rockwell response into effect.
#2 – Use as many Christmas pieces as possible in the main areas.
If you have more than one Christmas themed item, find similar places around the living areas of your house to display them.
I ignore all private areas such as bedrooms and offices, because who ever looks in there anyway.
#3 – Don’t overlook the small stuff.
Remember that your Christmas fabric art pieces can range from the very small – such as potholders – to the largest of quilts, and that a little goes a long way.
Some years I put out a lot of stuff, some years I only put out the staples, but I always try to make sure that there’s at least one bright spot of Christmas color in every main area of the house. No one’s ever complained!
#4 – Light it up!
I love Christmas lights!!! (It’s entirely possible that I love the lights more than the quilts, but we’ll leave it as a rumor).
Rather than have it look as though Christmas vomited in your house, maximize the homey and cozy effect of your fabric art pieces by adding lights around them. They instantly bring warmth and magic to your home. Use them judiciously – you don’t want to overwhelm and blind people with them, but do use them.
#5 – Always remember that the personal connection is vastly more important that technical perfection when it comes to making good memories.
Make great memories by having your children help you make Christmas decorations that will last, such as placemats, candle holders, fabric wreaths, etc.
You can purchase the wire wreaths at any craft store such as Michael’s, Hobby Lobby, or Joann’s. Then all you have to do is cut strips of Christmassy fabric 6”long by 1½” wide and double-knot each strip around the wire rims. It’s easy, quick, and looks fabulous and will live in your family’s hearts much longer than a store-bought wreath.
For years I bought Christmas ornament kits from Herrschners and the kids and I would spend hours constructing them. All these years later, they are still the favorite ornaments on our tree.
You can also make some of the easier kits and patterns in our store in a Christmas style with kids, or make the more advanced level ones as gifts – so be sure to check it out!
#6 – Think outside the normal “usage” box
Put placemats, potholders and table runners in places and on surfaces where they don’t usually go. This makes people look twice, gives you a lot more scope for the imagination, and gives you much more land for showcasing your talent; and let’s be frank here, which one of us doesn’t enjoy being admired for our talent and creativity!
Enjoy!
Using your own works of fabric art to decorate for the holidays will not only make your home unique and memorable, but it will bring those elusive positive emotions of joy, warmth, safety, and magic with it.
All the best to you and yours this holiday season!
Karyl (aka Princess YellowBelly)
P.S.
If you’d like to share pictures of how you decorate for Christmas with us you can do so privately by emailing me directly – or share publicly on our Facebook page.
And don’t forget to subscribe – FREE – to our fortnightly newsletter so you can stay up-to-date with all the latest news, tips, pictures, and products.
Almost all quilters – myself included – advise that you name your newly finished quilt with a nametag; today we’re going to talk about why we name and claim our fabric masterpieces, and more practically, how to name a quilt.
The second best part of giving birth is that you get to name that tiny scrap of humanity anything you want. Why do you have that privilege? Because you produced him/her! Giving everything a name was the 1st job that God assigned to Adam in the Garden of Eden so, to my way of thinking, naming something is a right, a privilege, and the honor of it naturally goes to the person who produced “it.”
The same is true of anything you produce during your times of quilivity.
The Power of a Name
Anything that you sew becomes yours, you are the creator – therefore – you are the namer. And, once you name something you are actually claiming it. Just the fact of the naming implies the act of claiming.
The wonderful thing about naming something is that it gives you all the power.
Not only does the thing that is named have to abide by your decision but so does everyone else!! It doesn’t matter what anyone else thinks about the name you bestow on your creation, you alone have all the power in this equation, so use it to the best effect. Below are a few ways that you can creatively name your creations.
The most beautiful nametags are often the ones that break the rules
How to Name a Quilt with Pre-Printed Tags
You can purchase pre-printed tags where all you have to do is fill in the blanks. I’ve seen a few of these available in quilting catalogs, and they seem like a good way to get the job done very quickly, but to my mind there are a number of difficulties as well.
Grain of Salt Advisory – I’ve never used a pre-printed tag, so these thoughts are based on opinions and guesswork, not lived experience.
Problems with Pre-Printed Nametags
What if the name of your project doesn’t fit on their lines?
You will have to make your own tag then.
What if there aren’t enough lines?
You will have to make your own tag then.
What if there isn’t enough height between the lines?
You will have to make your own tag then.
What if the style of the tag is all wrong and doesn’t correspond at all to the theme of your project?
You will have to make your own tag then.
How to Name a Quilt by Making Your Own Name Tags
Obviously, sooner or later you are going to have to make your own name tags – by this I mean both the background, fabric size, shape, and edging of the tag as well as the writing on it.
So you may as well learn how to make them right, learn how to make your letters the way you want them, how to measure and draw lines for all you want to say, and how to attach them to your projects.
How to Come Up with a Name for Your Quilted Masterpiece
While you’re doing all of this you should be trying out different names for your project. Naming something is fun, and so it’s a good idea to get your family involved. Try out a different name every few days – you will know instinctively when you’ve found the right one.
Use Alliteration
Words go very well together when they all start with the same letter and they’re much easier to remember. So, if at all possible, alliterate!
Give Your Creation a Name That Correlates With the Theme of the Project
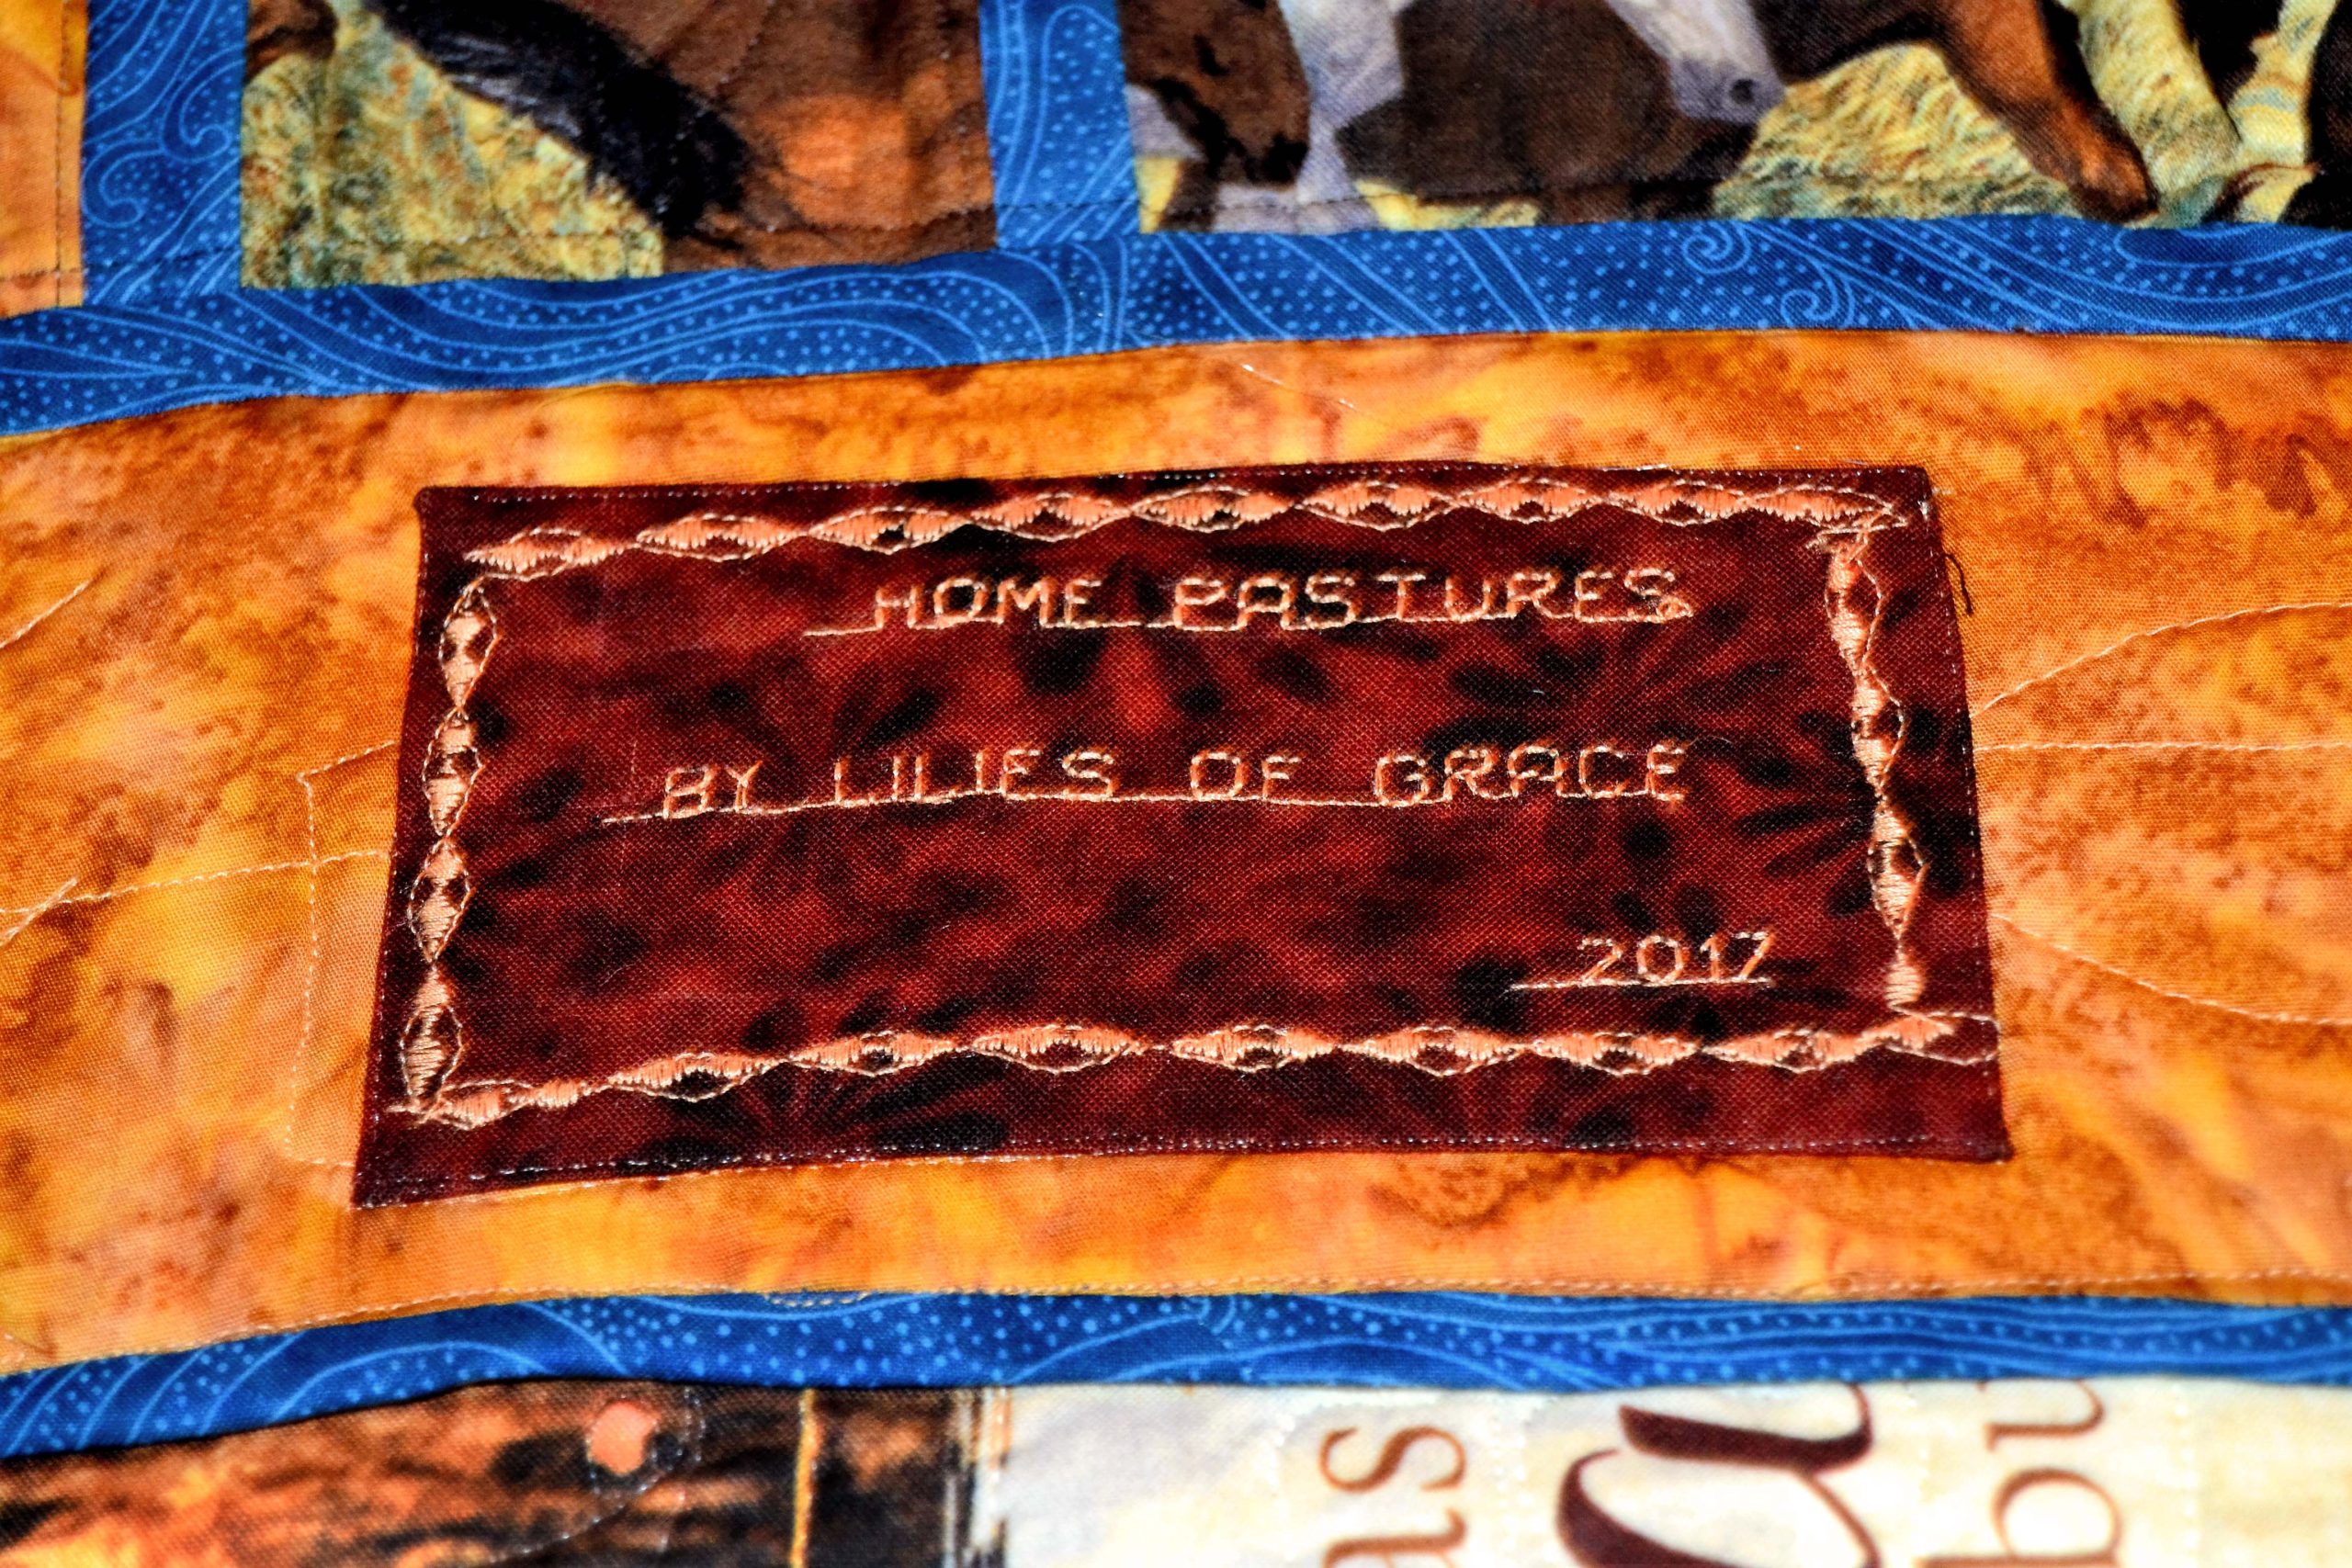
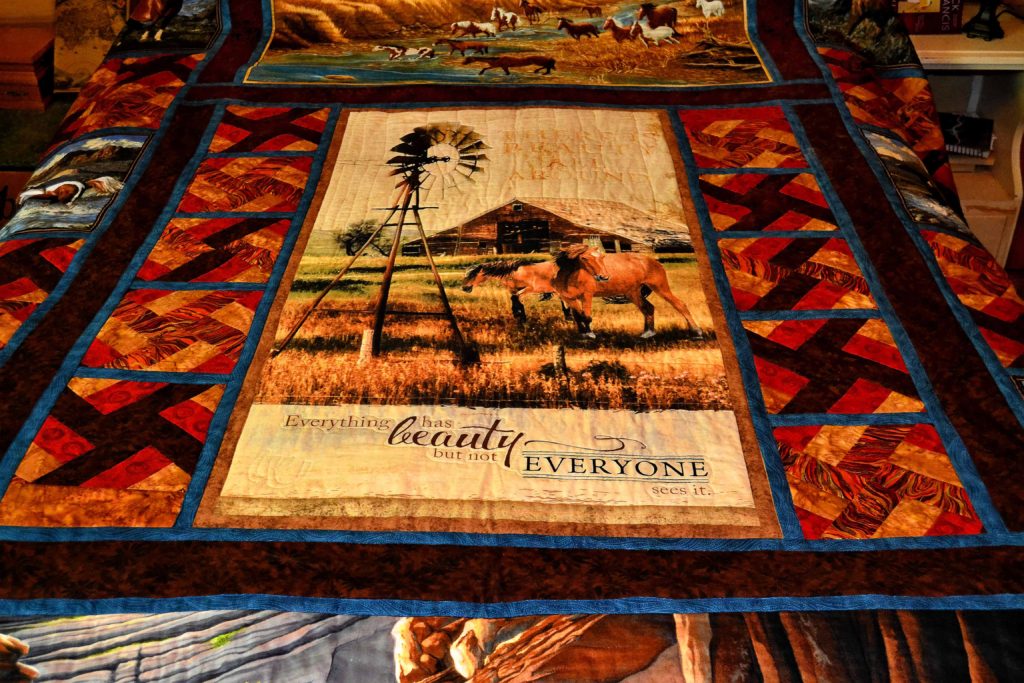
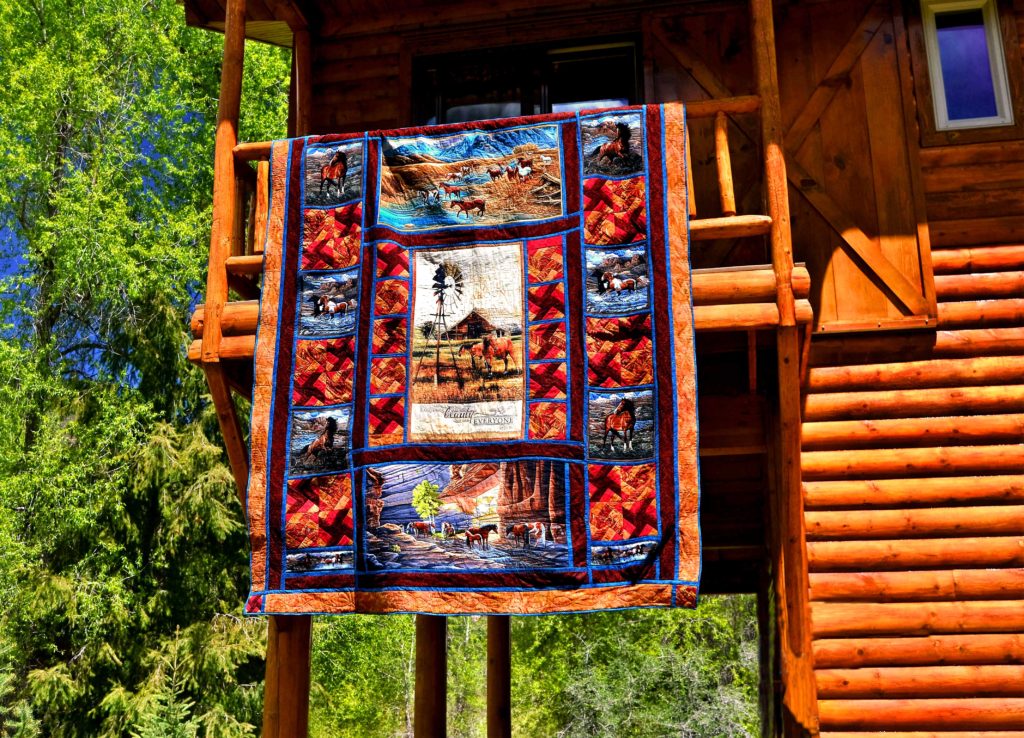
For instance, since our horse quilt had 11 different panels we decided to name it “Home Pastures” because all of the horses were in their separate, home pastures. We named our frog on a lily pad – “My Pad” – because the frog was on the lily pad but also because he has attitude.
So think mostly about what your quilt is saying while you think of a name.
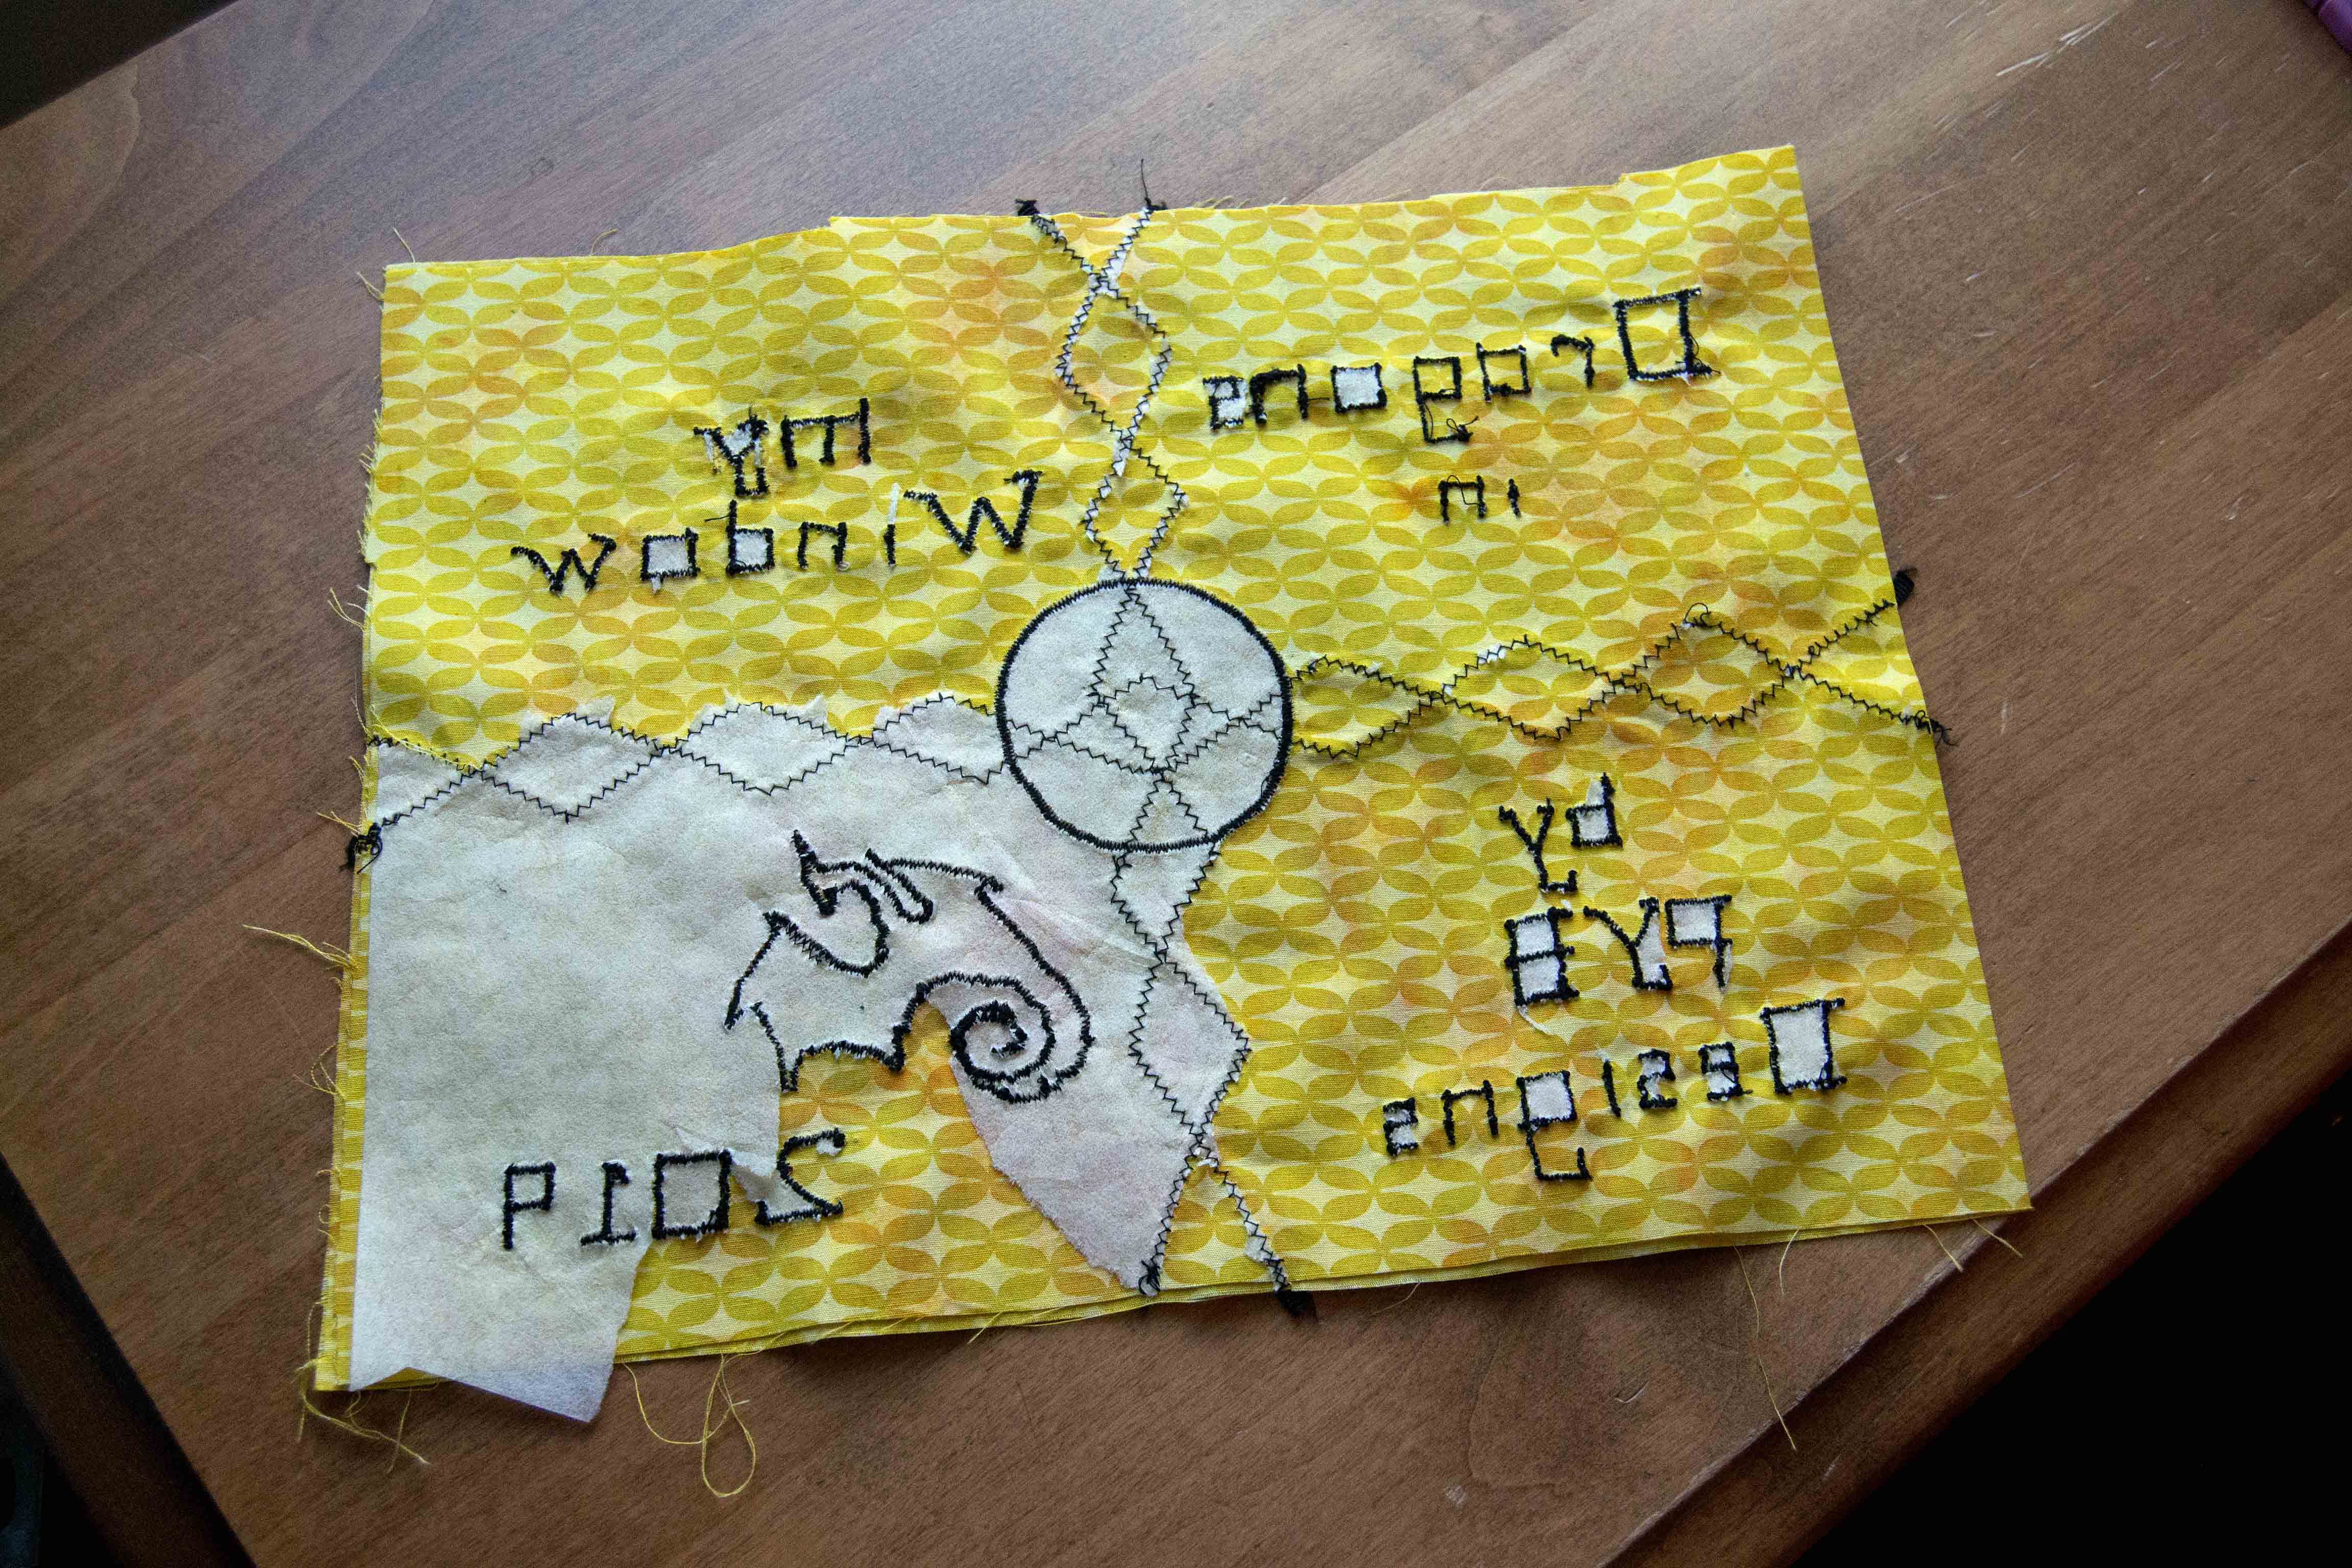
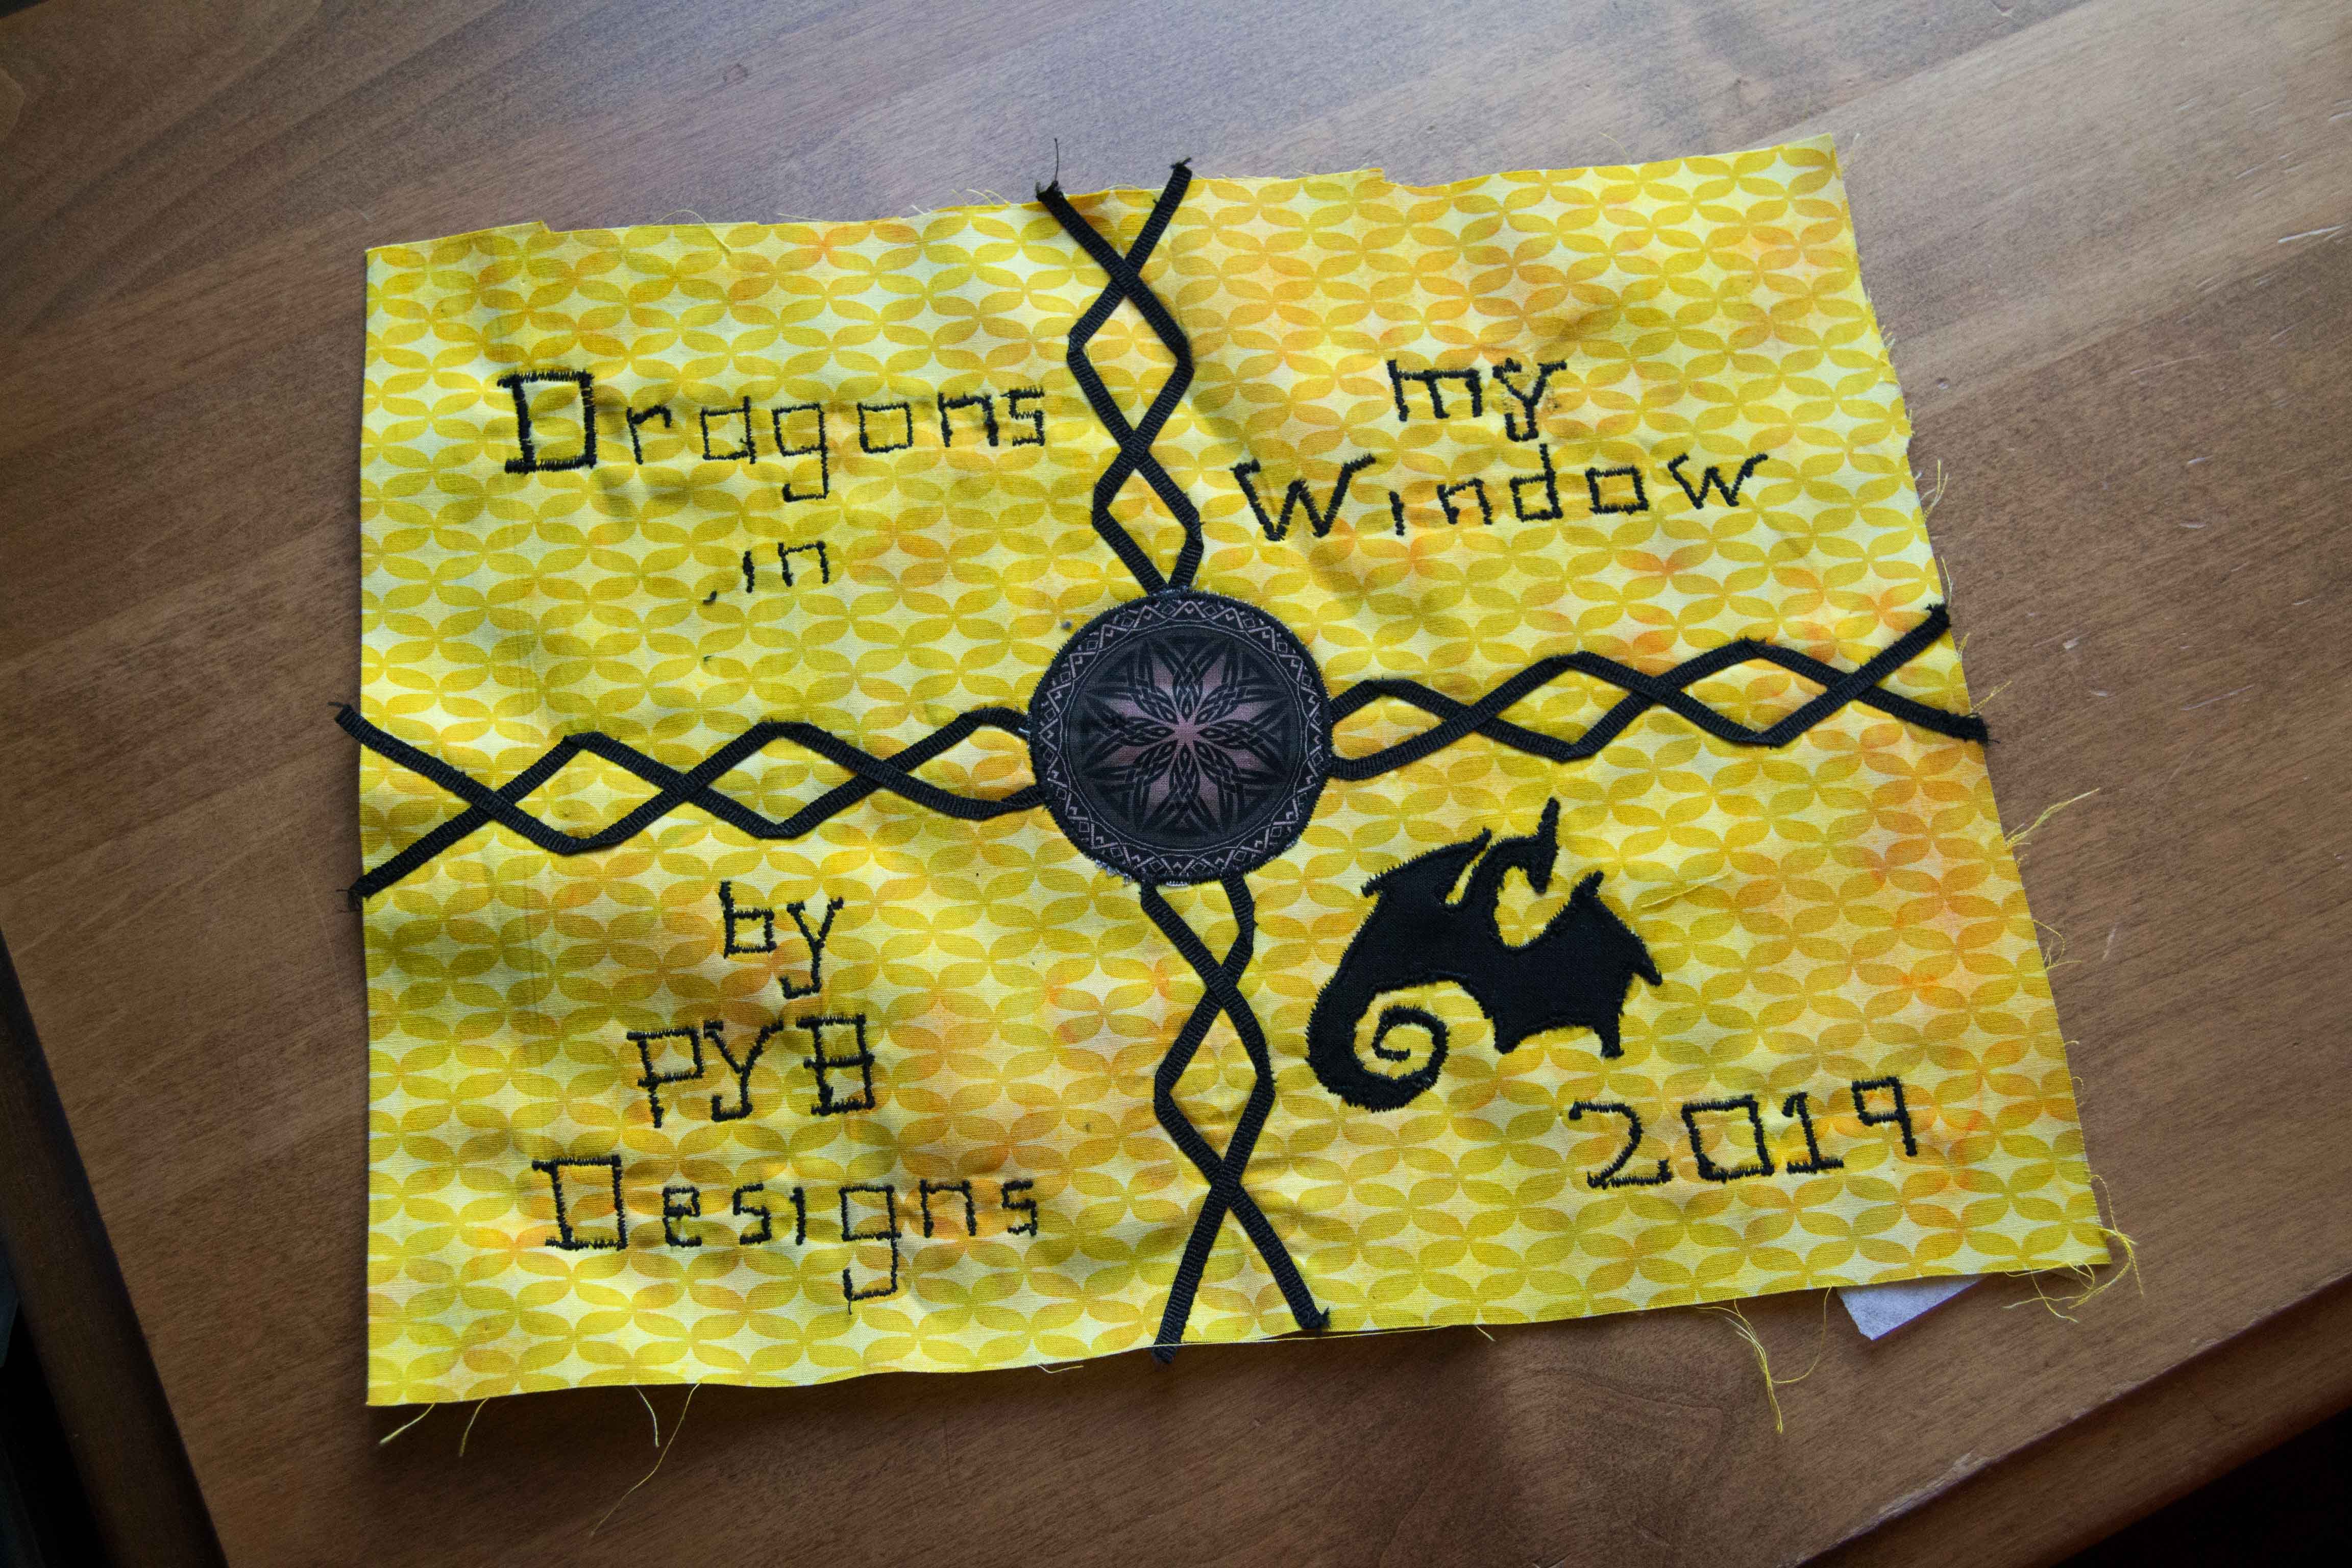
Try to Keep it Short!
The longer your quilt’s name is, the more letters you have to sew. This is not only tedious, but the longer the name, the bigger your tag has to be. The longest name I ever gave to a project was “Dragons in my Window” and the darn thing took me all morning to sew onto a tag! Brevity is the password here!
Make it Personal
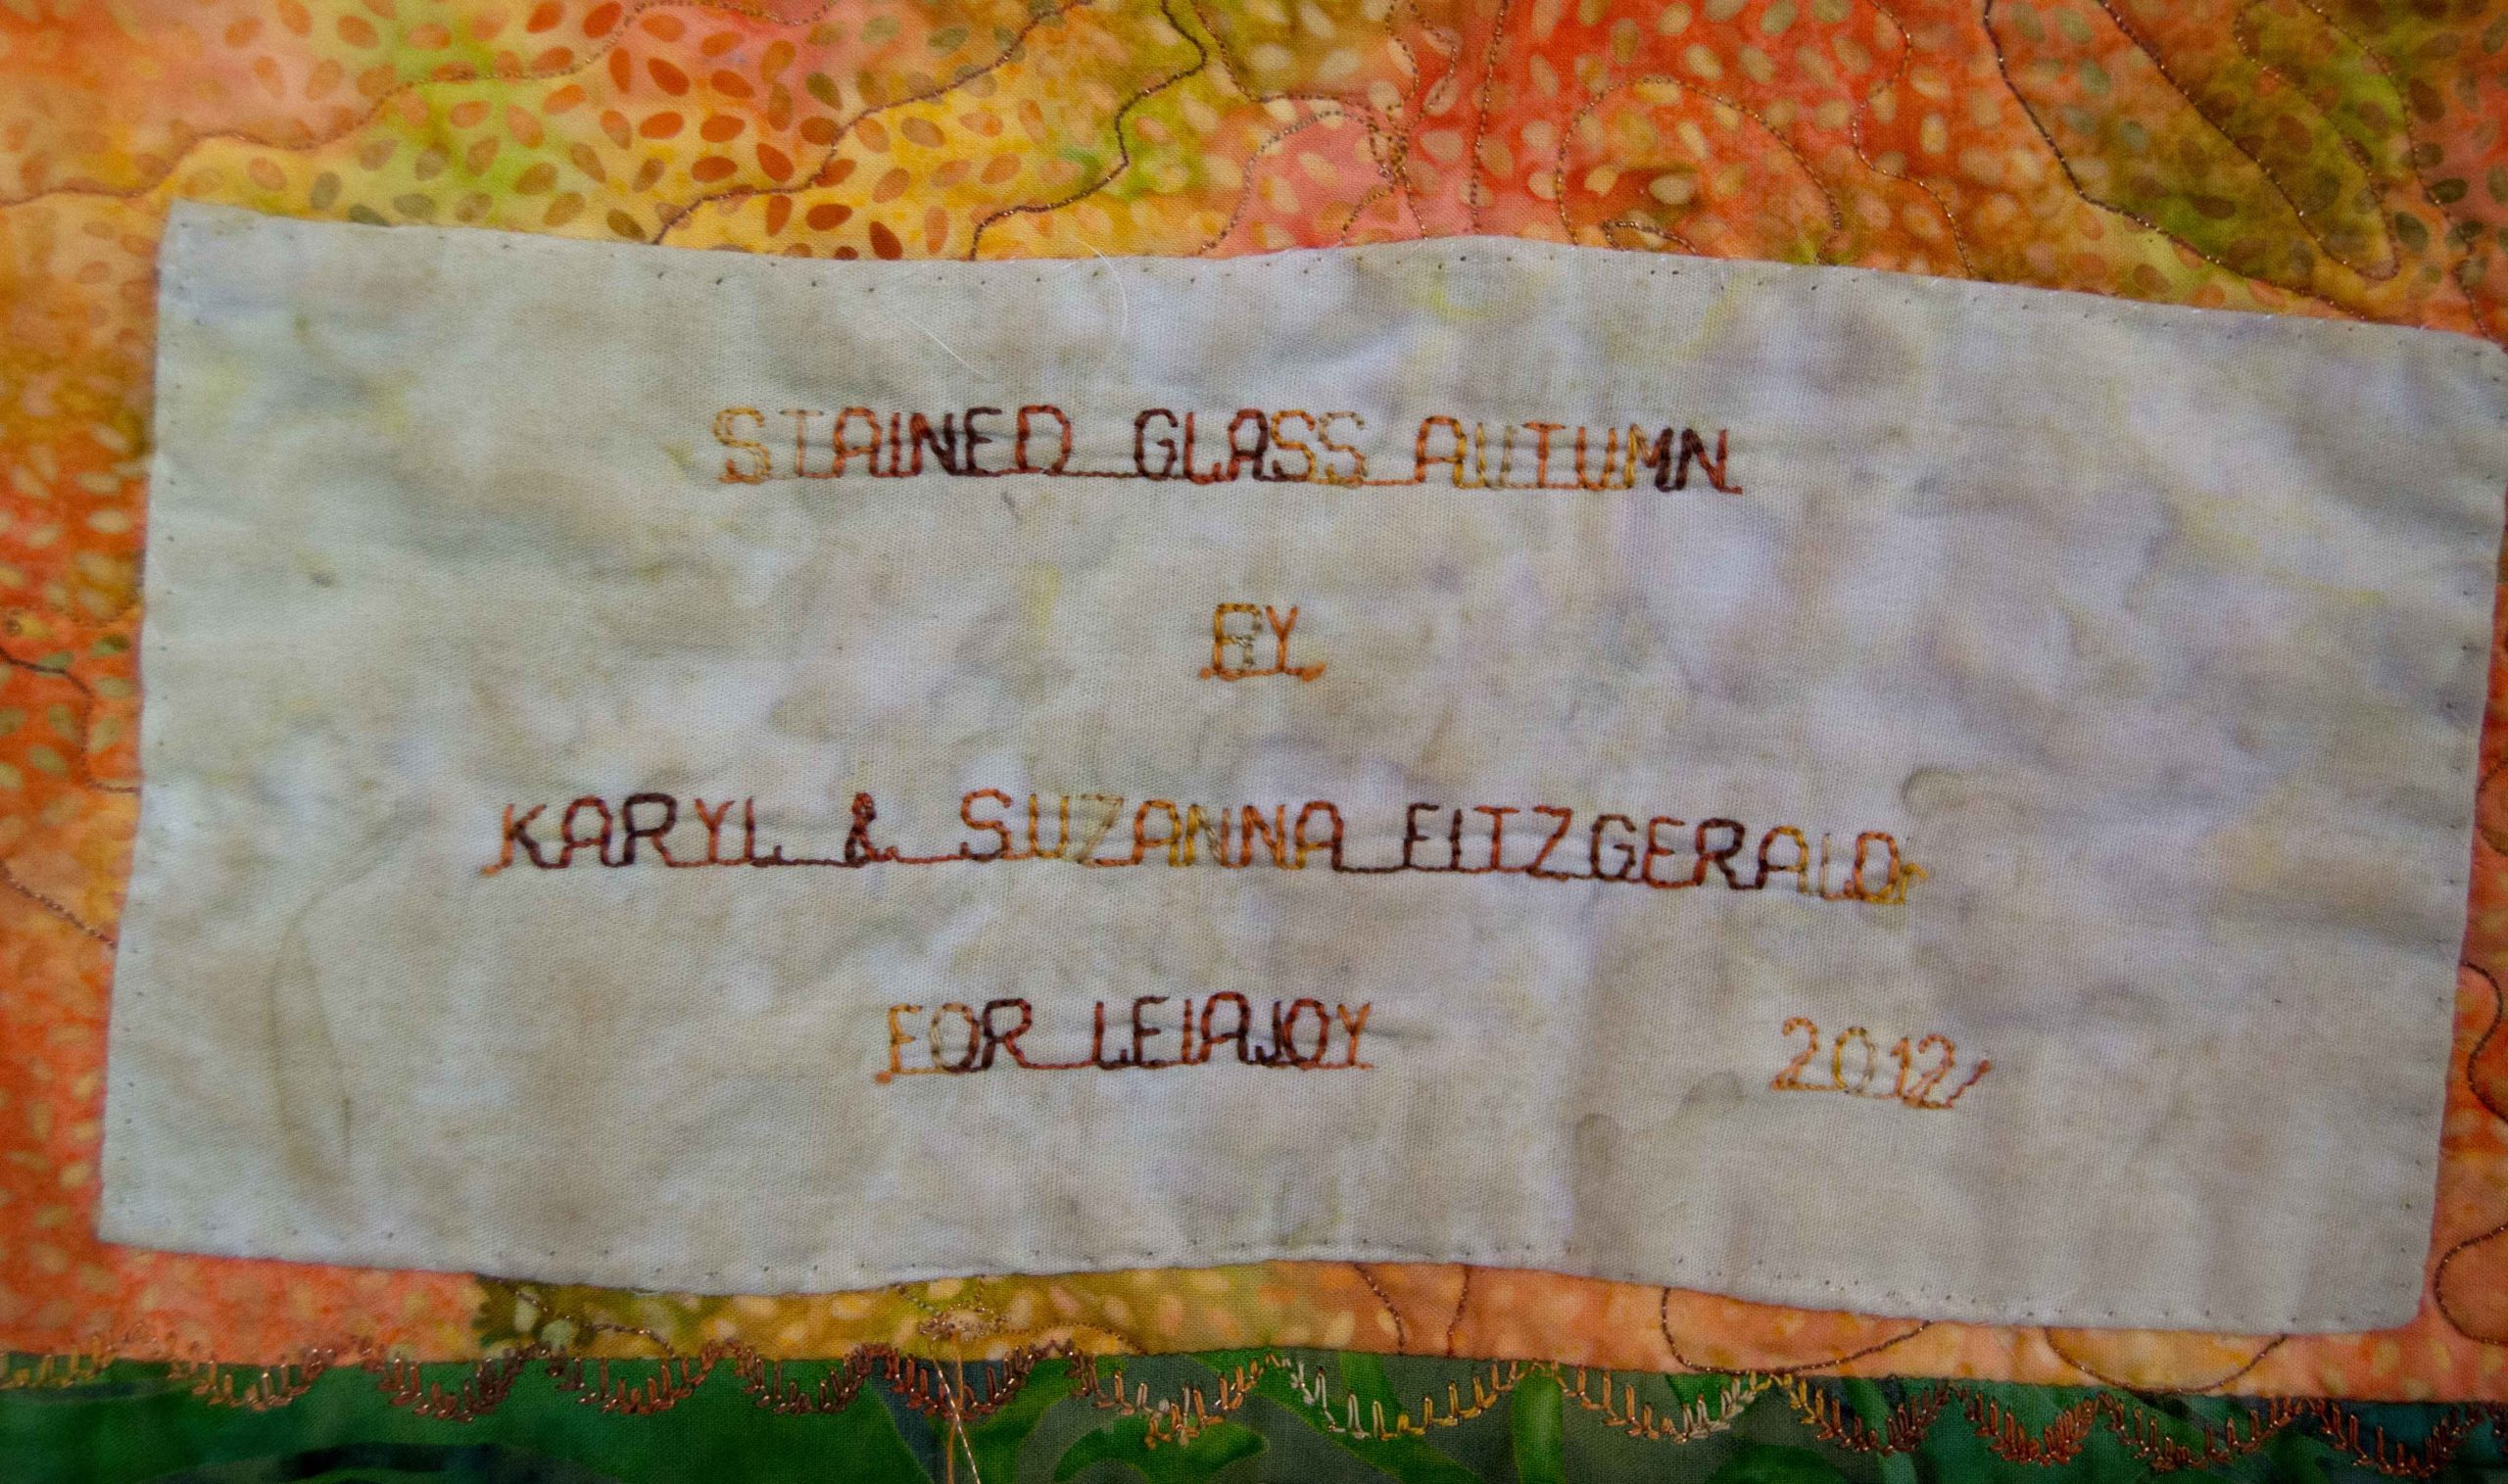
If your project is for a specific person it’s great if you can incorporate their name into the name of your project. I once made a rose quilt for a girl named Cassidy Rose, and guess what I named it – “The Cassidy Rose!”
The fact that I named it after her almost thrilled her more than the quilt itself. Be creative. I named the Sunbonnet Sue quilt I made for my oldest daughter the “Sunbonnet Suzanna” and she treasures it.
How to Make a Name Tag
Once you’ve settled on a name for your project, you can start thinking about what you want the tag to look like.
This includes not only the shape of the tag, but also:
The color of the background fabric
The color of the thread for the letters
The shape of the letters themselves,
How you’re going to construct the tag
And how you’re going to sew it onto your finished project
Since I don’t usually make my tags until the project is completely done, I have a lot of time to think and all of this thinking usually produces a clear picture in my brain of the name tag by the time I’m ready for it.
How to Name a Quilt by the “Nuts & Bolts”
Every craft has its “nuts and bolts” elements. A mechanic has literal nuts and bolts. A cabinet maker has wood and glue. A quilter has fabric and thread. And whatever you do, it all comes back to your nuts and bolts.
Making a name tag is back to the fabric and thread, just like everything else.
The first rule of thumb here is that your background fabric should – if at all possible – be a fabric that you used on the front as well. This helps to make the project more cohesive (such a big word!)
But also, on a more practical level, it gives you a chance to use up some of the leftover scraps from your project. The tag is 2 layers of fabric thick, so that you can use one fabric on the back of the tag and a different fabric on the front if you like. Or you can make the front of your tag a crazy block or a patchwork or whatever floats your boat.
You can also make your tag into almost any shape you like – this is where the creative juices can really flow and why homemade tags are so much more fun than store bought ones!
Outside Edge
Once you’ve decided on the background fabric and the design and shape of your tag you need to construct your tag. You can do this in one of 2 ways.
How to Edge Your Quilted Nametag Version #1:
Layer your 2 fabrics with right sides together and sew a ¼” seam all around the outside, leaving a 4-5” gap along one side. Don’t leave the gap in a corner, as corners are very hard to get straight when you turn your fabric. Turn your tag right-side-out and press in the edges of the gap with a hot iron so that they match the corresponding edges. Sew this down with a matching thread right along the outside edge of the tag.
How to Edge Your Quilted Nametag Version #2:
Layer your 2 fabrics with the wrong sides together and pin. When you have all the letters sewn down and are ready to sew your name tag to the back of your project, you can finish the raw edge in one of 3 ways.
Sew a ribbon such as grosgrain just along the edge of your tag so that it hang off the edge approximately ¼”. Grosgrain ribbon has a nice finished edge, and with the raw edge covered you can sew the outside edge down quickly and easily. I did this with the tag for Dragons in my Window.
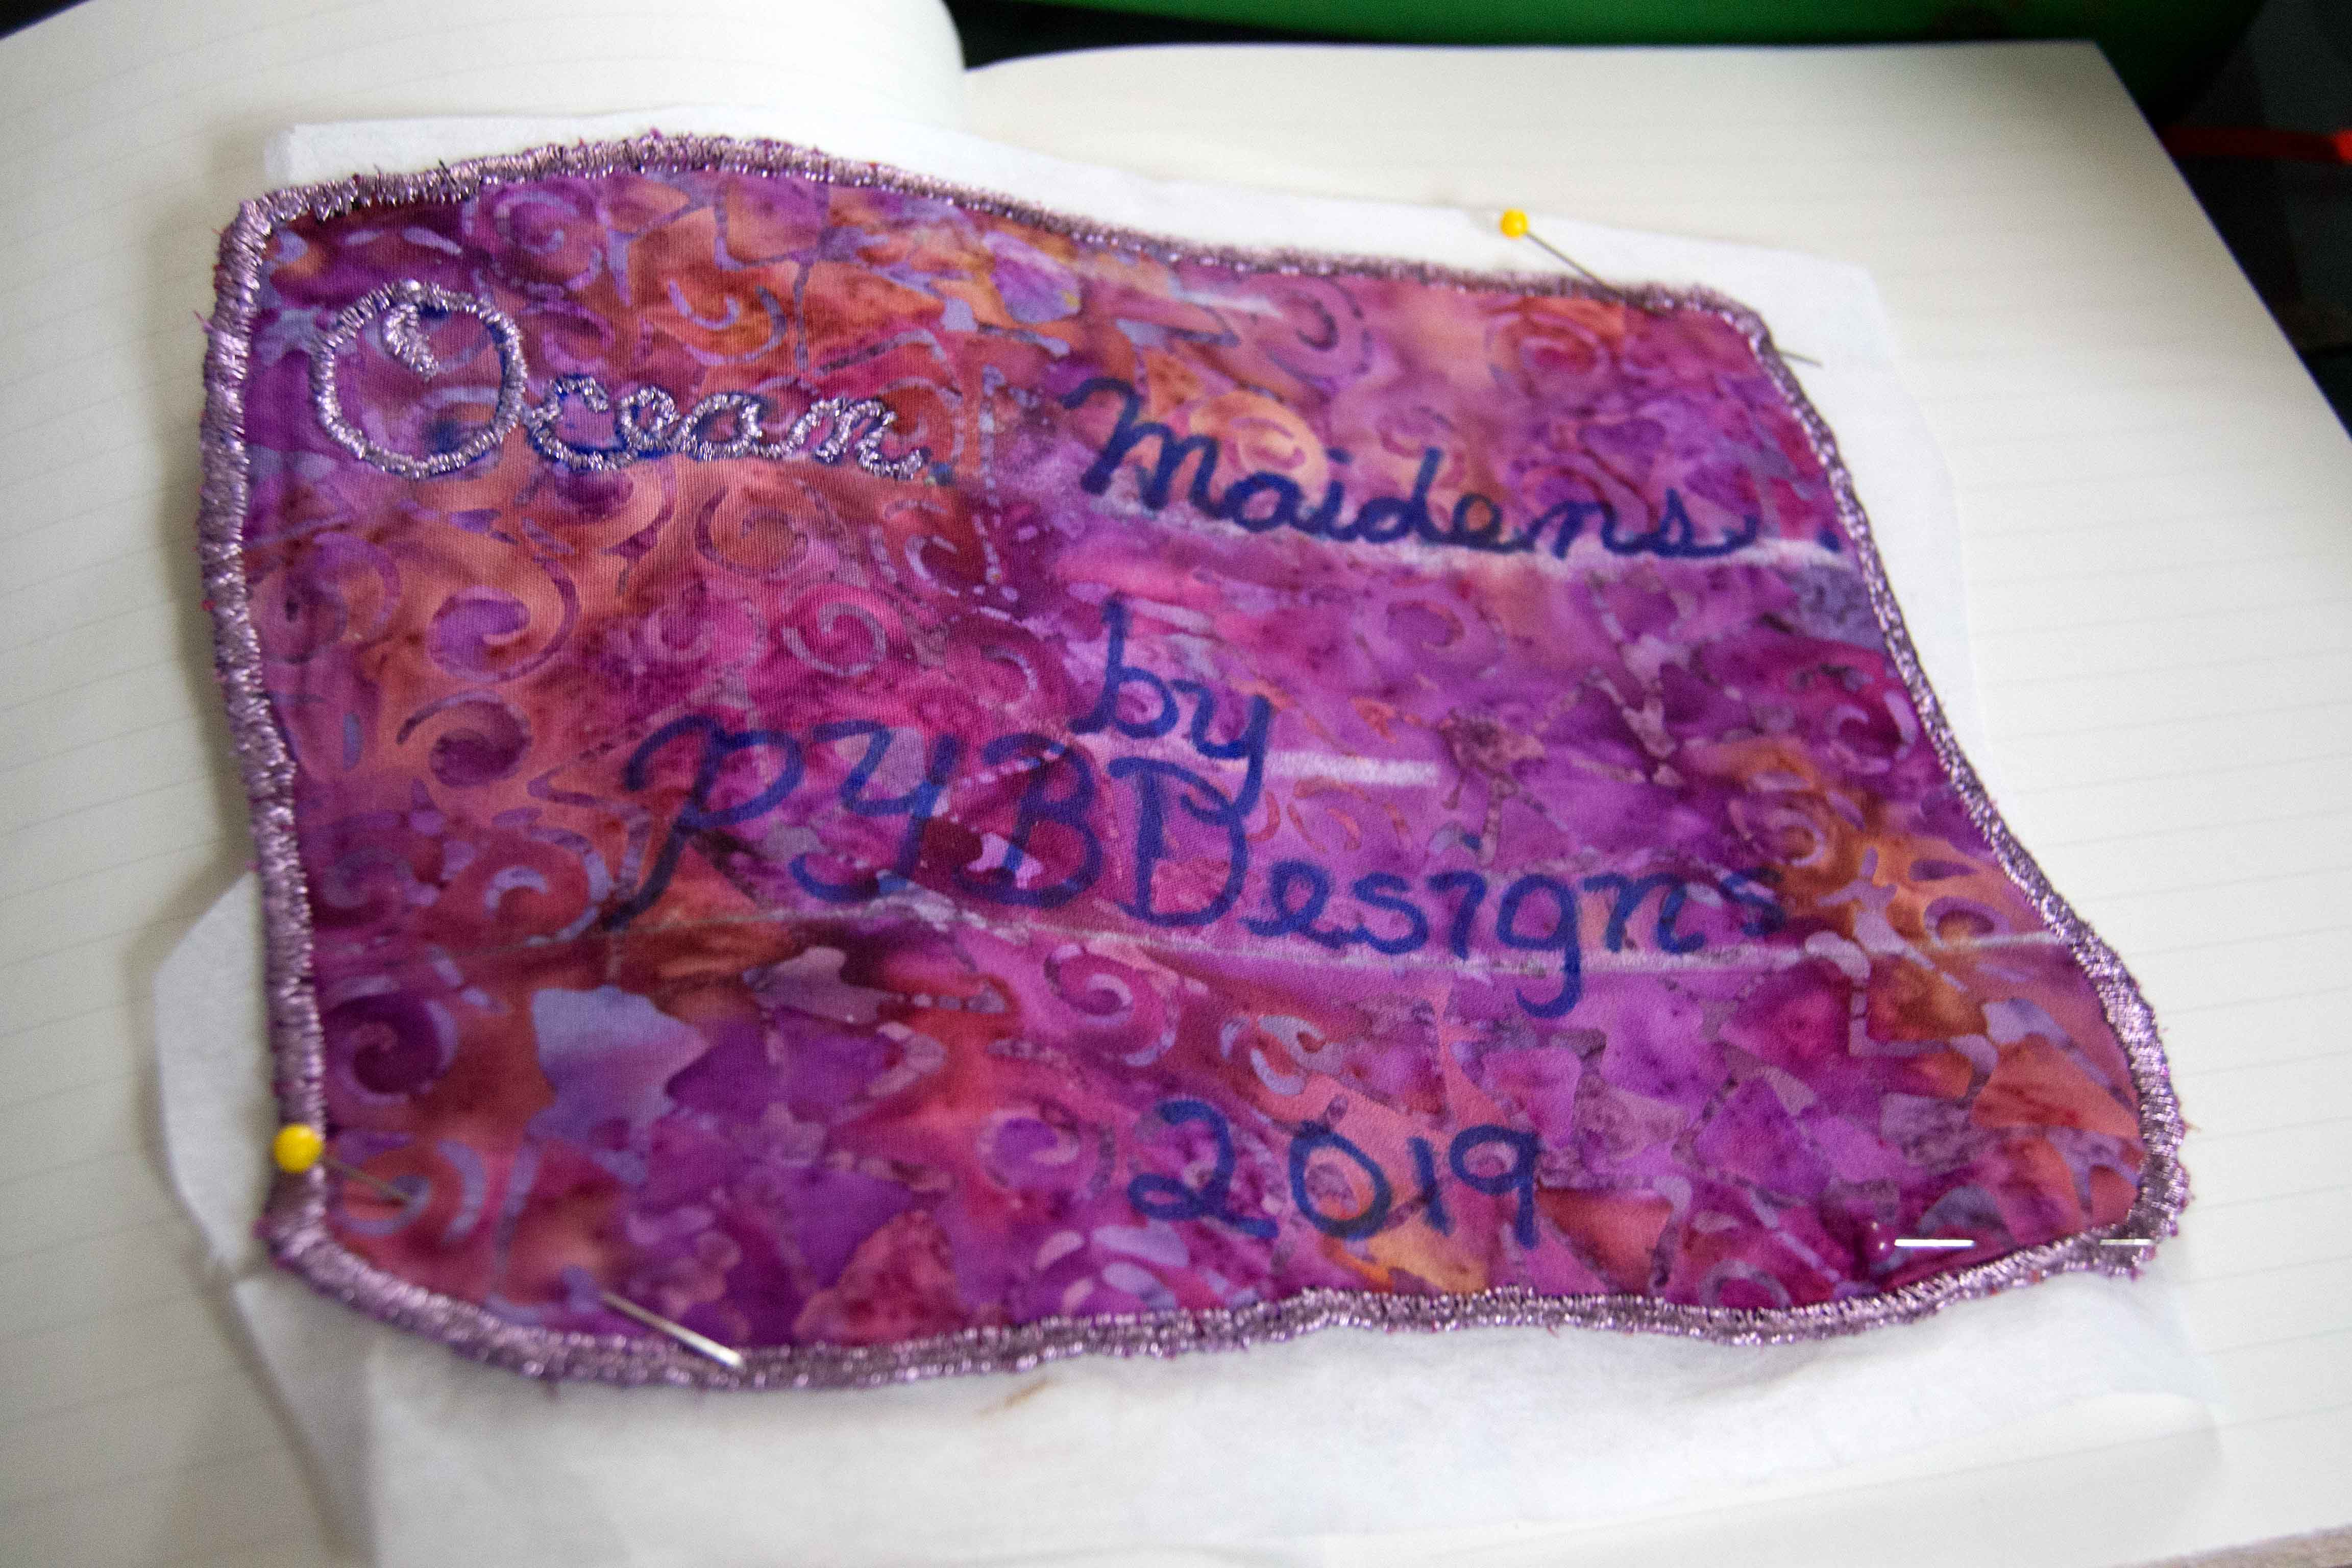
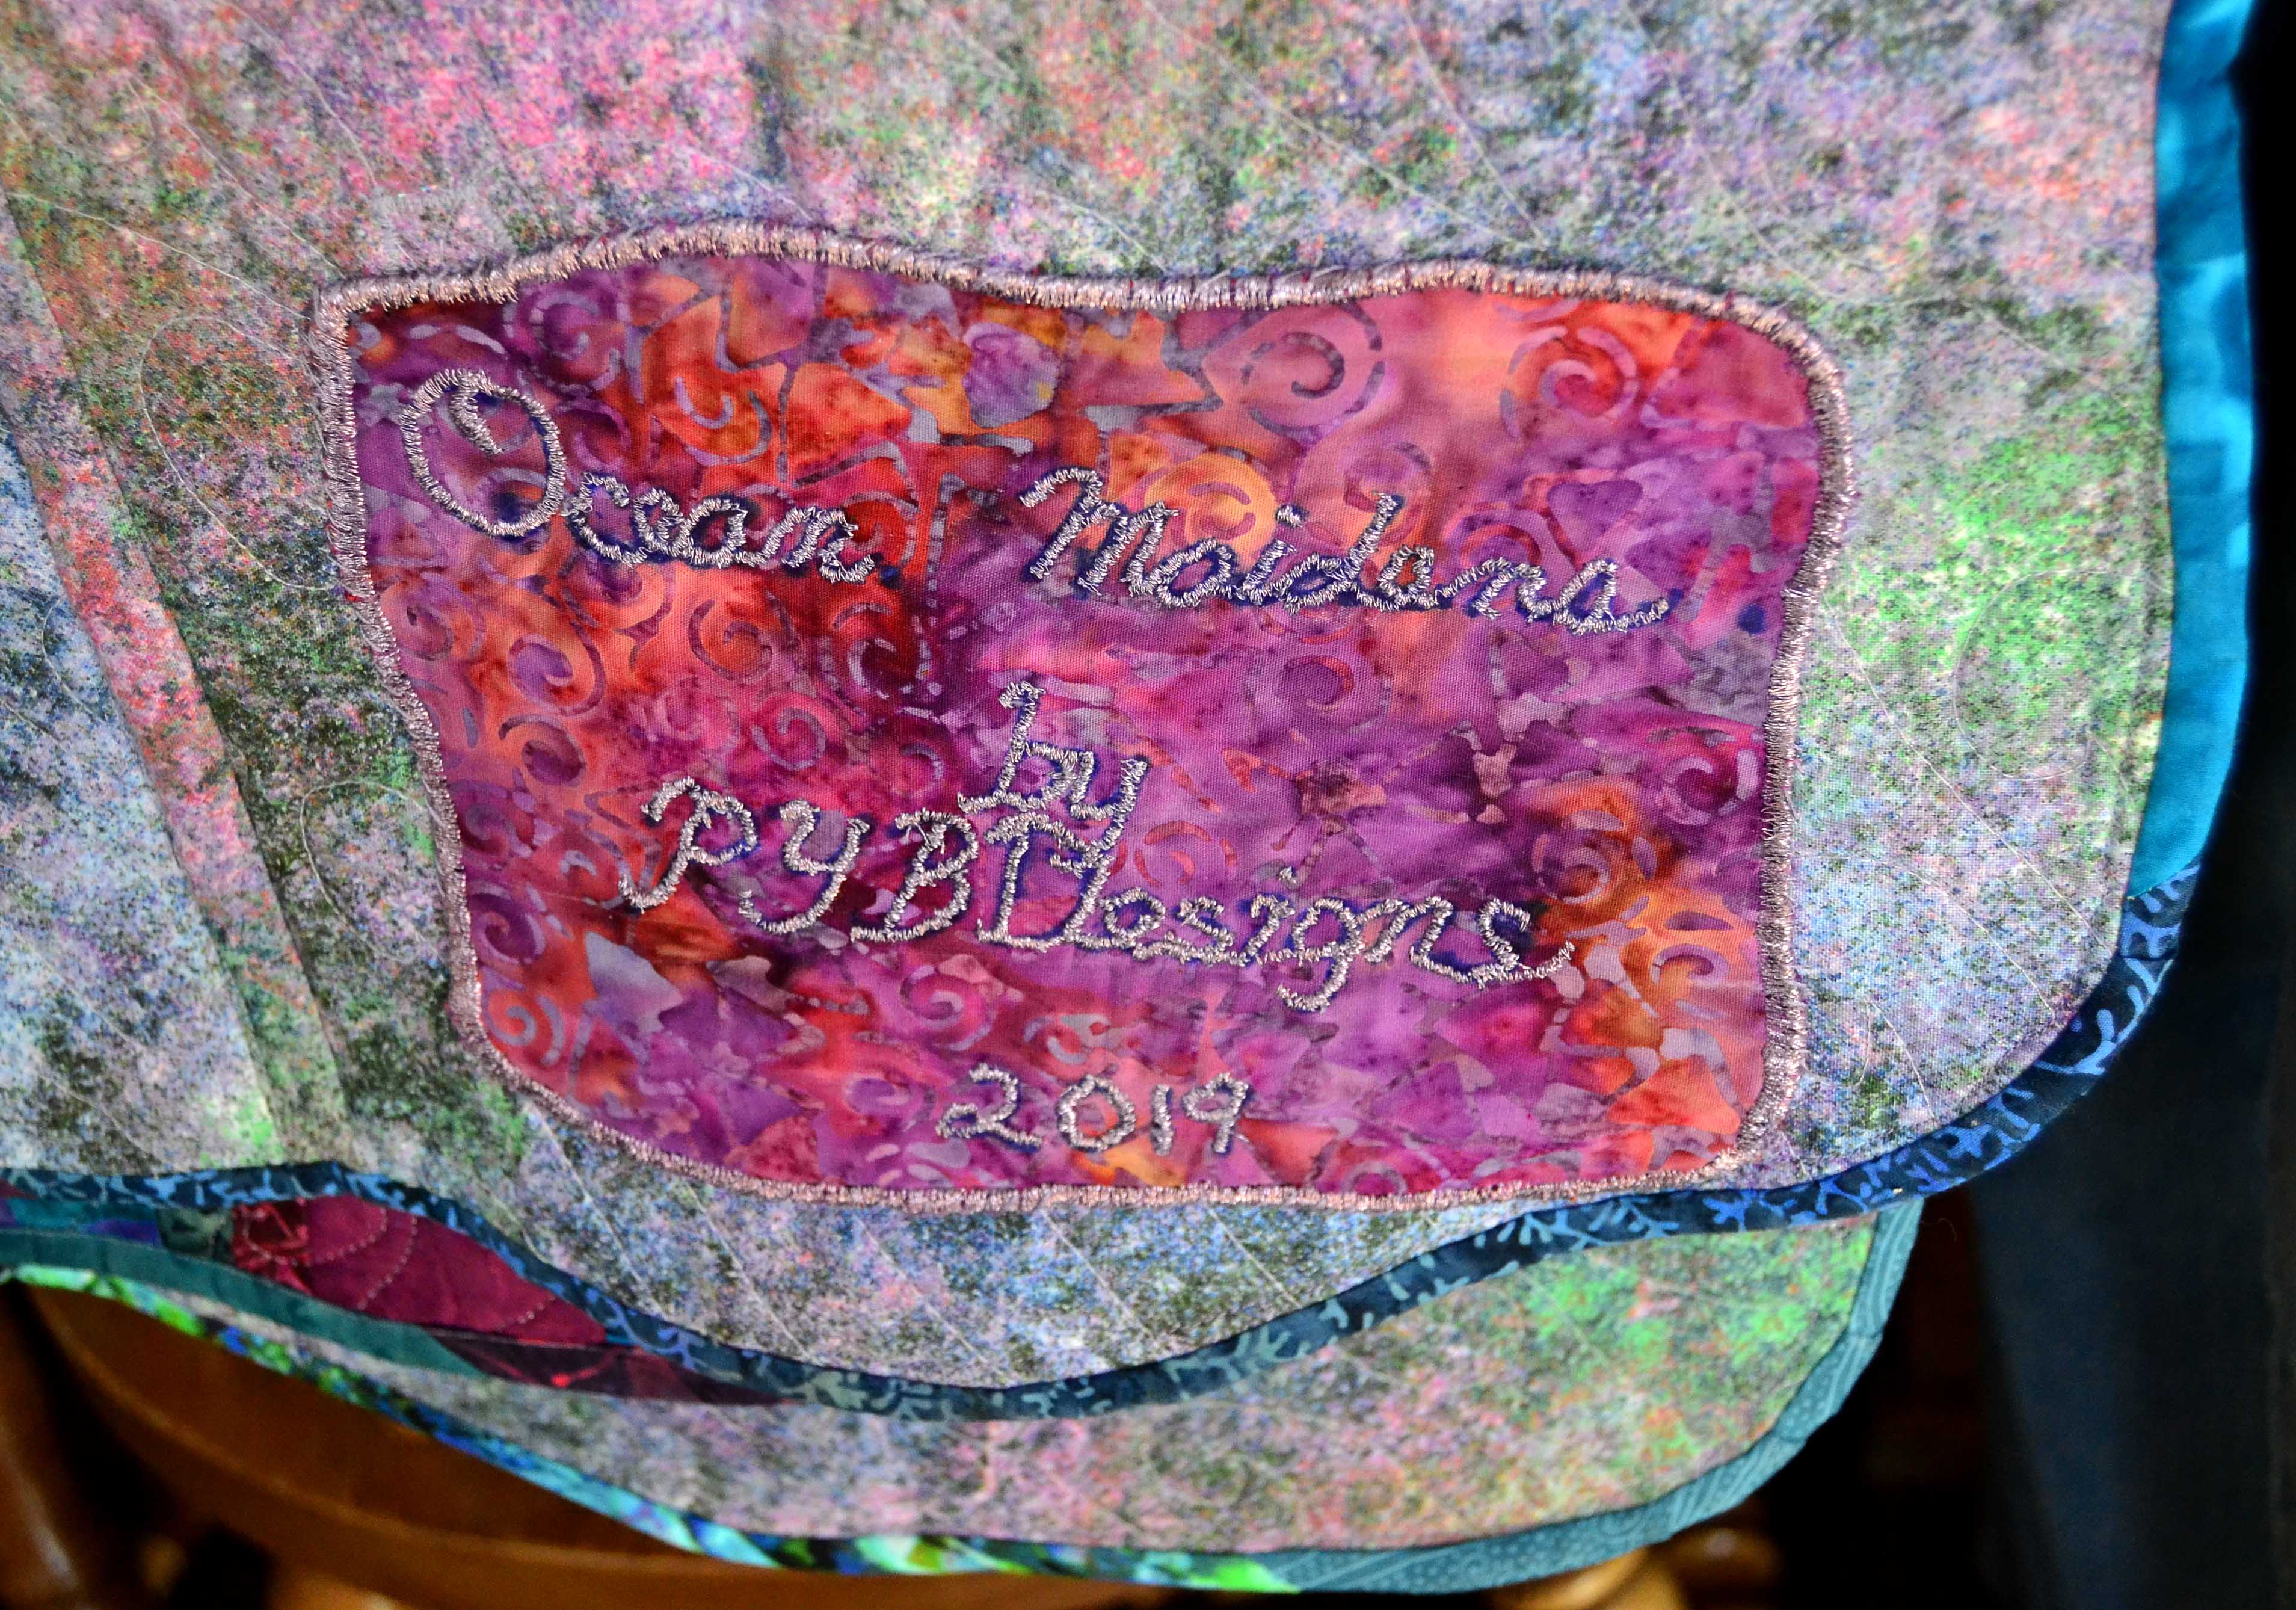
Sew a nice, wide satin stitch all around the edge of your finished tag. Depending on how well your machine does this, you may have to go around the edge twice – I often do. Sewing the edge like this will make it curl up but all you need to do is steam iron it or spritz it with spray starch and iron to make it lie flat again so that you can sew your tag on neatly. I used this method to sew the edge of my Ocean Maidens quilt.
Make a short length of binding and sew it around the edge to finish it off before you sew the tag on. Check out my blog ‘Binding Tips & Tricks’ if you’re not sure how to do a binding.
Measuring & Marking for Your Nametag
Once you have decided how to finish your edge, you need to mark your tag and draw lines so that your lettering will be straight and centered.
You’ll want to get everything on 3 lines if at all possible but if you can’t, use 4 – no more!
If you can’t fit everything onto 4 lines then you need to re-think, because there are 3 things that should go onto each tag that you construct:
If you can’t fit everything onto 4 lines then you need to re-think, because there are 3 things that should go onto each tag that you construct:
Name of the project
Your name
And the date
That’s it! Anything more is superfluous.
Measuring the Distance (it’s more important than you’d think)
To start, measure the length of your tag. Starting 2” down from the top, draw your first line all the way across.
This is the name line.
Measure how many inches you have left and divide it evenly in two. Remember, you have to leave enough space between your lines for the height of the letters. I like to leave at least 1 ½” if I can because it makes it so much easier to read.
If your fabric is dark, draw your lines with chalk but if it’s a light-colored fabric a black erasable pen is always a good choice.
Measuring by the Math
Next, count the letters in each set of words and divide them by the length of the line you have drawn. Remember to factor in an empty space at the front and back of each line, and, if your name has two words or more, a space between each word. For example, if your line is 8” long and you have 5 letters in the name of your project, you should make your spacing marks 1-1/4” long each. This gives you a place for all 5 letters, an empty space plus an empty space at the front and back end of the word.
If your machine has an embroidery feature that you can program to sew letters and words that’s great – my Bernina did that till it quit working – it takes all the figuring out of the equation for you.
But honestly, measuring your spacing for your letters isn’t rocket science. It sounds complicated on paper, but it goes pretty quick in practice.
Stabilizer
In order for the stitching and appearance of your letters to be smooth and even you will need to pin a piece of Tear-Away Stabilizer to the back of your tag.
Simply cut a piece of stabilizer a little larger than your tag, iron it flat and pin it to the back of your tag. This helps to stiffen your tag and helps your fabric to move smoothly and evenly over the feed dogs.
Once you’re finished stitching you simply tear it away from your letters.
It’s easy to do and will make a world of difference to the final appearance of your tag.
You can find Tear-Away Stabilizer in any store that sells fabric – it’s usually in among the batting and interfacing packages.
Sewing Your Letters
Once your measuring and marking is done, draw in your letters if you’re doing it by hand. I prefer using cursive because the letters join naturally and you don’t have to start and stop at the beginning and end of each letter to tie off.
It all depends on what I want my tag to look like.
Once again, use an erasable pen on the light fabrics and chalk on the darker ones.
HINT: Only draw one word or line of letters if you’re using chalk because it tends to rub off quite quickly.
HINT: I discovered that a pink glitter permanent fabric marker works real well for marking black fabric as well and lasts a lot longer than the chalk!
Once you have your letters marked, set your machine to a narrow, tight satin stitch and follow along your marks slowly. There is no way to do this fast if you’re sewing your letters by free hand.
HINT: Practice on a scrap piece of fabric first so you will get the stitch width, thickness, and feel of how the thread will work and look before you sew on the real tag. Make sure that your practice piece is constructed the same way as the tag – 2 pieces of fabric and a piece of stabilizer so that you will know exactly how your machine will handle this.
Sewing on Your Name Tags – The Final Step in “How to Name a Quilt”
Name tags are usually sewn in either bottom corner of your project – right or left doesn’t matter. Just make sure it’s in one of the bottom corners and is right-side-up. I once sewed one in upside-down, and I did it by hand so I learned my lesson – always double check!
There are three ways to attach a name tag to your project/
The First Way to Attach a Nametag is to Sew it by Machine
This option only works if you have a large section of very dark fabric on the front of your quilt where you’re planning to attach your tag. Preferably black. If it’s any lighter the stitching will show and mess up your pattern on the front. Sometimes, like on Dragons in my Window, I sewed the bottom and outside edge of my tag by machine, and the top and inside edge by hand.
Sewing your tag on by machine is much the quickest option, but unless you do it before you sew the backing down it is almost impossible to achieve. So give it a think before you completely finish your project.
The Second Way to Attach a Nametag is to Sew it by Hand
I’m anti-hand-sewing nine times out of ten, but this is the option that I choose most often because I rarely have a section on the front that will not show extra stitching coming through from sewing on the tag.
I don’t actually mind hand sewing tags since I did hand embroidery and cross-stitch for years. It’s actually a very soothing activity for me. Use thread that matches whatever color edge you put on your tag and your stitching will be almost invisible, especially if you use a smaller whip-stitch.
The Third Way to Attach a Nametag is to Glue it On
If, for some reason you can’t hand-stitch it, fabric glue is your last option and it’s a good one. Simply spread the glue – make sure it’s permanent – lightly over the entire back of your tag, lay it down on your project and then lay something heavy like a book on top of that and leave it for 24 hours.
Voila! A permanent bond and no hand-stitching involved!
I truly hope that you’ve enjoyed this article. As a last note, please consider naming your smaller projects as well – like table runners and wall hangings. Not only does a named, dated, claimed piece have more value in terms of money, it has more value in terms of human connection.
If you’re one of those people – like us here at Princess YellowBelly Designs – who just loves printed quilt panels, but isn’t quite sure how to add the borders to make them into a quilt on your own…keep reading. In this blog I’ll show you to “build a border wall” of sorts, to your own specifications, and how to go about calculating a quilt borders, or borders, so that you can turn panels into quilts of art!
This is actually a project I’m engaged in right now.
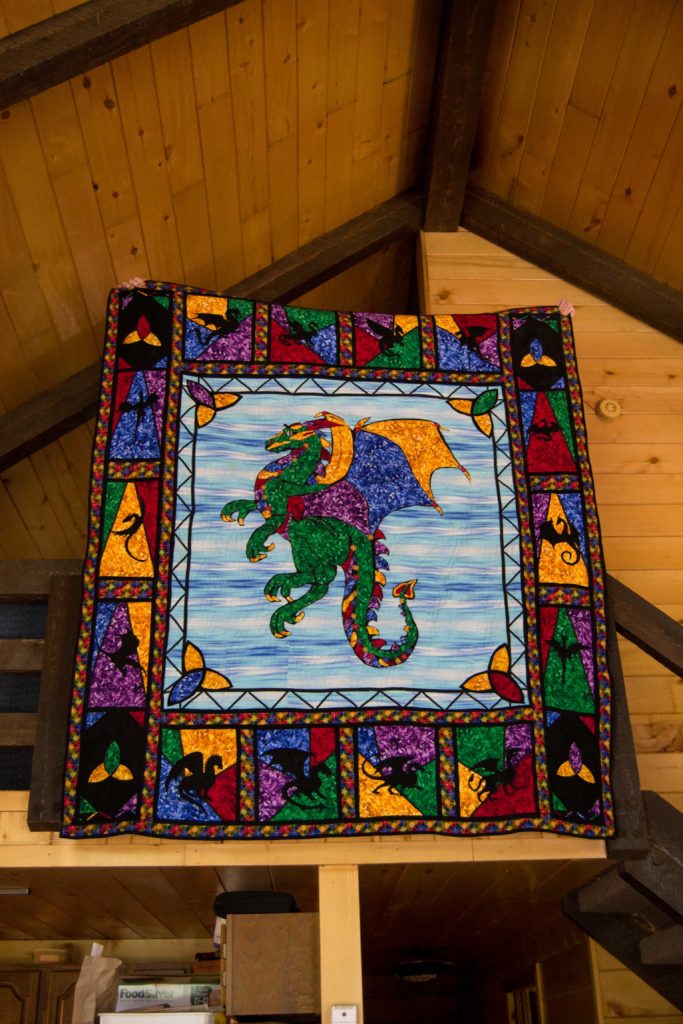
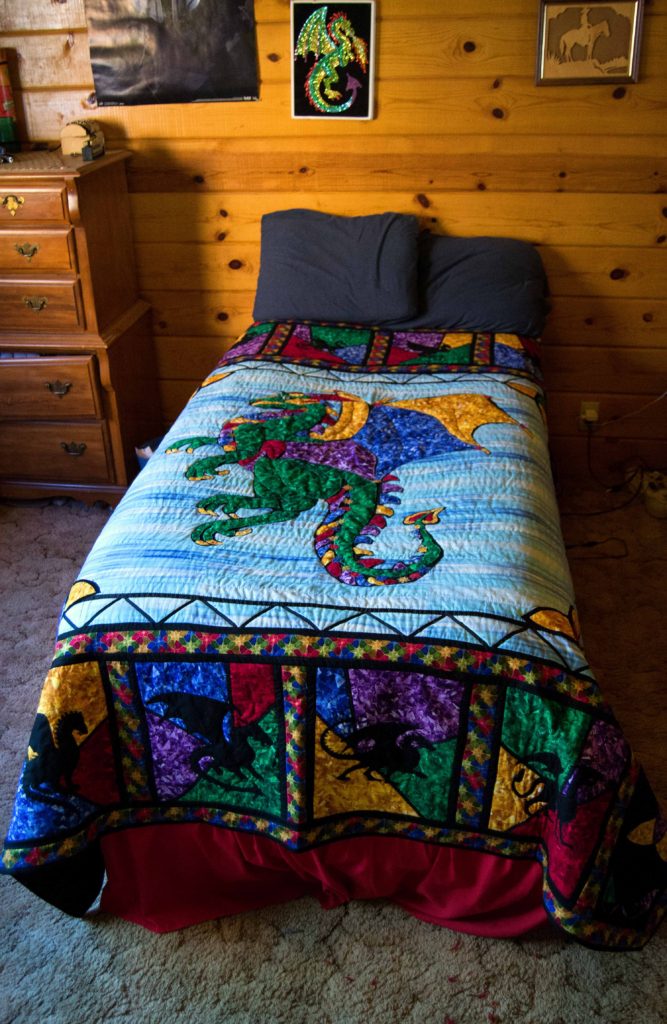
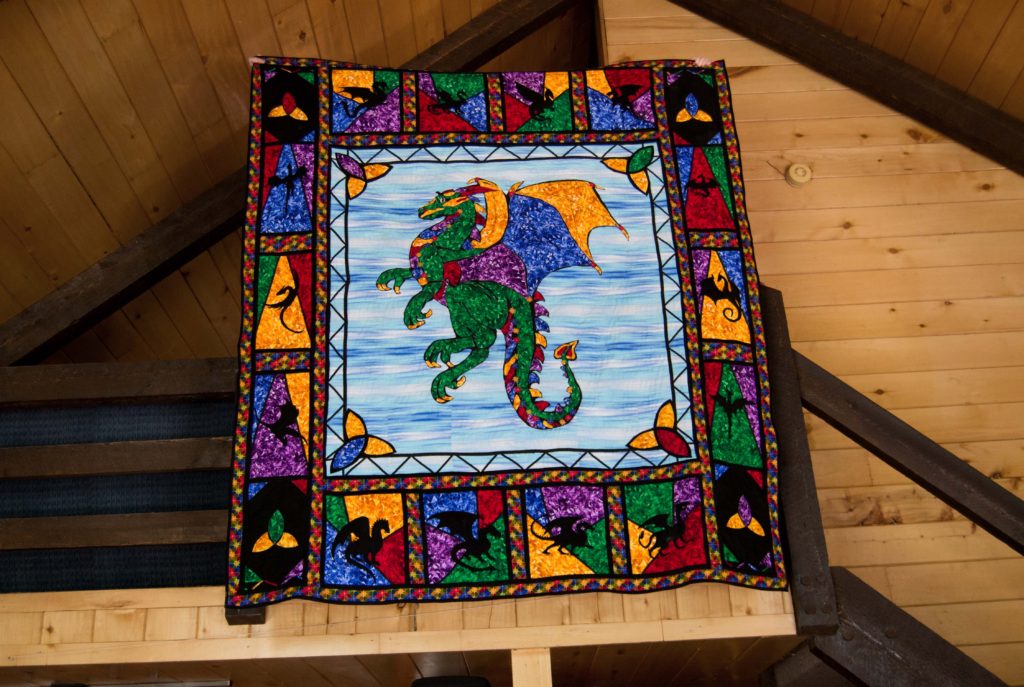
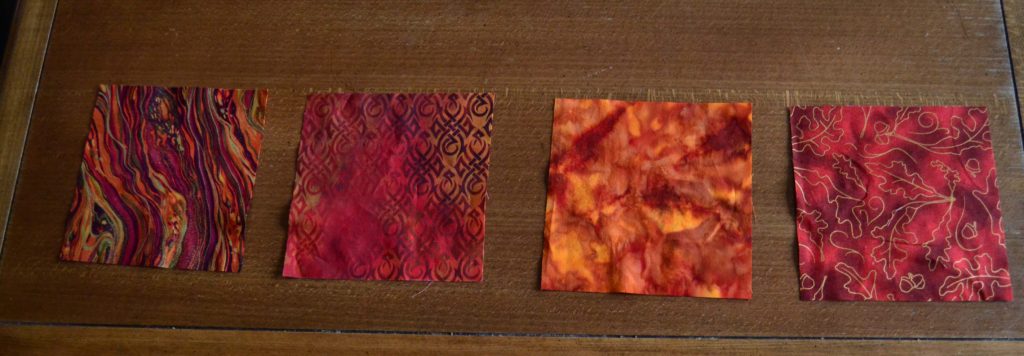
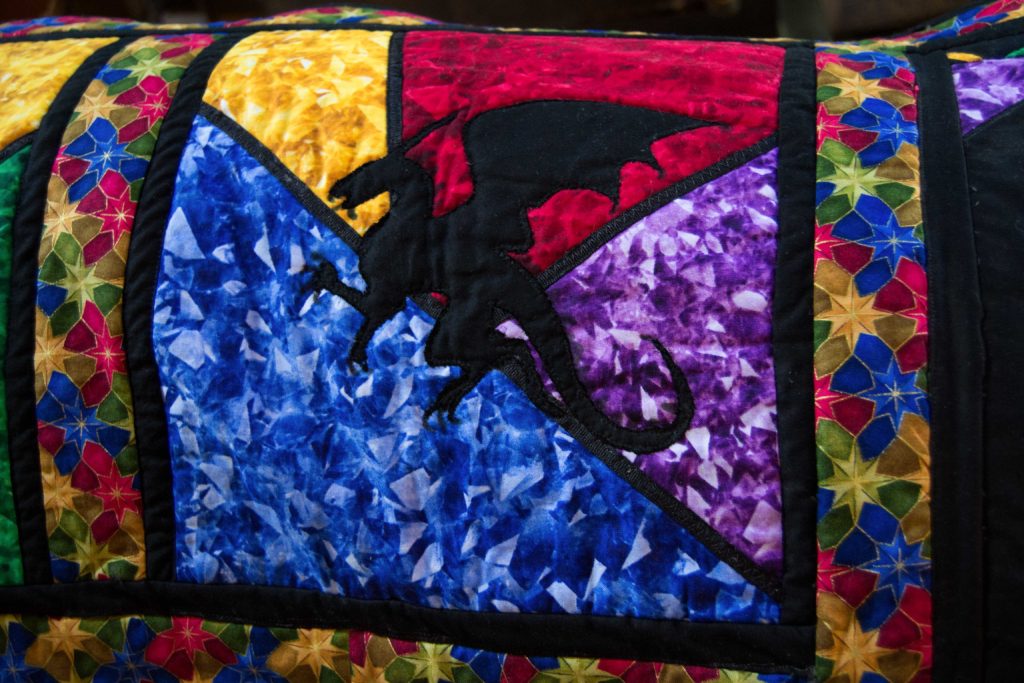
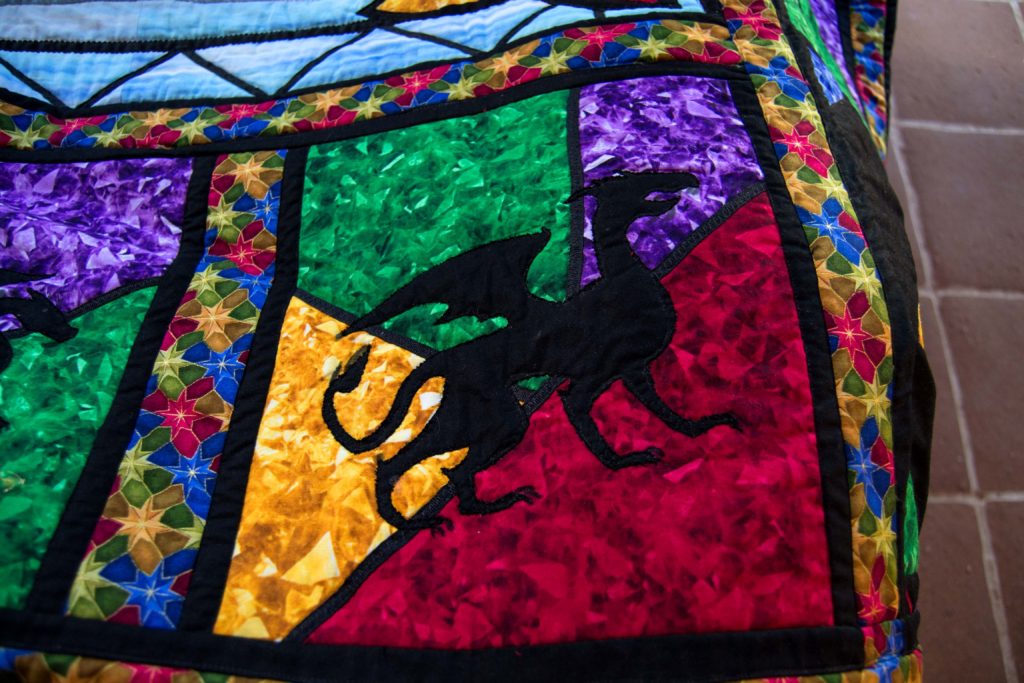
Here, There Be Dragons
My daughter, Leiajoy, LOVES dragons, so when I saw a set of dragon panels being sold as part of a quilting kit at my local quilt store, I immediately thought of her. Of course, the quilt came with a pattern and coordinating fabrics and supplies needed, etc.
Don’t get me wrong, it was a beautiful quilt indeed, but being me, I decided that I could do it my way, and do it better…at least what I think of as better.
So I purchased the main panel, the 6 smaller – 12”x12” – coordinating panels, and 1 yard each of 2 of the coordinating fabrics, but not the pattern. I didn’t like the pattern at all because when I first noticed the quilt in the store, what caught my attention was the interior, pieced border. It was big, bold and beautiful, and totally nullified the middle panel completely.
Calculating a quilt border means choosing complimentary colors, patterns, and themes to enhance the main feature.
I had to get up close and personal before I could see the middle panel, while the smaller ones faded altogether.
The Purpose of Quilted Border Walls
Fellow seamsters, this is not what a border wall is for!
The function of an interior border wall is to separate important elements from one another while also supporting and highlighting those elements so that they can shine on their own. And the function of an outside border wall is to separate the important elements from the infinity of noise that is the rest of the world.
Borders do this by providing an attractive but less bold appearance than the main quilt elements, not by jumping up and down in your face and screaming:
“Look at me, look at me, look at me now
I may be a border but I’m really WOW!
The main part of this quilt is basic old stock…
But I am the border and I really ROCK!
You get the idea. So, let’s look at borders and how they can be both functional and beautiful without taking over the entire narrative.
Interior vs. Exterior Borders
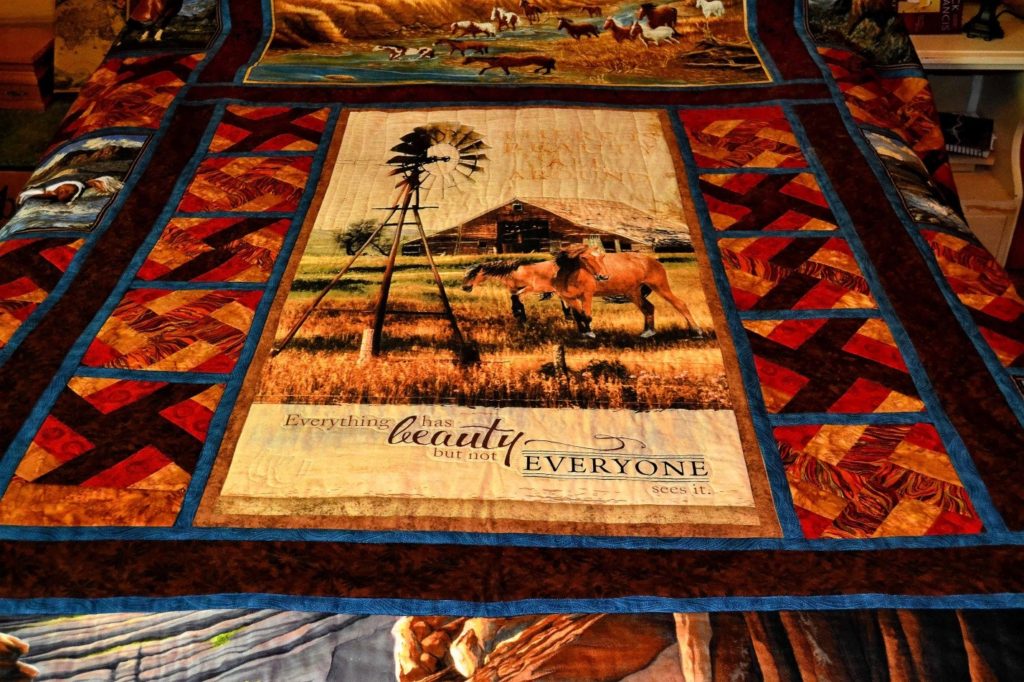
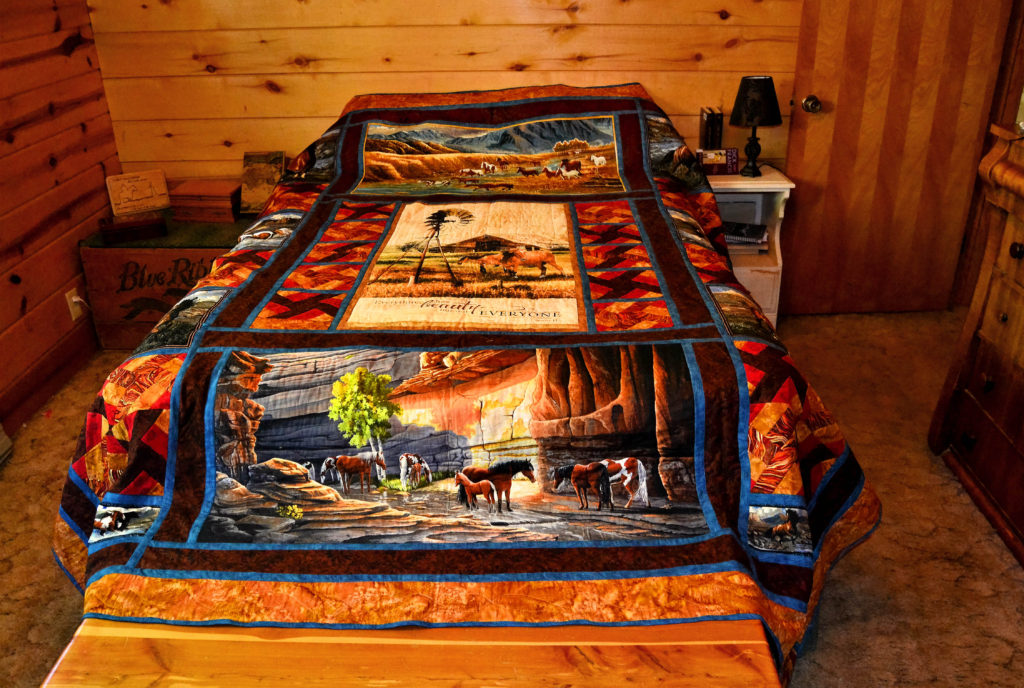
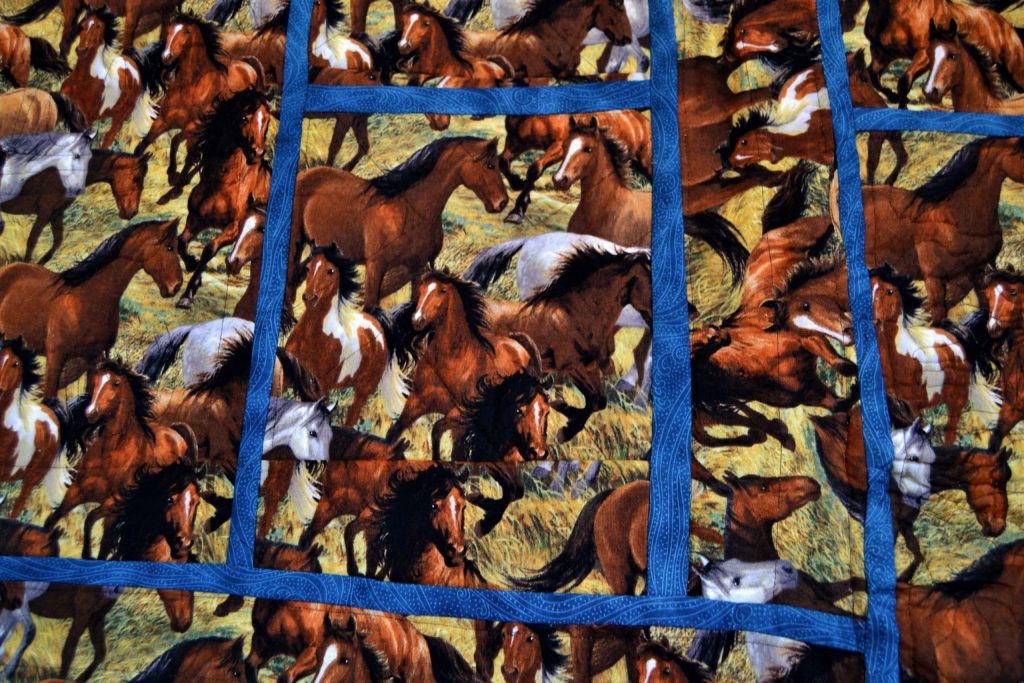
Mostly you only have interior borders if you’re sewing a panel quilt that has coordinating smaller side panels, such as my Home Pastures quilt – and now the new dragon quilt, of course.
I used 3 large panels and 6 smaller ones to make my queen size western horse quilt and it took a lot of borders and sashing to separate them all.
Unless you’re using some kind of infinite quilt pattern – of which there are a few – you’ll probably want to put an exterior border on your quilt eventually. If this isn’t a panel quilt, I recommend using scraps from the main quilt.
For panel quilts, an exterior border should almost always be a continuation of the inner borders, either in an exact replica, or in the theme.
3 Things to Consider When Calculating a Quilt Border’s Color Scheme
One of the most important part of calculating a quilt border is in choosing the correct color scheme. This is one of the big reasons that the border in the original dragon quilt didn’t work – in my opinion. Too many big, bold colors that actually overwhelmed the more intricate panels.
Thing One
Study the colors in all of the panels and choose which shades you want to bring out in the borders.
You should use a minimum of 4 different colors (unless you’re doing some kind of monotone quilt) so that you have enough to make different design patterns. Remember that your aim is to enhance, not overwhelm, so mix lights with mediums and darks.
This helps your eye to see but not to linger.
Thing Two
When I was teaching my ankle biters to choose their own clothes and dress themselves, they would sometimes come out with eye-crossing combinations that almost required sunglasses to view.
So I made a rule – no more than 4 colors and 2 patterns for any one outfit!
This was a great rule for creative but not blinding dressing and it’s a great rule for border walls as well! Sometimes I’ll use more than 4 fabrics, but they are shades of the same color and not completely different colors altogether.
Thing Three
Go through your quilting patterns and choose one that is not overly complicated and that connects with your panel theme if possible.
For the Home Pastures quilt I chose to do a windmill block pattern because there’s a windmill in the main panel and because windmills are a common site on many ranches.
Also, choose a pattern that you can easily enlarge or reduce as the situation calls for it. In the Home Pastures quilt, I used the windmill block exclusively, but I used it in 3 greatly different sizes.
The neat thing about the windmill block is that every 2nd block is the obverse of the first one, so that it appears that you’re using more than 4 colors because they are flipped. Many, but not all, simple patterns work like this – so take that into consideration.
Plan Ahead!
Next, choose which fabrics you will use for the border blocks, which fabric for the sashing, and so on, and stick with them! Don’t decide to change something halfway through your project.
Find a place where you can lay out one side of your quilt and your border choices and stand back and look at them objectively. It’s easy to switch your choices around before you start cutting and sewing; much more difficult later, and more expensive.
Also, think about the purpose of your border walls as you’re calculating a quilt border.
Some borders only need to be thin ribbons – and sashing will often work for this purpose. Other times the borders may take up more space than the main panel, but you still need to concentrate on elevating that main element rather than hiding it.
Don’t Choose a Fabric You Don’t Like Just “Because”
The colors and patterns you choose should be individual to you and reflect your likes.
It can be tempting to pick something because it’s popular, trendy, or simply on sale. But trust me, you’ll regret it – especially if you’re deeply in love with your main panel. Sooner or later that “lesser” fabric will turn into a sore tooth.
Telling a Story with Your Quilting Elements – Including the Border Wall
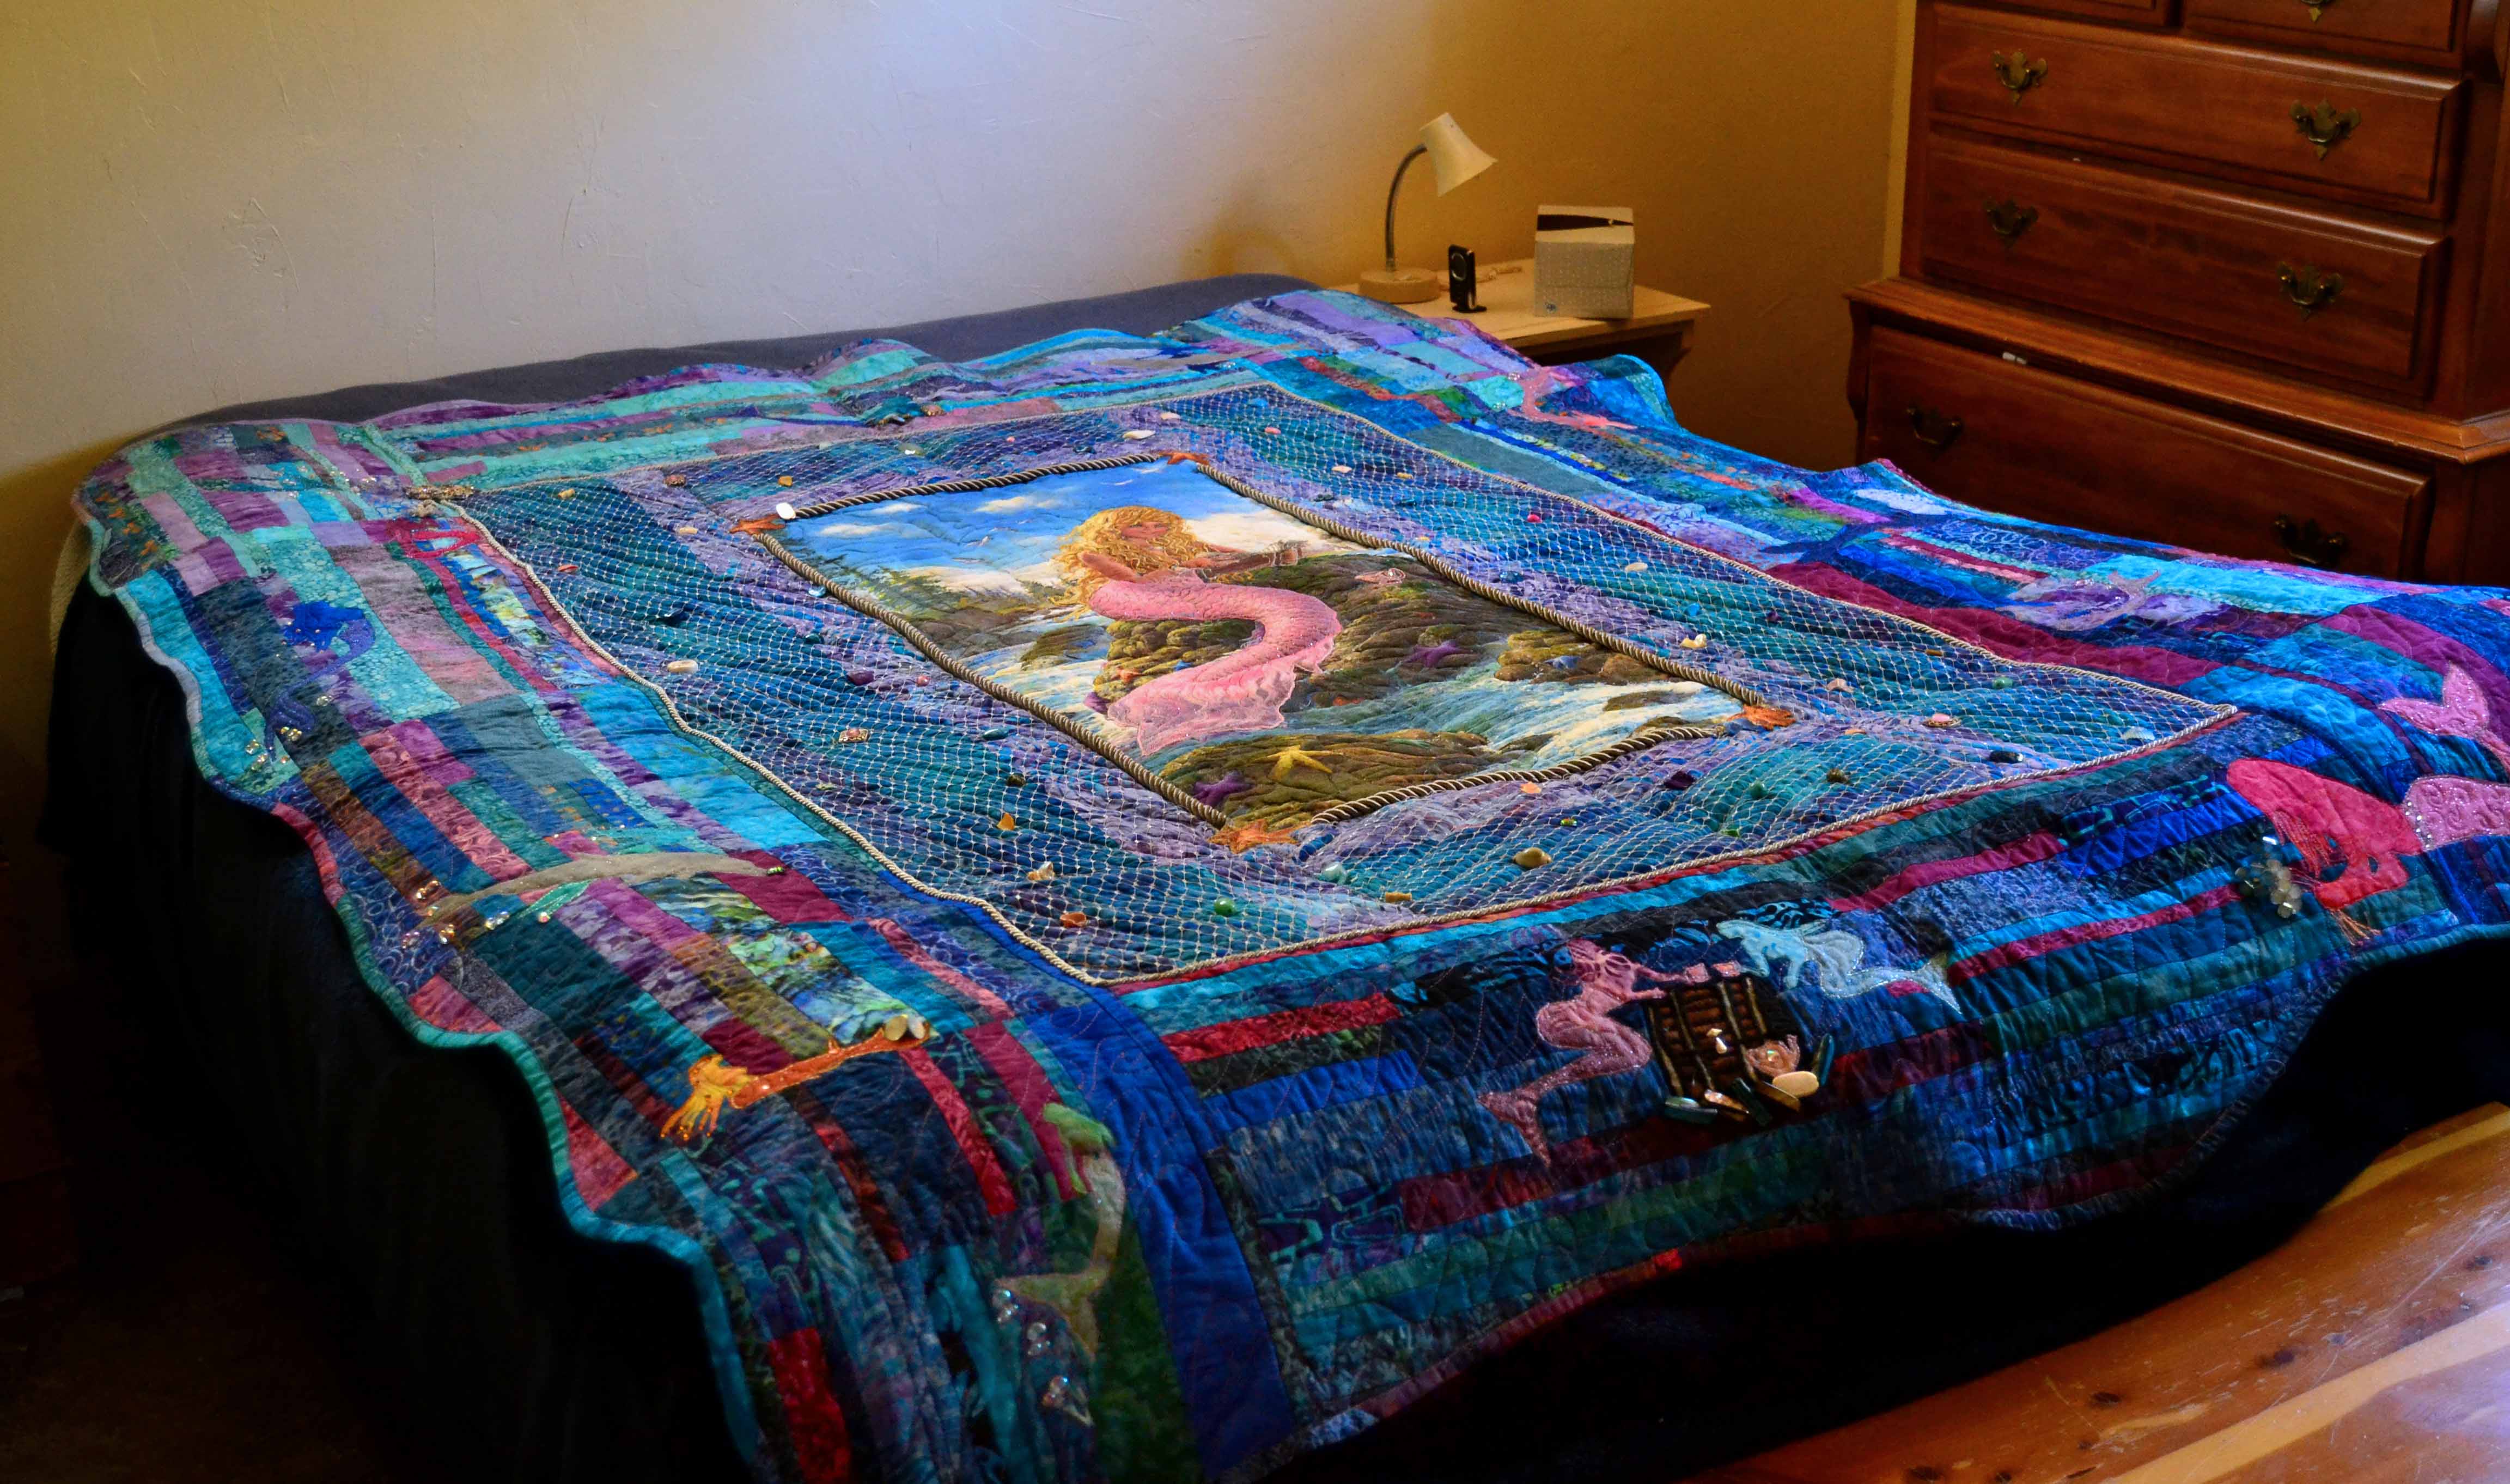
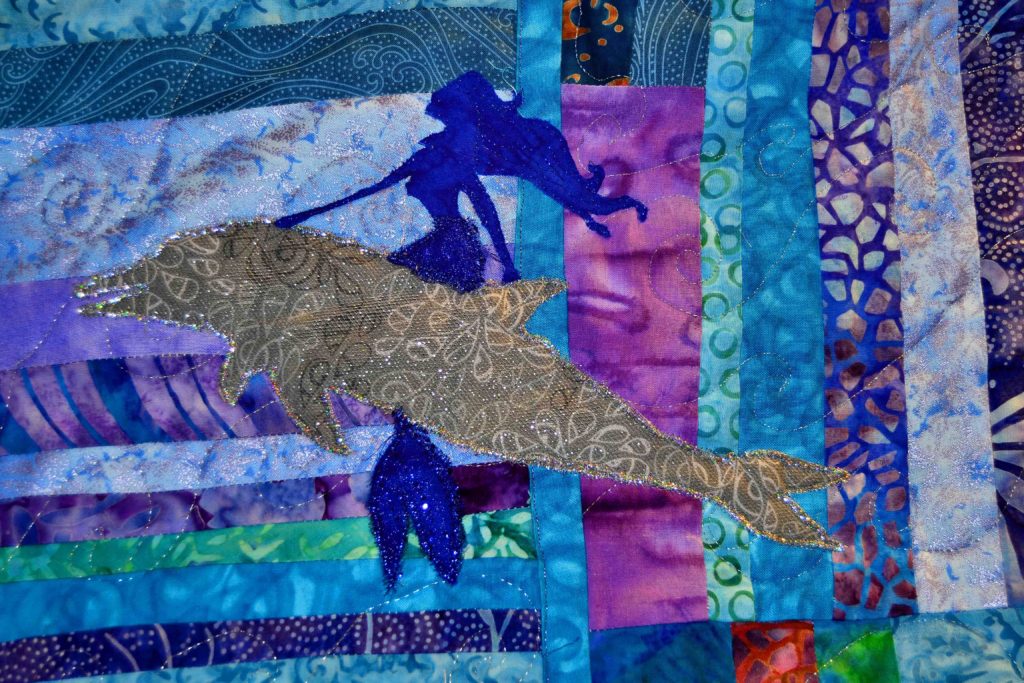
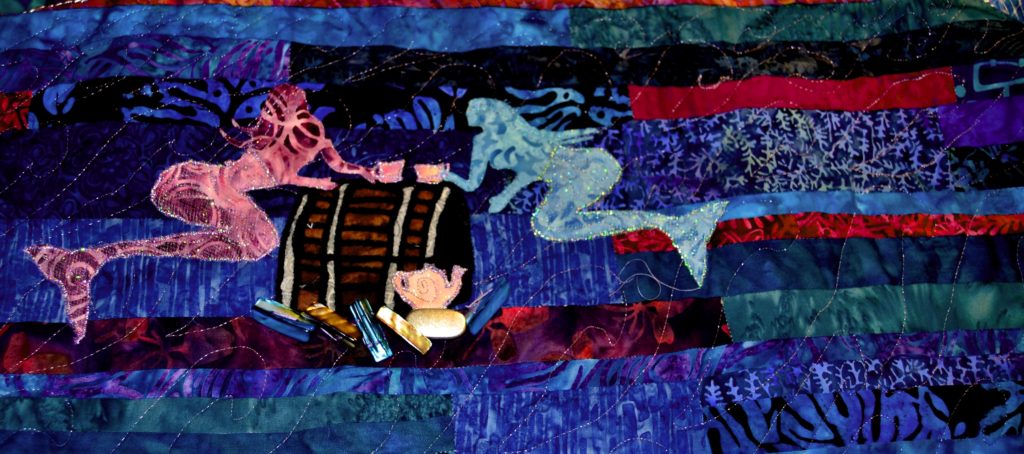
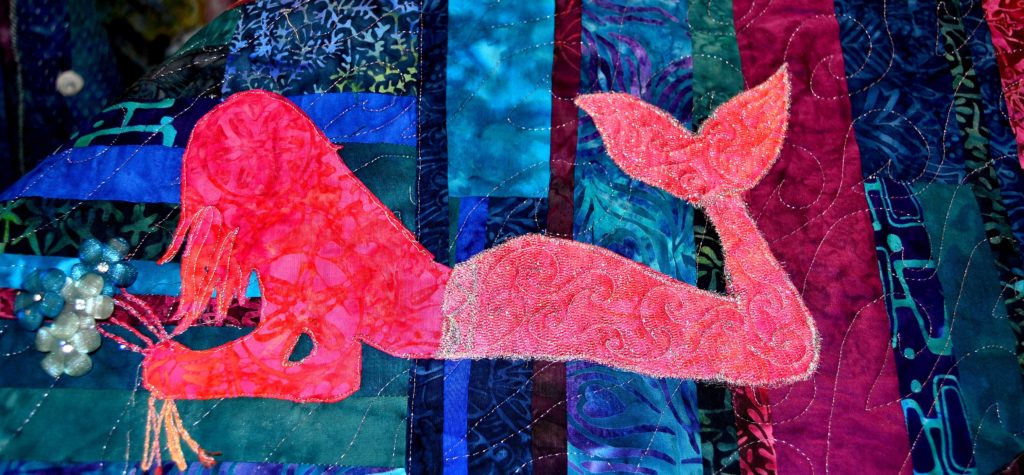
In my Ocean Maidens quilt, there is only the main panel, all the rest is border. Three interior borders, and a large wide outer border.
I thought very carefully about how I could incorporate the theme of the mermaid into the borders and which colors I should use. Suzanna insisted that mermaids are magical creatures and that silver was the color for magic, so we chose fabrics that went well with our silver accessories, were water-ish, and blended well together. Then we thought about how that mermaid came to be perched on her rock having tea and reading and decided that she obviously came in with the tide and got caught in a tide pool.
With this in mind, our inner 3 borders became the tide pool and the outer border the sea where all the rest of the mermaids are frolicking.
My advice to you is to not just jump straight in and start quilting a panel quilt.
First go through your stash and set aside any fabrics that might work in your quilt. Move them around, look at patterns and let everything percolate through your brain for as long as it takes until you have a clear vision of what you want the finished to quilt to look like, what you want it to say, and how you’re going to achieve that.
Patterns for Borders
Like most things, there are patterns that lend themselves well to borders and those that don’t.
My number one piece of advice to you is ignore any and all patterns that are difficult to make, either in the cutting or construction phases. You don’t want patterns that use specialized rulers, for instance, or require appliqueing, etc.
Remember, your borders are transition sections, NOT the main show! That said, let’s look at designs that work well for both interior and exterior borders.
Interior Borders
Some patterns lend themselves very well to borders, especially interior borders. I usually choose them for their simplicity for two reasons. The first one being that you have to do all your own calculating on a panel quilt’s borders. This sometimes requires heavy-duty math, even with a simple pattern and a calculator. The second reason is that it saves time, and helps to highlight the main element.
Strips
Truth be told, strips are the #1 choice for most borders, both interior and exterior.
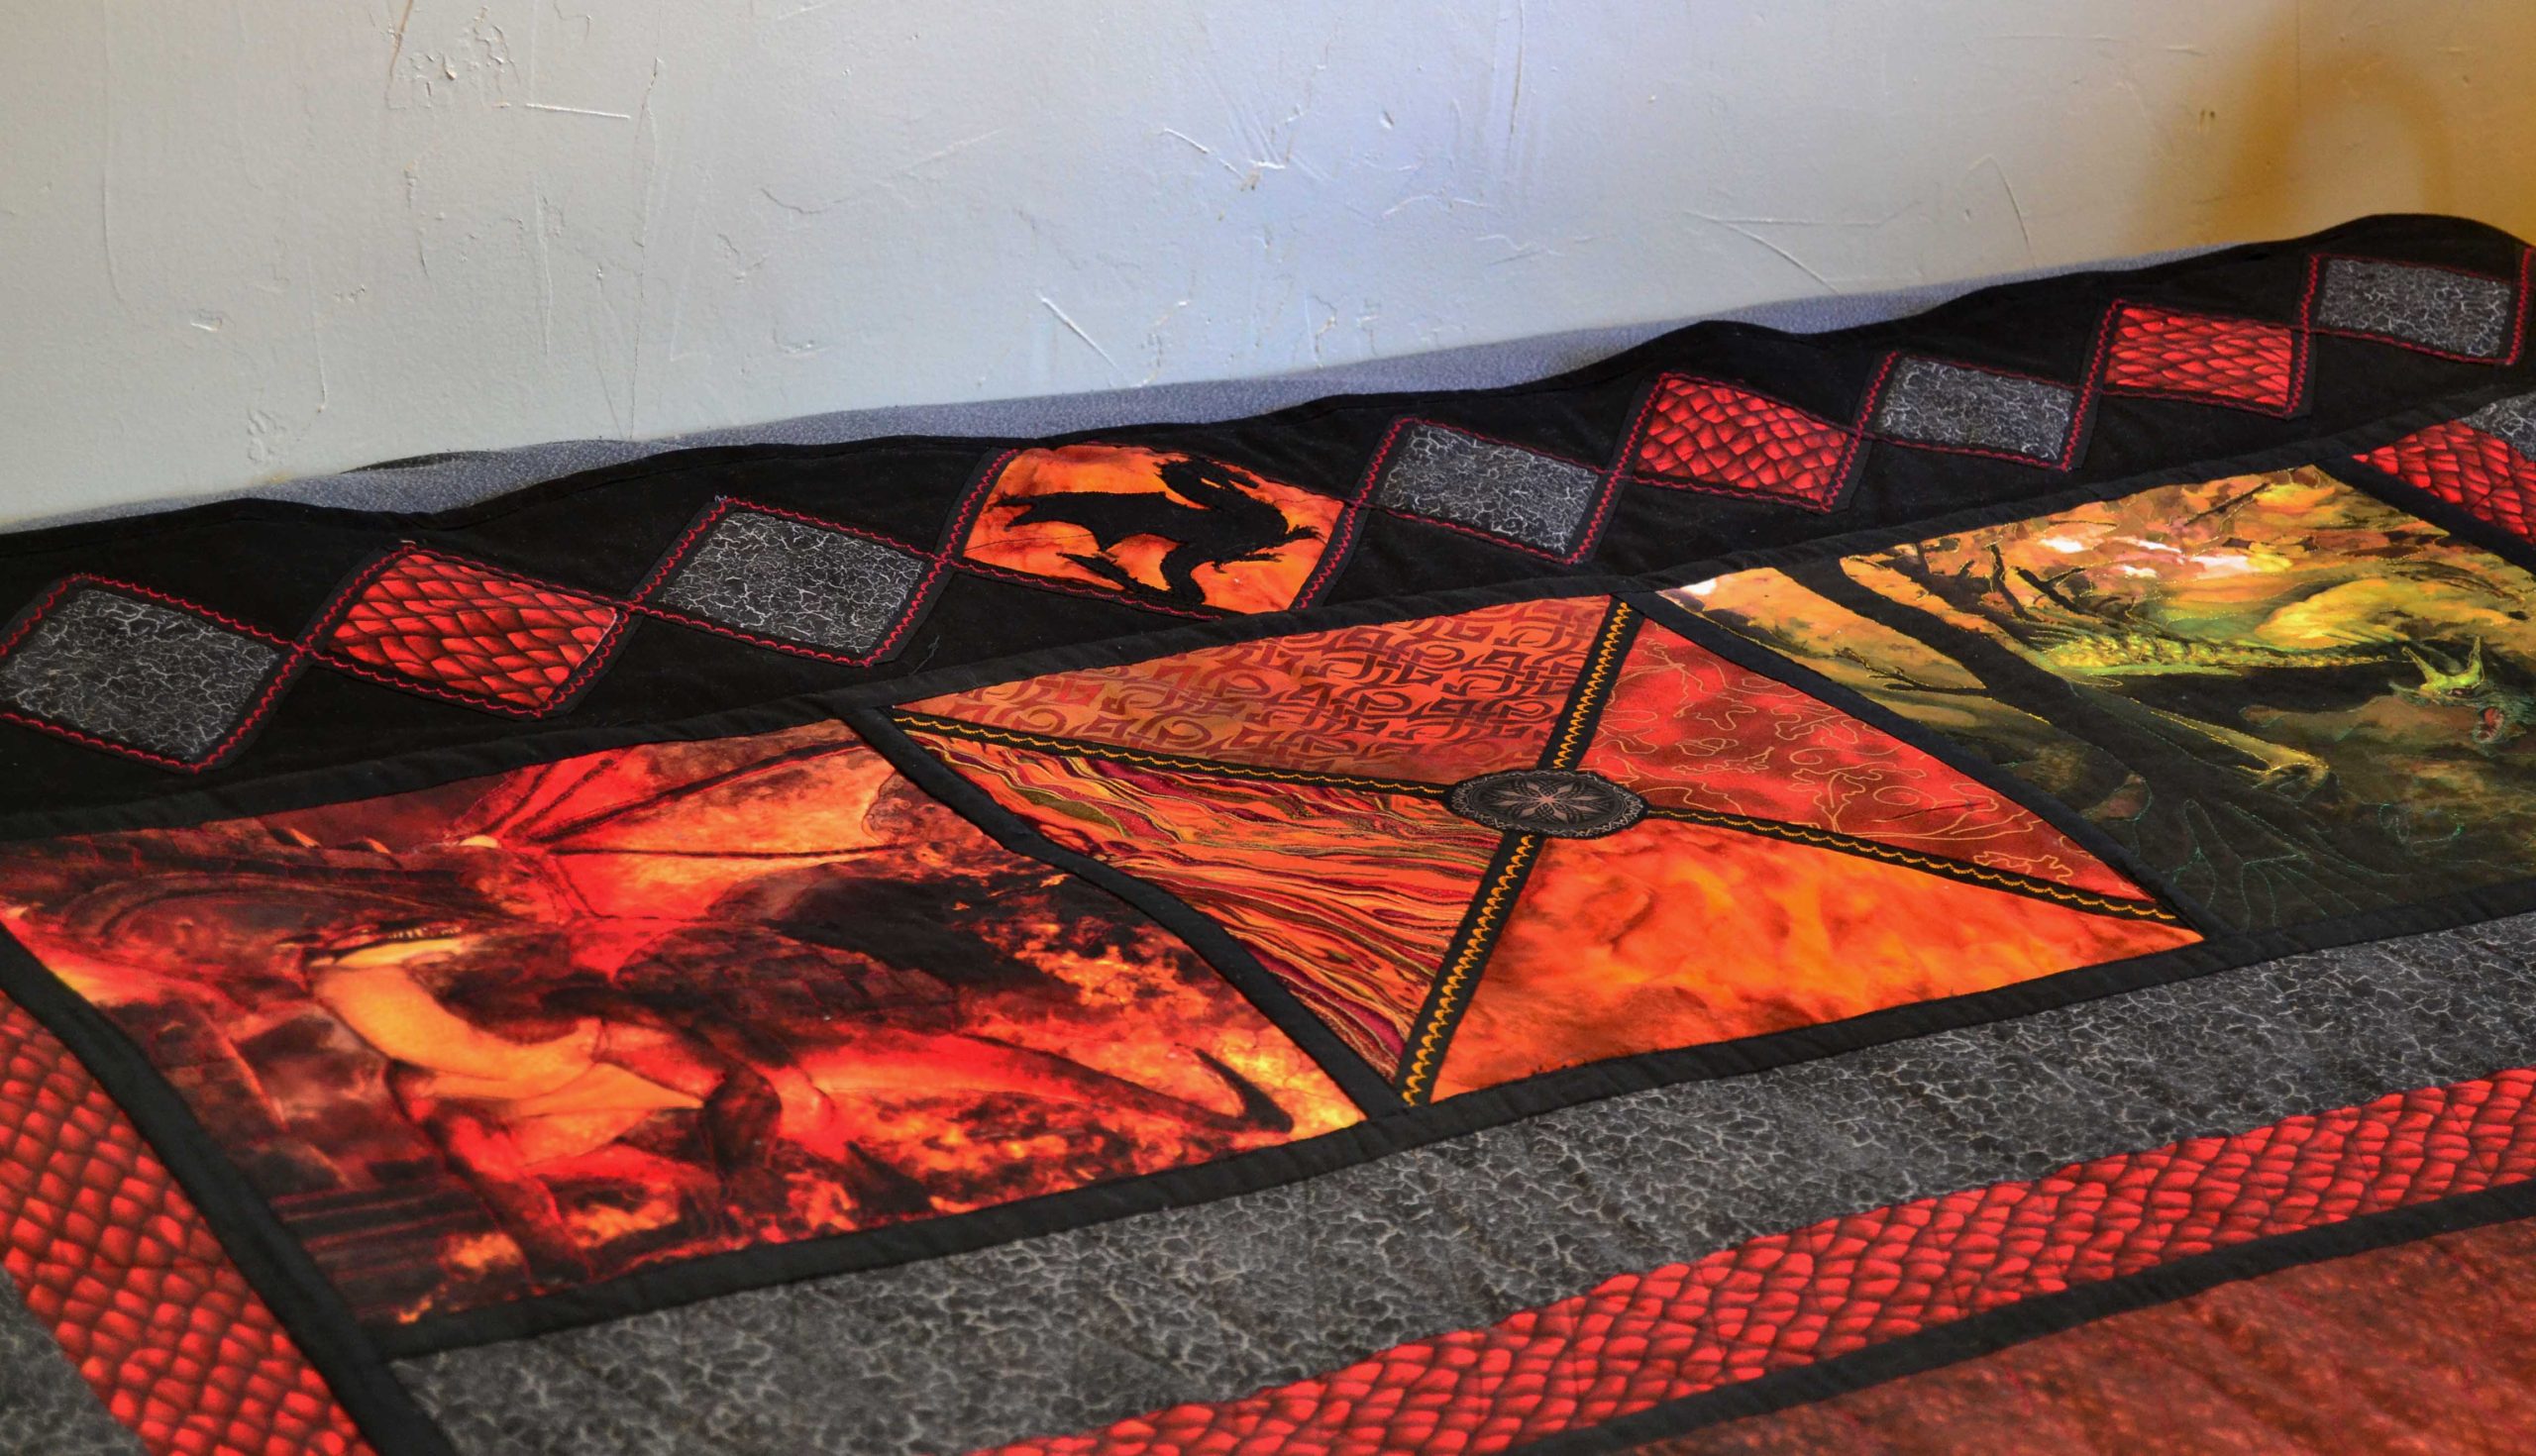
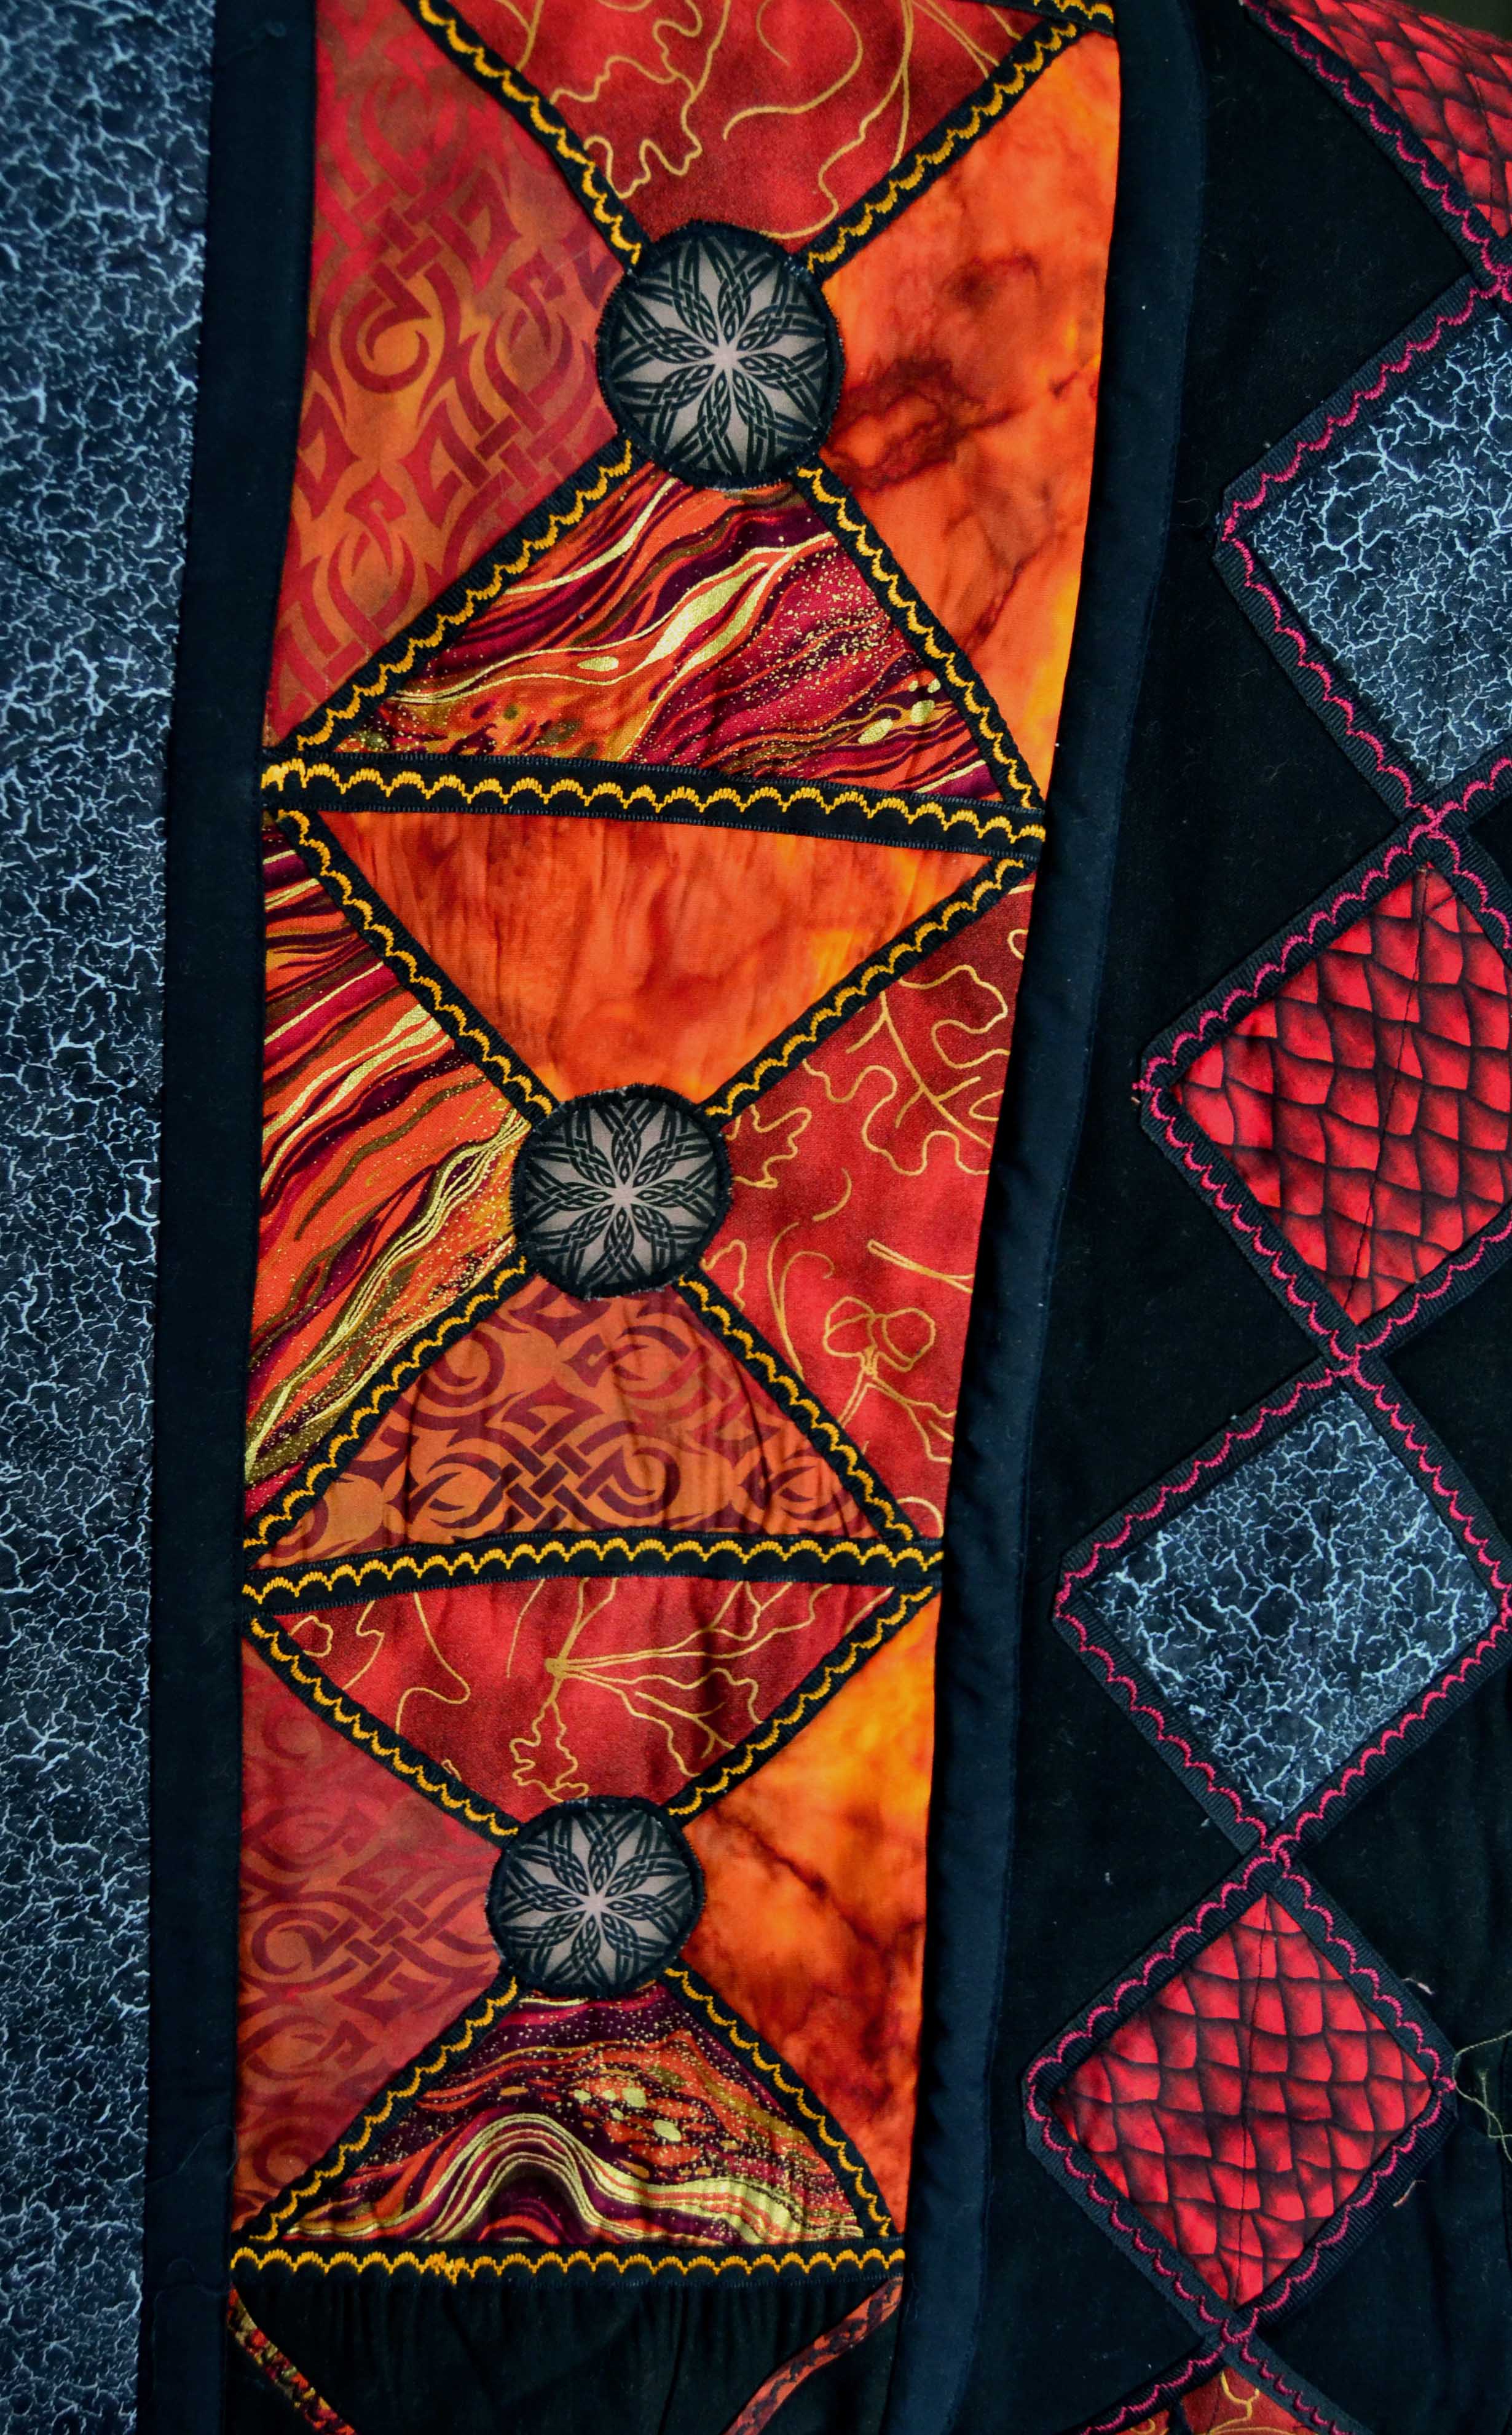
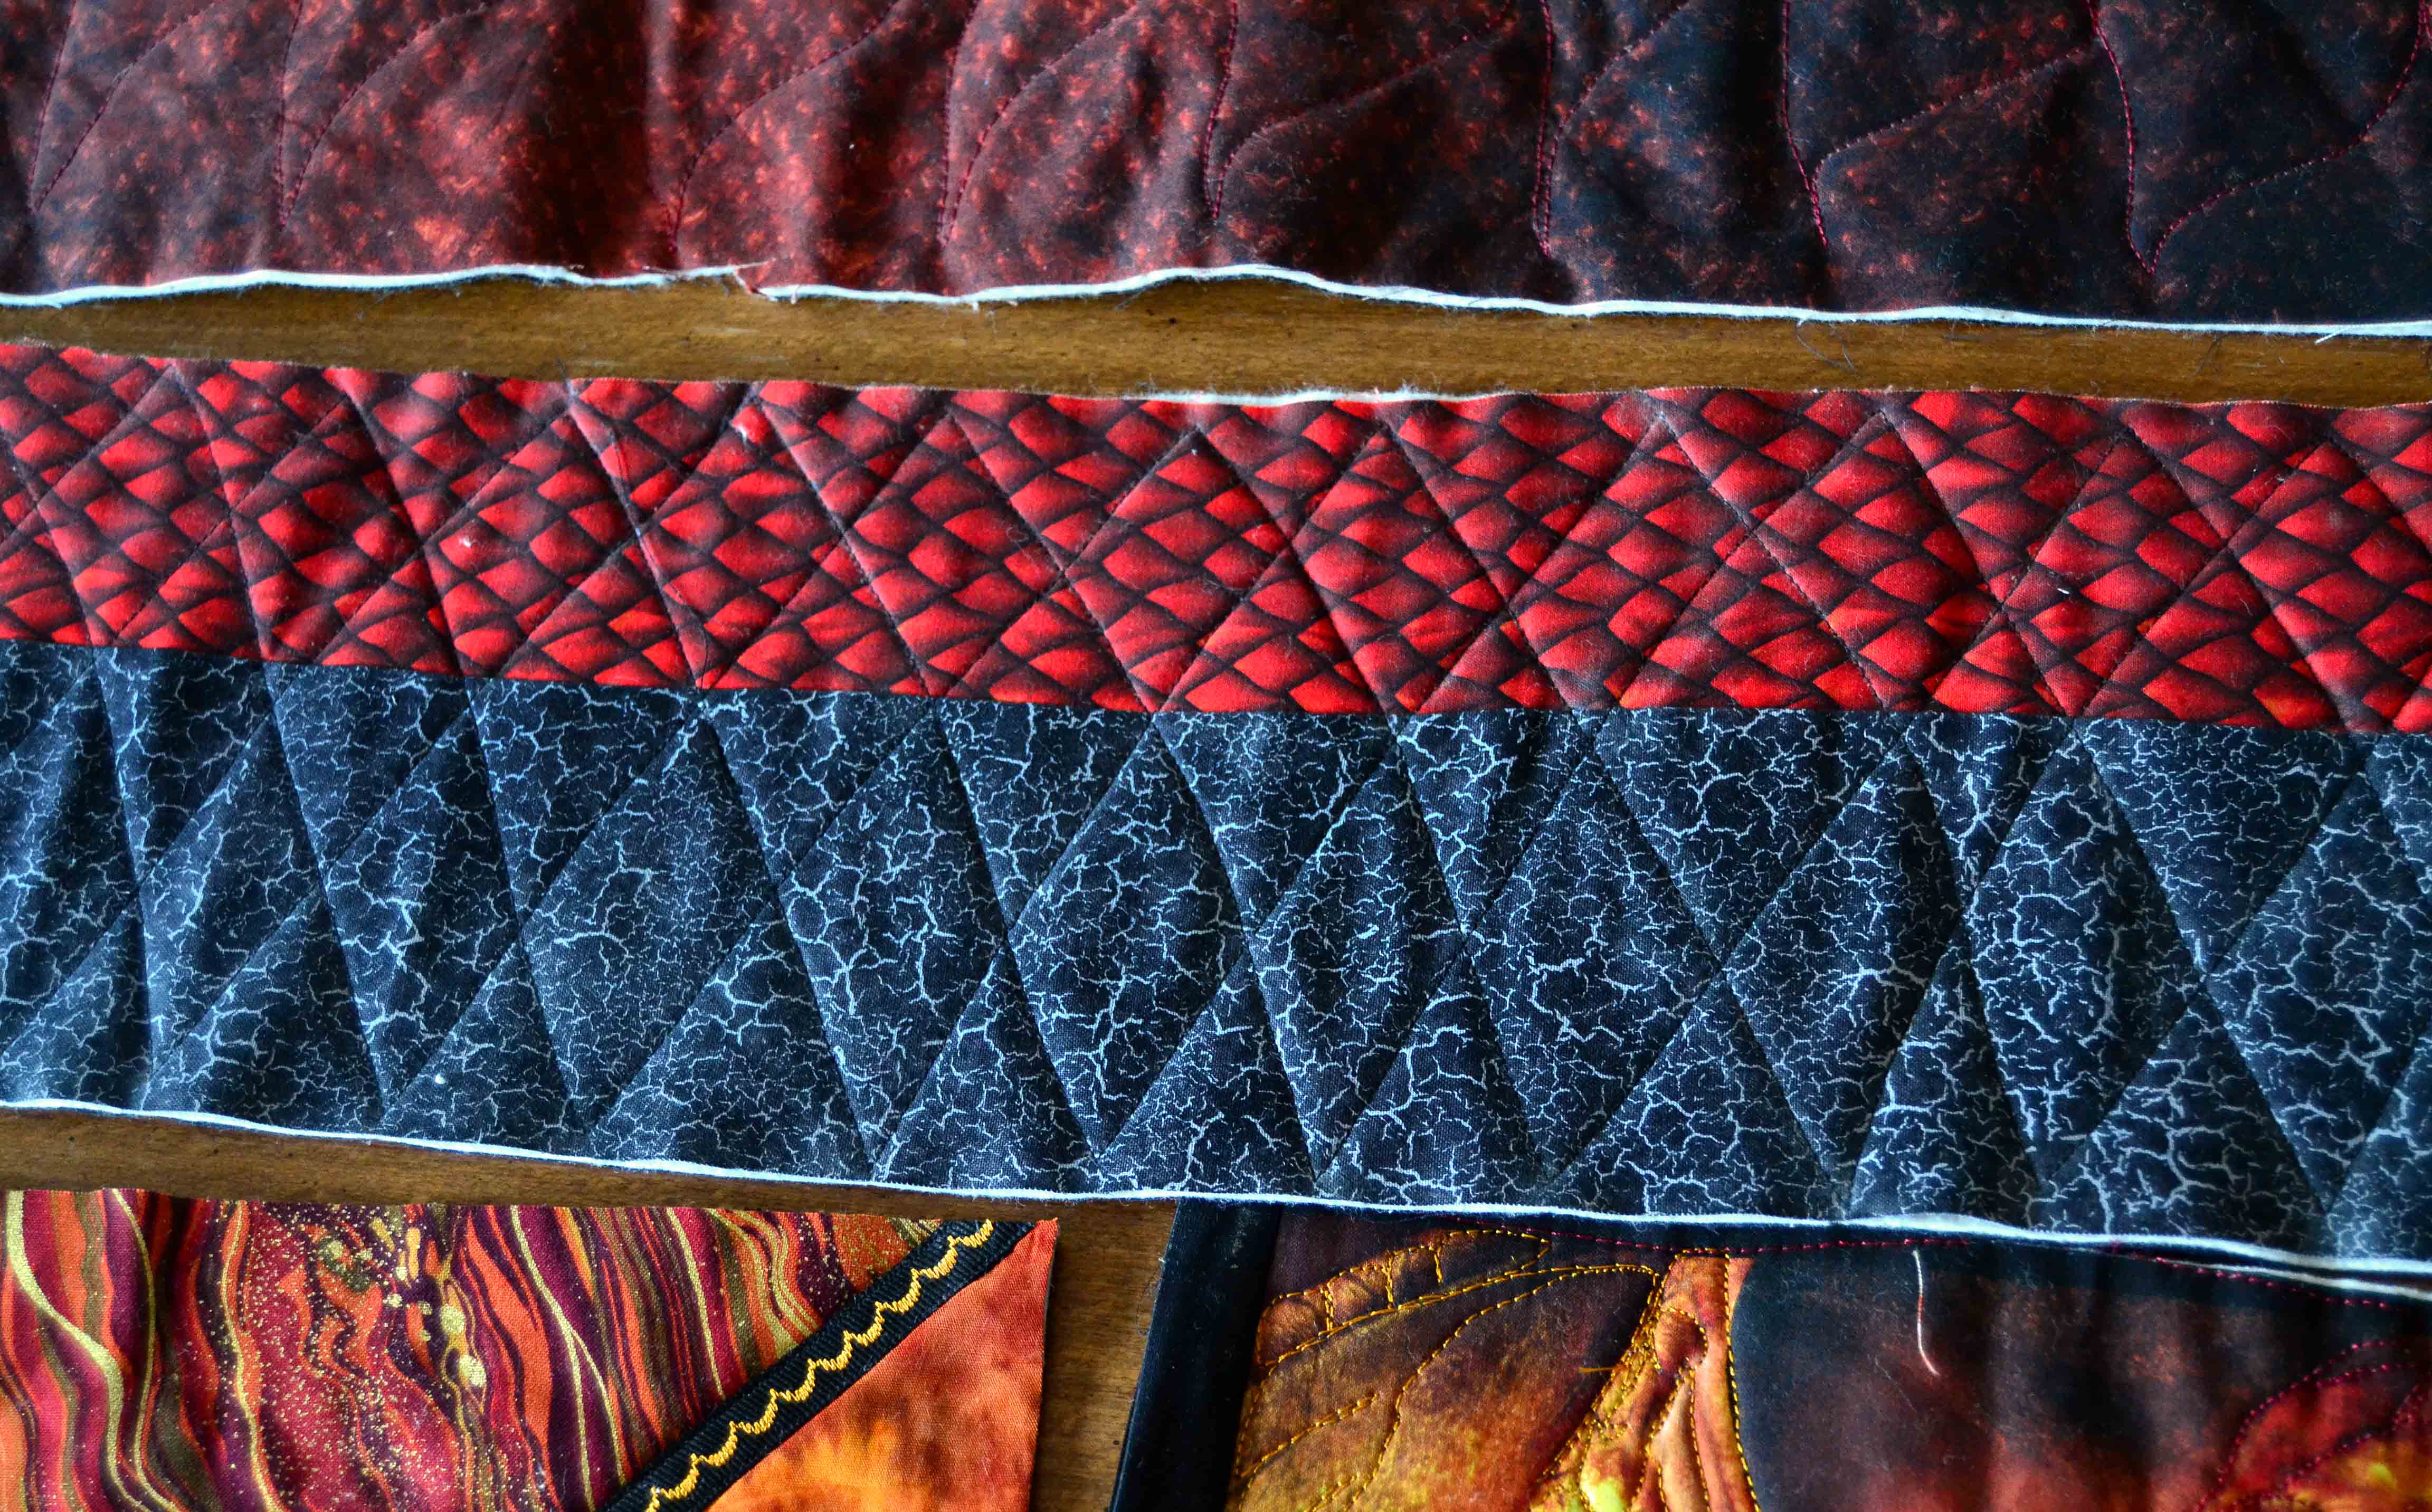
I’ve used them exclusively in some quilts – such as Dragons in my Window – but I try never to use them alone. For instance – in Dragons – the grosgrain leaded design around the large interior window acts as the first interior border, the black sashing functions as the 2nd, and the jeweled strips are the 3rd.
Because the jeweled fabric I used for this interior border was so bright, I didn’t make it into a pattern but left it alone just the way it came. It coordinated beautifully with my theme and I also used separate stars from it on the main dragon itself, to help pull it altogether.
Another way to use strips creatively in an interior border is to use them to separate other interior borders as in my Home Pastures quilt.
Here the brown strips separate the windmill blocks which are the main interior border and give the quilt a neutral breathing space.
Another way to make an interior strip border is to use 2-3 different fabrics and vary the width of each set of strips. For instance – make the 1st strip 1-1/2” wide, the 2nd strip 2-1’2”s wide and the 3rd 3-1/2” wide.
This lends interest and movement at the same time.
Squares
Square blocks are infinitely changeable and designable and as such can meet any border requirement you can imagine. Listed are just a few:
Patch – These are very easy to make and allow you to incorporate an entire spectrum of colors and shades.
4-Patch – These are just like 9-patch, but even simpler.
4-Patch Triangles – These are just as simple as the regular 4-patch, but give a completely different look to the finished block. You simply cut each block on the diagonal, re-sew with another color, re-cut on the opposite diagonal, and re-sew with a coordinating section. This triangular configuration can be very eye-catching without being overwhelming.
2 Triangle Block – This requires one less step than the 4-patch triangular block. Simply cut a block on the diagonal and re-sew with another color.
Plain Squares – Set on point solid squares are also very attractive especially if the square itself is a bold color while the 4 surrounding triangles are fabrics from your quilt.
Windmill/ Pinwheel – This is one of my favorite because, as I said earlier, it gives you 2 completely different looking squares with only the same amount of effort as making one takes. Windmill blocks are made from 4 different fabric strips, and their genius lies in the way they’re cut and re-sewn.
Consider Adding Embellishments
Any of you who’ve read my blogs know that I love enhancement in any form, from ribbons to flowers, from beads to buttons. Look at your border blocks and think if you can add anything to them to enhance the theme of your quilt.
In my Ocean Maidens quilt, we added silver netting and silver rope along with ‘jewels’ to help along the idea of a tide pool.
In the dragon quilt I’m making now, I’m going to construct my interior borders from 4-patch triangle blocks and then I’m going to cover the seams with black grosgrain ribbon to give it a stained glass look, because (for me) dragons are medieval-ish and so are stained glass windows. I may even have to add a fancy stitch across each ribbon with the threads I’m using to quilt the panels.
The beauty’s in the details, friends!
Exterior Borders
Most exterior borders are made of strips and are mainly used to bring the quilt up to the size you want it.
Calculating a Quilt Border with a Super-Wide, Single Exterior Border
If you have only a narrow width to construct, one strip of one width is fine. If your exterior border needs to be more than 3” wide, however, please consider using more than one strip and alternating their widths as I mentioned above.
This adds interest, flow and color and is much more attractive than one very wide border.
We constructed the Ocean Maidens border this way, using 3 different widths, a plethora of colors and shades and then appliqued mermaids onto it to help detract from the width of the whole thing.
To me, a very wide border just looks desperate, so anything you can add to it to visually lessen the impact is a plus.
If you do need a wide border, consider inserting a filler border in between an outer and inner strip. For instance, you can place a coordinating triangle border or a 4-patch, etc., in between your 2 outer border strips.
Most of the borders I mentioned as working with interior borders will also work with an exterior border – given some resizing and imagination.
Basically, there are a LOT of different ideas for exterior borders floating around in the quilting universe, and if constructing complicated and visually stunning exterior border is your thing then more power to you!
The Easiest Exterior Border Ever – the Piano Key Border
This is exactly what it sounds like. You simply take all the fabrics you’ve used in your quilt, cut them all the same width and length you need, and sew them together horizontally. This is a great border for children’s quilts as it adds a lot of visual interest.
Sweet Roses’ first border is a large pinwheel block, the second is a piano key, the third is a solid strip, and the final is another scrappy piano key…
Sashing
I always construct my panel quilts as if they were “quilt as you go” blocks. This technique requires sashing, and this is also a border, don’t forget!
As such, it should coordinate well with the colors of your quilt and you can use it to either ‘pop’ by itself or blend in with the rest of the border. The choice is yours but remember, even though sashing is very narrow, it makes a big impact so choose wisely. You’ll use a lot of it.
Final Note on Calculating a Quilt Border
When you have decided what size blocks you’re going to make for your borders, cut the basic, starting blocks or strips at least 2”-3” larger, longer, and wider than you want your finished blocks to be.
This gives you plenty of wiggle room because you need to factor in the inches that the seams will take up, as well as the fact that crazy blocks NEVER sew back together with all of the edges nice and even, no matter how careful you are.
Trust me on this – I have made hundreds of these blocks. So you will need to have the extra room for trimming the block down to the size you want it.
To the greater good of your quiltivity (and please let us know if you’d like us to do patterns or instructional videos on any of these techniques and patterns via karyl@pybdesigns.com.)
After my sewing disasters in Home Economics classes in Junior High and High School, it took another 16 years before I wanted to sew anything again. And when I did, it was because the man I’d married was 6’6” long and tall…and a rancher, and finding working shirts, jackets, and coveralls that fit him was a nightmare.
Remember,
these were the days of no internet!
So
that got me into sewing again and I did my duty, but it was when Suzanna made
her appearance and was so adorable that I started to really enjoy sewing
again. A grandma I met in a trip to
Texas when Suzanna was 2 gave me a box full of children’s patterns from 0 – 10
and this really started my imagination going.
Then
I discovered Thrift Stores, etc. and my sewing for the kids gradually petered
out, so I started looking for another outlet for my genius and discovered
quilting! I really enjoyed all of this,
but the one thing that bothered me a great deal when the kids were babies was
all of the money that I spent on disposable diapers.
Why I Didn’t Use the Obvious
Alternative
I
didn’t use cloth diapers because the weird-but-true fact was that in our
isolated neck of the woods there were no such things as cloth diapers to be
had. And besides that we had to haul
every drop of water we used.
However,
this did not negate the amount of money I spent on those disposable or the
guilt I felt every time I threw one away.
A Saner – And More Environmentally
Friendly – Diaper Solution
So it was with great interest that I discovered the Babyville Boutique line of baby accessories in a JOANN Fabric store about 3 years ago.
The
pattern book I purchased for the diaper patterns was laid out with easy to
follow instructions and lots of pictures to help you along. They have
also developed a cotton/polyurethane cloth that sort of feels like plastic (but isn’t) that goes on the outside of
each diaper and is leak proof.
This
delightful stuff also comes in tons of cute colors and designs which just make
my fingers itch to start sewing.
The
powers that be have also developed soft, wide, folded elastic in matching
colors that you sew all around the outside of the diaper and that help the
diaper to conform snugly to the shape of your baby’s bottom.
I
purchased some of this stuff and made a number of diapers and I have to say, it
almost made me want another baby these diapers are so cute.
Almost!
The
fact that I’m physically too old now was a great relief to the rest of the
family! But, grandkids will be coming
and I will be ready.
Money-Practical Reasons to Create
Your Own Homemade Diapers
I
decided to run the numbers just for fun – because this is what I do when I’m
sewing. I figure out how many pieces I
sewn together, or how many yards of thread I’ve sewn into a project, or how
many diapers a baby uses each month.
As
I figure it, this number is somewhere between 250-300 diapers! Each month!!!
For
approximately 24 months, which makes the diaper usage total approximately 7,200! I say approximate because kids do potty-train
at different ages, but I feel that this staggering number is a fair average.
This
life total does not count the diapers you may need at the end of your life, but
that’s a different blog altogether!
So,
you have to purchase 7,200 diapers for each baby assuming that they’re potty-trained
by 2.
I’m no longer au courant on what disposable diapers cost, but I can only imagine that the price of the material needed to make enough reusable, homemade baby diapers is significantly less than even a few months of disposable diapers.
How Many Homemade Baby Diapers
Should You Make?
As
I was thinking about this astonishing number, 7,200, I looked at the tiny
little newborn diaper I was sewing and thought about how fast babies grow and
how long a newborn would fit into that tiny little diaper scrap.
Which
led to me thinking about how many I would need to get a baby through each stage
of growth till 2 years old.
My
final number ended up being around 24 diapers per stage and if every stage is
approximately 3 months long, then you would need approximately 100 diapers for
a baby’s life total!!! This is 7,100
diapers less than when you use disposables. The cherry on top being that you can use them
for any subsequent babies you have.
Assuming you have 3 children – like I did – you would need 100 hand-sewn, adorable, machine-washable
and re-usable cloth diapers vs 21,600
disposable ones.
This
is a HUGE difference to both your wallet and the environment, so I would really
like to encourage you to consider this option.
The Best Patterns & Materials
for Creating Homemade Baby Diapers
There
are many diaper patterns out there, but the one I used was extremely easy to
make – once I got the hang of it – was Babyville Boutique.
Like
I said, I found their diaper fabrics and accessories at JOANN’s so they’re easy
to find, but, being me, I made a slight improvement to the diaper design so
that I could pull the inside padding out of the outside of the diaper to wash
and dry. Just that one little adjustment, and I found you could get a much
better clean on stains, etc., and drying time was cut down by hours not
minutes.
Let
me know if you would like to know how I did this! I always try to answer
questions I receive in the comments section, but the best way to get ahold of
me is to send an email to karyl@pybdesigns.com.
One
word of advice, though.
Babyville
diaper designs have the option of Velcro or snap closures. Because I
didn’t know any better, I purchased the colored matching snaps and the snap
setting machine but found out after I sewed a few diapers that I much preferred
just using the Velcro to close the diapers with. The snaps may come in
handy for bigger, mischievous babies – we know who you are – who decide it
would be fun to pull off their diapers…
But
especially for the smaller babies, I would just go with Velcro closures.
Want Your Own Pre-Made Baby Set for
Yourself or a Baby Shower Gift?
I
have made up a set of newborn diapers that I plan on gifting each of my kids
with when their first babies are born. I think this would be a supremely
practical and also thoughtful gift and I’m really pleased to be able to do this
for them.
If you check out our Etsy Store – Lilies of Grace – we have 2 sets of baby shower gift sets available which include a number of useful new-baby items I’ll talk about in my next blog.
I
think these sets would be really useful if you’re about to become a new mother
– and of course they’d make fantastic, stand-out baby shower gifts if a friend
is about to go through this incredible, but admittedly intense, experience.
To
paraphrase a Texan nurse “save the diaper, save the environment!”