
Almost all quilters – myself included – advise that you name your newly finished quilt with a nametag; today we’re going to talk about why we name and claim our fabric masterpieces, and more practically, how to name a quilt.
The second best part of giving birth is that you get to name that tiny scrap of humanity anything you want. Why do you have that privilege? Because you produced him/her! Giving everything a name was the 1st job that God assigned to Adam in the Garden of Eden so, to my way of thinking, naming something is a right, a privilege, and the honor of it naturally goes to the person who produced “it.”
The same is true of anything you produce during your times of quilivity.
The Power of a Name
Anything that you sew becomes yours, you are the creator – therefore – you are the namer. And, once you name something you are actually claiming it. Just the fact of the naming implies the act of claiming.
The wonderful thing about naming something is that it gives you all the power.
Not only does the thing that is named have to abide by your decision but so does everyone else!! It doesn’t matter what anyone else thinks about the name you bestow on your creation, you alone have all the power in this equation, so use it to the best effect. Below are a few ways that you can creatively name your creations.
The most beautiful nametags are often the ones that break the rules
How to Name a Quilt with Pre-Printed Tags
You can purchase pre-printed tags where all you have to do is fill in the blanks. I’ve seen a few of these available in quilting catalogs, and they seem like a good way to get the job done very quickly, but to my mind there are a number of difficulties as well.
Grain of Salt Advisory – I’ve never used a pre-printed tag, so these thoughts are based on opinions and guesswork, not lived experience.
Problems with Pre-Printed Nametags
- What if the name of your project doesn’t fit on their lines?
- You will have to make your own tag then.
- What if there aren’t enough lines?
- You will have to make your own tag then.
- What if there isn’t enough height between the lines?
- You will have to make your own tag then.
- What if the style of the tag is all wrong and doesn’t correspond at all to the theme of your project?
- You will have to make your own tag then.
How to Name a Quilt by Making Your Own Name Tags
Obviously, sooner or later you are going to have to make your own name tags – by this I mean both the background, fabric size, shape, and edging of the tag as well as the writing on it.
So you may as well learn how to make them right, learn how to make your letters the way you want them, how to measure and draw lines for all you want to say, and how to attach them to your projects.
How to Come Up with a Name for Your Quilted Masterpiece
While you’re doing all of this you should be trying out different names for your project. Naming something is fun, and so it’s a good idea to get your family involved. Try out a different name every few days – you will know instinctively when you’ve found the right one.
Use Alliteration
Words go very well together when they all start with the same letter and they’re much easier to remember. So, if at all possible, alliterate!
Give Your Creation a Name That Correlates With the Theme of the Project
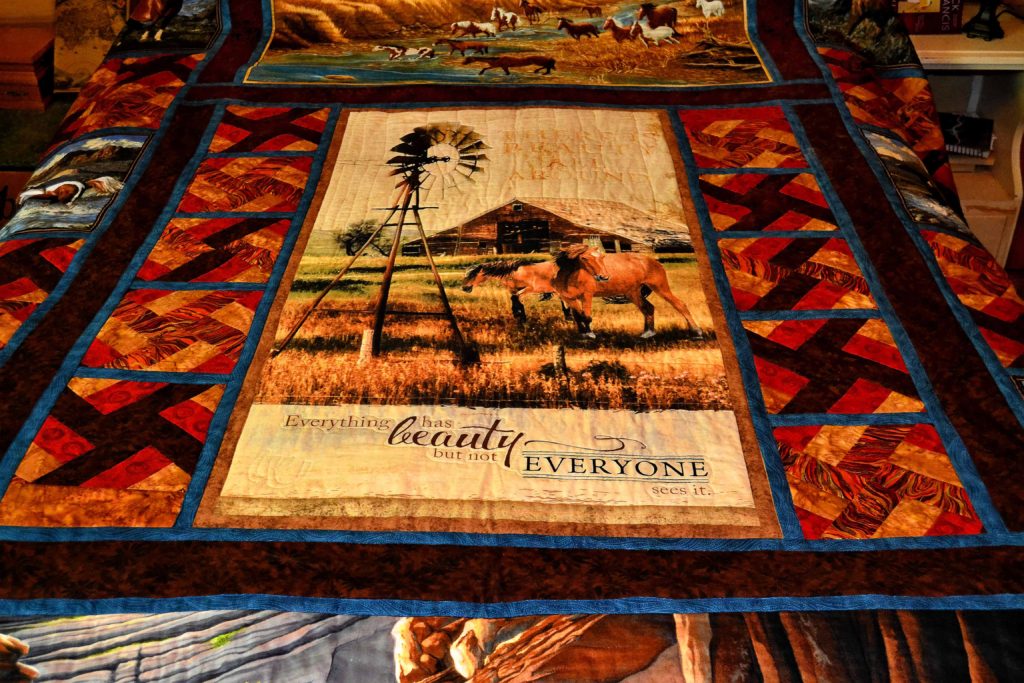
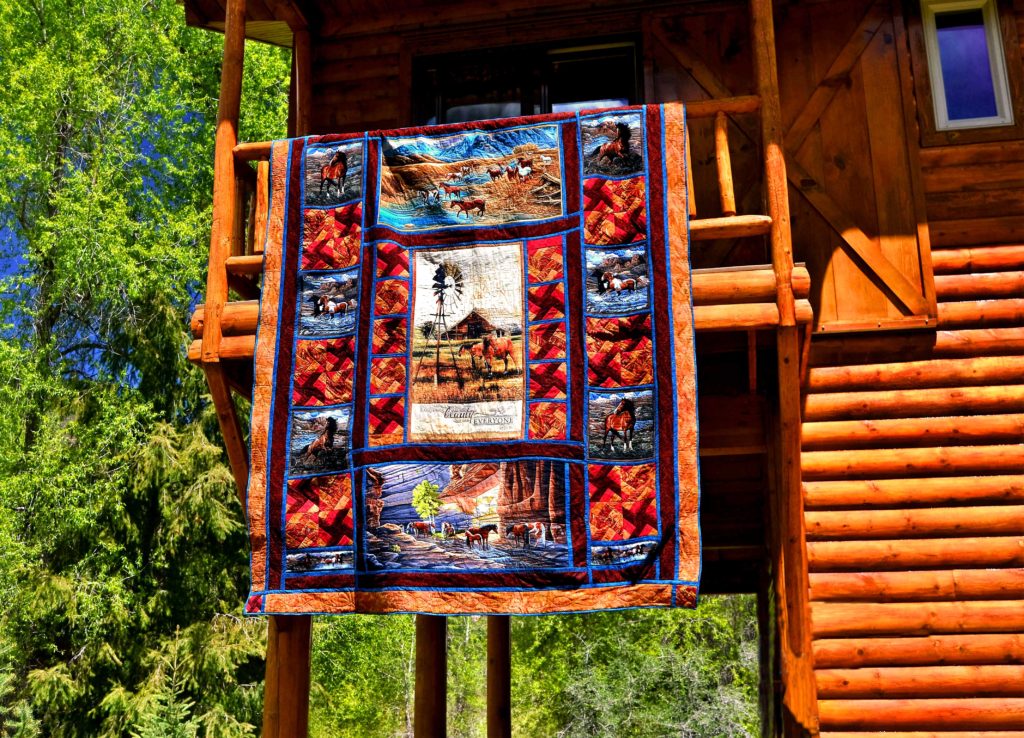
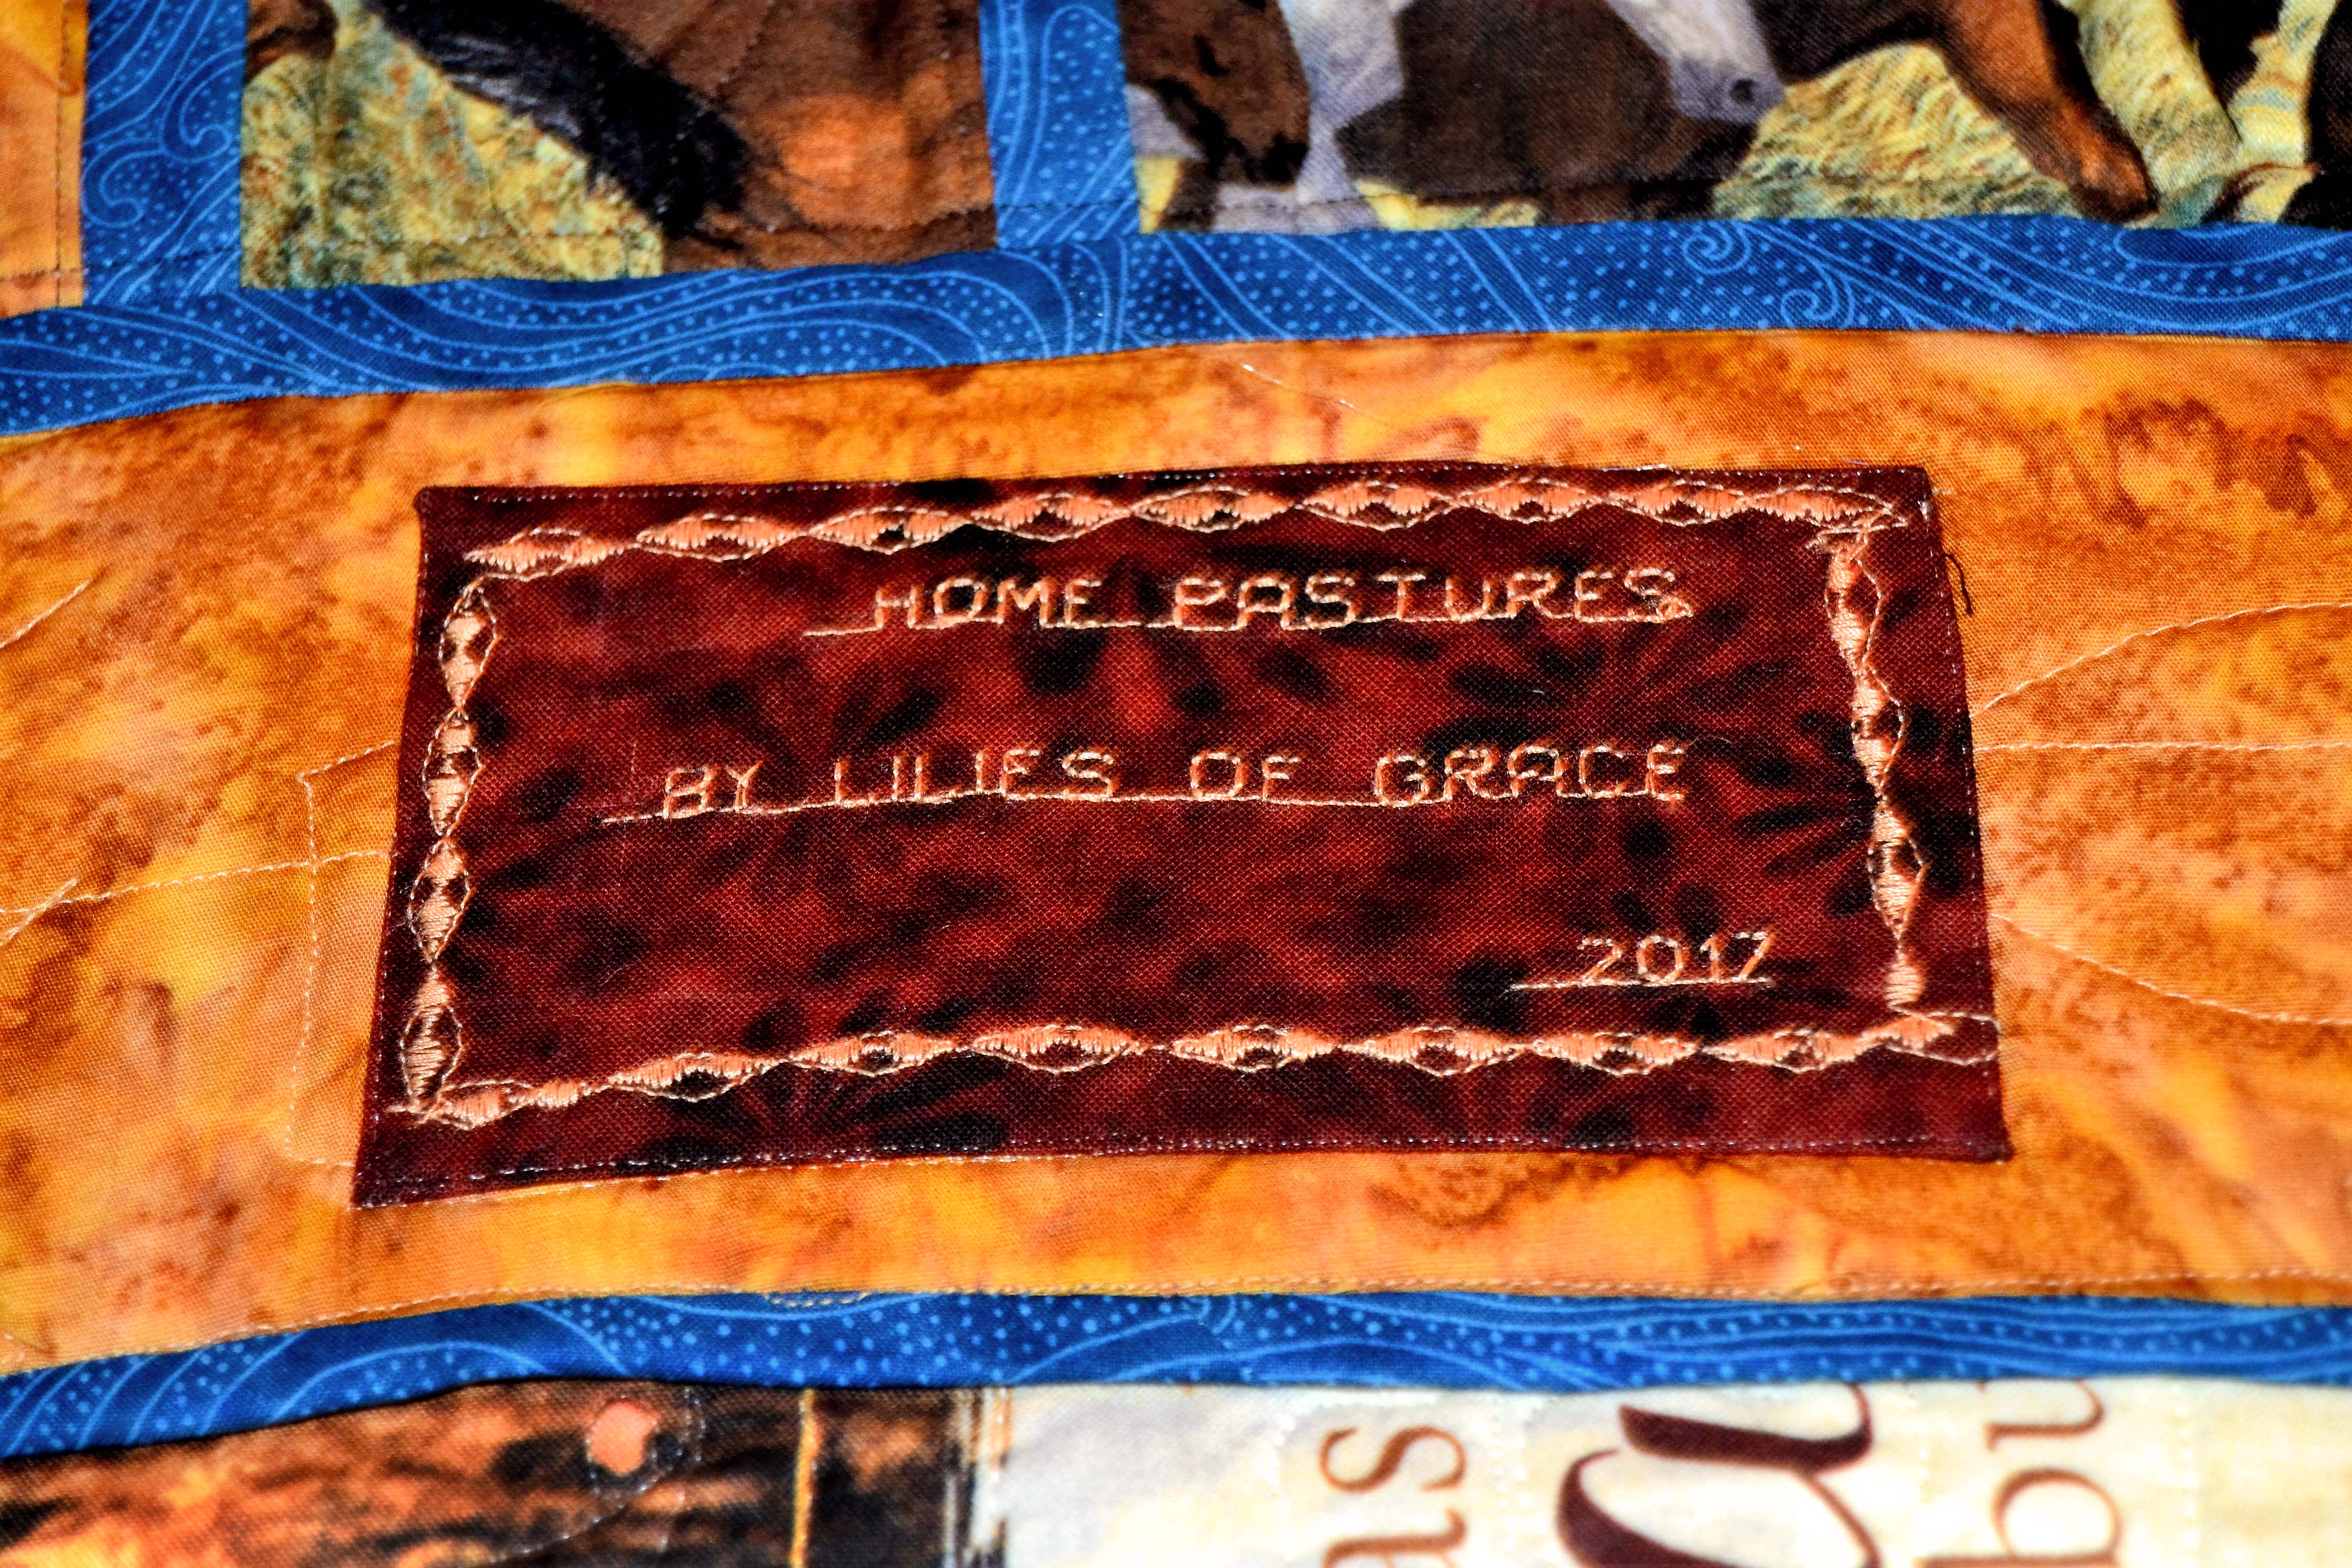
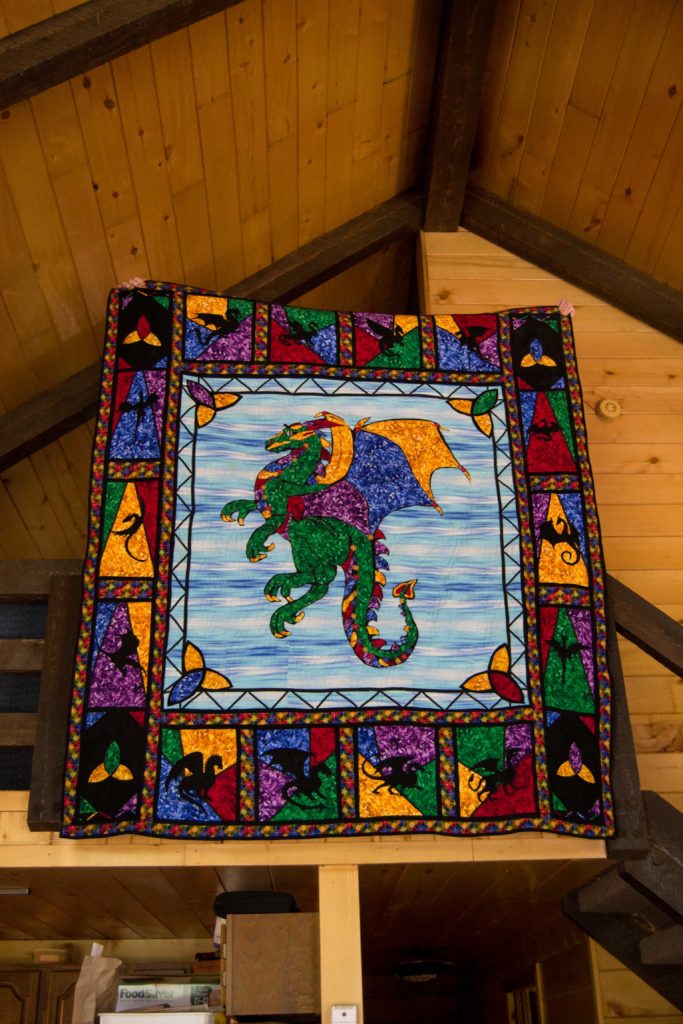
For instance, since our horse quilt had 11 different panels we decided to name it “Home Pastures” because all of the horses were in their separate, home pastures. We named our frog on a lily pad – “My Pad” – because the frog was on the lily pad but also because he has attitude.
So think mostly about what your quilt is saying while you think of a name.
Try to Keep it Short!
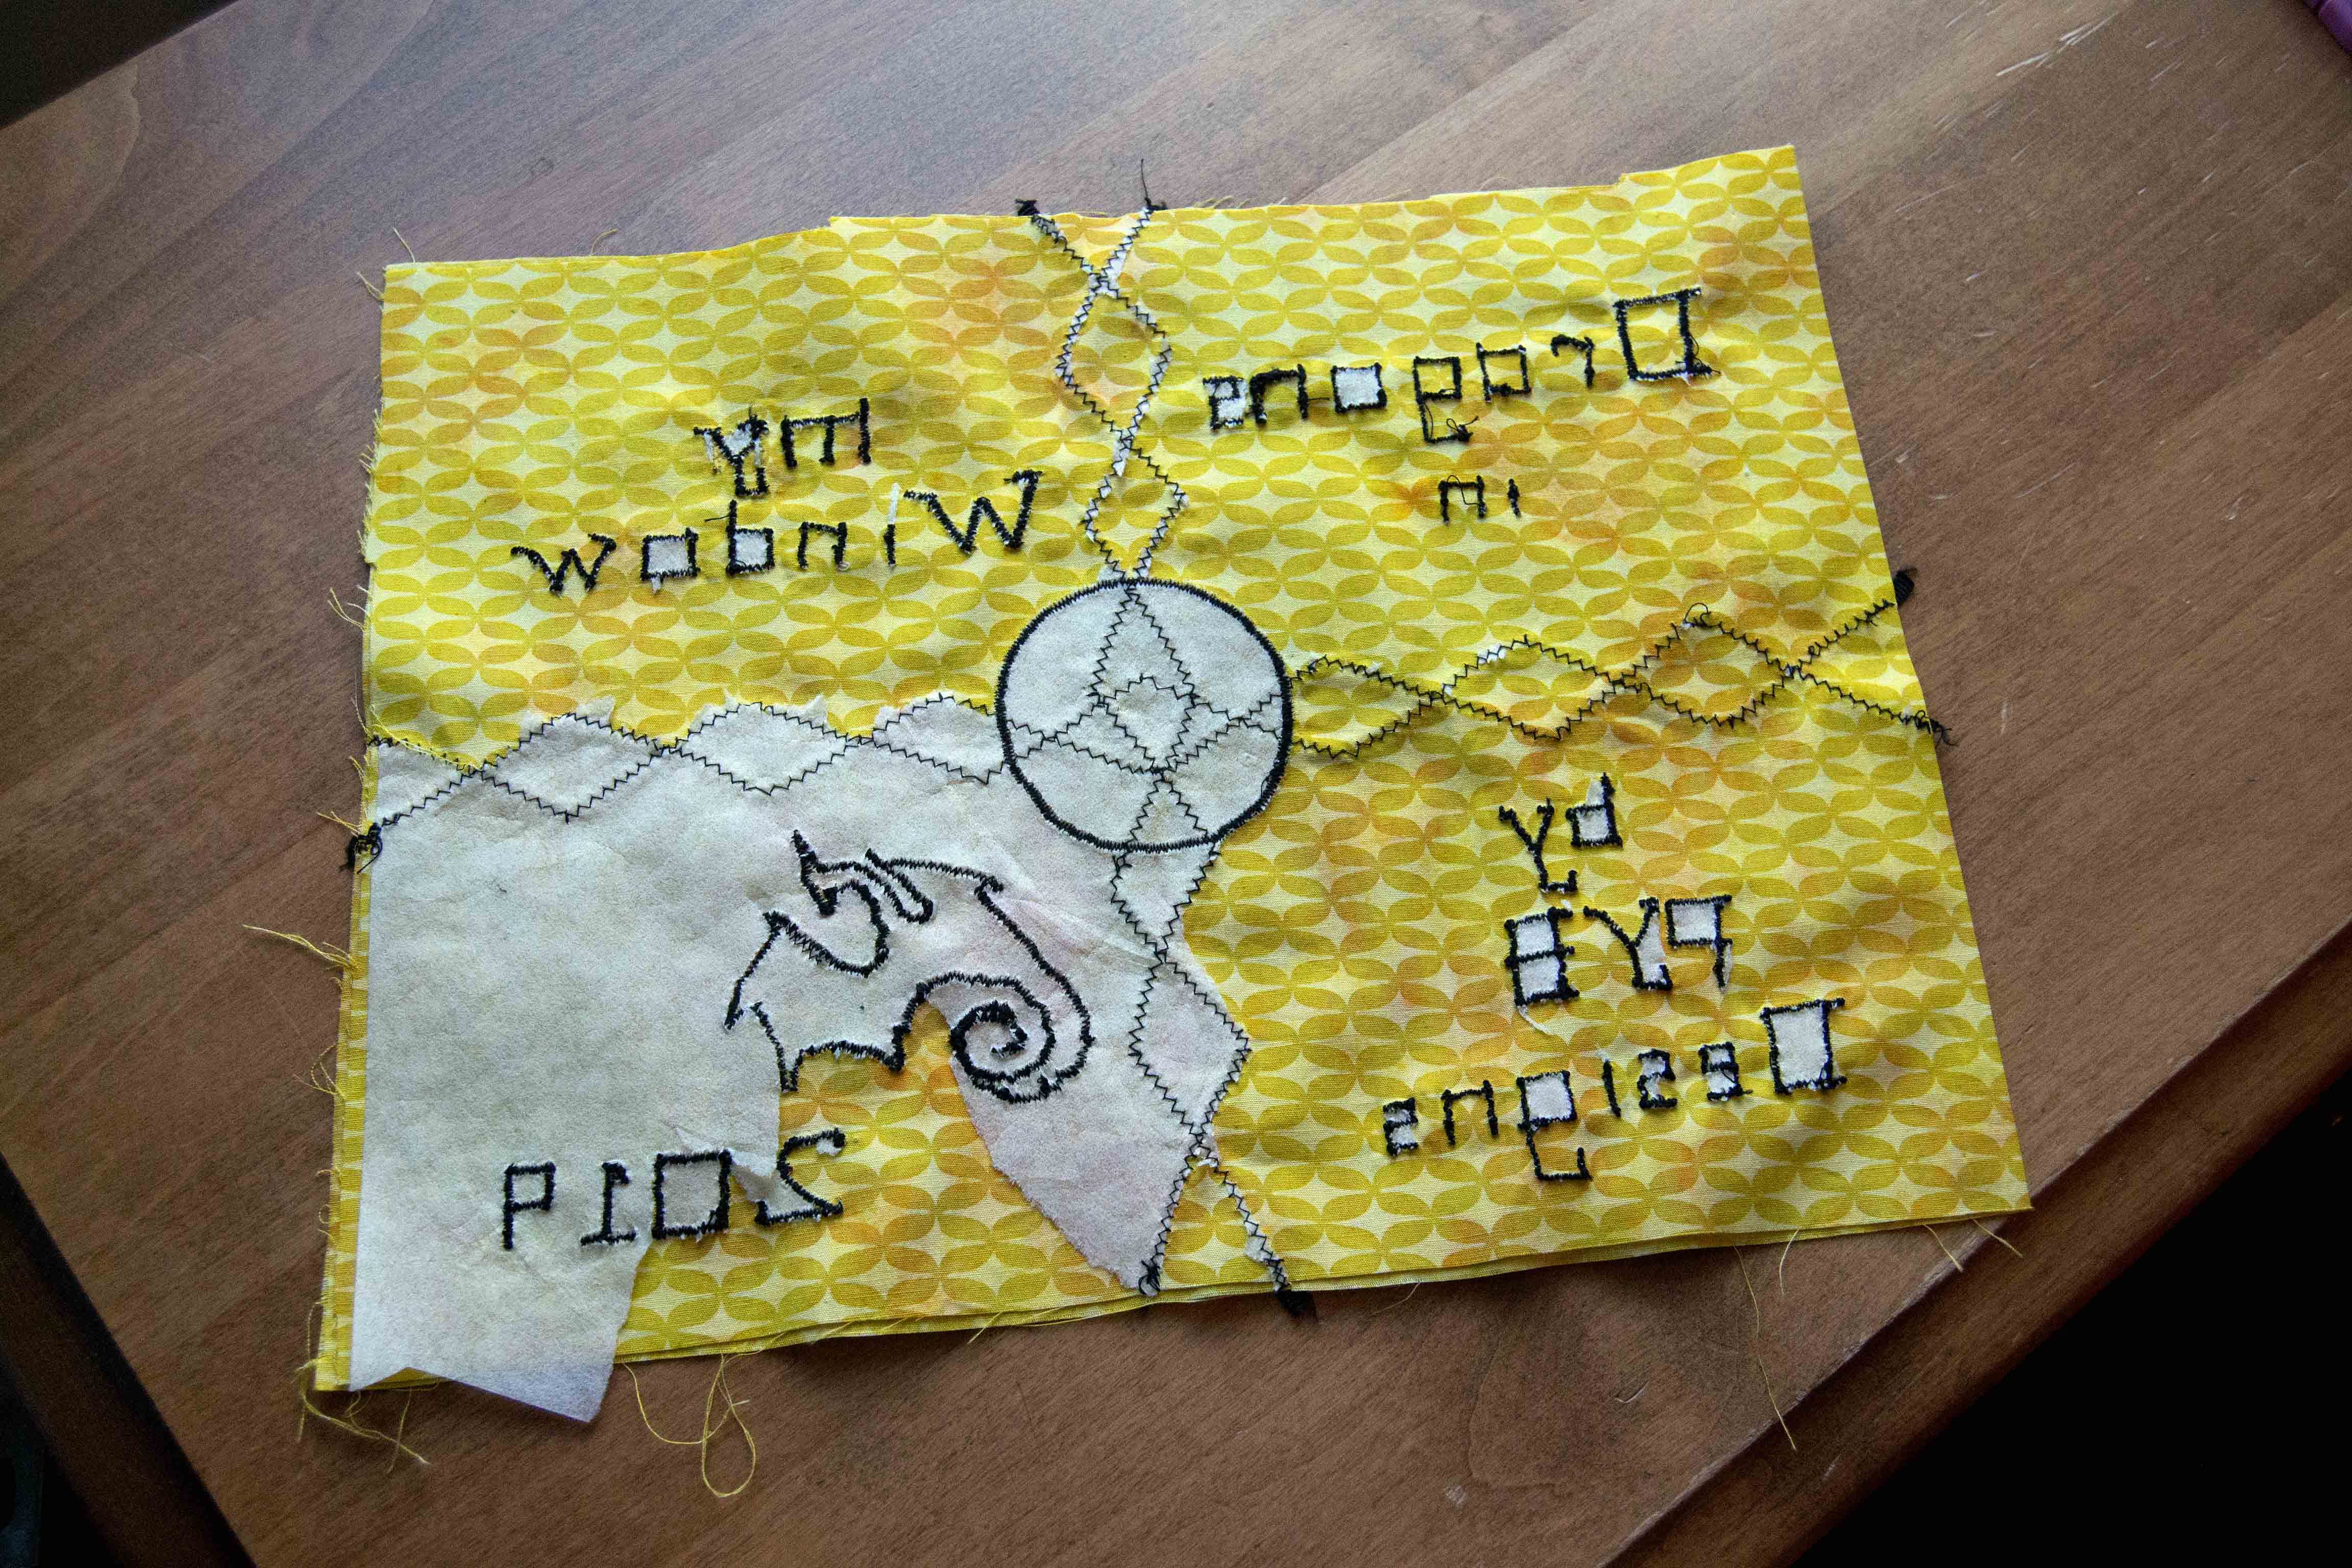
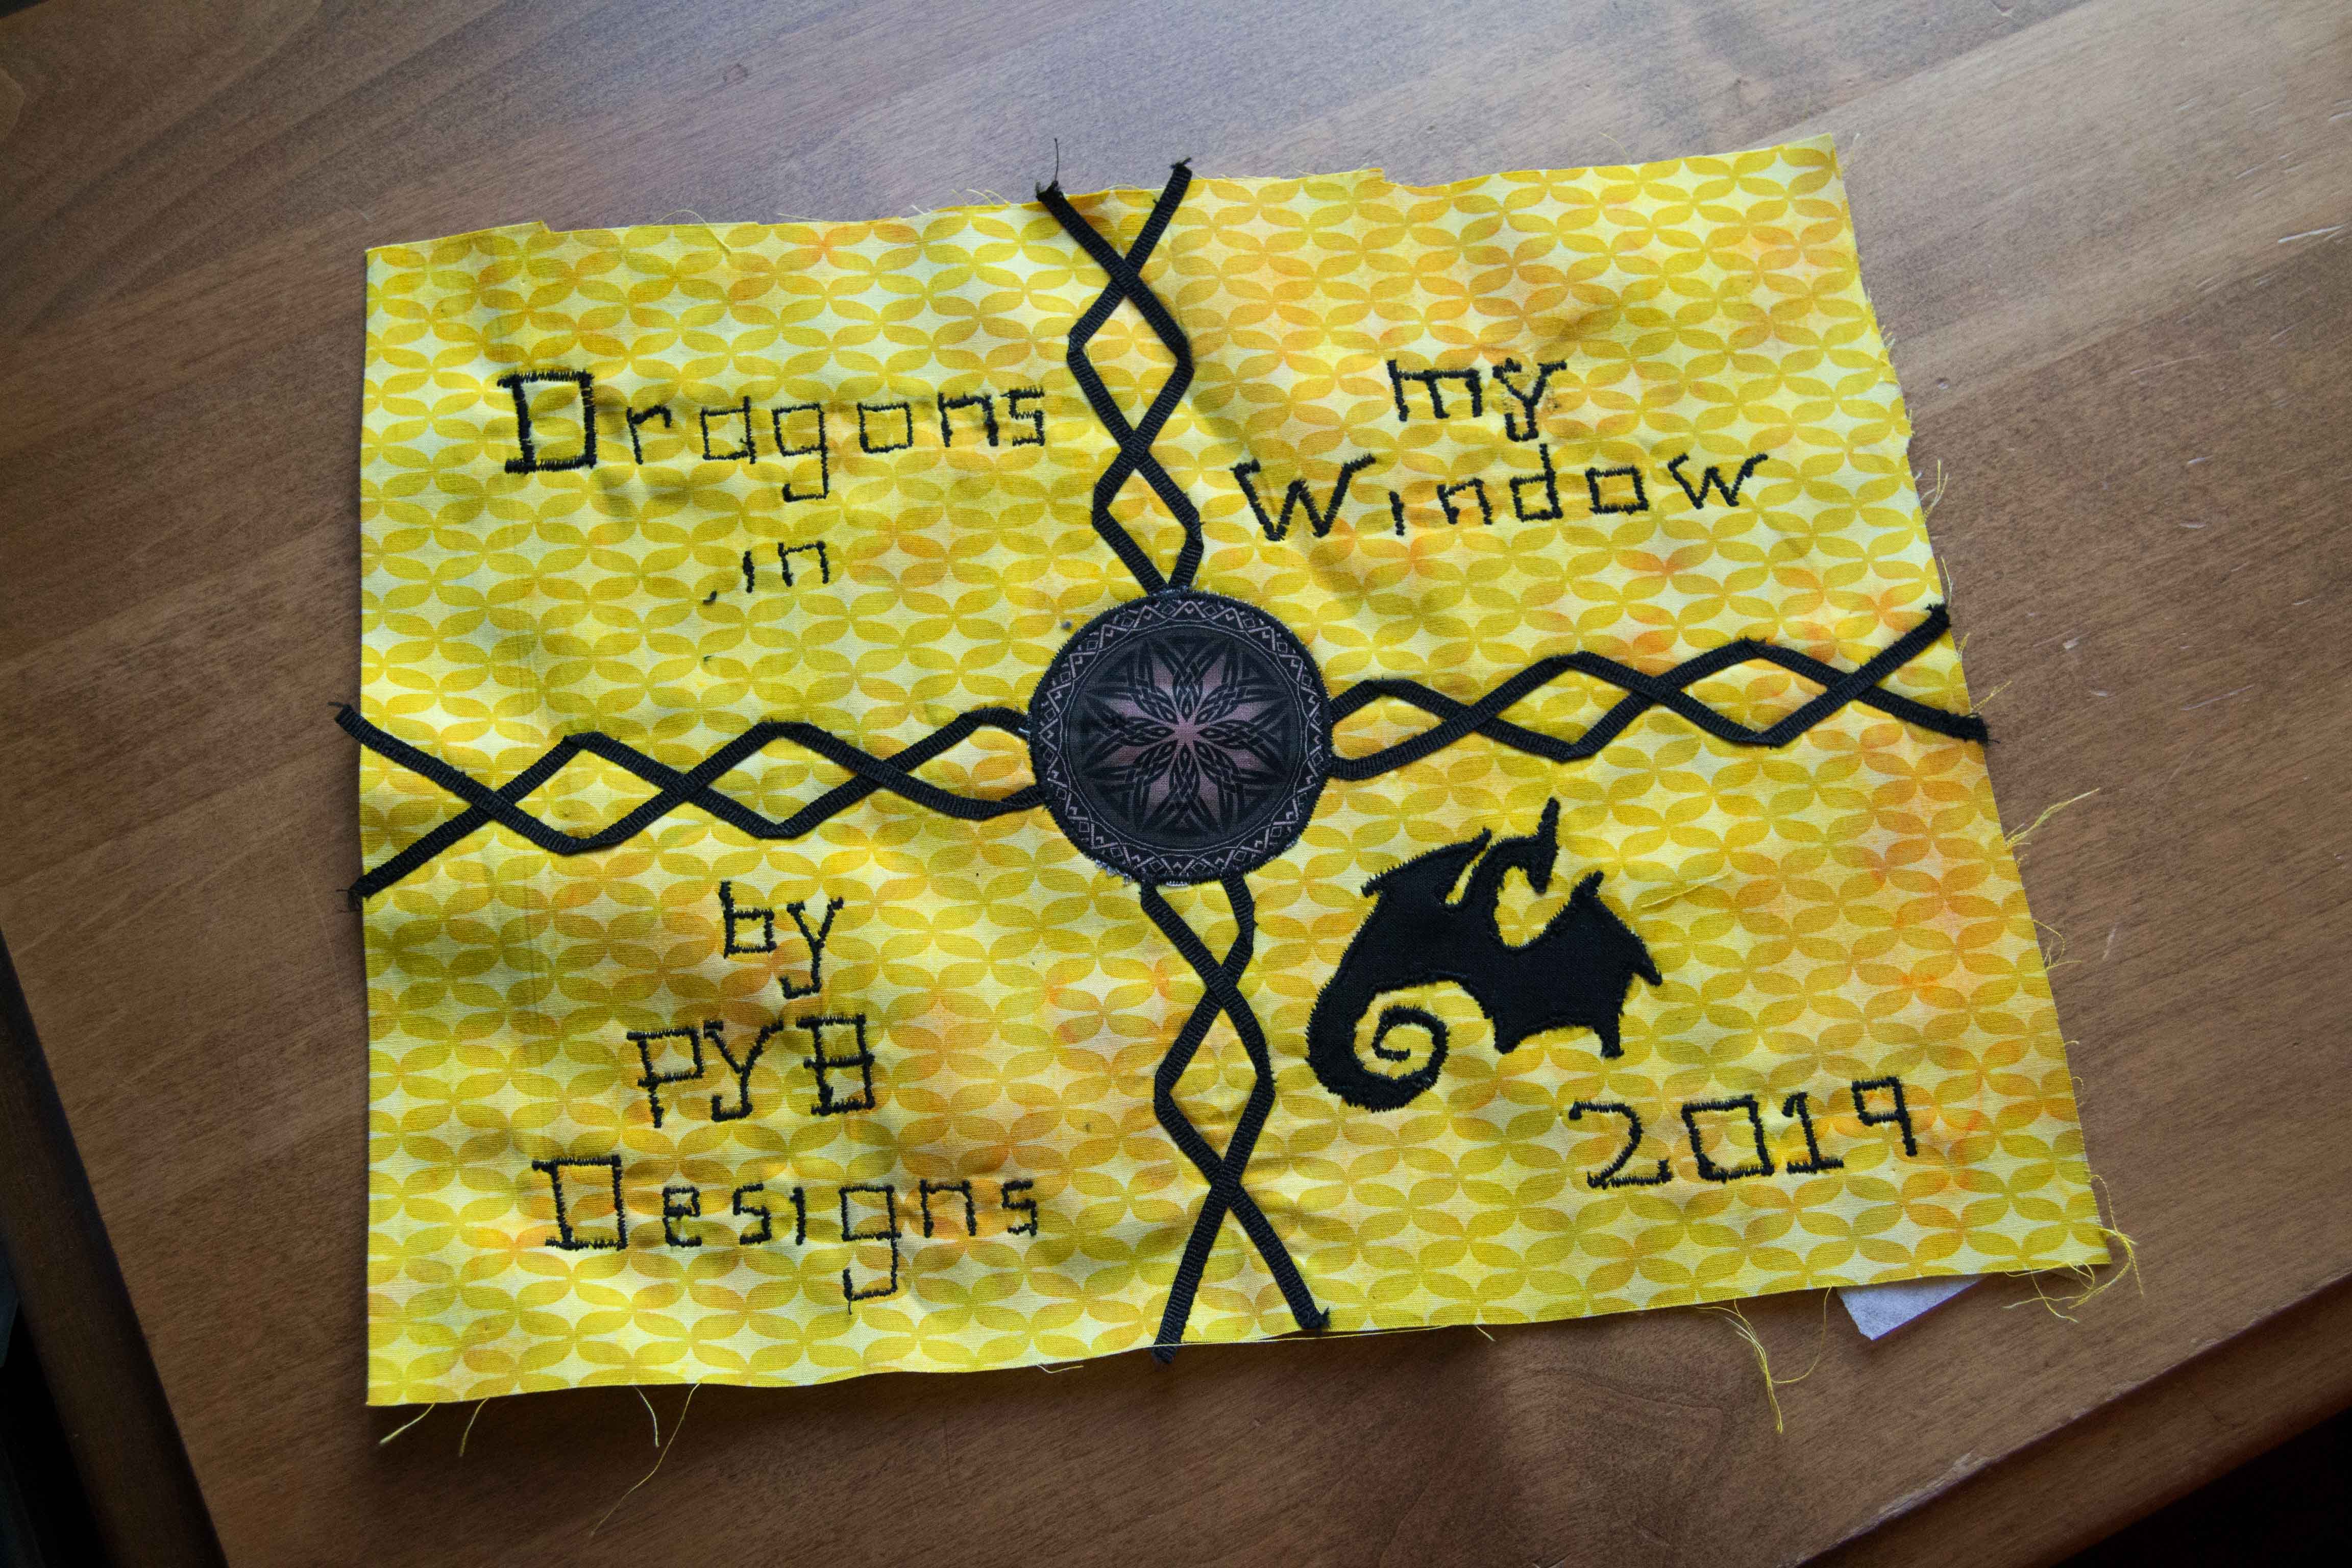
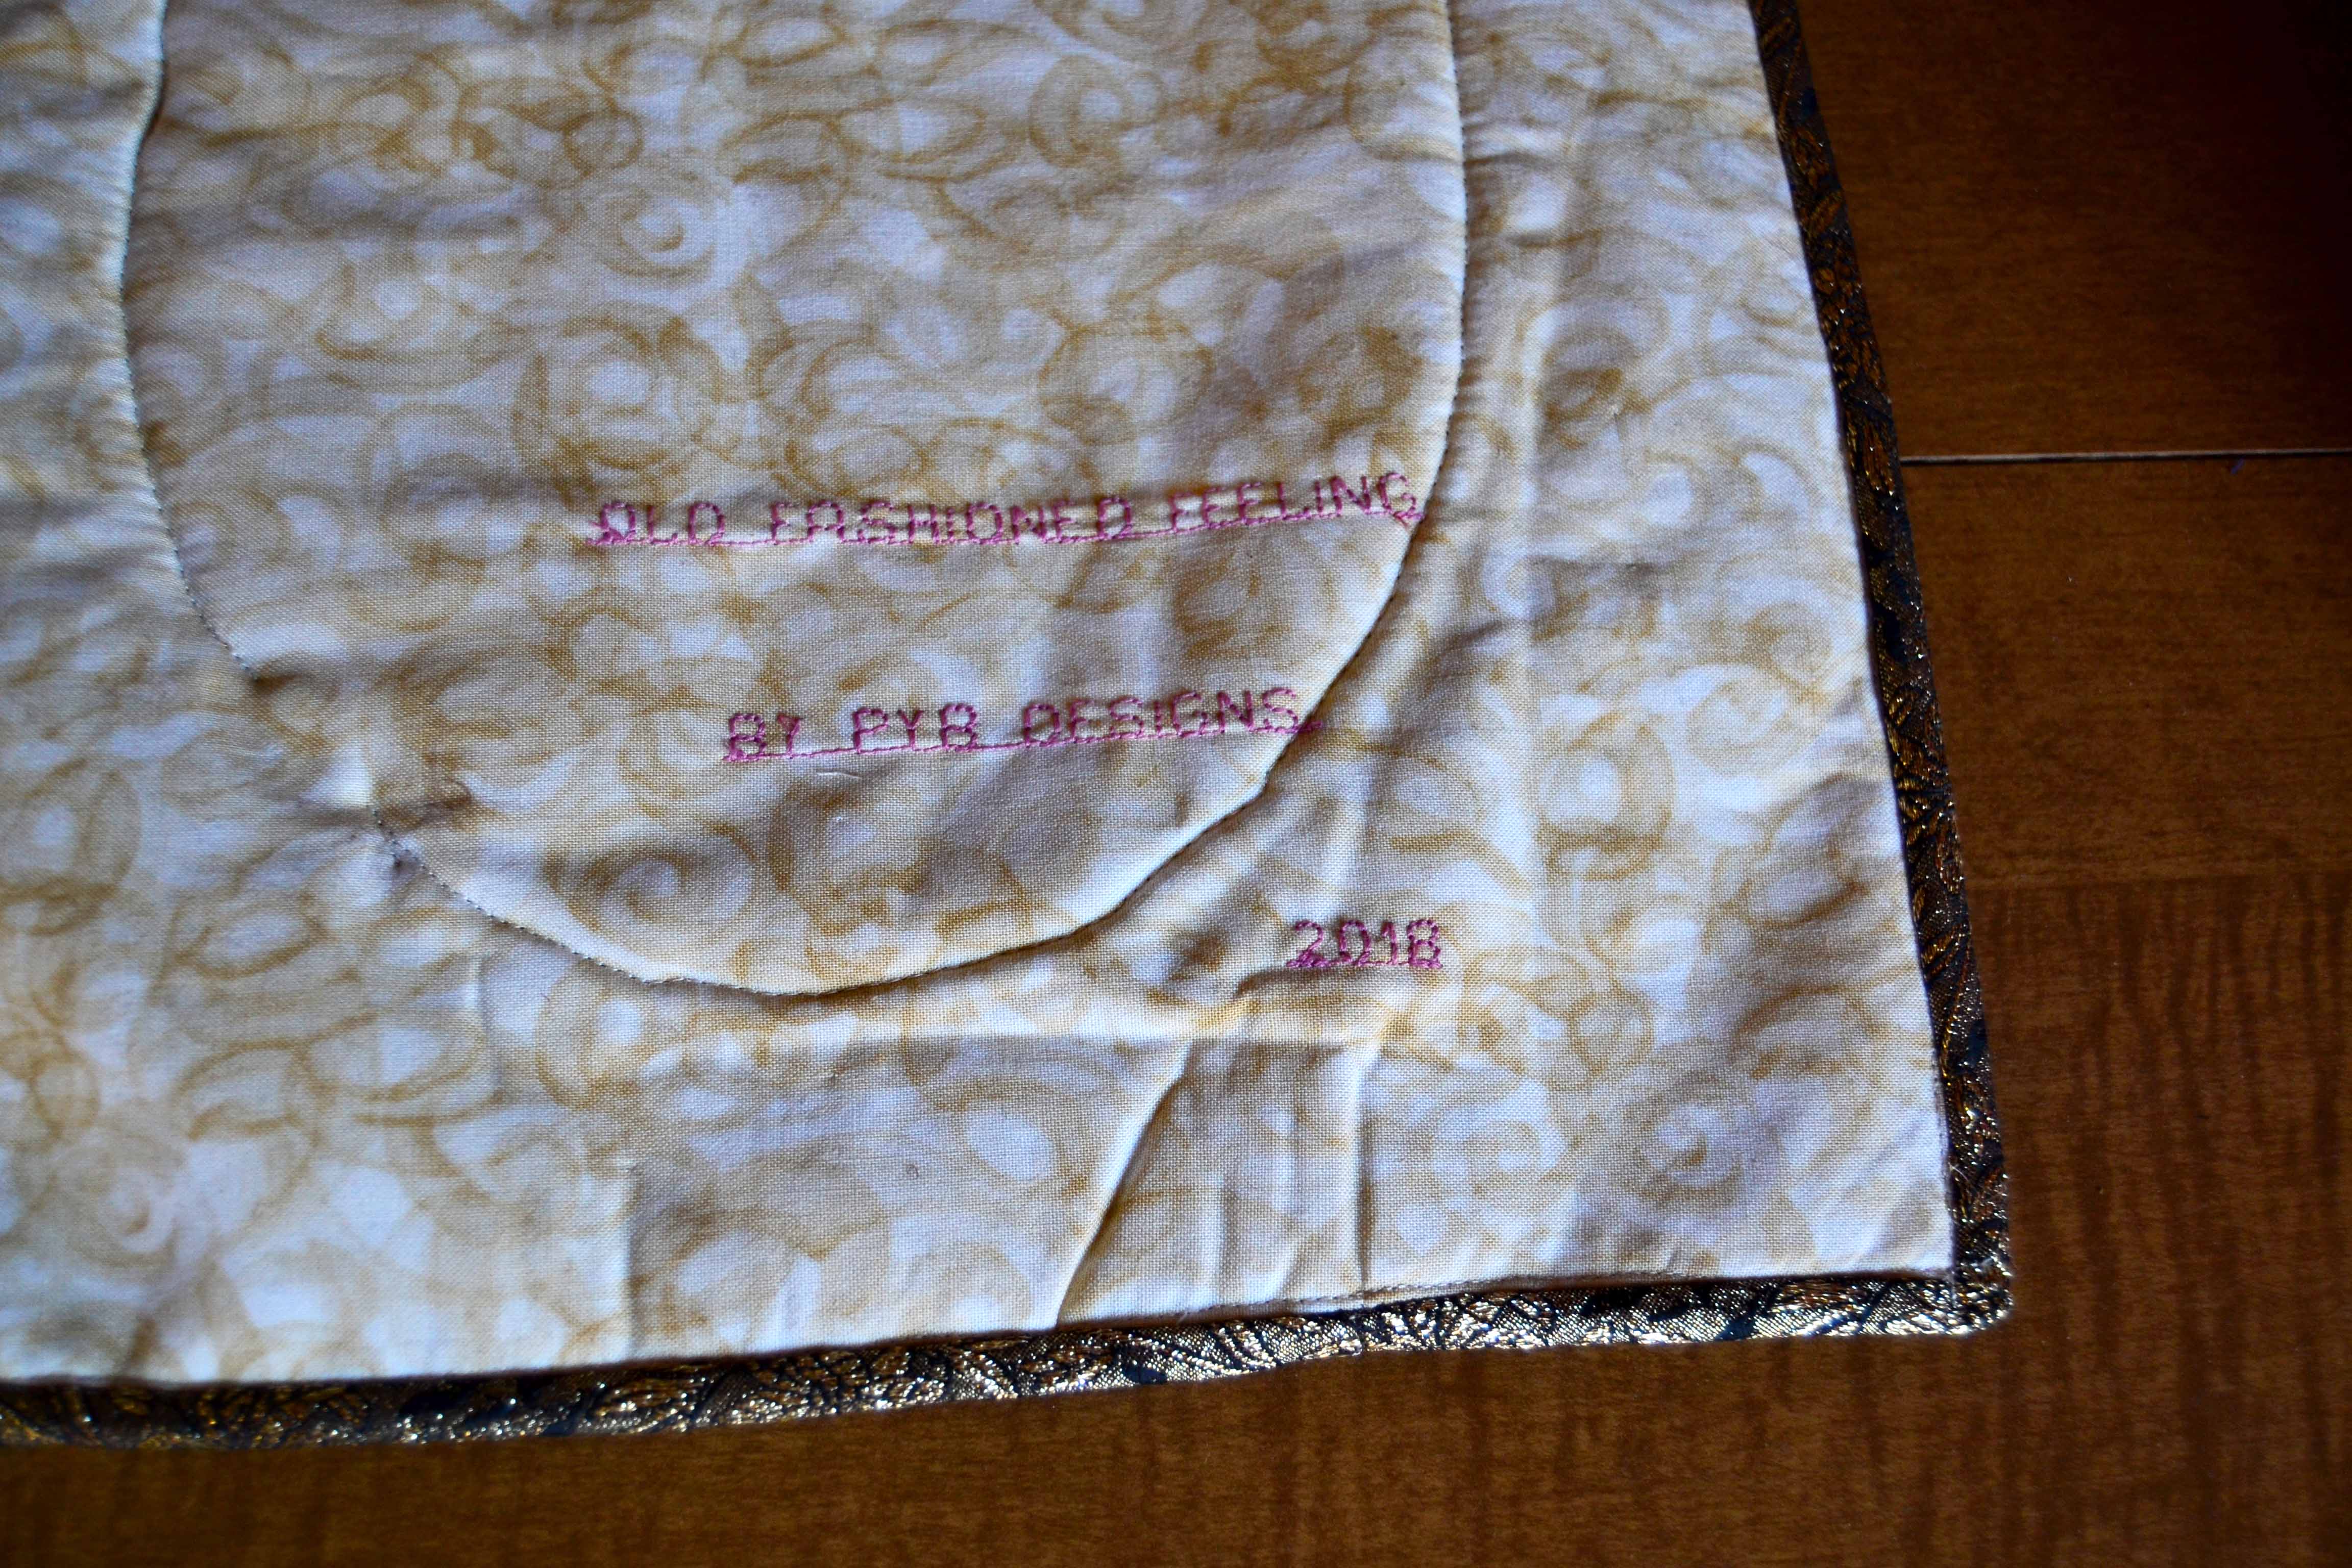
The longer your quilt’s name is, the more letters you have to sew. This is not only tedious, but the longer the name, the bigger your tag has to be. The longest name I ever gave to a project was “Dragons in my Window” and the darn thing took me all morning to sew onto a tag! Brevity is the password here!
Make it Personal
If your project is for a specific person it’s great if you can incorporate their name into the name of your project. I once made a rose quilt for a girl named Cassidy Rose, and guess what I named it – “The Cassidy Rose!”
The fact that I named it after her almost thrilled her more than the quilt itself. Be creative. I named the Sunbonnet Sue quilt I made for my oldest daughter the “Sunbonnet Suzanna” and she treasures it.
How to Make a Name Tag
Once you’ve settled on a name for your project, you can start thinking about what you want the tag to look like.
This includes not only the shape of the tag, but also:
- The color of the background fabric
- The color of the thread for the letters
- The shape of the letters themselves,
- How you’re going to construct the tag
- And how you’re going to sew it onto your finished project
Since I don’t usually make my tags until the project is completely done, I have a lot of time to think and all of this thinking usually produces a clear picture in my brain of the name tag by the time I’m ready for it.
How to Name a Quilt by the “Nuts & Bolts”
Every craft has its “nuts and bolts” elements. A mechanic has literal nuts and bolts. A cabinet maker has wood and glue. A quilter has fabric and thread. And whatever you do, it all comes back to your nuts and bolts.
Making a name tag is back to the fabric and thread, just like everything else.
Background Fabric
The first rule of thumb here is that your background fabric should – if at all possible – be a fabric that you used on the front as well. This helps to make the project more cohesive (such a big word!)
But also, on a more practical level, it gives you a chance to use up some of the leftover scraps from your project. The tag is 2 layers of fabric thick, so that you can use one fabric on the back of the tag and a different fabric on the front if you like. Or you can make the front of your tag a crazy block or a patchwork or whatever floats your boat.
You can also make your tag into almost any shape you like – this is where the creative juices can really flow and why homemade tags are so much more fun than store bought ones!
Outside Edge
Once you’ve decided on the background fabric and the design and shape of your tag you need to construct your tag. You can do this in one of 2 ways.
How to Edge Your Quilted Nametag Version #1:
Layer your 2 fabrics with right sides together and sew a ¼” seam all around the outside, leaving a 4-5” gap along one side. Don’t leave the gap in a corner, as corners are very hard to get straight when you turn your fabric. Turn your tag right-side-out and press in the edges of the gap with a hot iron so that they match the corresponding edges. Sew this down with a matching thread right along the outside edge of the tag.
How to Edge Your Quilted Nametag Version #2:
Layer your 2 fabrics with the wrong sides together and pin. When you have all the letters sewn down and are ready to sew your name tag to the back of your project, you can finish the raw edge in one of 3 ways.
- Sew a ribbon such as grosgrain just along the edge of your tag so that it hang off the edge approximately ¼”. Grosgrain ribbon has a nice finished edge, and with the raw edge covered you can sew the outside edge down quickly and easily. I did this with the tag for Dragons in my Window.
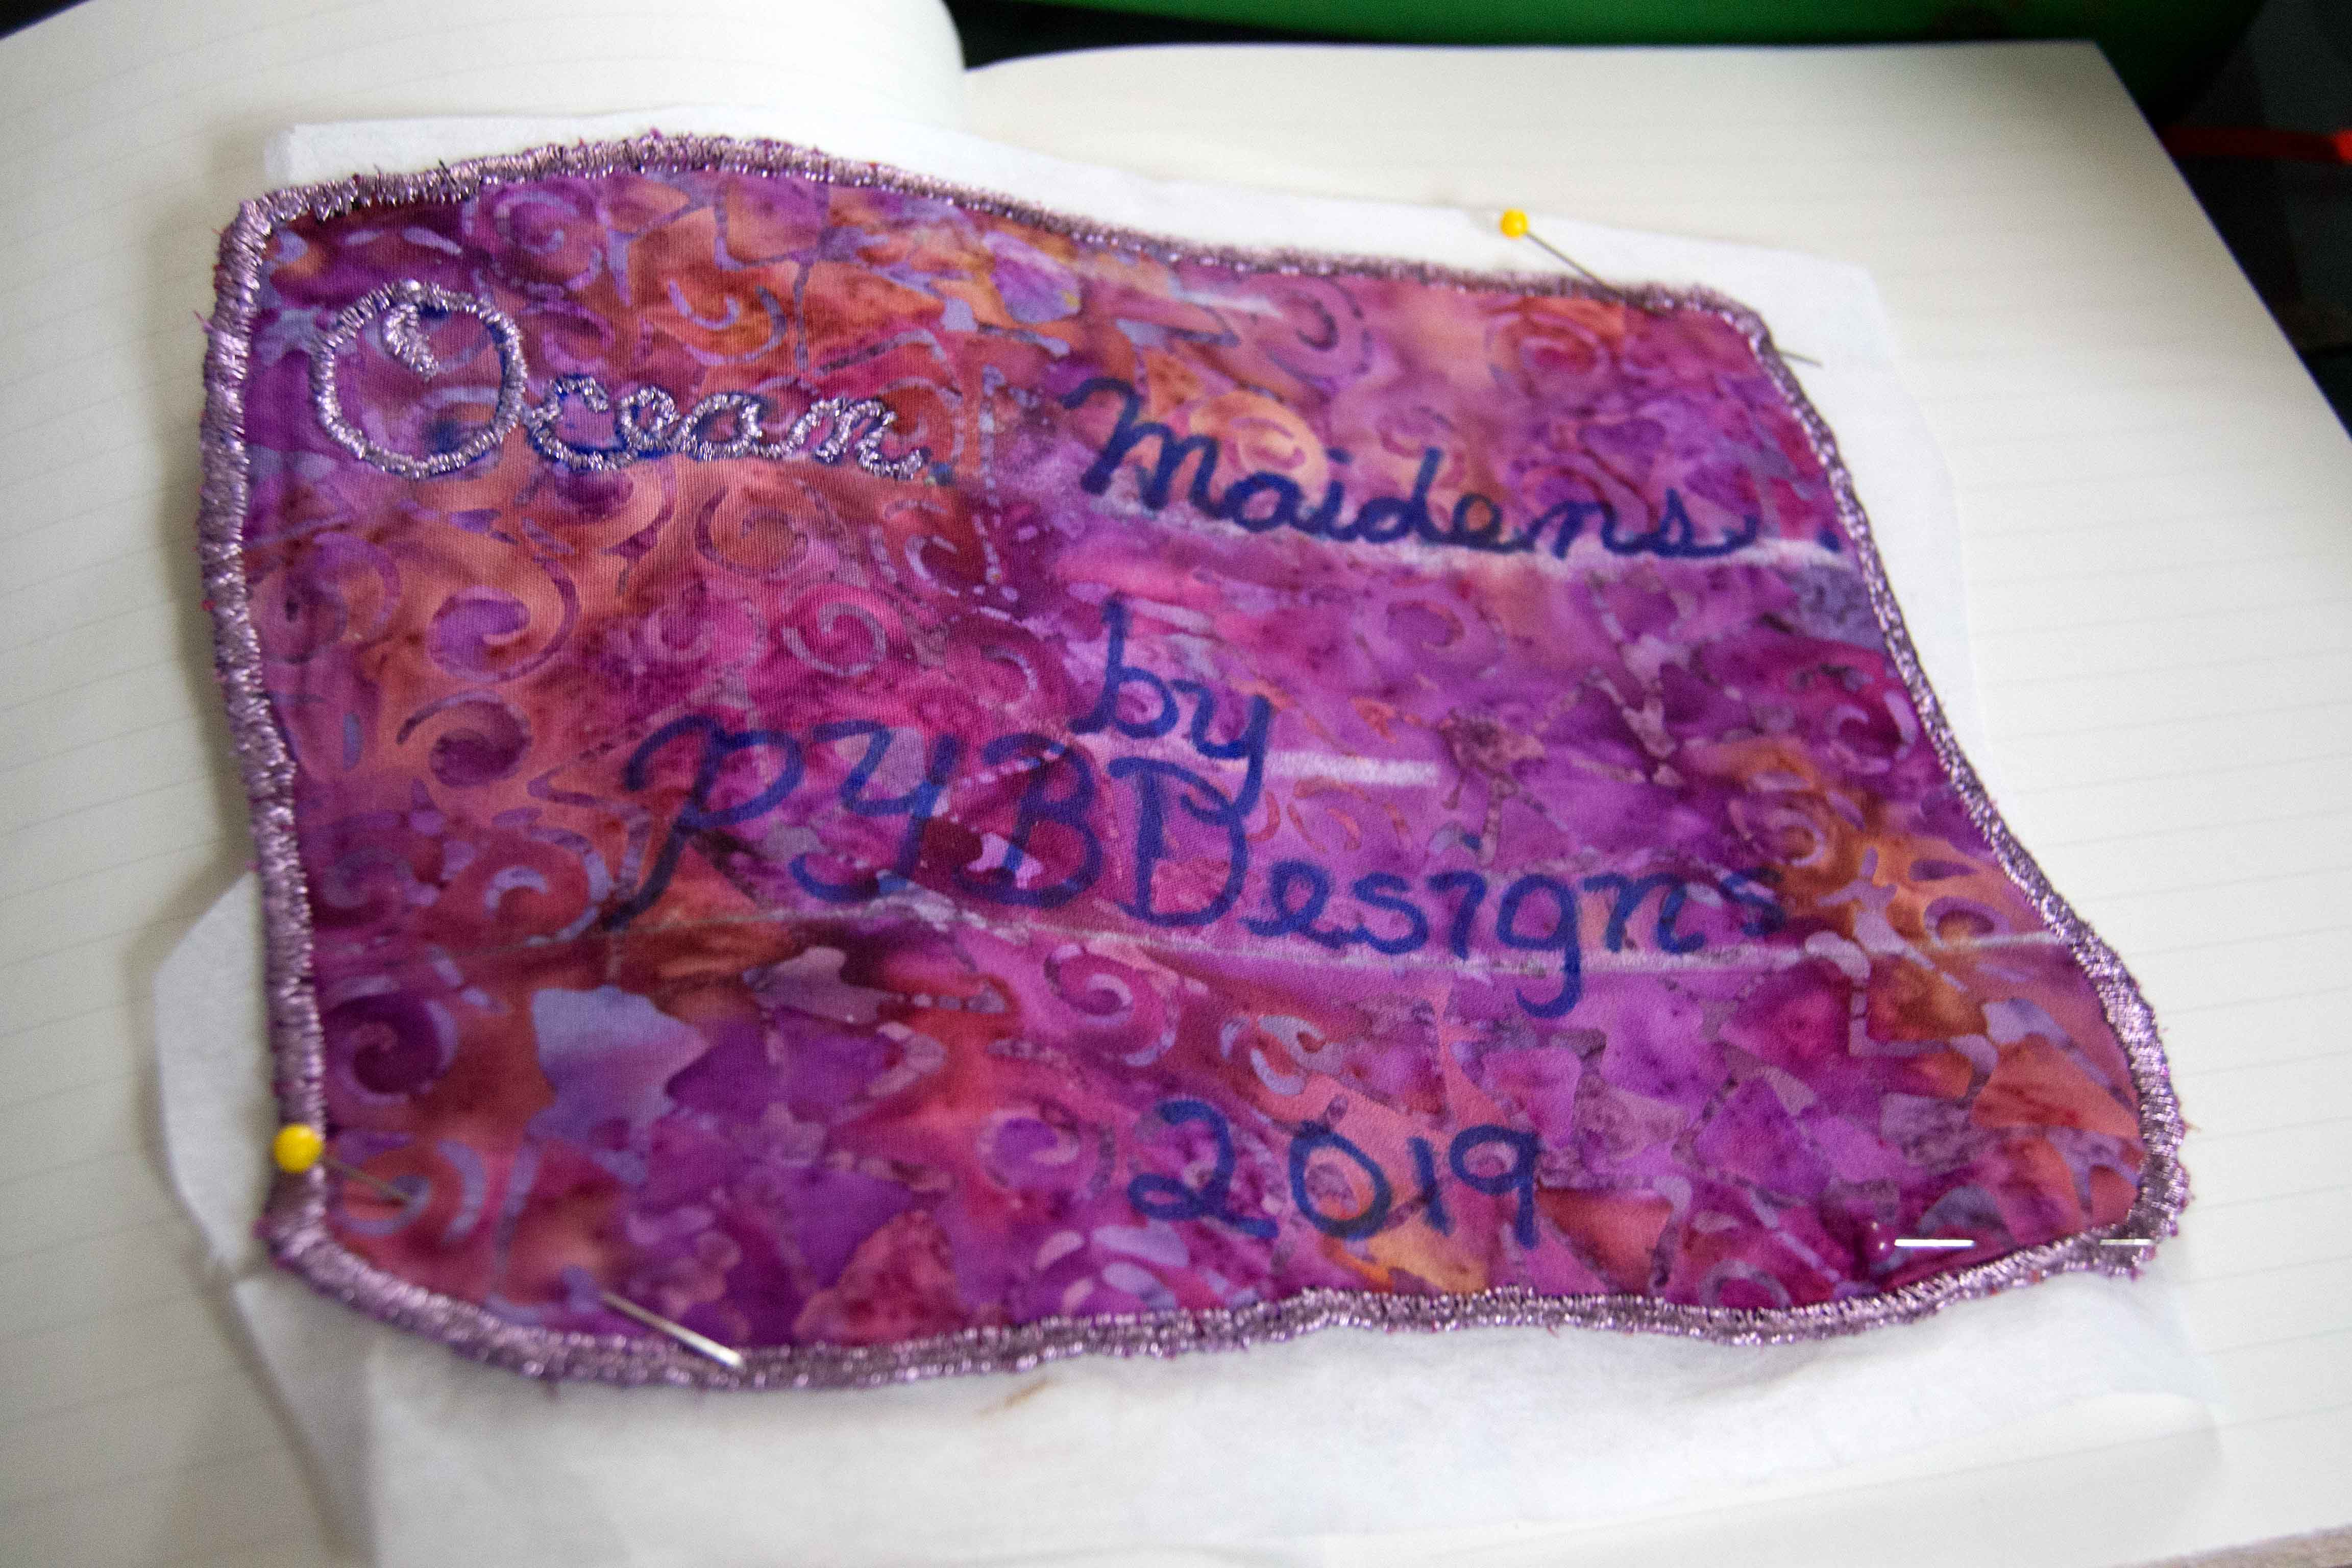
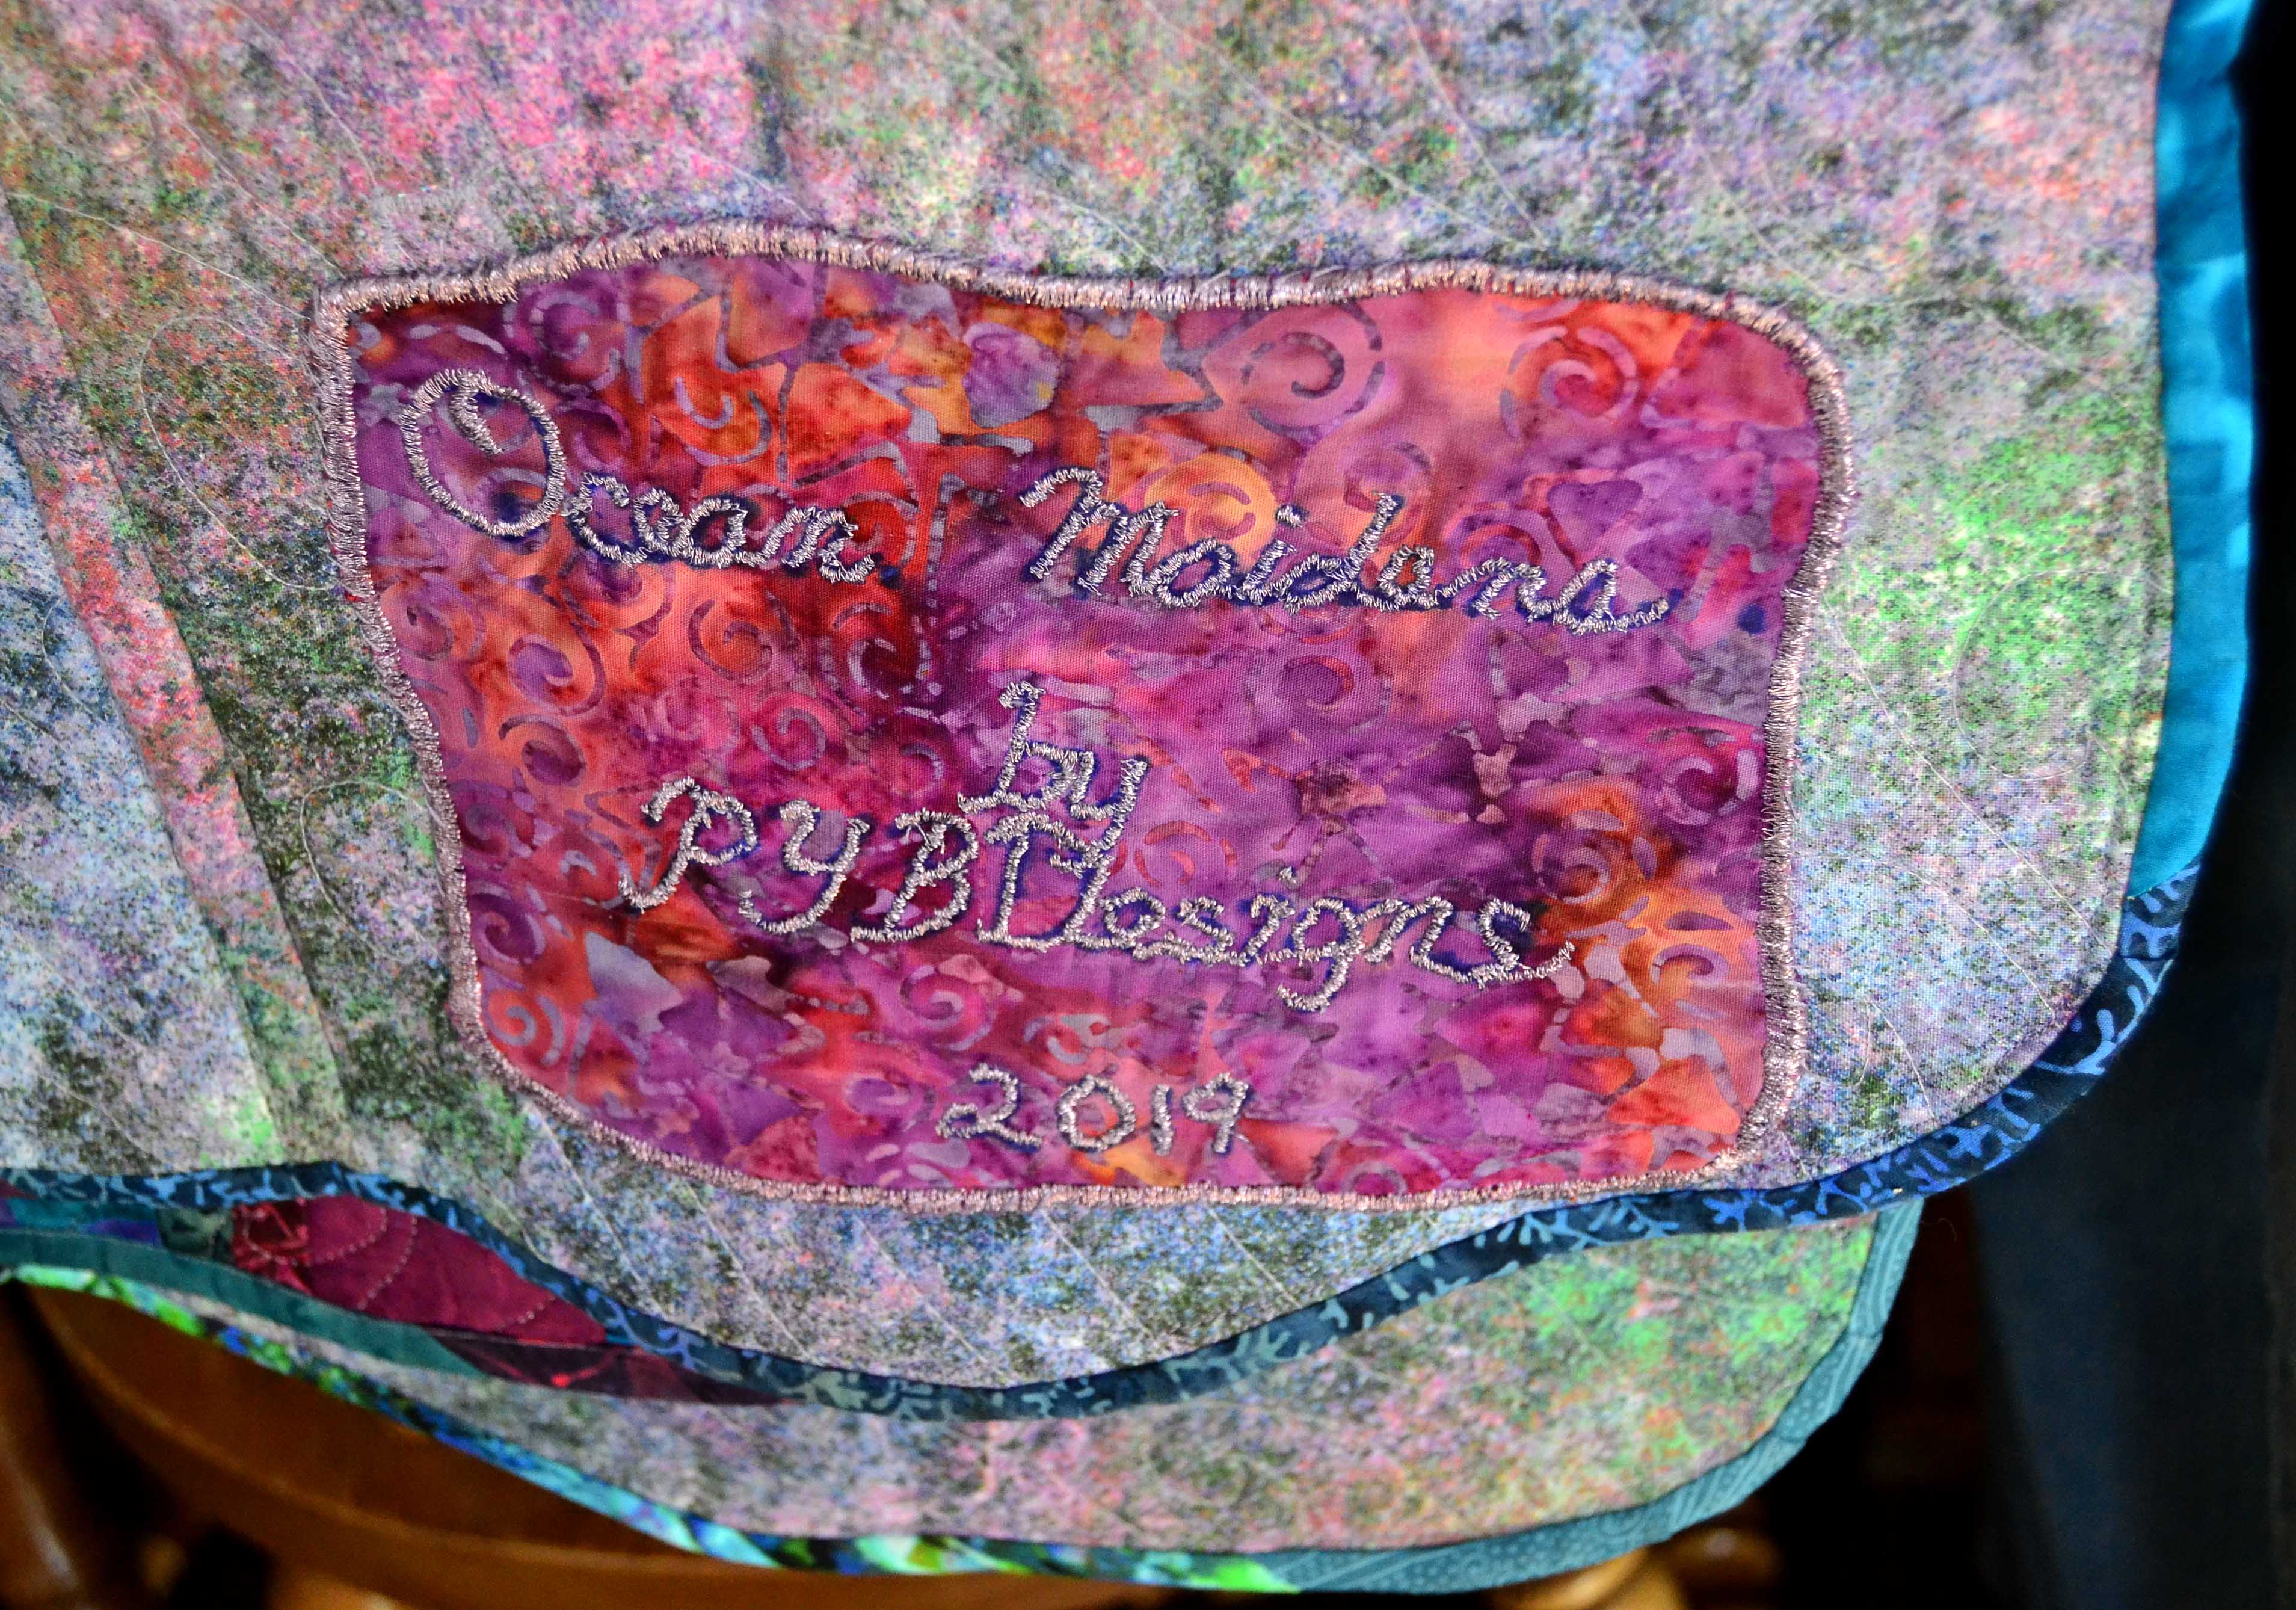
- Sew a nice, wide satin stitch all around the edge of your finished tag. Depending on how well your machine does this, you may have to go around the edge twice – I often do. Sewing the edge like this will make it curl up but all you need to do is steam iron it or spritz it with spray starch and iron to make it lie flat again so that you can sew your tag on neatly. I used this method to sew the edge of my Ocean Maidens quilt.
- Make a short length of binding and sew it around the edge to finish it off before you sew the tag on. Check out my blog ‘Binding Tips & Tricks’ if you’re not sure how to do a binding.
Measuring & Marking for Your Nametag
Once you have decided how to finish your edge, you need to mark your tag and draw lines so that your lettering will be straight and centered.
You’ll want to get everything on 3 lines if at all possible but if you can’t, use 4 – no more!
If you can’t fit everything onto 4 lines then you need to re-think, because there are 3 things that should go onto each tag that you construct:
If you can’t fit everything onto 4 lines then you need to re-think, because there are 3 things that should go onto each tag that you construct:
- Name of the project
- Your name
- And the date
That’s it! Anything more is superfluous.
Measuring the Distance (it’s more important than you’d think)
To start, measure the length of your tag. Starting 2” down from the top, draw your first line all the way across.
This is the name line.
Measure how many inches you have left and divide it evenly in two. Remember, you have to leave enough space between your lines for the height of the letters. I like to leave at least 1 ½” if I can because it makes it so much easier to read.
If your fabric is dark, draw your lines with chalk but if it’s a light-colored fabric a black erasable pen is always a good choice.
Measuring by the Math
Next, count the letters in each set of words and divide them by the length of the line you have drawn. Remember to factor in an empty space at the front and back of each line, and, if your name has two words or more, a space between each word. For example, if your line is 8” long and you have 5 letters in the name of your project, you should make your spacing marks 1-1/4” long each. This gives you a place for all 5 letters, an empty space plus an empty space at the front and back end of the word.
If your machine has an embroidery feature that you can program to sew letters and words that’s great – my Bernina did that till it quit working – it takes all the figuring out of the equation for you.
But honestly, measuring your spacing for your letters isn’t rocket science. It sounds complicated on paper, but it goes pretty quick in practice.
Stabilizer
In order for the stitching and appearance of your letters to be smooth and even you will need to pin a piece of Tear-Away Stabilizer to the back of your tag.
Simply cut a piece of stabilizer a little larger than your tag, iron it flat and pin it to the back of your tag. This helps to stiffen your tag and helps your fabric to move smoothly and evenly over the feed dogs.
Once you’re finished stitching you simply tear it away from your letters.
It’s easy to do and will make a world of difference to the final appearance of your tag.
You can find Tear-Away Stabilizer in any store that sells fabric – it’s usually in among the batting and interfacing packages.
Sewing Your Letters
Once your measuring and marking is done, draw in your letters if you’re doing it by hand. I prefer using cursive because the letters join naturally and you don’t have to start and stop at the beginning and end of each letter to tie off.
It all depends on what I want my tag to look like.
Once again, use an erasable pen on the light fabrics and chalk on the darker ones.
HINT: Only draw one word or line of letters if you’re using chalk because it tends to rub off quite quickly.
HINT: I discovered that a pink glitter permanent fabric marker works real well for marking black fabric as well and lasts a lot longer than the chalk!
Once you have your letters marked, set your machine to a narrow, tight satin stitch and follow along your marks slowly. There is no way to do this fast if you’re sewing your letters by free hand.
HINT: Practice on a scrap piece of fabric first so you will get the stitch width, thickness, and feel of how the thread will work and look before you sew on the real tag. Make sure that your practice piece is constructed the same way as the tag – 2 pieces of fabric and a piece of stabilizer so that you will know exactly how your machine will handle this.
Sewing on Your Name Tags – The Final Step in “How to Name a Quilt”
Name tags are usually sewn in either bottom corner of your project – right or left doesn’t matter. Just make sure it’s in one of the bottom corners and is right-side-up. I once sewed one in upside-down, and I did it by hand so I learned my lesson – always double check!
There are three ways to attach a name tag to your project/
The First Way to Attach a Nametag is to Sew it by Machine
This option only works if you have a large section of very dark fabric on the front of your quilt where you’re planning to attach your tag. Preferably black. If it’s any lighter the stitching will show and mess up your pattern on the front. Sometimes, like on Dragons in my Window, I sewed the bottom and outside edge of my tag by machine, and the top and inside edge by hand.
Sewing your tag on by machine is much the quickest option, but unless you do it before you sew the backing down it is almost impossible to achieve. So give it a think before you completely finish your project.
The Second Way to Attach a Nametag is to Sew it by Hand
I’m anti-hand-sewing nine times out of ten, but this is the option that I choose most often because I rarely have a section on the front that will not show extra stitching coming through from sewing on the tag.
I don’t actually mind hand sewing tags since I did hand embroidery and cross-stitch for years. It’s actually a very soothing activity for me. Use thread that matches whatever color edge you put on your tag and your stitching will be almost invisible, especially if you use a smaller whip-stitch.
The Third Way to Attach a Nametag is to Glue it On
If, for some reason you can’t hand-stitch it, fabric glue is your last option and it’s a good one. Simply spread the glue – make sure it’s permanent – lightly over the entire back of your tag, lay it down on your project and then lay something heavy like a book on top of that and leave it for 24 hours.
Voila! A permanent bond and no hand-stitching involved!
I truly hope that you’ve enjoyed this article. As a last note, please consider naming your smaller projects as well – like table runners and wall hangings. Not only does a named, dated, claimed piece have more value in terms of money, it has more value in terms of human connection.
Until next time!
Your Guide to Quiltivity,
Karyl Fitzgerald
Princess YellowBelly Designs’ “original-pattern-designing, straight-seam-sewing, seam-ripping-mistake-fixing, verbose-wording, how-to-do-it-funner-faster-easier-instructing, quilting-artist”Resident Genius
P.S. You can contact me with questions or ideas for articles, patterns, whatever, at my personal email: karyl@pybdesigns.com.
I learned a lot from your label making instructions, a subject appropriate for all skill levels. You are very thorough and clear!
An addendum for attaching – if the label is lightweight it can be adhered with double sided fusible tape to the back corner of the quilt. I just tried that and it stayed on nicely.
I look forward to your offerings!
Wow! That’s a really neat tip we never thought of. Thank you so much for sharing, we’ll be looking into that tape, I promise.