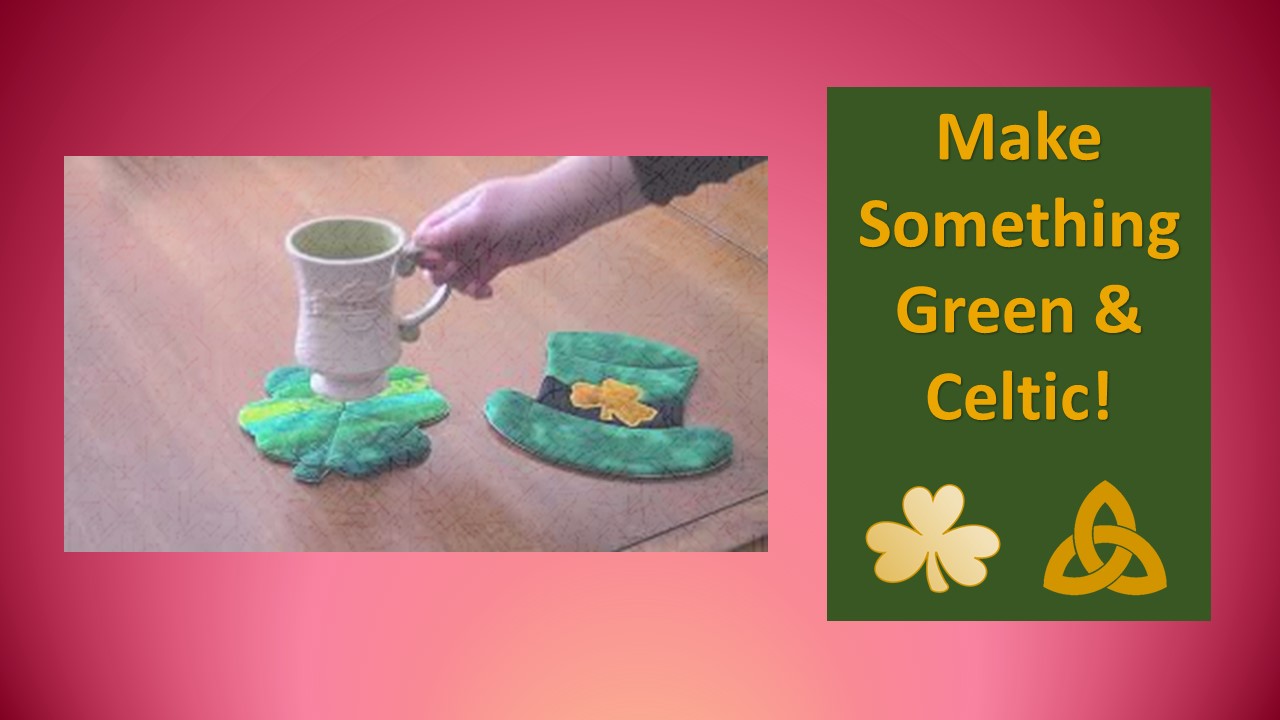
A traditional way to celebrate the fun and festive holiday of St. Patrick’s Day is to wear something green. Here at Princess YellowBelly we want to take it a step further, and challenge you – and ourselves – to make something green.
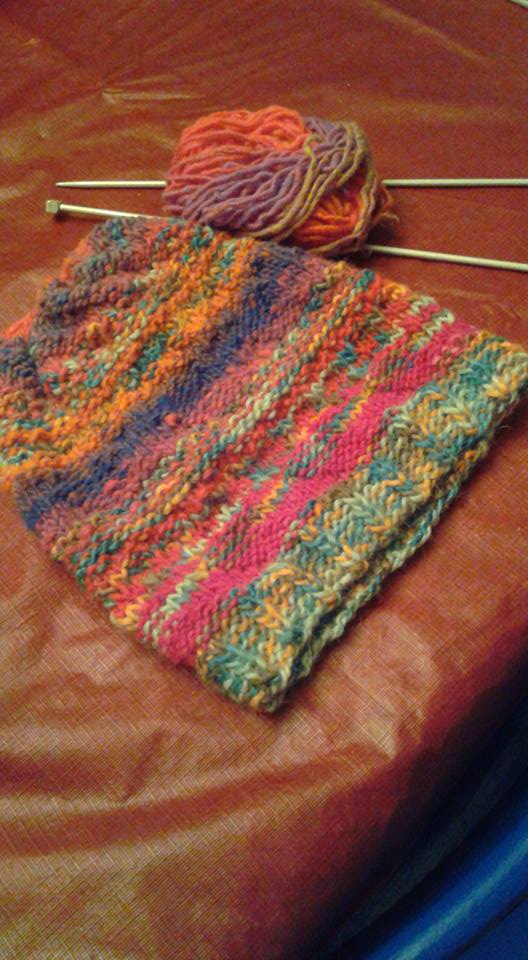
We’ve made two mug rugs [aka potholders or hot pads] that are green, Irish-inspired, and just plain fun!
All the details on the Shamrock Mug Rug creation process is in this article. In this article, we’ll be sharing how we made the leprechaun hat pot holder – which is just a teensy bit harder, but can still be finished in just 1 Hour!
Or make up your own green piece of Irish magic! Table toppers, your own mug rug design, crochet, knitting, felting…let’s just have some fun with it!
4. Sew all around template leaving a ¼ inch allowance with the outside line and your stitching line.
5. Remove template – gently! If you can pull it loose from the stitching line without tearing it, you can use it again and again.
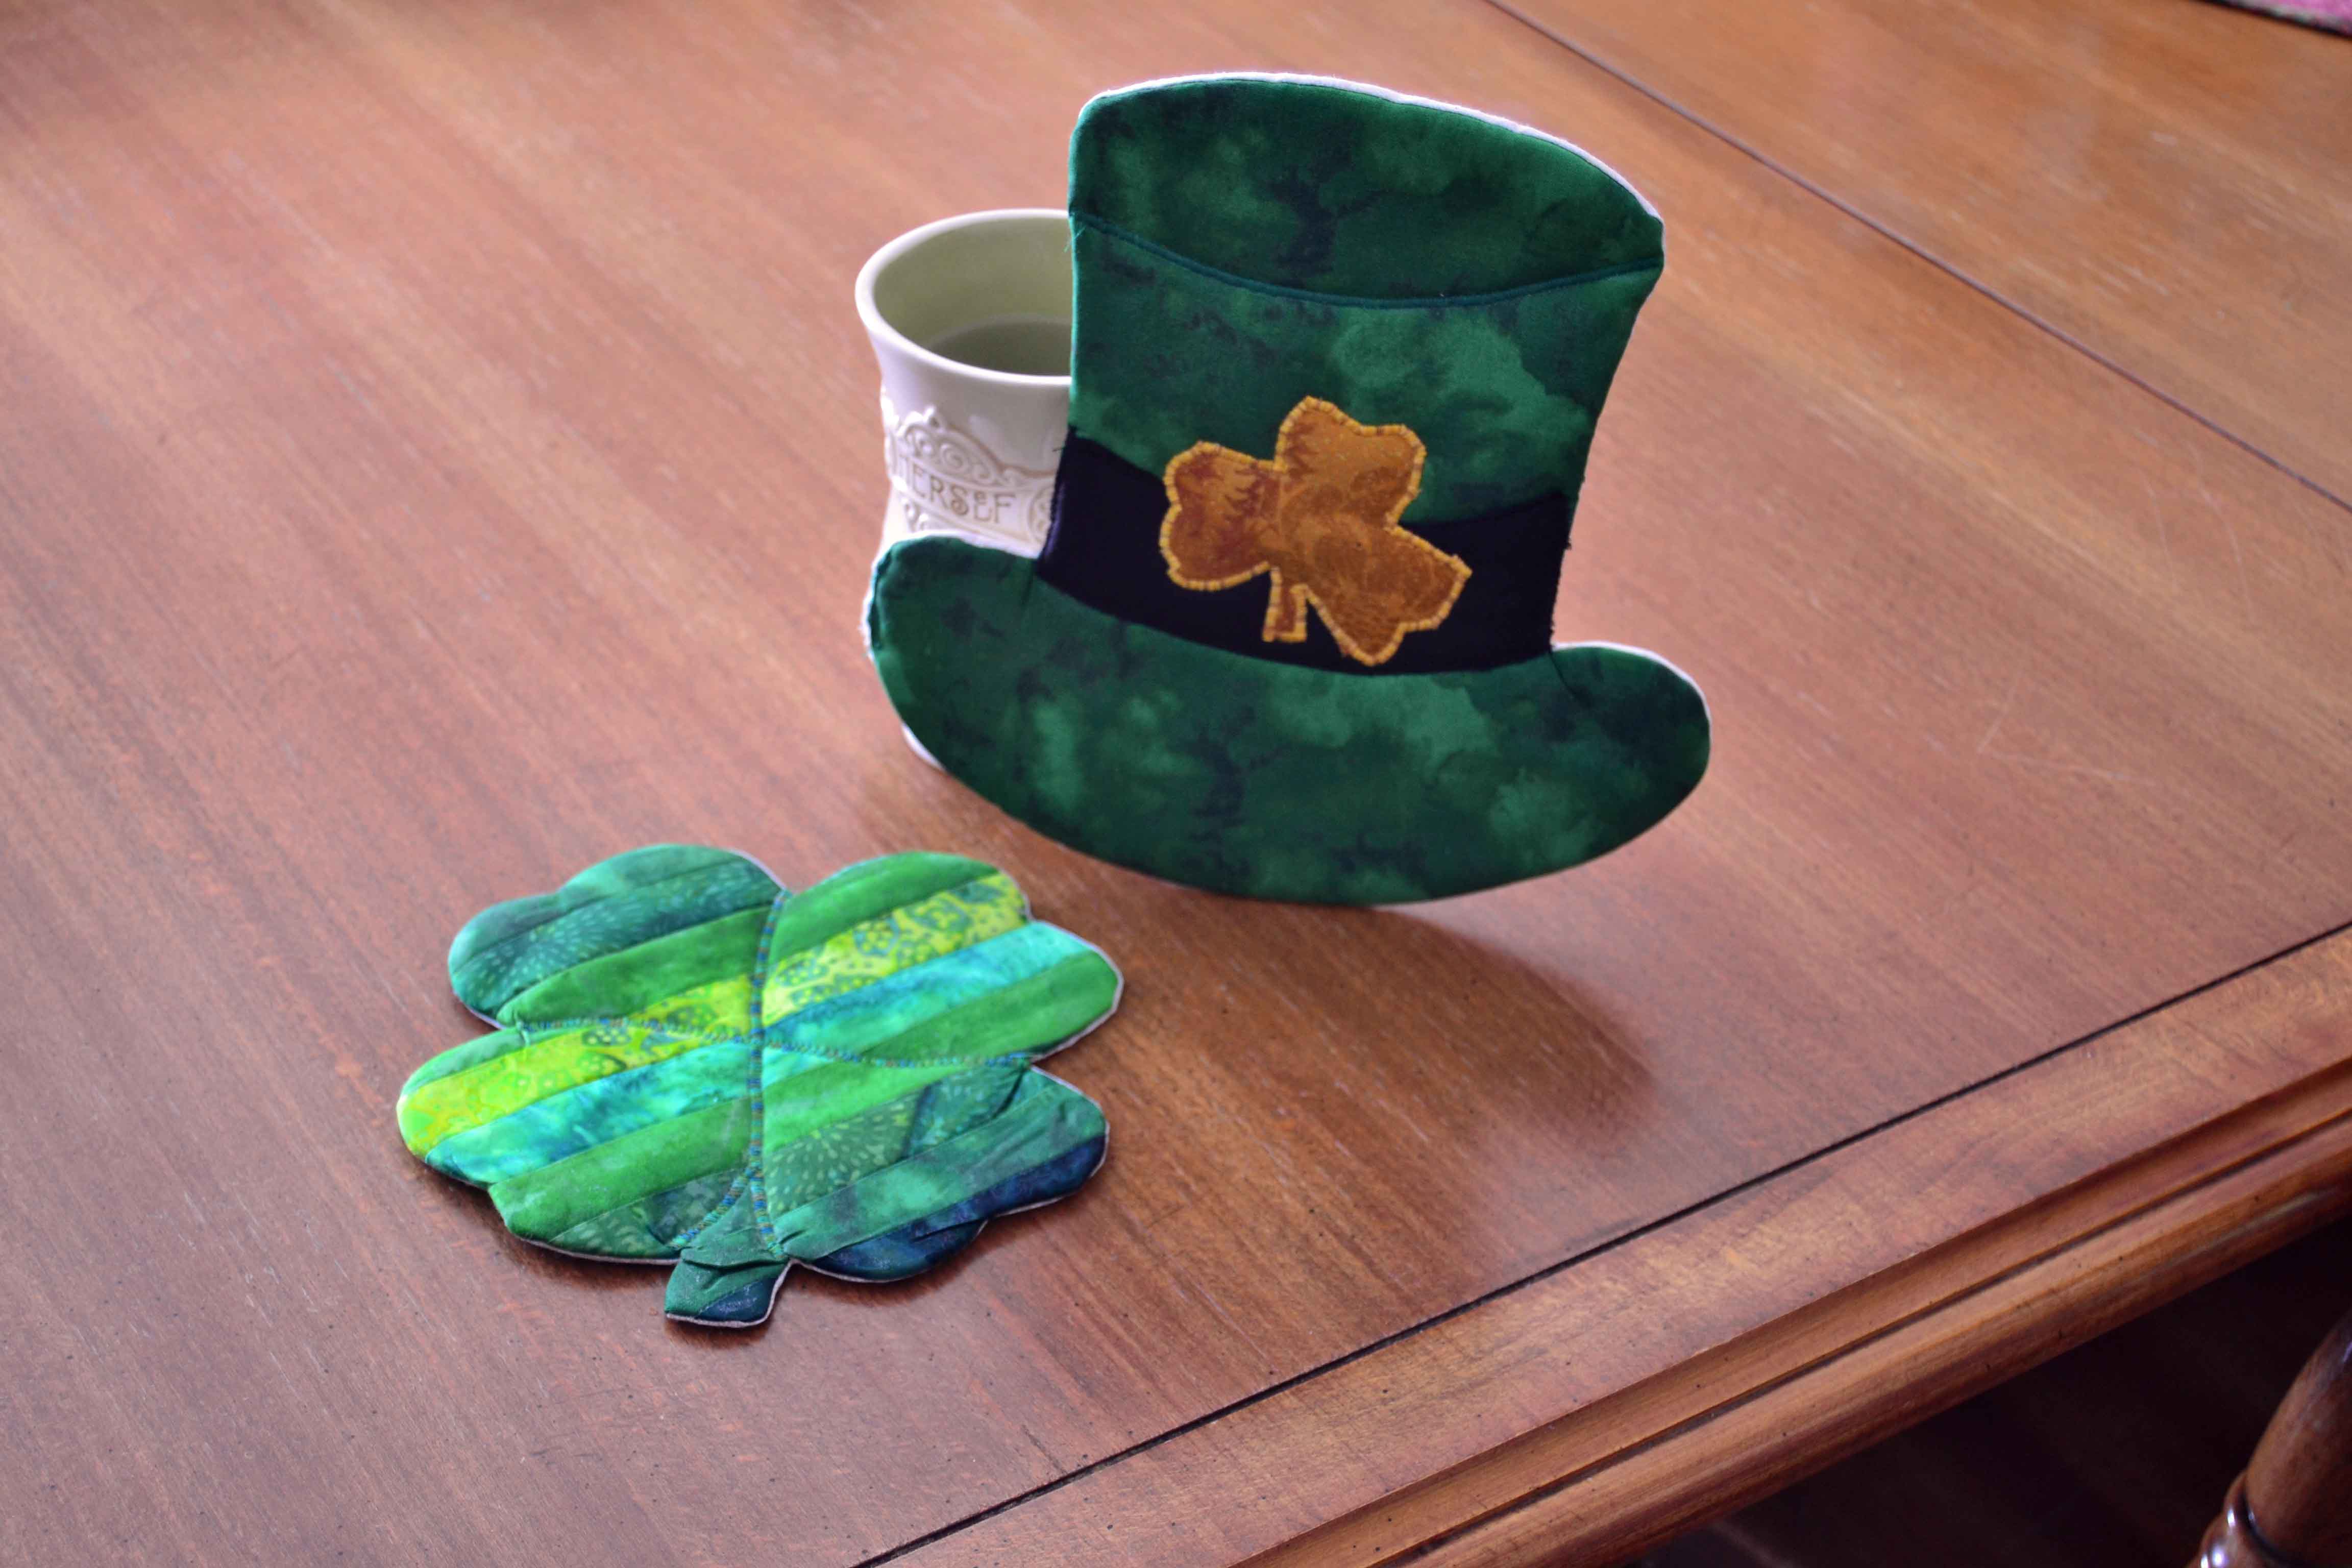
Make a Leprechaun Hat Pot Holder Steps 6-12
Now it’s time to do the beautiful details:
6. Cut out shamrock. Leave a ¼ inch seam allowance between where you cut and the stitching line. Snip the points – it’ll pucker if you don’t.
7. Turn shamrock right side out, gently, through the turning slit.
8. Gently push out the seams and points using a corner turner
9. Iron flat, front and back
10. Sew turning closed by hand! Use a hand sewing needle, matching thread, and a whipstitch.
11. Cut apart your paper template; the top oval of hat, the band, and the shamrock
12. Pin shamrock template on gold fabric, band template on black fabric, and cut out.
FINISH Making a Leprechaun Hat Pot Holder! Steps 13-15
13. Place top hat oval on the top of the top hat, and trace the bottom edge in chalk – then quilt this line as you like (straight stitch or satin stitch)
14. Pin black band to the hat, and sew it down using a tight, narrow satin stitch.
15. Place shamrock on the band, quilt all around the edge with a satin stitch using the thread you like best – we usually use matching thread for already pop-out detailing
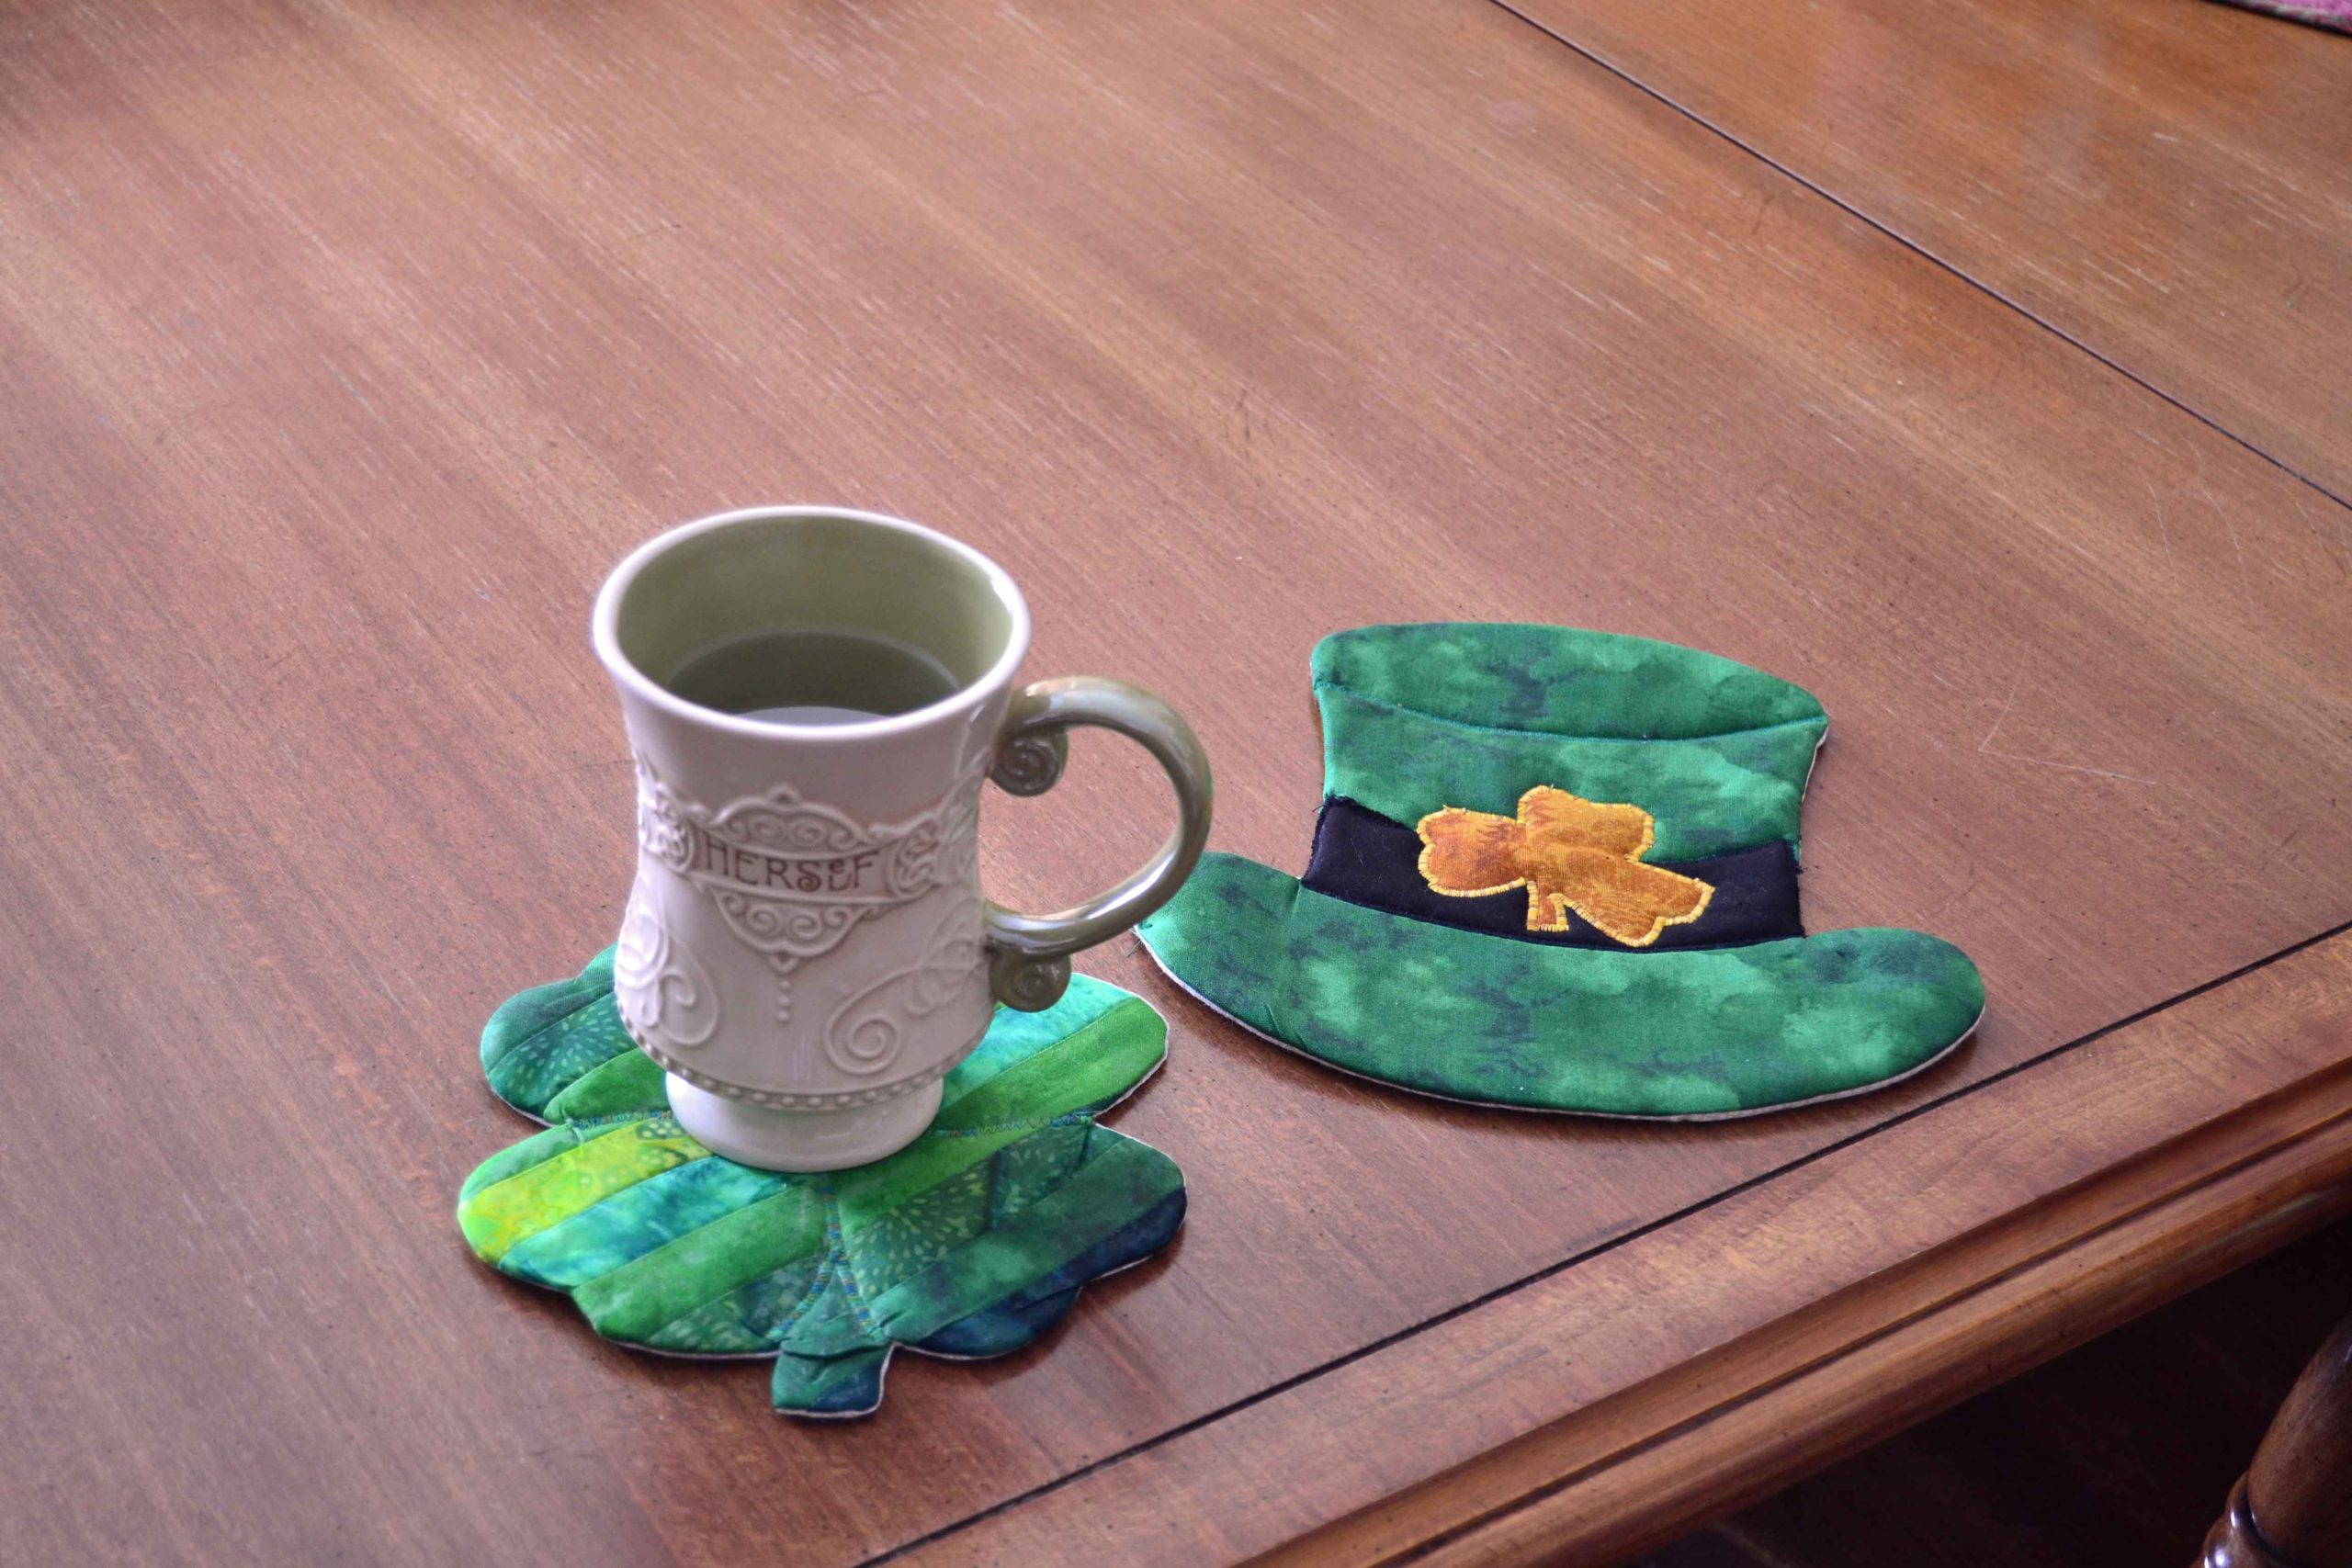
And You’re Done!
Take a second to celebrate and enjoy your new Irish-inspired mug rug – mug rugs if you’ve also made our lucky shamrock potholder! Let us know about your experience in the comments below, and make sure to subscribe so you can stay current with all our great content.
Learn How to Make Cute & Easy Irish-Inspired Mug Rugs / step-by-step green & Celtic tutorial
A traditional way to celebrate the fun and festive holiday of St. Patrick’s Day is to wear something green. Here at Princess YellowBelly we want to take it a step further, and challenge you – and ourselves – to make something green.
We’ve made two mug rugs [aka potholders or hot pads] that are green, Irish-inspired, and just plain fun!
These mug rugs are super-easy to make, and if you want to follow along, we’ll be posting the steps in the days before St. Patrick’s Day (March 17, 2022), if you want to follow along. Or make up your own green piece of Irish magic! Table toppers, your own mug rug design, crochet, knitting, felting…let’s just have some fun with it!
Shamrock Mug Rug Day 1: Steps 1-4
Of the two mug rugs we designed to celebrate St. Patrick’s Day, we chose to start with the Shamrock, because it’s the absolute easiest!
Select 5-8 green fabrics ranging from light-dark
Spray starch and iron green fabrics and your backing fabric
Cut 1 ¼ inch strips from fabrics – you need 8 total strips at this width to create the right size for the shamrock, so if you only chose 5 fabrics (like we did), you need to pick a couple of colors to repeat. We chose to start at dark, go to light, and then build back up to dark for our shamrock strip set.
Sew strip set together and iron seams flat
Shamrock Mug Rug Day 2: Steps 5-10
5. Construct turning slit in backing fabric (mark a 2-inch line down the middle of your backing fabric. Sew a narrow satin stitch all around this line, then cut the line open.)
6. Iron 2 layers of batting (these are mug rugs, so you’ll need the extra insulation)
11. Cut out shamrock. Leave a ¼ inch seam allowance between where you cut and the stitching line. Snip the points – it’ll pucker if you don’t.
12. Turn shamrock right side out, gently, through the turning slit.
13. Gently push out the seams and points using a corner turner
14. Iron flat, front and back
FINISHING the Shamrock Mug Rug Day 4: Steps 15-17
15. Sew turning closed by hand! Use a hand sewing needle, matching thread, and a whipstitch.
16. Following the template lines, draw in leaf lines with chalk.
17. Quilt on lines (you can do this with a straight stitch for a quicker finish, or with a satin stitch in a brighter thread for a more stand-out statement)
Find Out How to Adapt & Create Original Quilting Patterns
Hello to all of our wonderful Princess YellowBelly members!
If this is your first time here, then no worries, we’re about to do a first of our own. And if you’ve been with us for a while, then you know that the announcement that we’re about to do a live interview – our first every live video event ever – isn’t an exaggeration.
We enjoy doing video, and doing live interviews has been a dream of our for over a year.
And now it’s finally about to happen, thanks to a true friend and fellow innovative fabric artist Laura Piland from Slice of Pi Quilts.
Slice of Pi Quilts – Original Quilting Patterns
Laura’s already shared a bit of her amazing story of how she creates amazing quilting patterns and how we’ve adapted one of hers. I highly recommend reading her story before you join the video, to find out more about Laura beforehand, and figure out questions that you’d like to ask her live!
We’re sure excited to get to talk to her about creating and adapting original quilting patterns. Please do make sure to join us live for an interesting conversation with questions like:
How many patterns have you adapted?
Do you have a standard method for adapting patterns?
How do you get ideas for new quilting patterns?
What’s your process for creating a new pattern?
See you there this afternoon, September 28 @ 4 PM (Eastern Standard Time)!
*If for any reason you can’t join us live, the replay will be available on our Facebook page, and we’ll be seeing what we can do to share it here, as well.
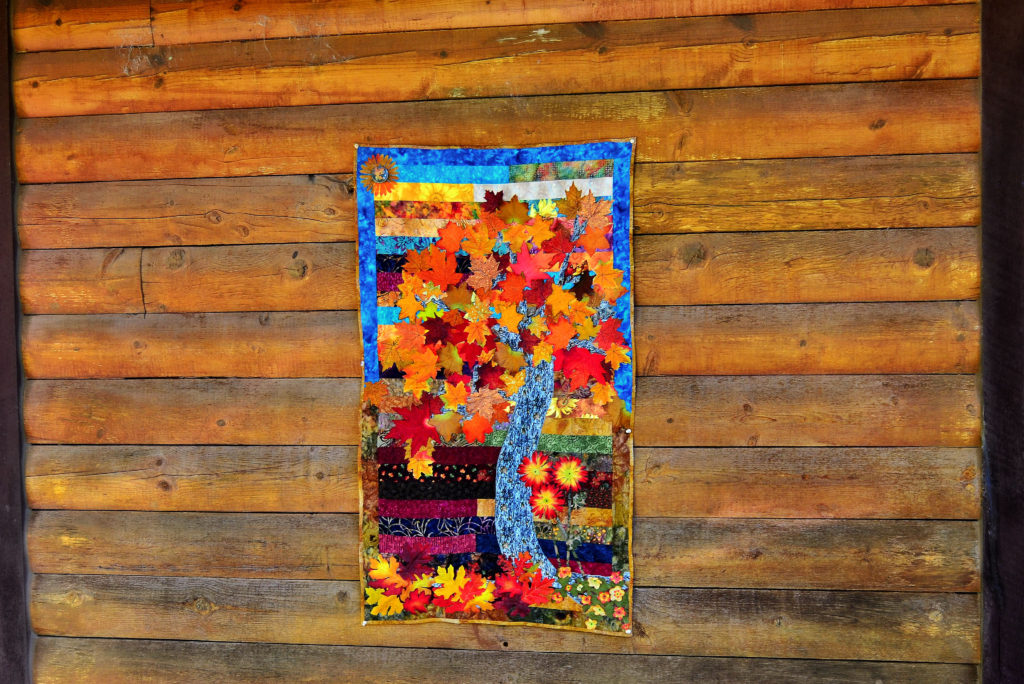
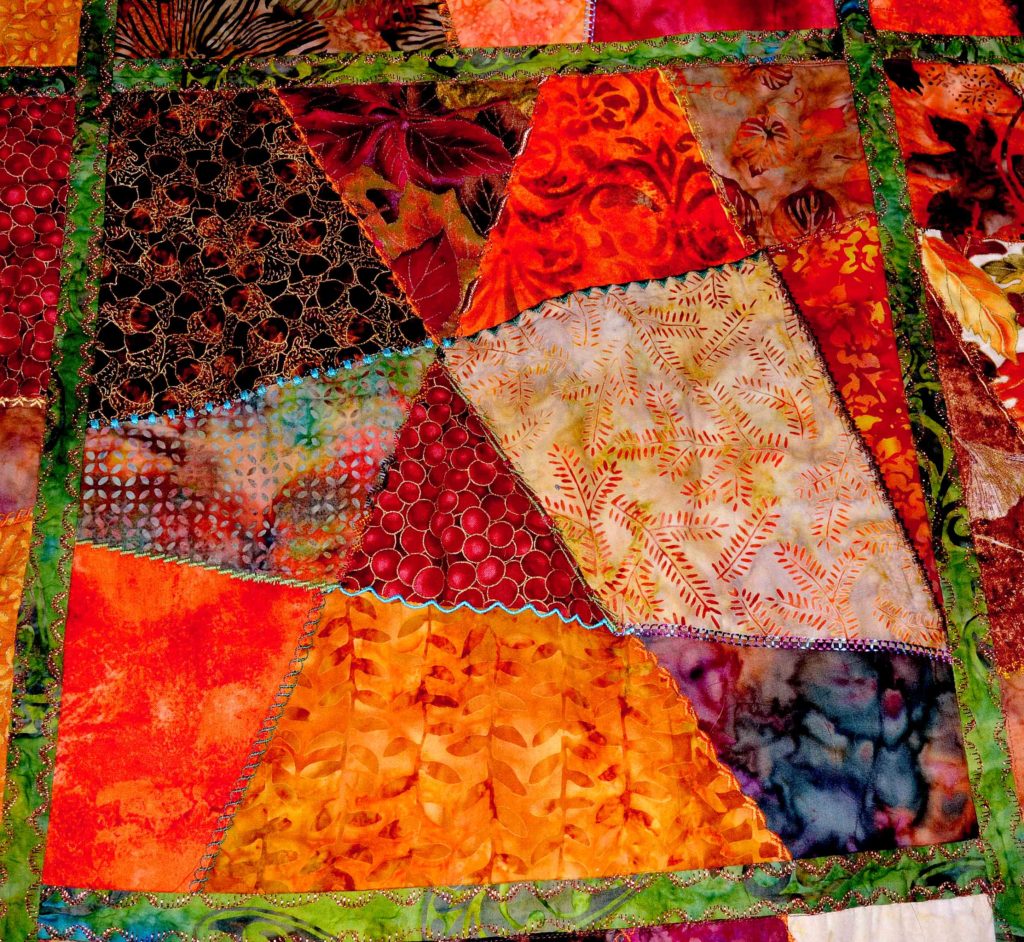
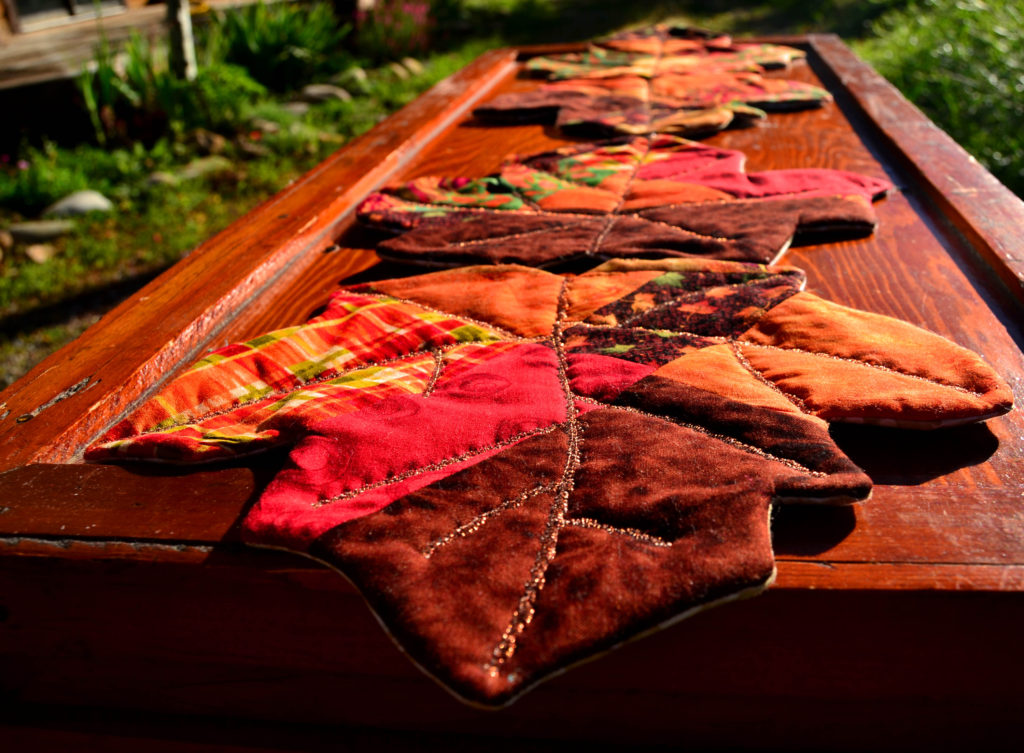
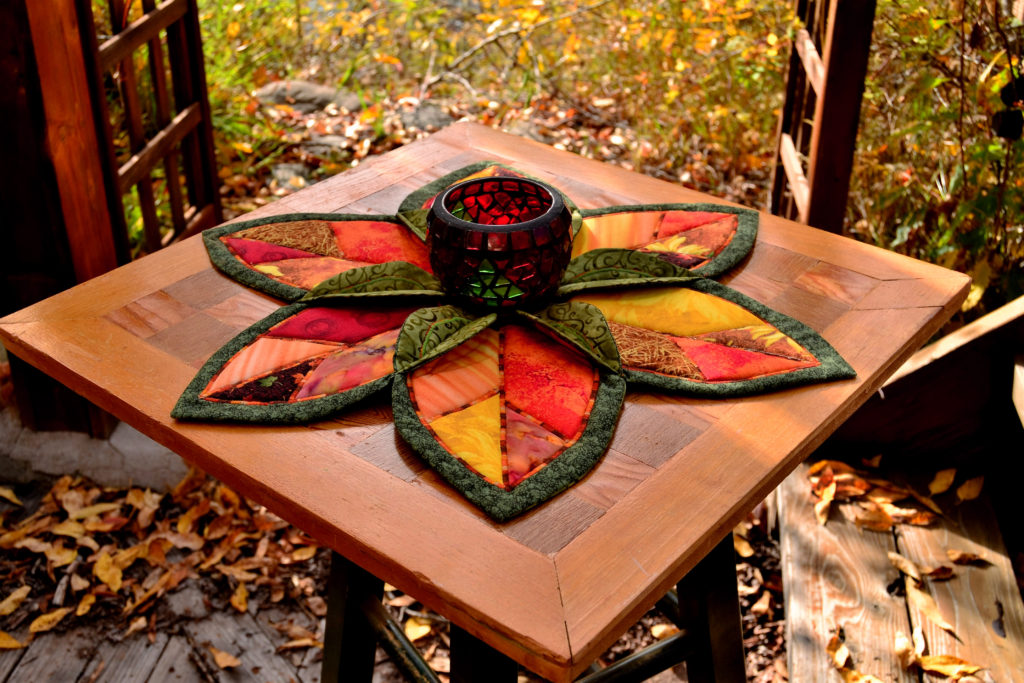
Don’t you just love autumn designs? I know that Princess YellowBelly does – in her role as my quilting muse she seems to return to autumn designs and elements for probably around half of all my original quilts and quilting patterns.
Which leaves us with A LOT of autumn, harvest, and fall quilts – or at the very least, autumn-interpretative.
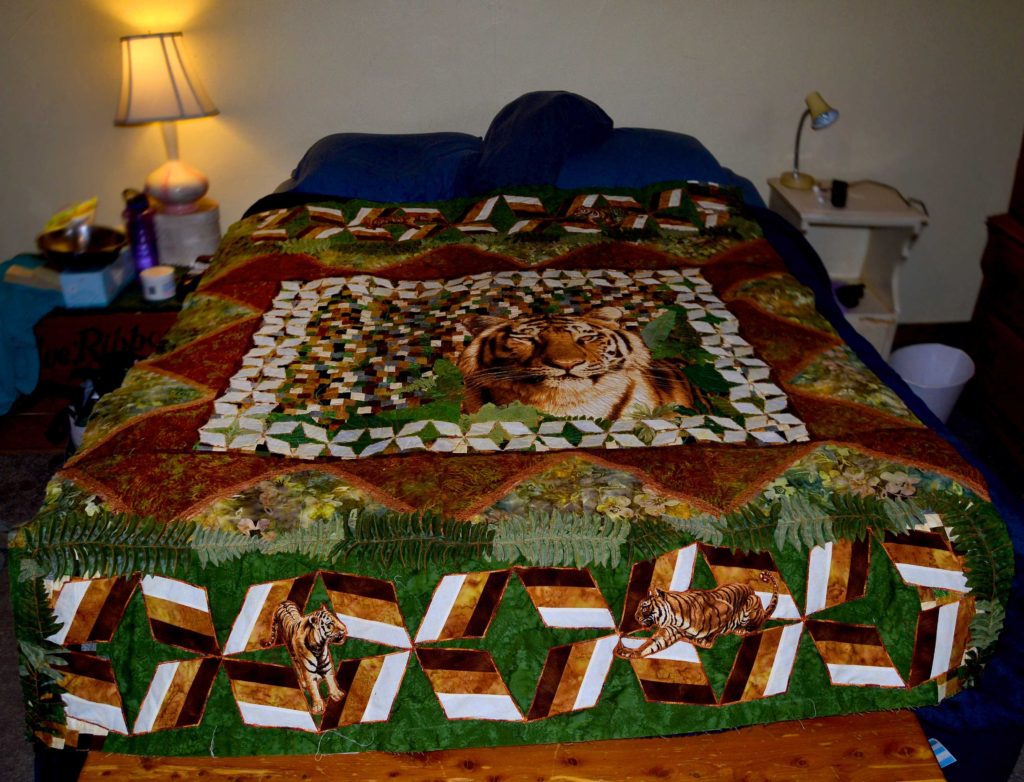
For instance, our Tiger Quilt isn’t technically an autumn design, but it can be used in that way!
Which leaves us with a weird problem. It’s one of those problems that we’re actually glad that we have, because it’s a problem of overabundance.
We have too many fall-themed quilts, wall hangings, and table toppers!
It’s like Old MacDonald had a farm, and on that farm he had some fabric and some fall leaves and left them alone for a while. And having hung many of these projects on my walls for my internal “changing of the seasons” decorating efforts, I think my creativity is running a little low.
Please Help Us Get Our Creativity Going this Fall!
Would you please share with us how you decorate for autumn? Especially if you use quilts, wall hangings, and other forms of fabric art as part of your interior decorating scheme. But even if you don’t really use fabric art in your home, please share with us how you make a fall-ish look.
Do you decorate more for Thanksgiving or Halloween?
Do you do a lot of decorating or minimal decorating?
How would you incorporate unique pieces like furniture?
Would you use antique – well, anything – to help display a wall hanging or quilt?
Please let us know your ideas, your decorating tips, your past experiences! Fall will be on us before we know it – thank goodness, since I’m done with the summer heat – and I want to do something really unique.
We’ll be sharing some of our past fabric art decorating methods on Facebook & Pinterest, and there’ll be some fun prizes for anyone who gives an answer!
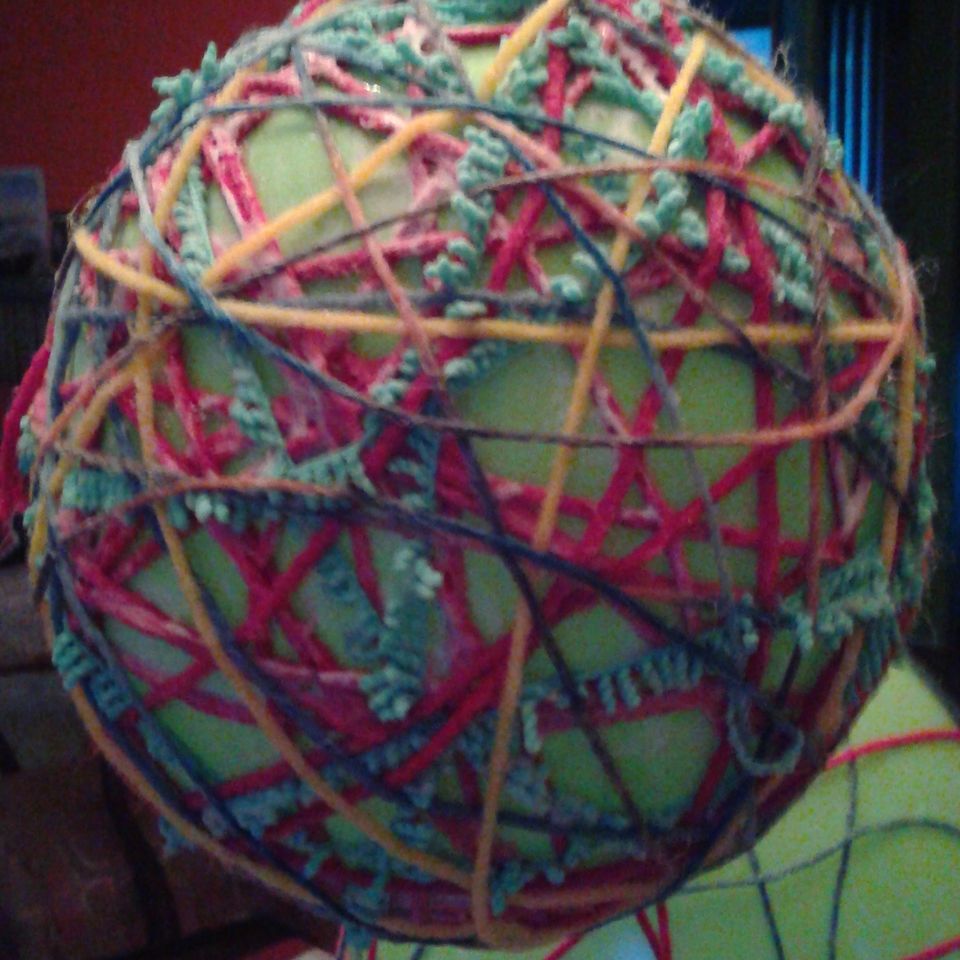
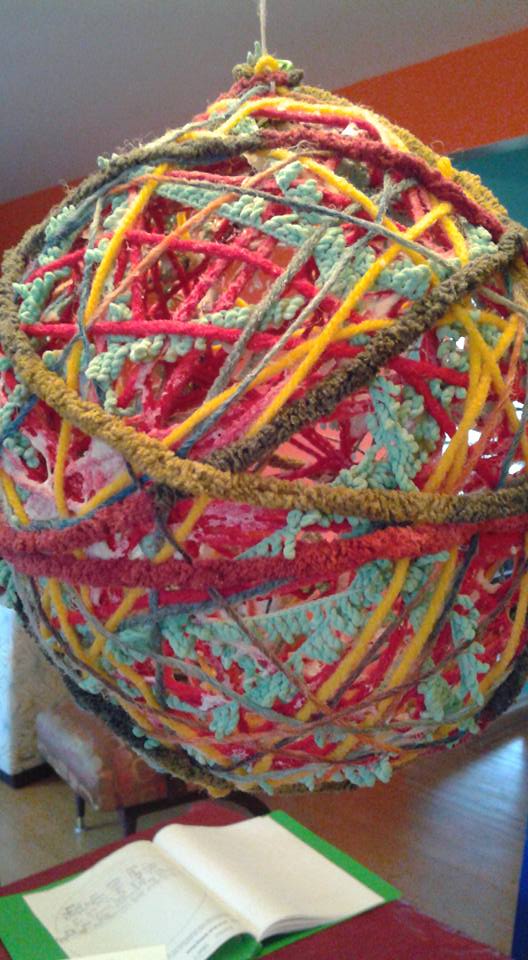
This has been a year of unique fabric artists! So far we’ve met two amazing women who take fabric art to new and dizzying heights of creative genius. And now, we have another one to share with you.
More than that, courtesy of our lovely new guest, we’ve discovered a whole new type of fabric art that we’d never heard of before!
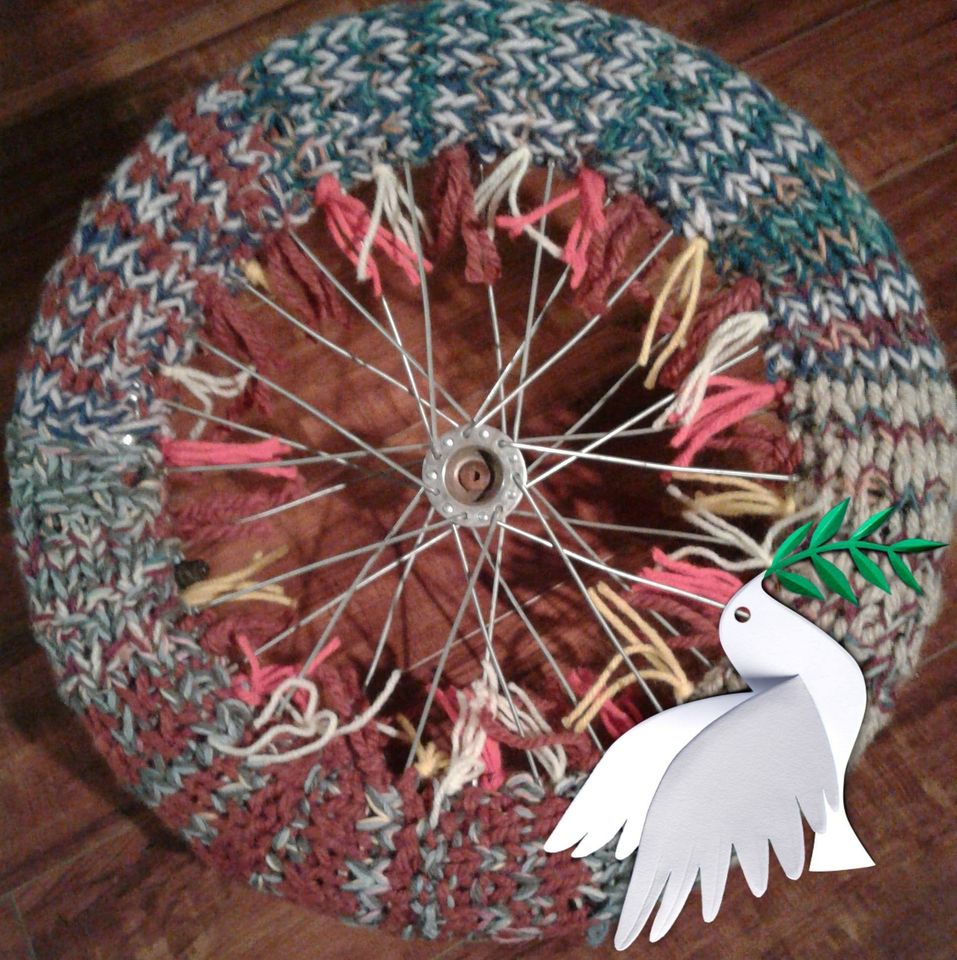
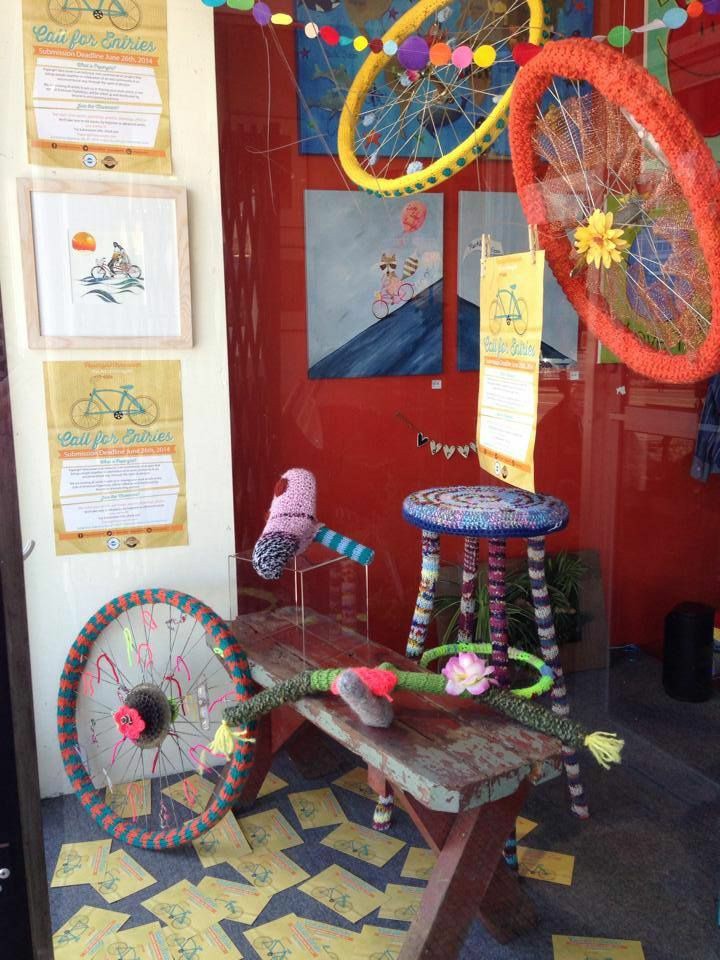
It’s a type of street art, or graffiti (as some call it), where the artist takes a leftover bit of knitting or yarn and wraps it around something.
The supports of a bridge
The limbs of a tree
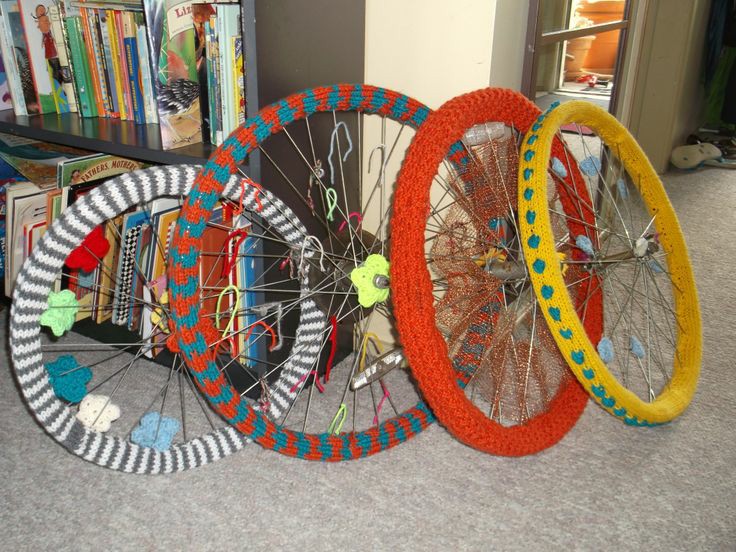
The spokes of a bicycle
Yarnbombing has become a way of saving and repurposing “junk” destined for the landfill, and salvaging those odd ends and pieces that always seem to hang around after a knitting project.
Perhaps unsurprisingly for such an outside-the-box endeavor, yarnbombing seems to have originated in Texas, with those saucy southern Belles who needed something to do with their leftover knitting.
Now, however, it’s a practice that’s already migrated across America and over the Pond, and is now adorning everything from New York City Streets to Italian Bridges.
So without any further ado, please encounter our newest unique fabric artist, and give her a warm greeting!
Yarnbomber Ola O’Shea
You do a very different kind of art. It’s fresh, different, and evidently means different things to different people and artists:
How do You Define Your Specific Type of Yarnbombing?
My art is unique, every single piece is like no other. I started with knitting sweaters, hats etc., but I always felt a need to create things that were more unique. I connected with a yarnbombing crowd and took part in large group projects internationally.
I start with an object and my yarn selection.
I do not buy yarn
Therefore I work with what I have on hand. Minimizing waste I use small scraps of yarn first.
Ola O’Shea
Rather than spending a lot of time on personal stuff, I will focus on my journey with yarn artwork.
I have worked with yarn all my life, knitting and crocheting. Later in life I started to incorporate my craft into art and now I’m saving items from the landfill.
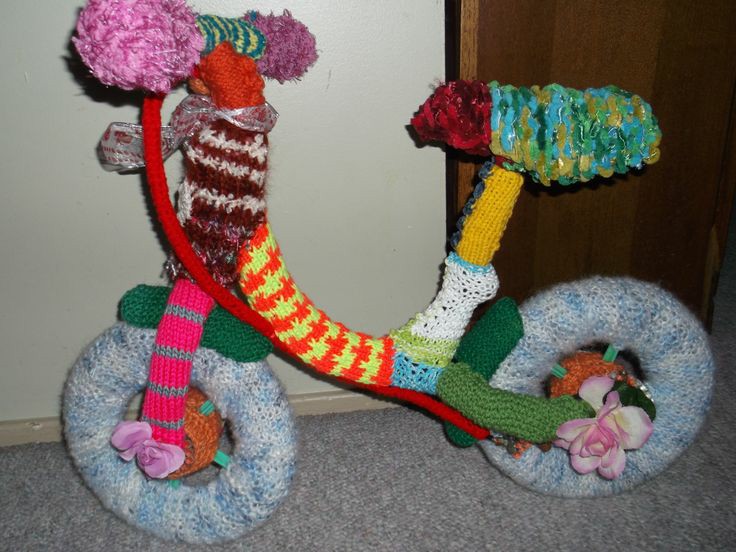
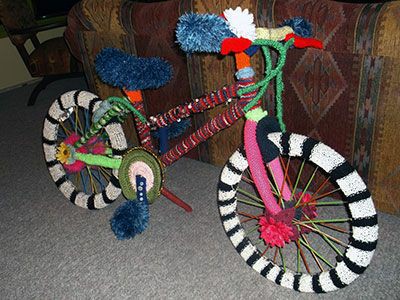
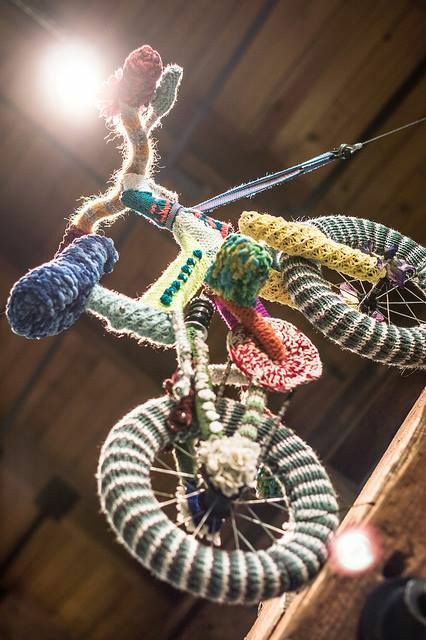
In the very beginning, I was loading kids’ bicycles into the car. One bicycle was left behind which I did not notice. I drove over it. I had a broken bike and decided to save it from the landfill.
That is how my yarnbombing of broken bicycles started.
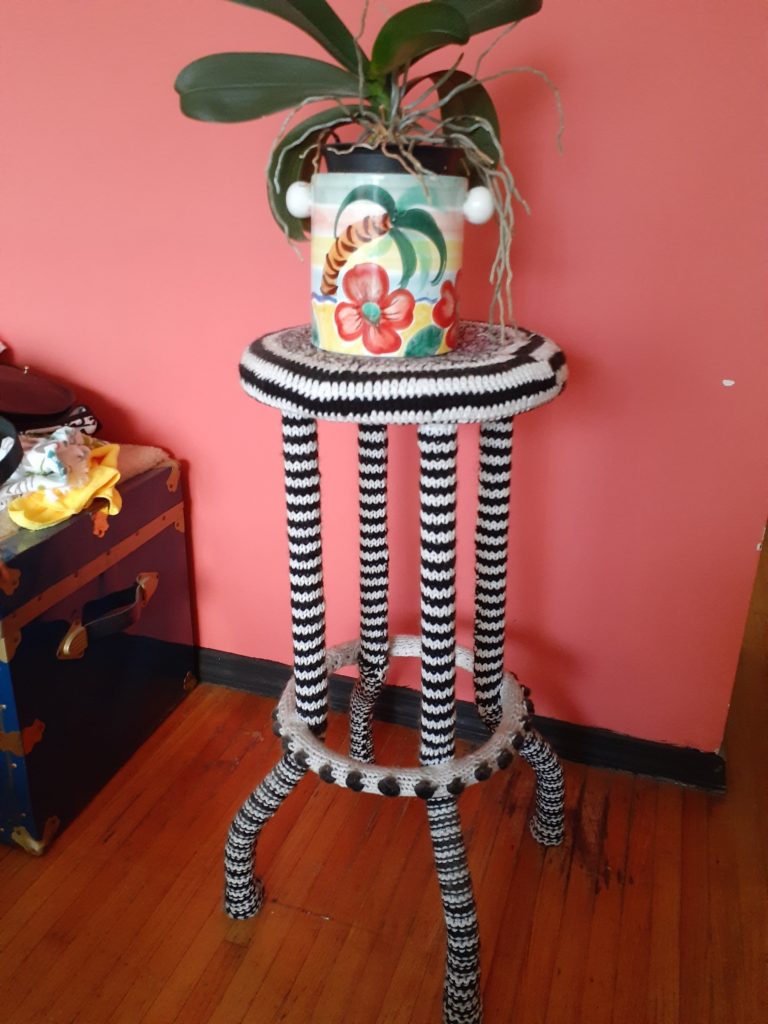
I cover many items in yarn, making them not only into décor but also great for practical use. My yarn covered stools can be used as plant stands etc.
Interesting Trivia about Me
I love colors, primary colors.
My style is boho.
I never use a pattern.
I create items that are unique.
And no 2 items are exactly the same.
I do not coordinate colors
I go by how it feels.
I do not plan my projects
They are very spontaneous depending what I have on hand.
Can You Tell Us More About the Culture and Community Surrounding Yarnbombing?
Yarnbombing is unique form of art, which comes with the responsibility of removing a display within an appropriate timeframe, so it does not turn into littering. Knitted/crocheted pieces can be turned into blankets and donated to people in need.
What’s Your Response to Environmental Criticisms of Yarnbombing?
Yes, there is an environmental criticism. I believe a yarnbombing carries responsibility, otherwise it becomes littering. I always make sure the projects I take part in, have zero waste and are environmentally friendly. I do not create art that interferes with wildlife, nature and I always make sure my display is removed in the timely matter.
Where Do You Find Inspiration for Your Ideas?
I find inspirations daily. I see what supplies I have on hand and what I can create. Everything I use is recycled. I do not buy yarn, I accept donations. I look for broken items, cover them with yarn and save them from landfill.
What Motivates You to Create Yarnbombing?
What motivates me to create is recycling items which would end up in landfill.
I do not purchase anything for my art; so I’m recycling yarn as well. I also use fabric. I look for colors and texture.
Why Did You Start Specifically with Yarnbombing?
I started my art, because I want zero waste. Too many items get discarded.
Did you start with a standard pattern or design, or was this all your own creation?
Everything I do is my own creation. I do not follow patterns; I don’t know how to read them. I pick up yarn and go by how it feels.
What is your process; design, prep, work, completion, etc.?
I look for items that are unusable, discarded. I will even pick them up from the side of the road. Then, I open my trunk, where I store yarn and fabric. The rest is spontaneous creation. I do not have the finished object in my head when I start. I never know what end result would be like.
Which is how it all got started with yarn covered bicycles.
Bicycle was broken.
I was knitting, crocheting pieces, and adding them to the bike.
No pattern, no plan.
Just plain creation.
How long does each finished (item) take to complete?
Hard to say, because I work on few projects at the time. I consider it completed when I am satisfied with the outcome.
How many have you made in all (or a rough estimate)?
Lots. I’ve lost count, but the projects include bicycles, plant stands, wheels, paper lanterns, and (in part) a plane, and everything in between!
Do You Display Your Yarnbombing Art Publicly? Exhibits, Contests, Events?
I do participate in exhibits, although I’ve never entered a contest.
And yes, I do events.
My yarnbombing art has been displayed in LA and other cities in the US, as well as Hawaii, London, Canada etc.
I made my part, mailed it and it was incorporated into a large project. We covered façade of art gallery in LA, and a plane in Yukon, Canada.
What’s the best place for our readers to find and/or contact you?
Being able to showcase unique artists like Ola is one of the best parts of being Princess YellowBelly Designs. We love discovering new artists, learning about their techniques, and getting to experience their amazing works of art. If you know of someone – or are someone – who practices a unique form of fabric art, please use the form below to let us know!
Princess YellowBelly Designs loves, loves, LOVES finding fabric art and artists who are unique, amazing, and oh-so-special. The art we especially love to find is when an artist has tried several different mediums, like quilting and crochet, for example, and has found some way to combine the two into an amazing new style – something you can’t find in any pattern book.
Here at PYB we do it with quilts, we start with quilting patterns, add in some applique, include embroidery techniques, buttons, etc. But recently we’ve shared people who do it with crochet, clothing, and – now – weaving!
And, really, wow. What weaving. We’ve found someone who not only loves bright colors, but combines a truly staggering number of different artforms and influences. And, while it may not be humanly possible to become proficient at each and every type of fabric art – our new unique artist may very well have at least tried just about every way to apply art to piece of thread or fabric.
So, without any further ado, please help us welcome a truly amazing, unique fabric artist:
Nancy Lattier Hinsey
What inspired you to start weaving?
In 1974 I visited Salem, MA and took a docent-led tour. The main room in one house featured a 6’ wide loom. I’d never seen a loom before and was fascinated. I decided then that one day I would own a loom and know how to weave.
Where Do You Find Inspiration for Your Ideas?
I’ve lived alone since 2015, for the first time in my life. This has led to an explosion of creativity and revealed the true artistic soul inside me – one that can finally express herself in any way she chooses! At age 73, I feel like I am finally living my “true life.” Even dinner becomes an artistic expression and the consumption of a meal a gift to myself!
Many ideas appear in my dreams!
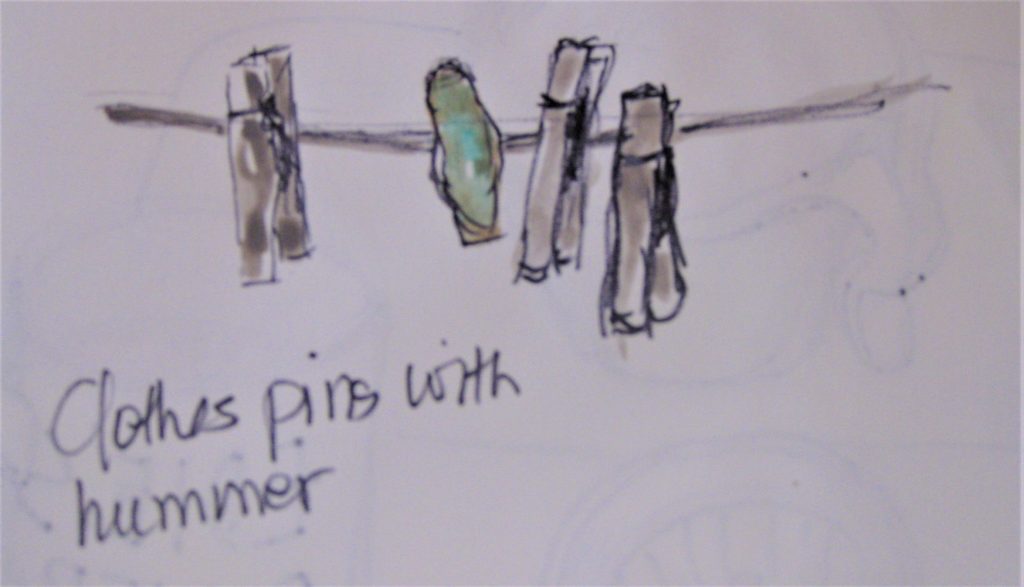
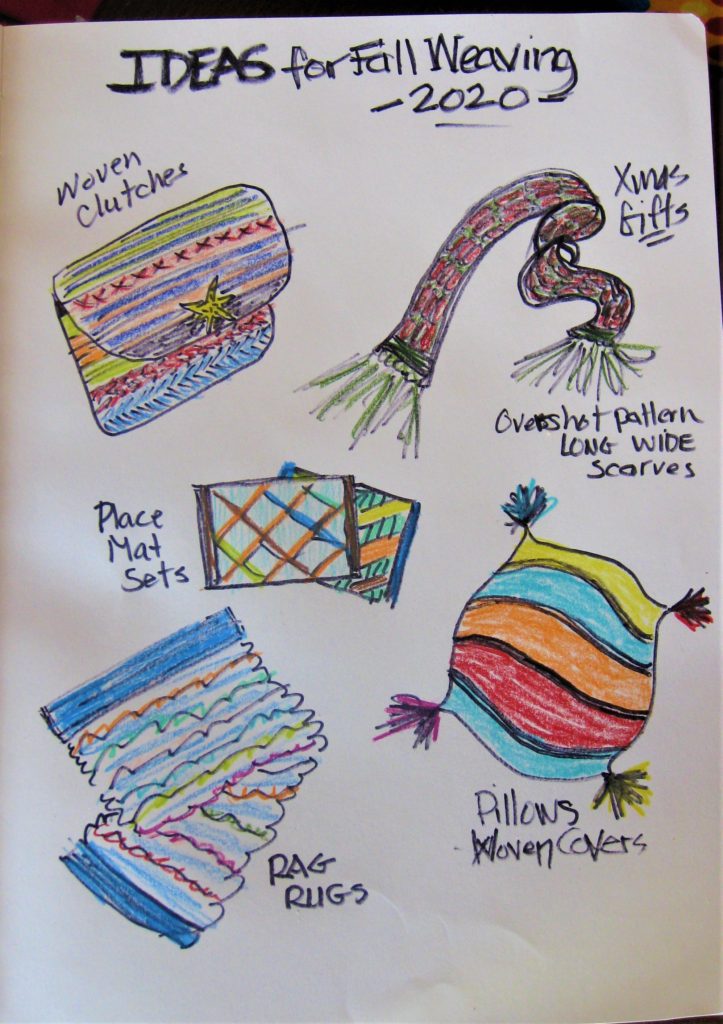
My Fall and Winter plans include new experiments with Fabric Layering and Manipulation, Shibori dyeing, new Overshot weaving patterns and fibers, and a promise to myself to learn to “COLOR OUTSIDE THE LINES.”
Nancy Lattier Hinsey
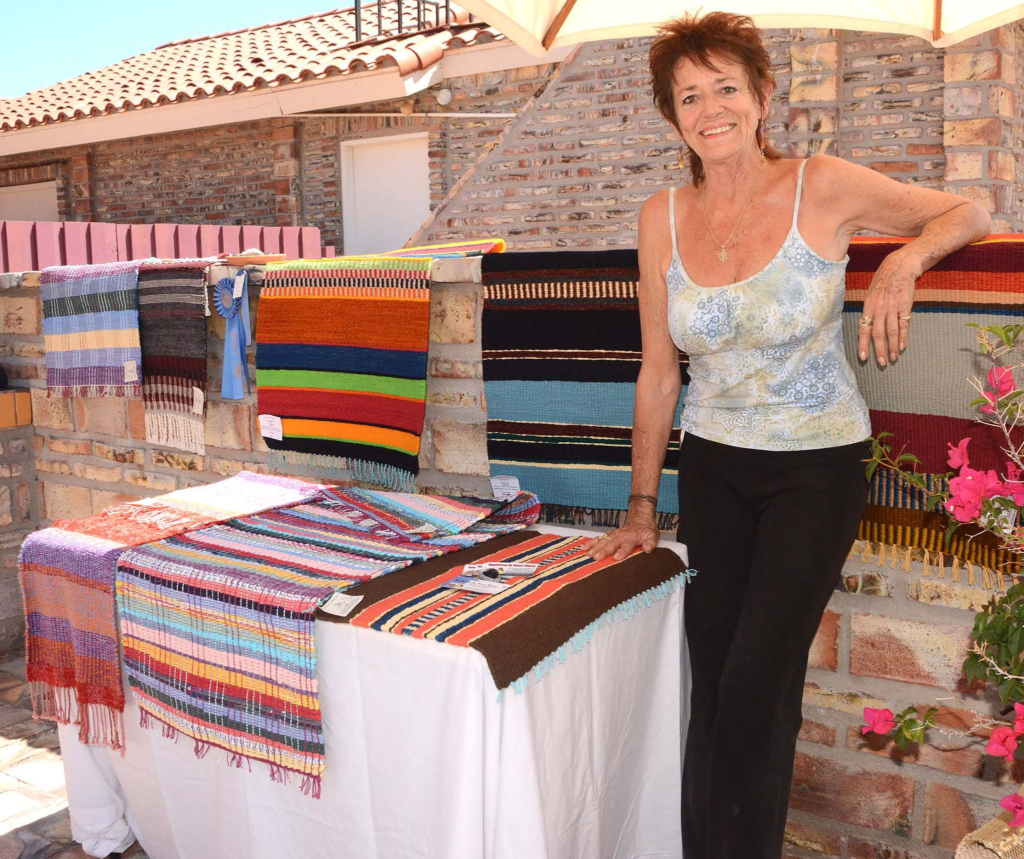
I was an Escrow Officer in So. Calif and lost my job in 2007 when the R.E. & Mortgage Loan-stoked recession hit. I’d always wanted to learn to weave, so I bought a loom and enlisted 2 weaver friends to mentor me.
2 years later, I lost my home.
But I had my small but unencumbered home in Baja, Mexico, on the shores of the Sea of Cortez, so I packed myself, my looms (2 now) and the 2 cats and headed south in 2009.
I’m the only weaver around and as such I generate a lot of interest. I sell to people here, Americans and Canadians, who (used to) visit my home studio, opened an Etsy shop 2 years ago to showcase my wares and promote/sell on Facebook. And, until Covid, I participated in 4 – 6 Art Shows in San Felipe per season. 90% of the gringos leave by June 1st, before Summer hits with high temps and humidity!
I feel like I am finally living the artistic life I was destined to live, but kept circumventing due to career and job pressures. Every day is now devoted to creation, expression, experimentation and presentation of Wearable and Practical Art:
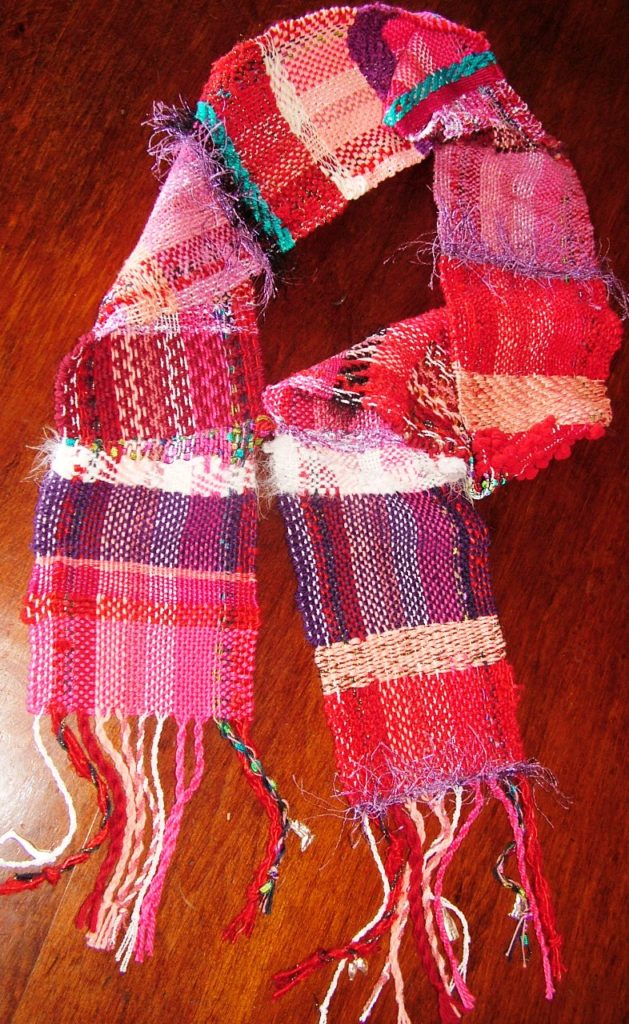
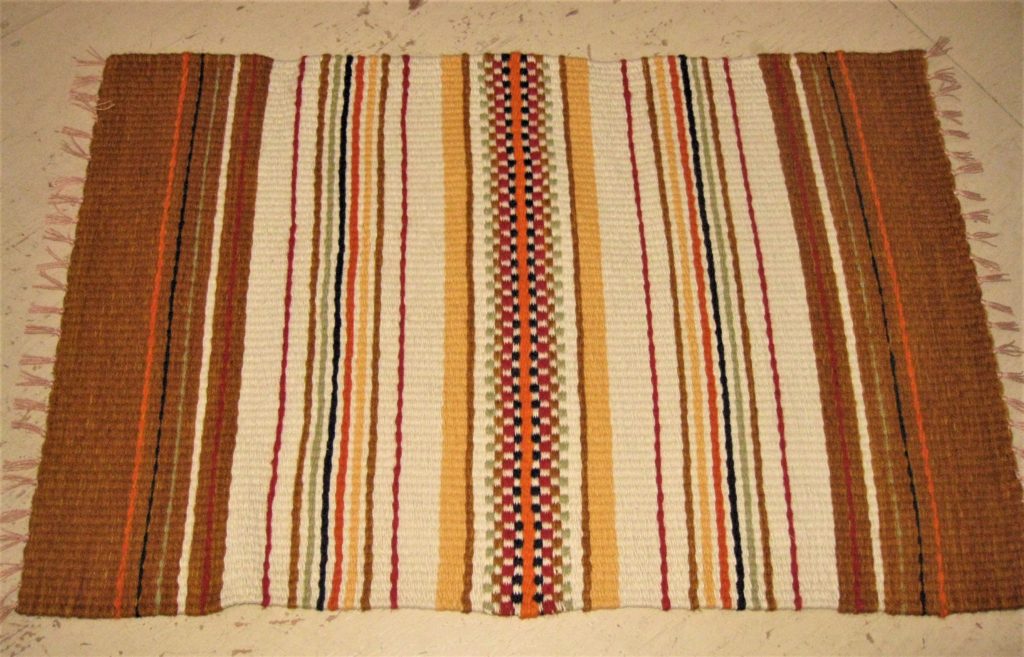
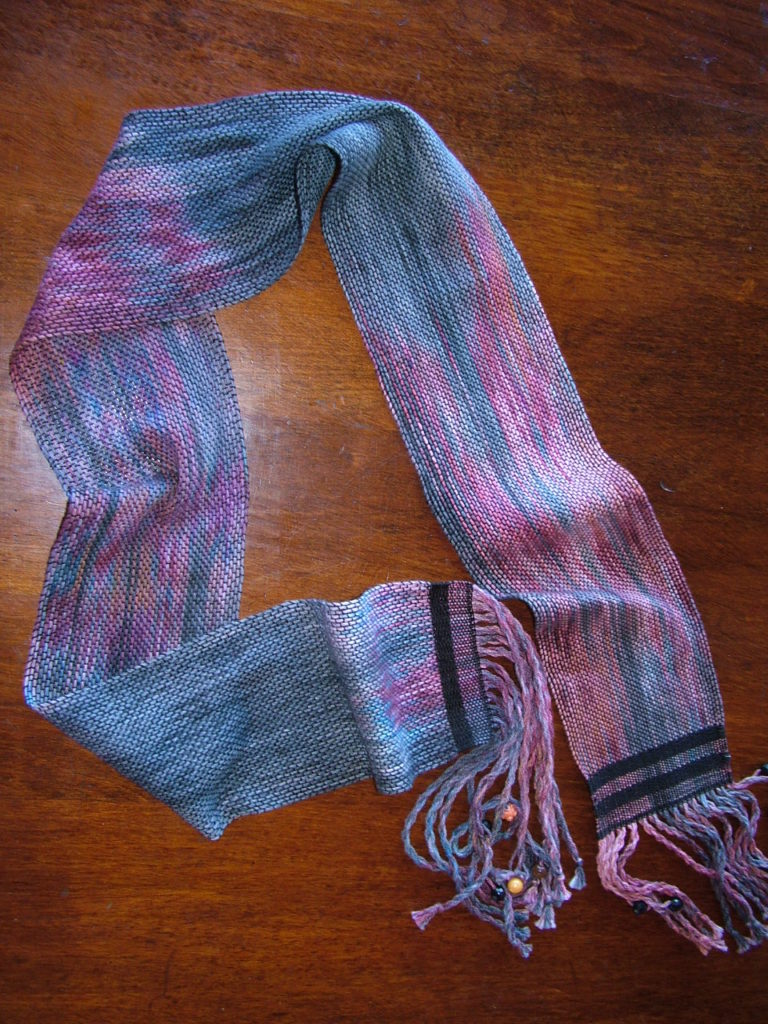
Rugs
Scarves
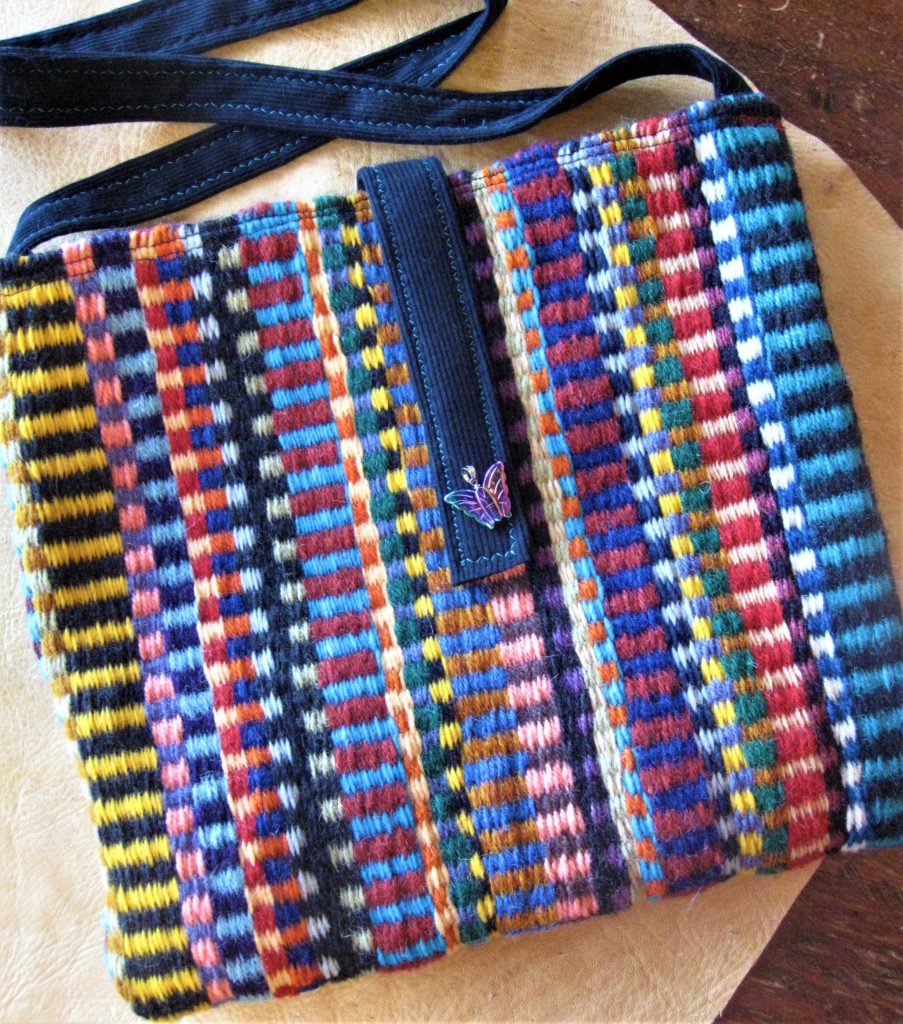
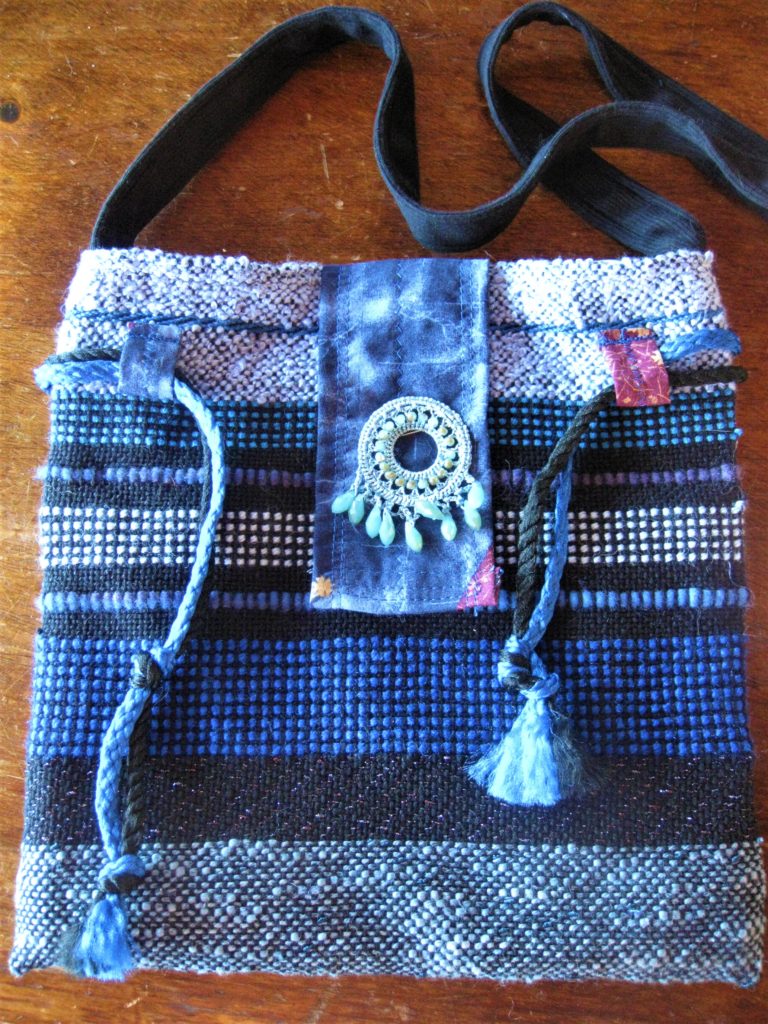
Boho bags
What Motivates You to Create Fabric Art?
I am motivated by Curiosity and Boredom. A compelling combination that has led me to explore many aspects of life and creative expression.
I’m mostly self-taught and have created in, or at the very least experimented with, numerous art forms including:
Cut paper
Quilling
Calligraphy
Illumination
Beading
Crochet
Knitting
Macramé
Oil painting
Candle making
Pen and ink
Shibori and tie-dye
And silk screening.
My silk screened “Jelly Bean Bags” found their way to Ronald Reagan’s desk.
Yes – she said Ronald Reagan’s desk! Email if you’d like to hear more!
Scarves – Saori style and traditional patterns – (Saori is an organic Japanese weaving style of flowing consciousness)
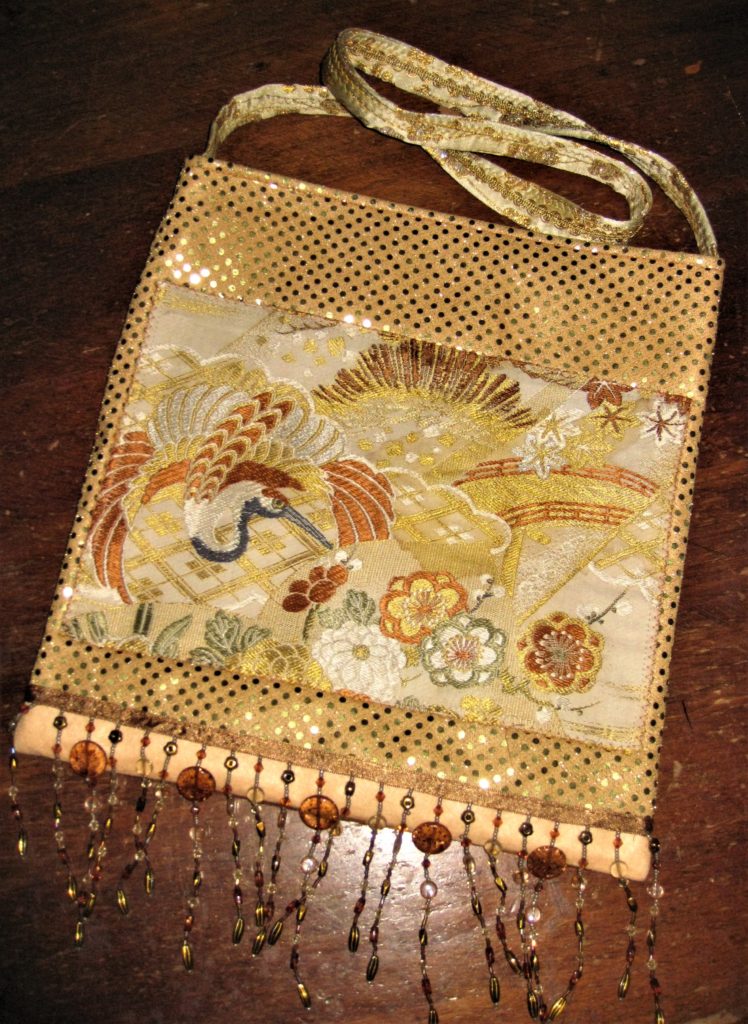
Purses
Fabric
Boho Bags
Hat Bands
Clothing – pants, caps, blouses
I believe my multi-media “work” represents a respectful combination of Arts and Crafts.
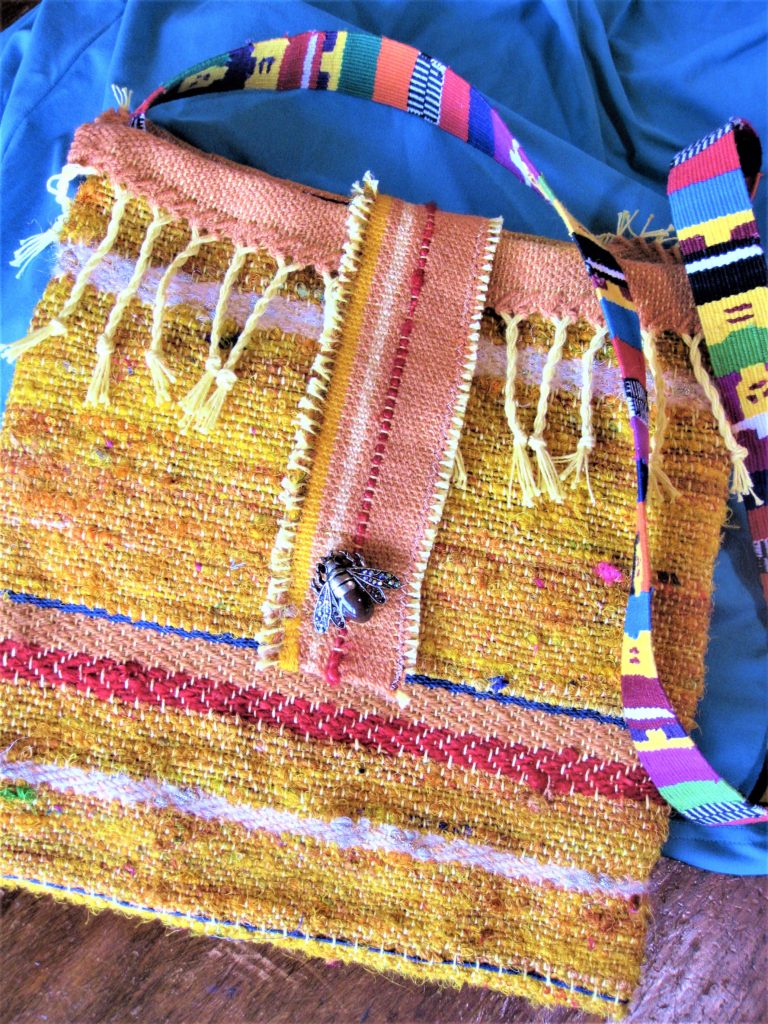
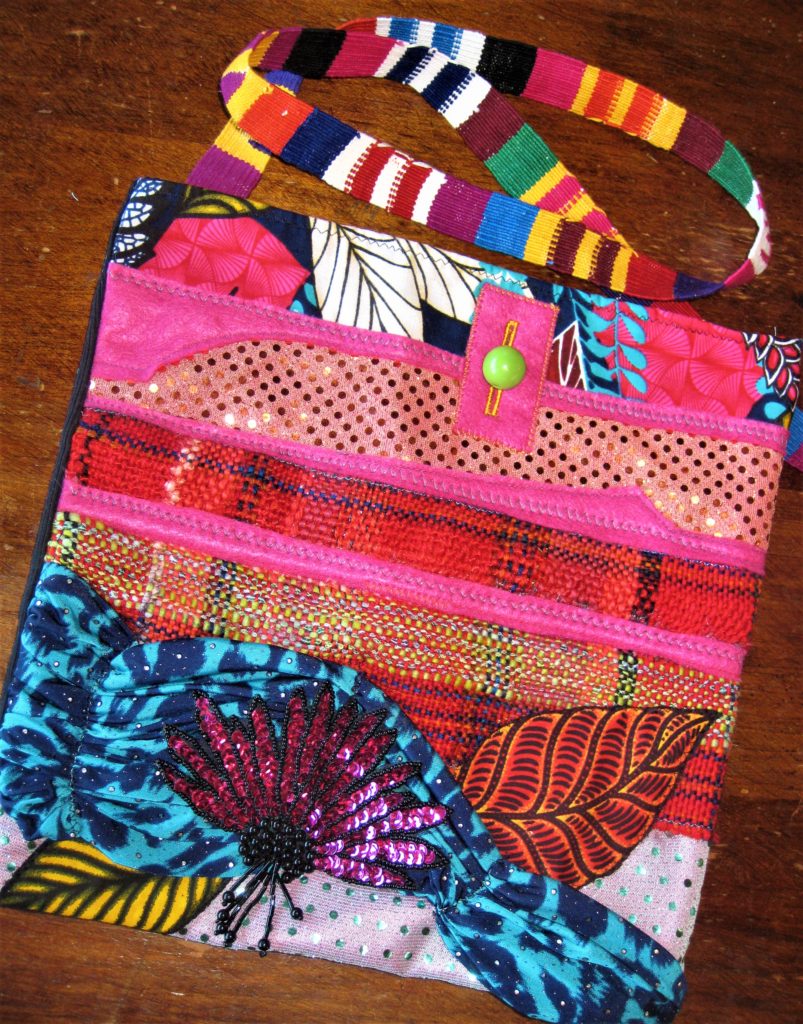
Why did you start making Boho bags?
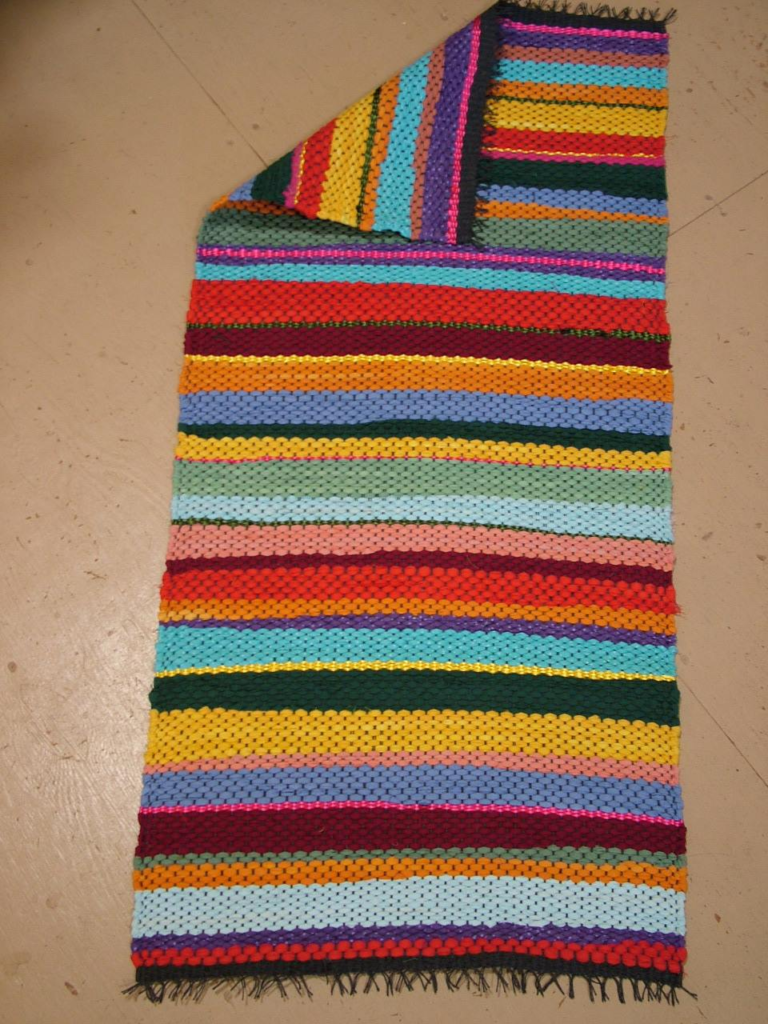
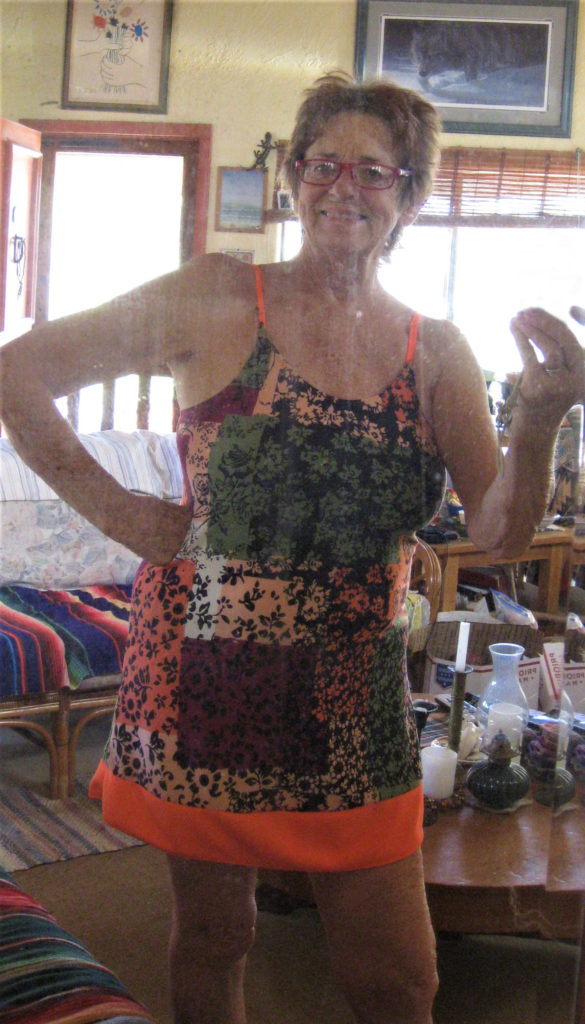
I began weaving Boho Bags in 2013. At the time, I was weaving Rag Rugs from fabric strips, and had lots of fabric people had donated for my use in weaving these. (I tear or cut the material into 1 ½” strips for weaving.)
One day I noticed a stack of fabrics that looked so great together I decided to do a patchwork piece of fabric and Boho Bags were born!
While I love the colors, textures and patterns available to me through weaving, the fabric manipulation satisfied a craving for a more immediate tactile experience. I re-acquainted myself with my sewing machine (an antique Singer) and started to sew; the old Singer only lasted a couple of months.
I put out a request for a machine on my local Facebook page and was gifted a Kenmore that has become my work horse! I was also given a programmable Pfaff with all the bells and whistles, but I still do all the basics with the Kenmore.
The Boho Bags are one-of-a-kind and wildly popular. Several clients have bought numerous bags.
Did you start with a standard pattern or design, or was this all your own creation?
I started with a simple woven rectangle 15” wide and 30” long, resulting in a 14 X 14 bag when stitched. I keep it simple, though I do experiment with various closures, over flaps and straps. I recently found a woman in WA who now weaves custom-order straps in specific color combos, for specific purses.
And I’m always on the prowl for fobs, focals, lace, trims, beads, sequins, fringe and anything sparkly to add to the bags.
I follow many people on Pinterest and occasionally see a purse style that grabs me. Otherwise, I feel the purpose of the bags I create is to evoke a visceral reaction to the color and texture, and this size fits the bill to express that.
Practicality is important but secondary.
Each bag, whether fabric or woven, has interior pockets. Most feature outside pockets as well. Some fabric bags are constructed with a flat bottom and sides, creating a more voluminous tote. Some have pockets on the sides as well, perfect for sun and reading glasses. People LOVE pockets! And always one pocket slot that fits the phone!
What is your process; design, prep, work, completion, etc.?
I don’t do a lot of planning!! It all starts with the visual for me.
I browse fabrics, either on hand or on-line. Sometimes I wake up with a certain color or trio of colors dancing in my head. The search begins. I pull out anything that fits the bill, without stopping to evaluate. I often end up with a large stack of fabrics on my dining room table aka Work Space. (Fortunately I live alone!) I work on a “base” piece out of muslin, (my palette), and affix my fabric designs to that. And finally, each purse is fully lined with at least one interior pocket.
I fall under the category of Obsessive-Compulsive I’m sure! Which works fine for me.
I work on the new purse till I’m either stumped or bored. But since I always have at least three projects going at once…. I go on to the next one and keep the creative juices flowing. I call it Multi-Tasking. And it makes for a very full, exciting and productive day/week/month/year! The weaving process though requires a Zen focus – when I’m weaving, I weave.
Is there anything you can tell our readers about how to integrate two very different fabric art styles into one finished piece?
I don’t really do much of this. I have used some of my woven fabrics as over flaps on the fabric Bohos, but otherwise I prefer similar fabric textures on a bag.
How long does each finished bag or scarf take to complete?
THE most often asked question at shows!
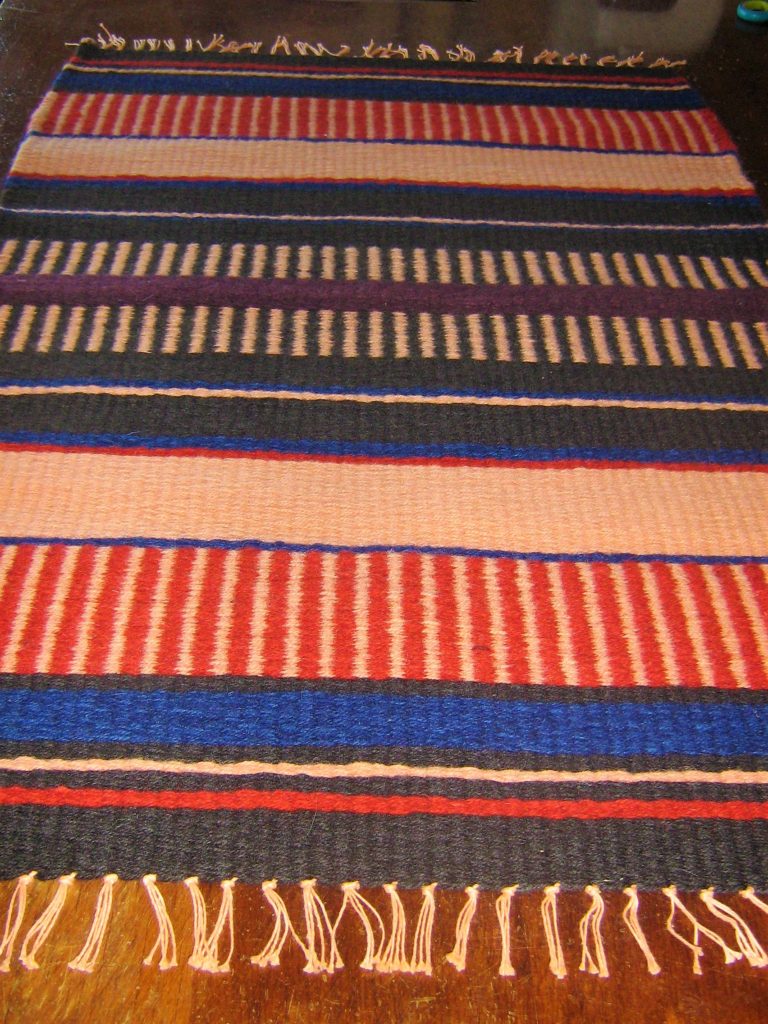
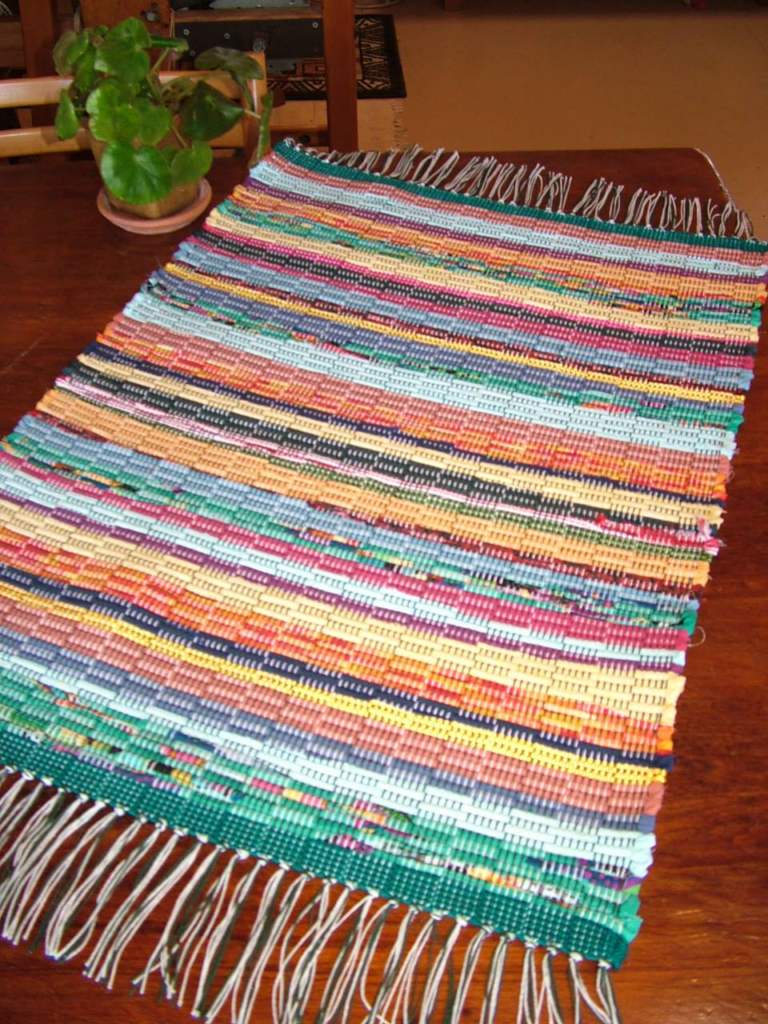
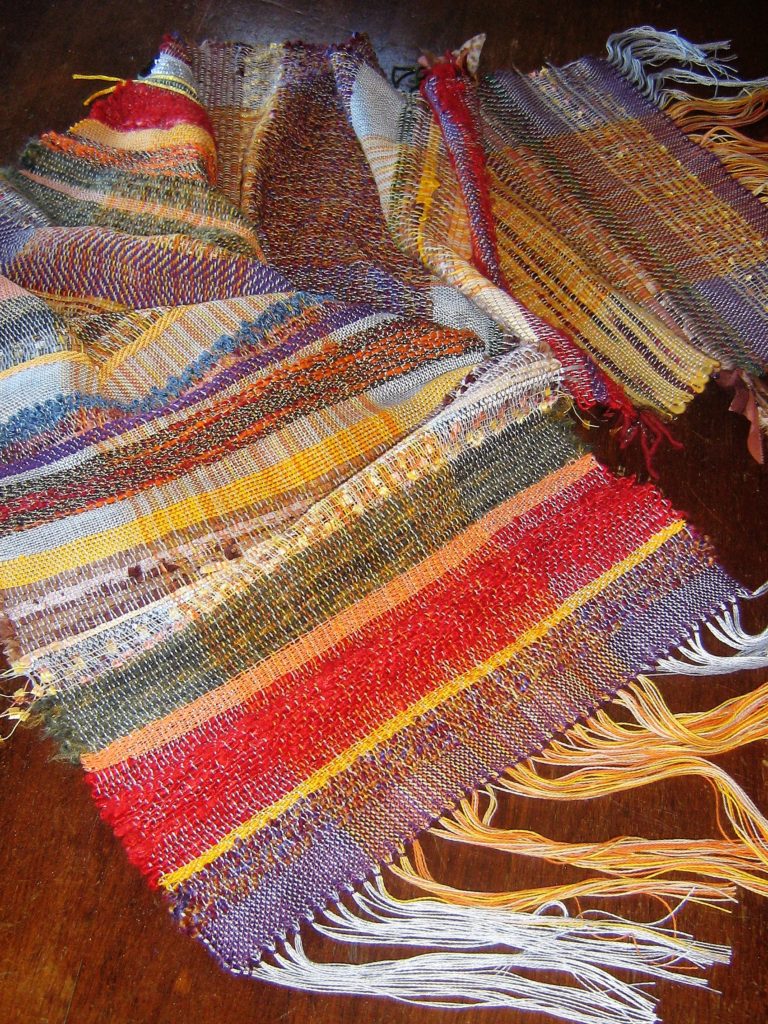
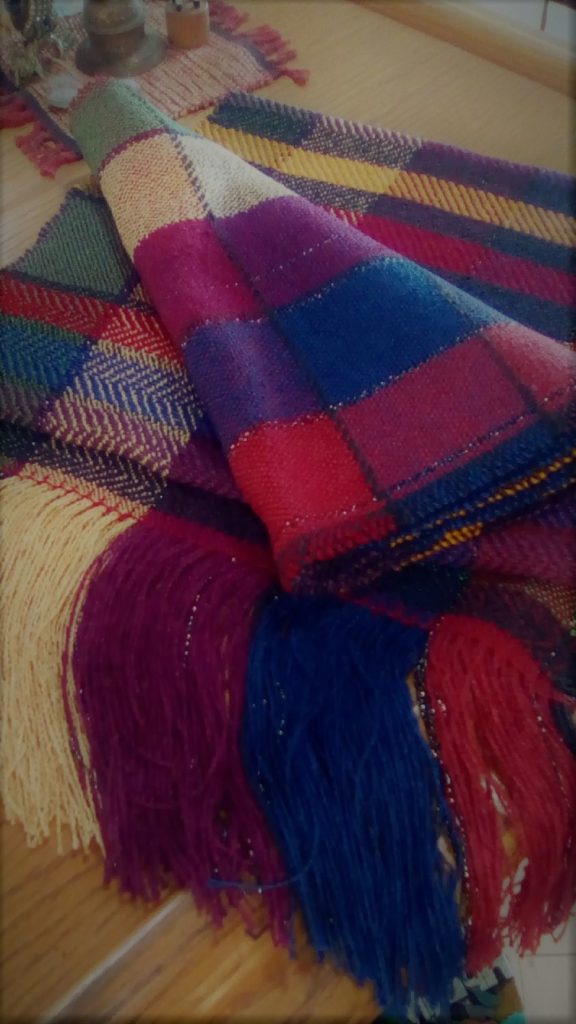
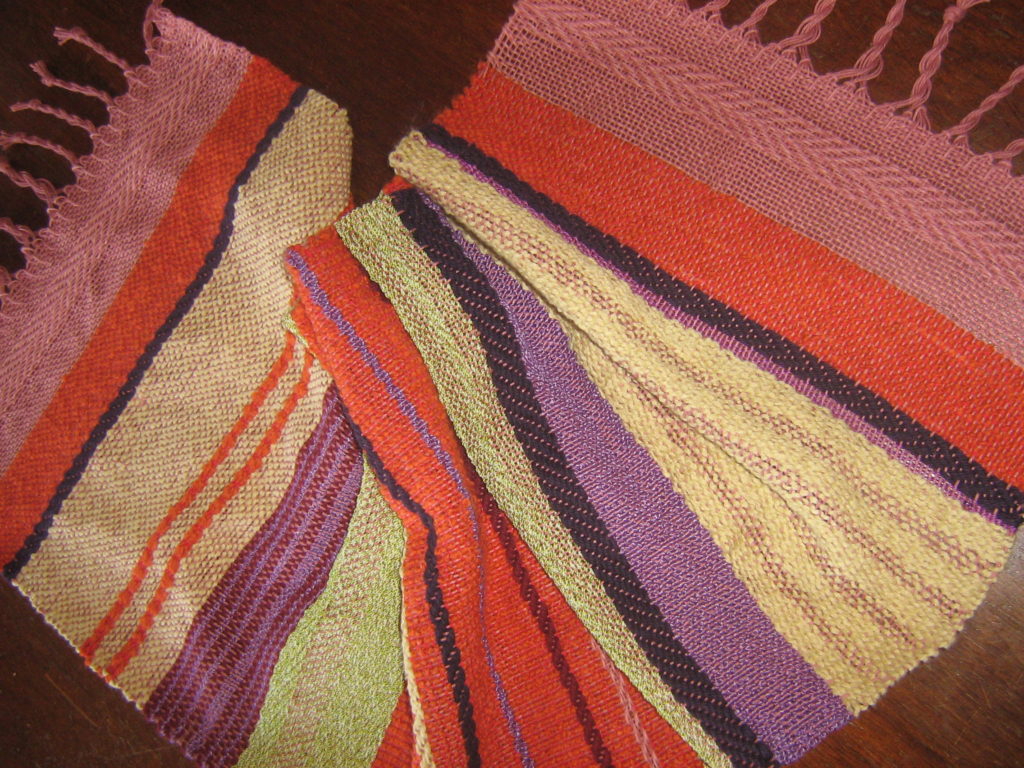
Especially with my woven rugs. Most of my wool rugs are 2 ft. X 3 ft. And depending on the intricacy of the pattern, each rug takes an average of 12 hours to weave. Add to that the preparatory steps of winding a warp, threading and dressing the loom, and then the final process of tying and twisting fringe and in some cases, wet finishing. I weave a special wool rug I call a “Kaleidoscope Rug,” woven with the remnants of the many colors of wool left over from previously woven rugs.
I weave most of my wool rugs in the “Indian Saddle Blanket” style with the color scheme the only pre-determined element. I weave in a “stream of consciousness” fashion, changing colors when it feels right to do so. This makes each rug an adventure and suprise for me!
The Boho Bags vary from 6 to 10 hours, and the woven rugs can take as many as 20 hours total!
How many have you made in all (or a rough estimate)?
In my 13 years of weaving:
Wool rugs – probably 80…..all but 3 have found homes.
Rag Rugs – 40. Woven Bags – 60.
Fabric Bohos – 60.
I also weave Table Runners (10), and Scarves (100). The woven scarves are very popular as Christmas gifts! Last year alone I had orders for 20 of them. It was a very busy 3 months for me!
I’m currently exploring Fabric Layering and Manipulation including Appliques and Reverse appliques, various forms of stitching, embroidery and “slow stitch” ala Alabama Chanin. I do have four stitched Hat Bands (Head Bands) available. These are done in the reverse applique method with floss stitching and embroidery. And of course, the fabric bags make the perfect base for exploring these techniques.
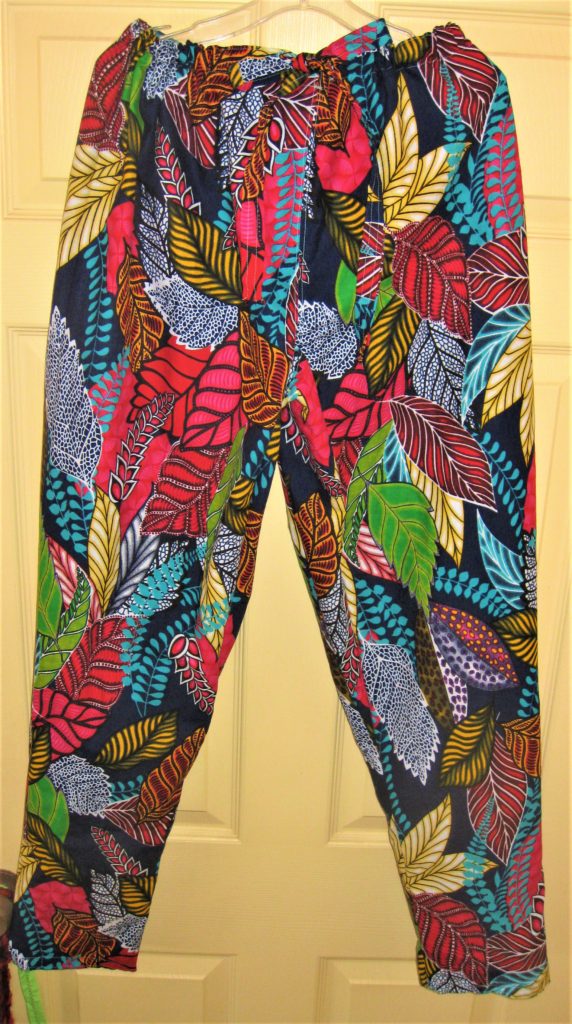
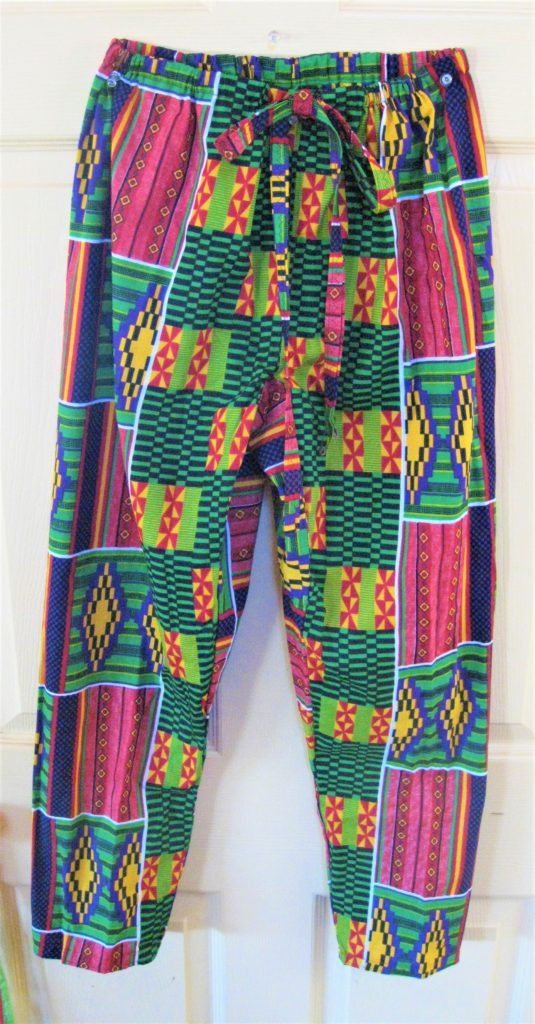
Also, I’ve recently begun a love affair with African print fabrics. Oh, what dynamic colors and bold geometry!! I’ve sold a few pair of African style pants in these prints as well as the retro Newsboy Caps.
And, next up will be a Japanese Hapi Jacket in a wildly colorful African print. The perfect pairing of cultures.
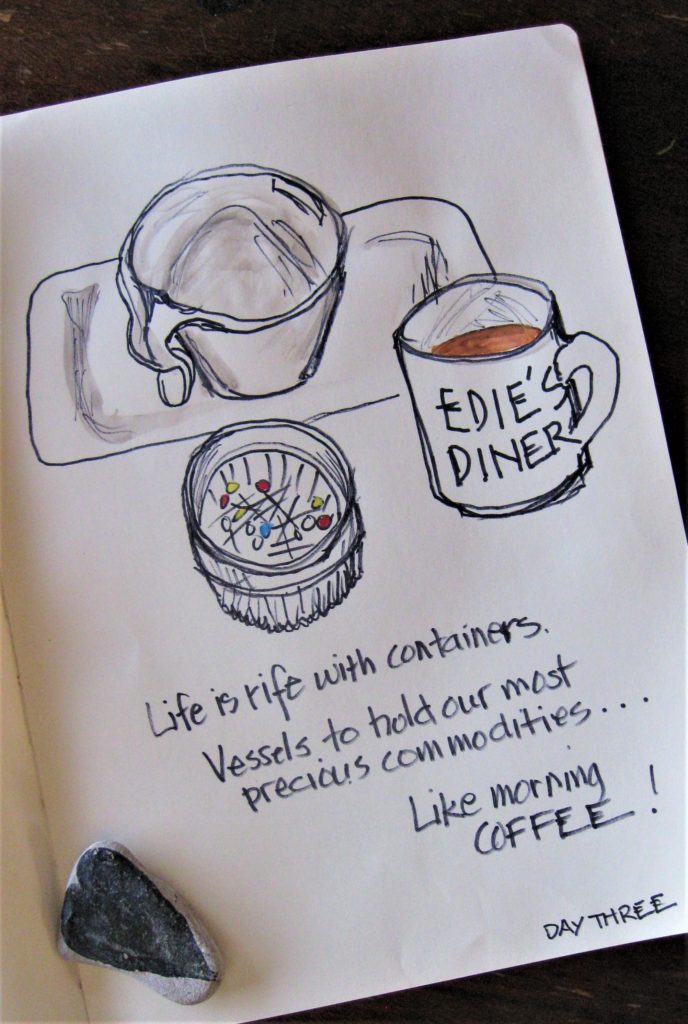
And, in a commitment to forward movement and further expanding my ability to “think outside the box” and “paint outside the lines,” I’ve begun daily entries into a new Artist’s Sketch Book.
I love the bold look of a black Sharpie, so that’s my first line of expression on the page. Then, I embellish with watercolors – also a new endeavor. I share each day’s sketches on Facebook. So many people enjoy sharing in the process of discovery. I am finding that sketching from “real life” enhances my perception and attention to details, shading and shape.
Who knows where this may lead? Also a new adventure for me.
I hear you’ve won quite a few contests, can you tell us more about that?
My dear friend and weaving mentor, Suzanne, bought one of my first woven wool rugs. It was a unique design in the “Indian Saddle Blanket” style which features alternating blocks of color and solid stripes of varying depths. This one was black, red, white and turquoise. She entered it in the annual Riverside County Fair & Expo and shocked the heck outta me when she told me the rug had won “Best of Weaving” and “Best Woven Rug” divisions!
Plus I received a small check and two blue ribbons!
In 2013 I created the First Annual South Campos ART TOUR.
This is a unique celebration of the colorful local art I enjoy so much. It consists of 8 local artists, visitors purchase a ticket and drive to their home/studio to see demo, view and purchase original art, then enjoy events like Lunch, Raffle and Silent Auction at Community Center, proceeds to local middle school ART AND ESL programs, which we established and staff.
Do you display at fairs or events?
I participated in approx. 6 Art Shows/Sales per Season (Oct – May) here in San Felipe, where there is a large community of retired Americans and Canadians. Those are on hold till it becomes safe to be in crowds again!
I have also just made arrangements with a friend/customer who is opening a Tourist Gift Shop in Poncha Springs, CO to provide some of my woven pieces for sale there.
SALES: Most of my sales are made in-person at local San Felipe Art Shows and to visitors to my home studio (PRE COVID). I certainly miss those visits with coffee and convo!
My Etsy shop serves as a tableau for all of my current inventory. The Covid virus has hit San Felipe hard, and mask and in-home precautions are still in effect. Thus, on-line sales, mostly through Facebook, are especially important to this solo artist living on a sand dune in Mexico!
What’s the best place for our readers to find and/or contact you?
Being able to showcase unique artists like Nancy is one of the best parts of being Princess YellowBelly Designs. We love discovering new artists, learning about their techniques, and getting to experience their amazing works of art. If you know of someone – or are someone – who practices a unique form of fabric art, please use the form below to let us know!
Princess YellowBelly Designs is all about celebrating the most unique and creative ways that fabric can possibly go together – and if these artistic creations happen to be useful as well, all the better! From quilts to wall hangings, from table toppers to mug rugs, from patterns to printed photo panels – we’re all about the magic in the art.
Which is why we’re so excited to welcome an incredibly unique artist that we just met on Facebook!
Please give a warm welcome to our wonderful guest star:
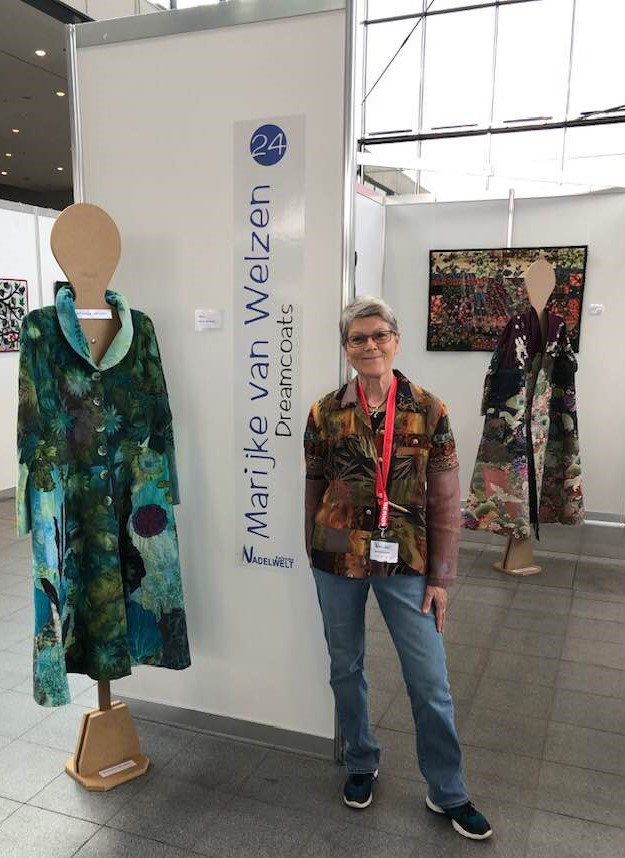
Marijke van Welzen!
The Art
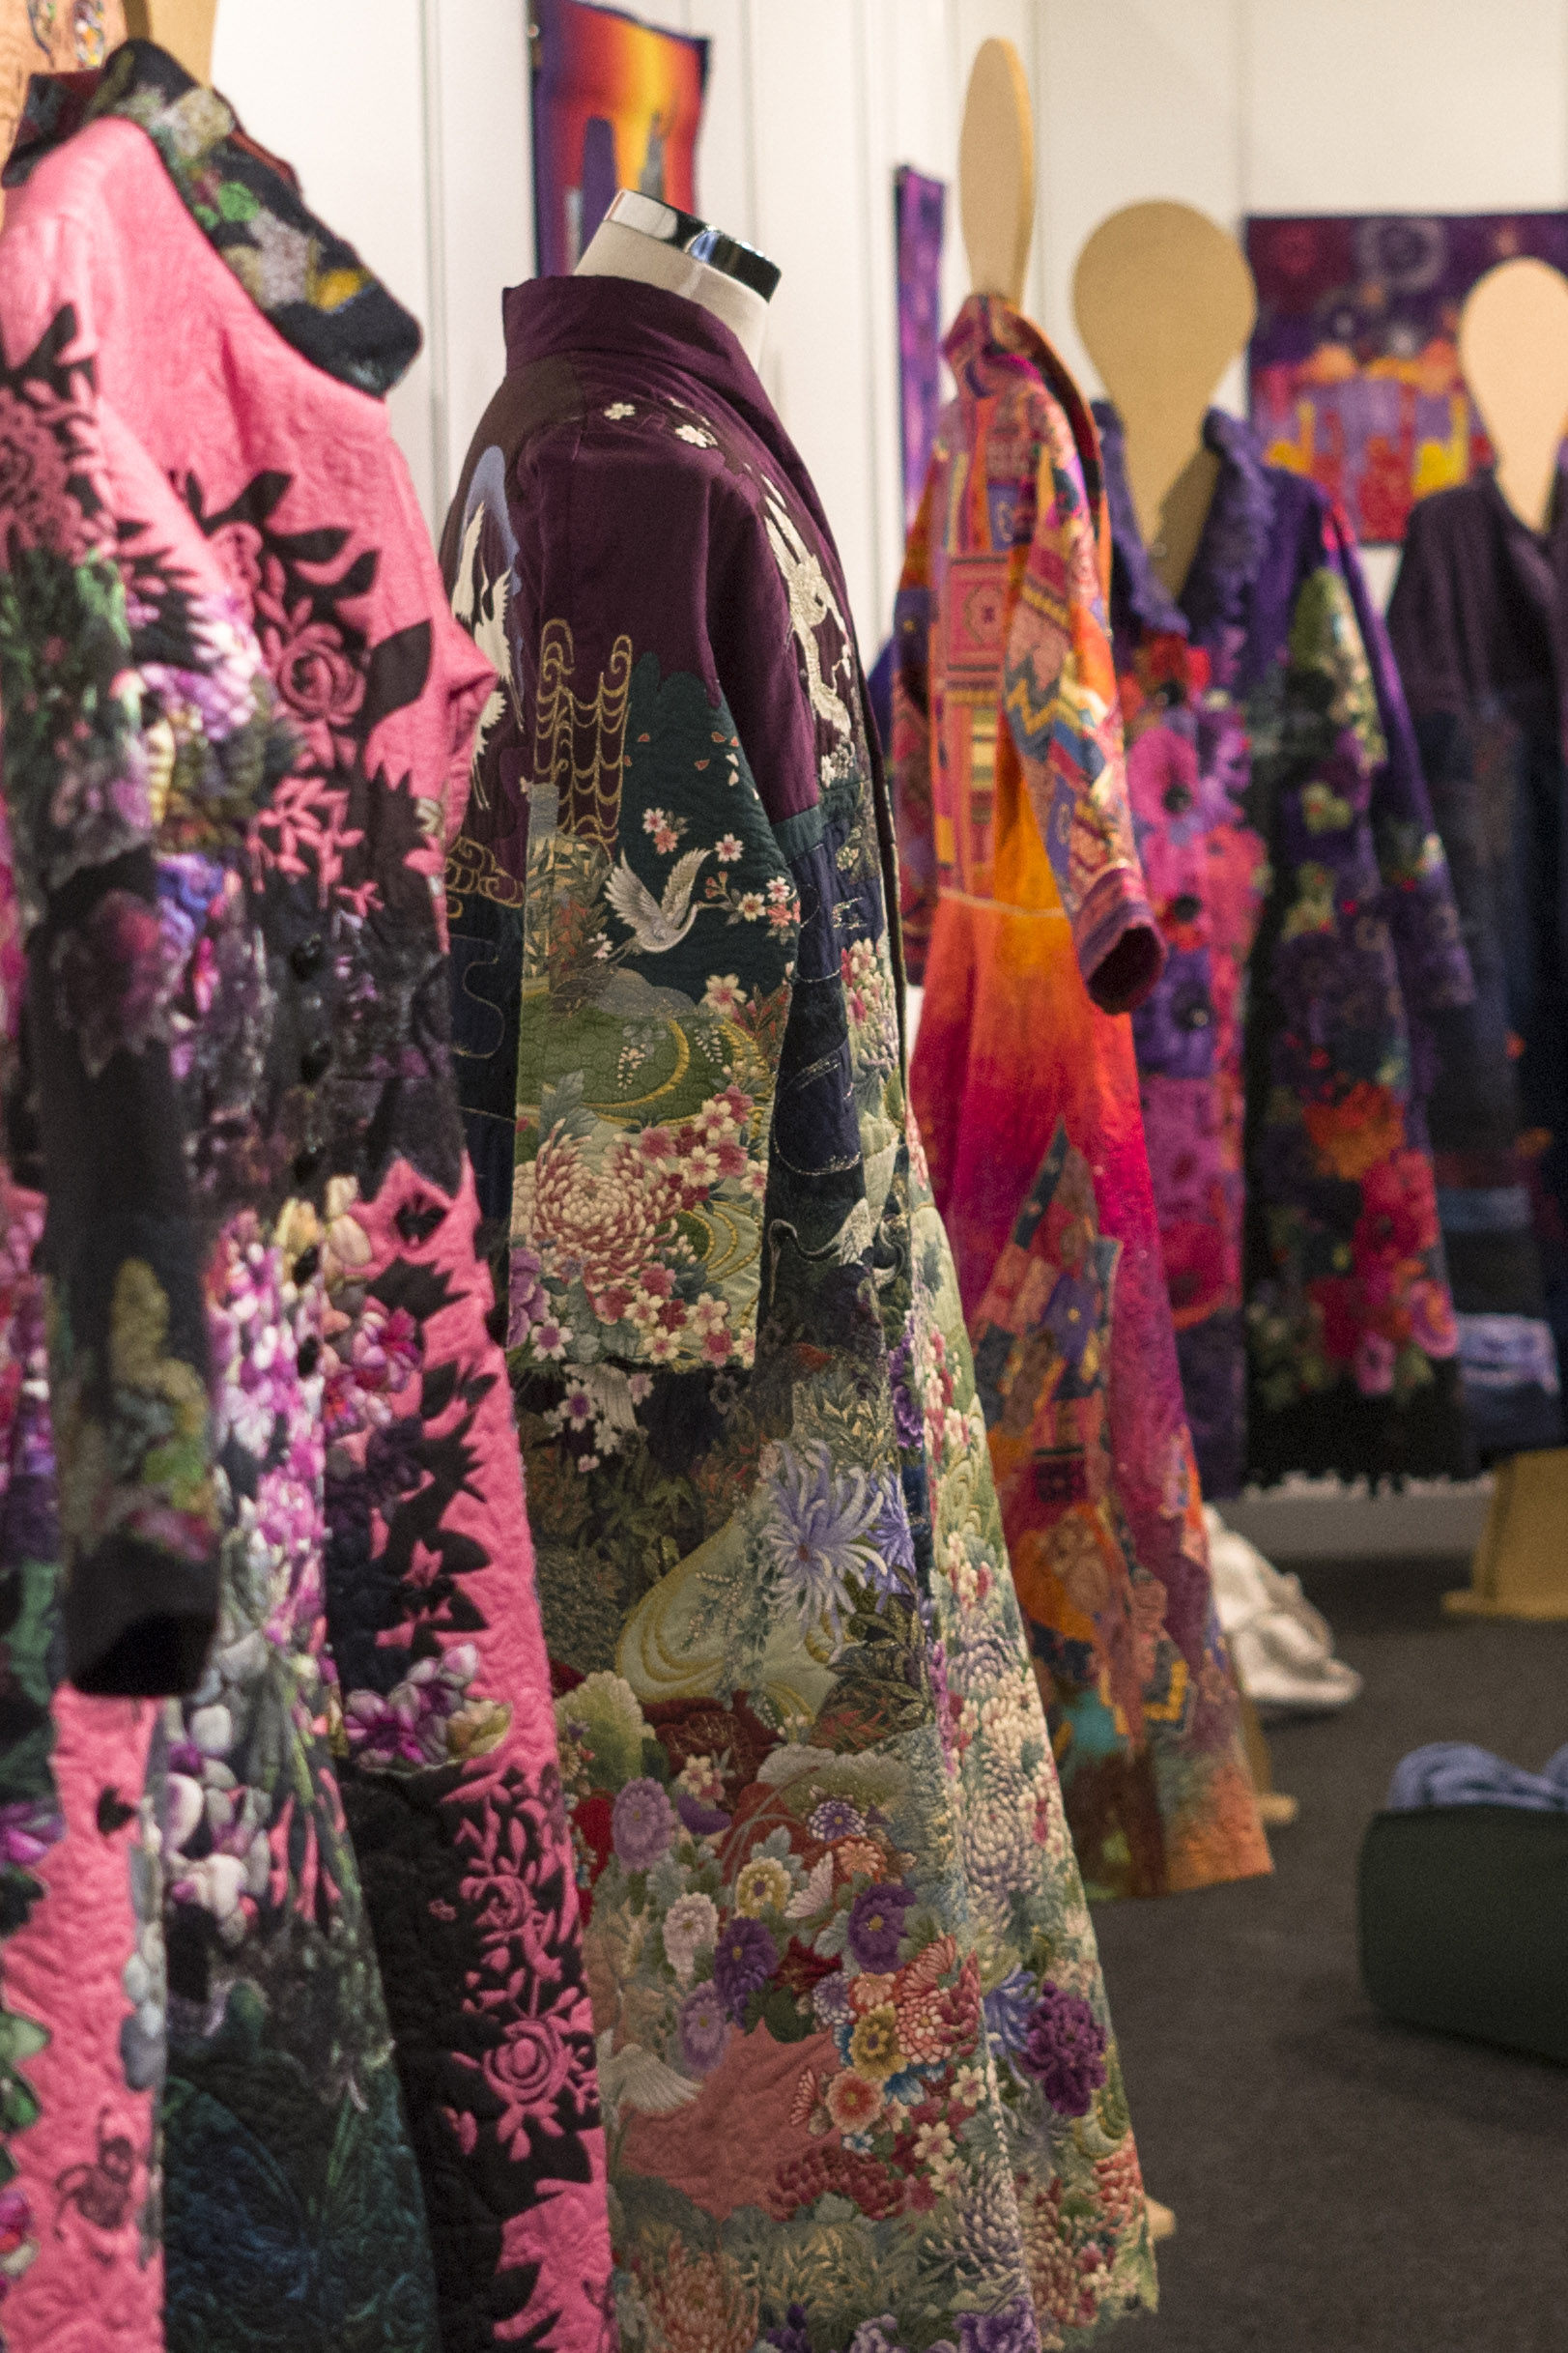
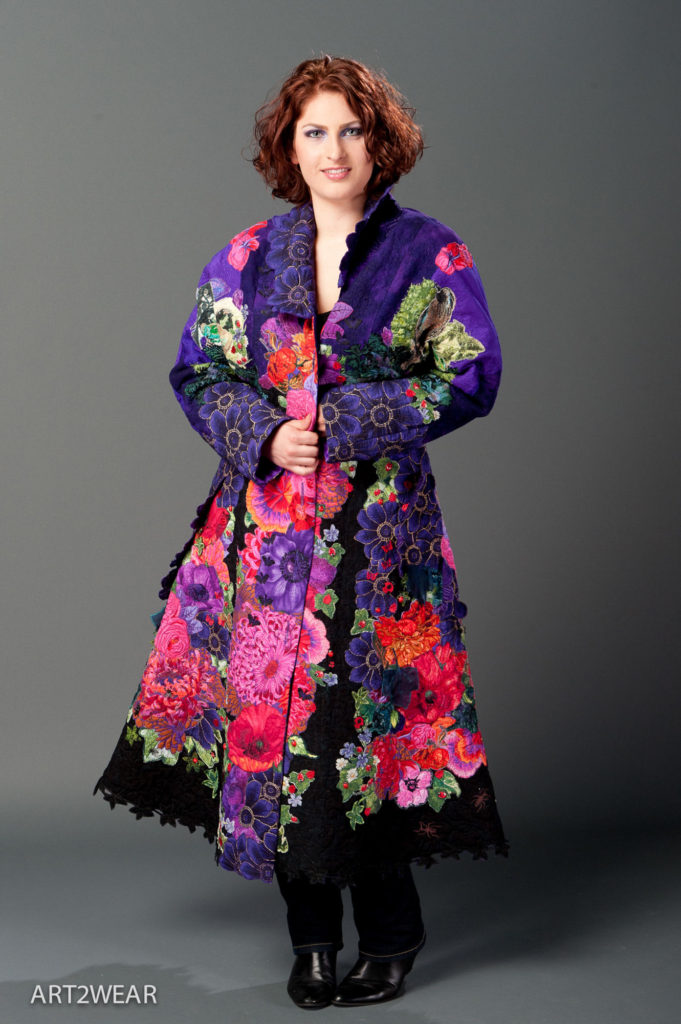
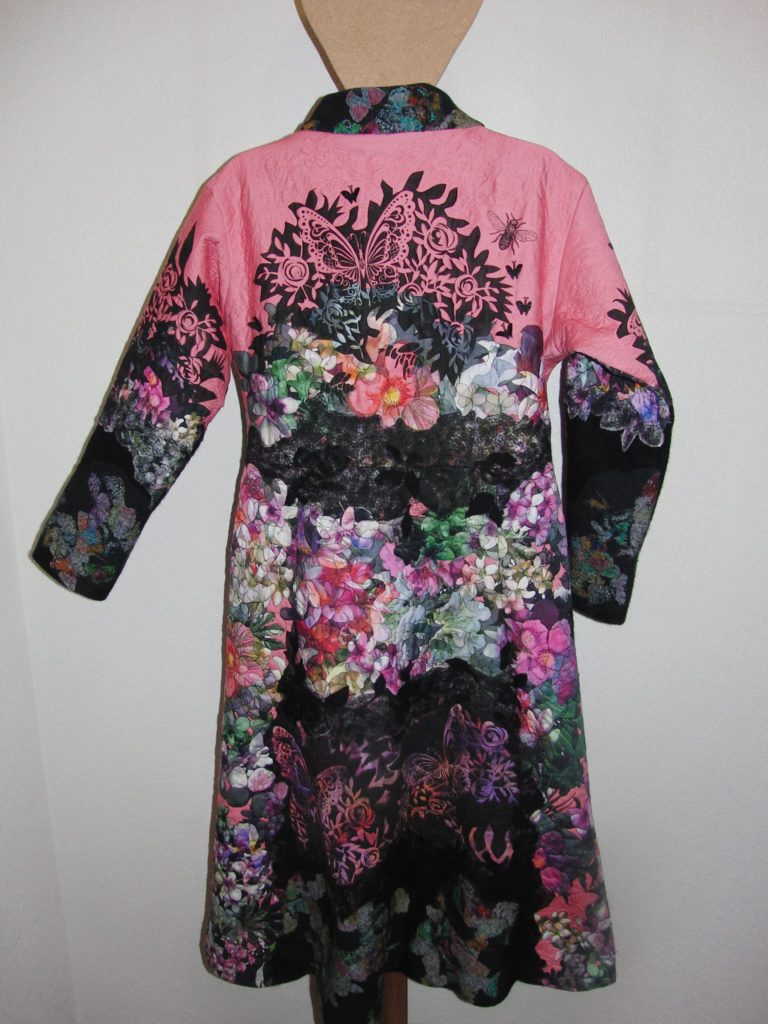
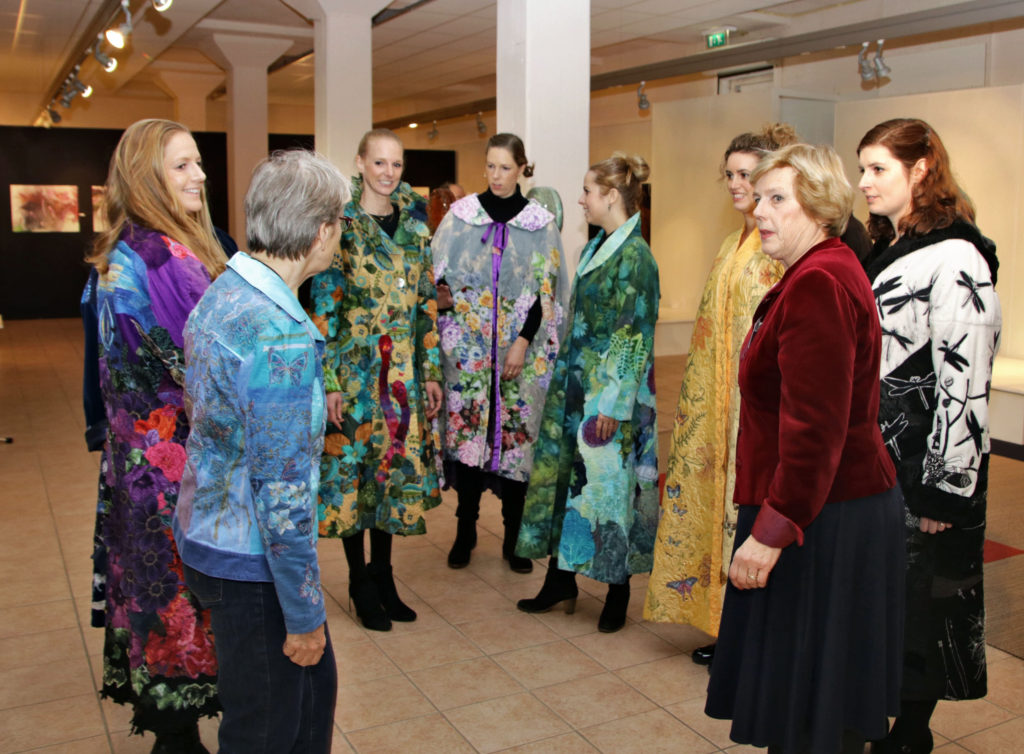
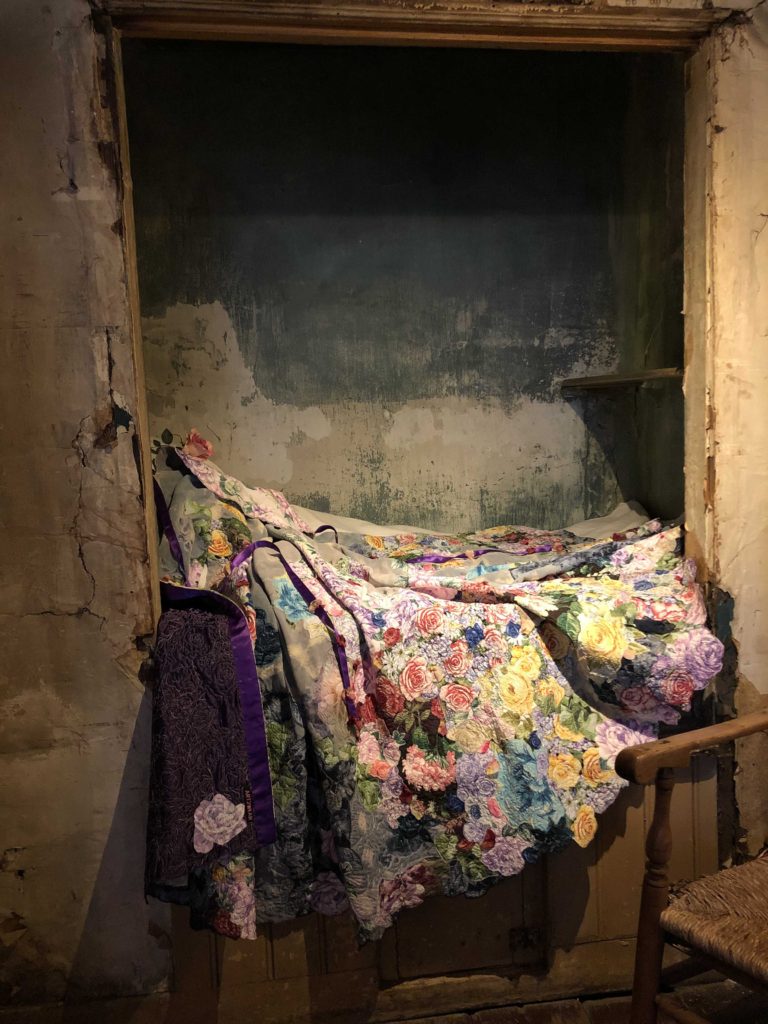
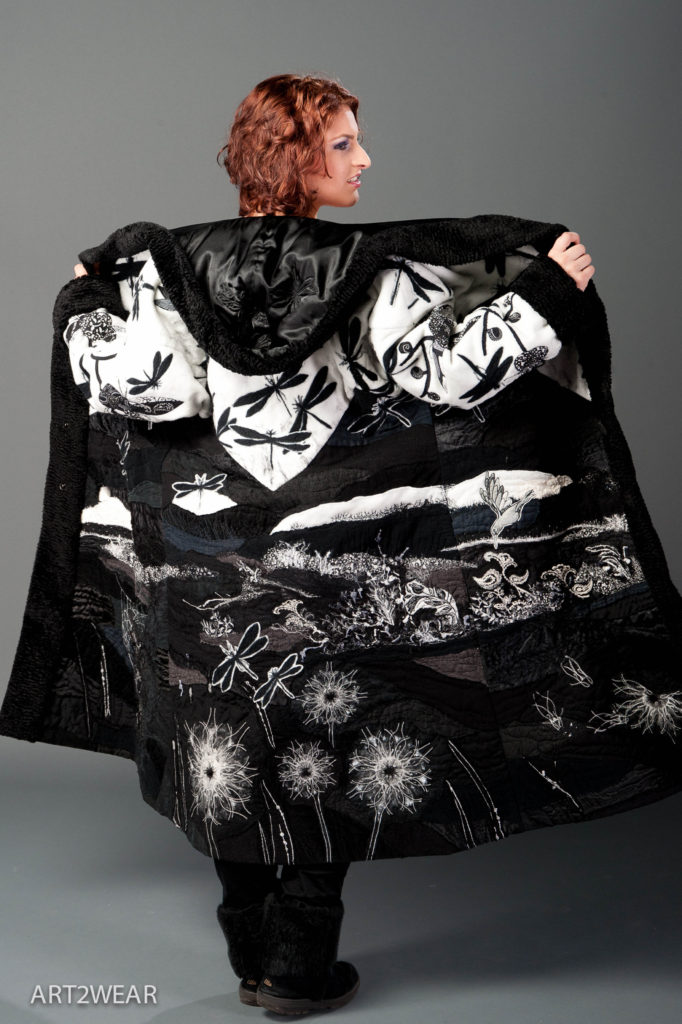
Marijke does something with the basic idea of quilts and fabric art that we’d never considered – she creates mesmerizing art that you can wear!
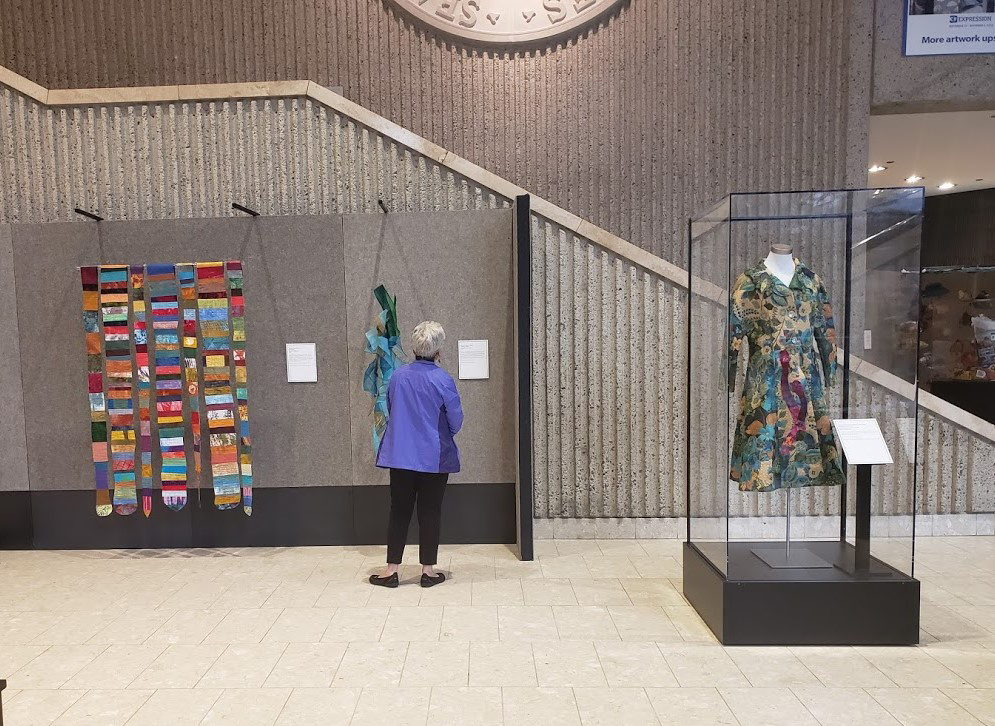
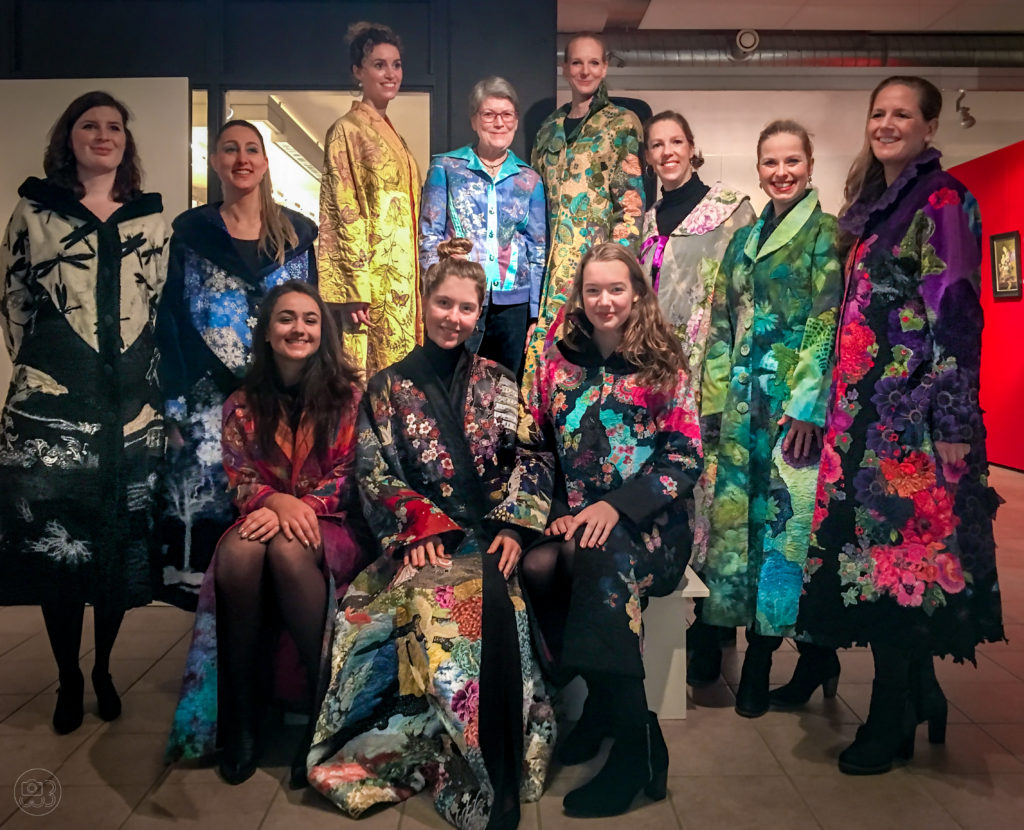
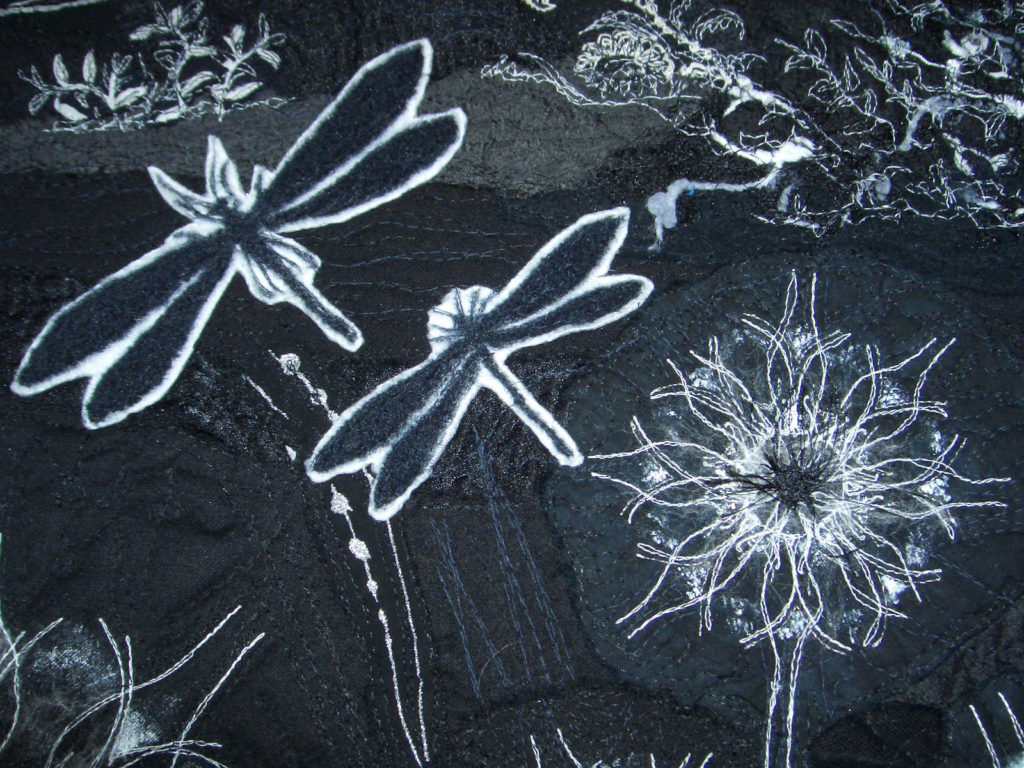
Her amazing long coats and jackets look as if a field of flowers, or butterflies, or dandelions decided to wrap themselves up in silks and watercolors and grace a quilt. Everything, from the stunning overall effect, to the unbelievably perfect fine details and embellishments, to her picture-perfect stitching make Marijke’s art2wear creations beyond stunning.
What inspires you to make wearable art?
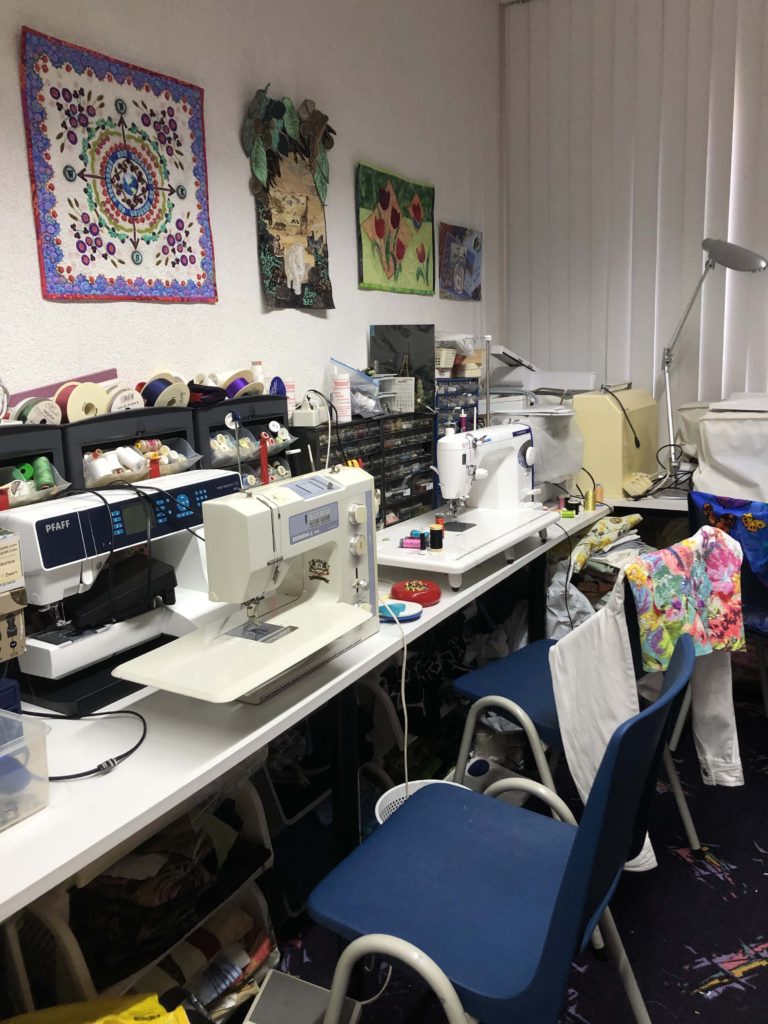
Marijke van Welzen is an amazing and truly unique textile artist. Under the label art2wear she makes high-end wearable art and accessories with a story to tell. From her home in the beautiful Netherlands she works at combining multiple fabric art disciplines and techniques to create one-of-a-kind show-stoppers. As if that wasn’t awe-inspiring enough, she also makes quilts and teaches.
Read to the end of the article to see a video of Marijke creating this art!
“I love the 3D aspects of Wearable art. I’m inspired by:
Art
Other artists
Fabric
Fibers
Fashion
People
Fairy-tales
And the natural world
I like to participate in contests, I pick the ones with themes that inspire me. When I read the theme it has to be catchy at once. I start thinking about it, doing research, reading articles, looking at images at Google etc.
An idea comes to my mind, has to whirl around in my head for some time, then I start working.
The rest is very intuitive, once I start, it works like a kind of puzzle, I find another piece, or I just have to wait until some more pieces turn up. I never know exactly beforehand what the end result will look like.”
Was there anything in your life story that led to you making these beautiful works of art?
I already made a lot of my own clothes, but I had not done something like that, I decided to try it out.
I now have made more than 50 jackets and coats.
Why do you enjoy making these jaw-dropping creations?
I love working with textiles. I love the tactile aspect (to feel the different textures, soft, rough, hairy, smooth etc.) the flexibility, the unlimited color range and the visual texture (shiny, muted, glittering etc.). I usually work very intuitively, sometimes I use a Mandala drawing I made for inspiration.
Daily life can be very hectic, my art helps me to balance my life; it gives me a way to escape everyday life, relax my mind.
I occasionally work on commission. The garment is tailor-made for that particular client. I keep in mind wishes like favorite color, design, shape etc.
I start with an interview with the client, we talk about their life, pets, work, that way I get an idea about what they would like in their jacket. Then I take measurements. It is a time-consuming process, which make the garments quite pricey.
Did you start with a standard pattern or design, or was this all your own creation?
I learned how to draw patterns. I use basic patterns which I adapt.
Do you make a lot of different designs or variations of a basic one?
I make one-of a-kind garments. Each one is different.
What is your process; design, prep, work, completion, etc.?
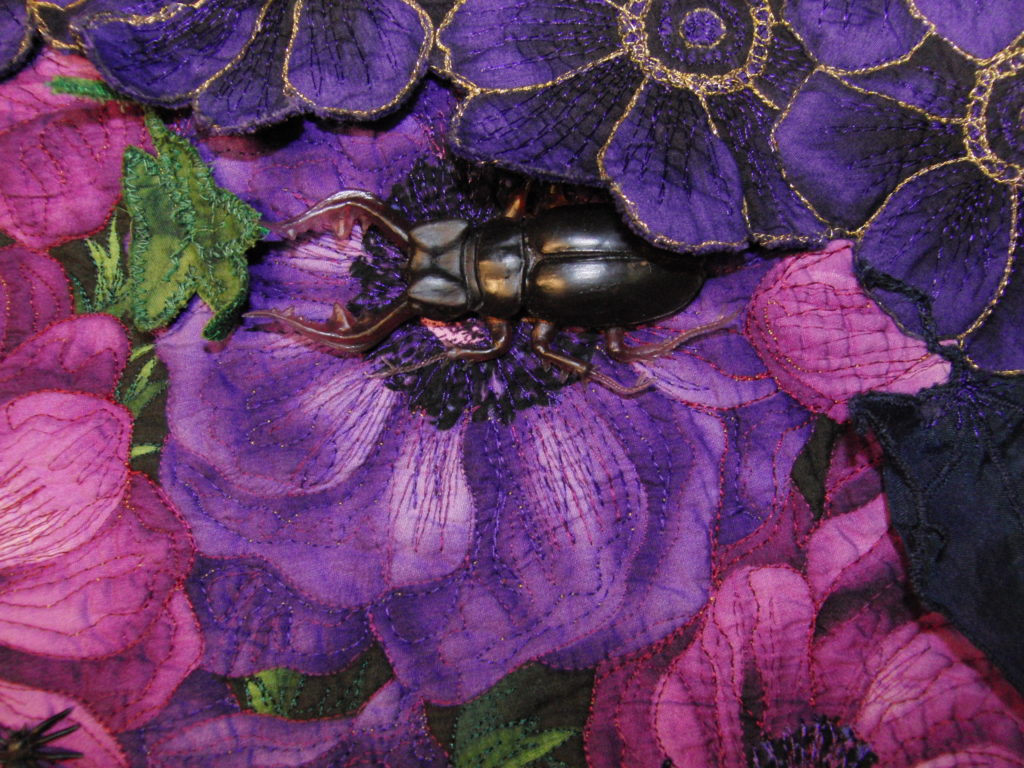
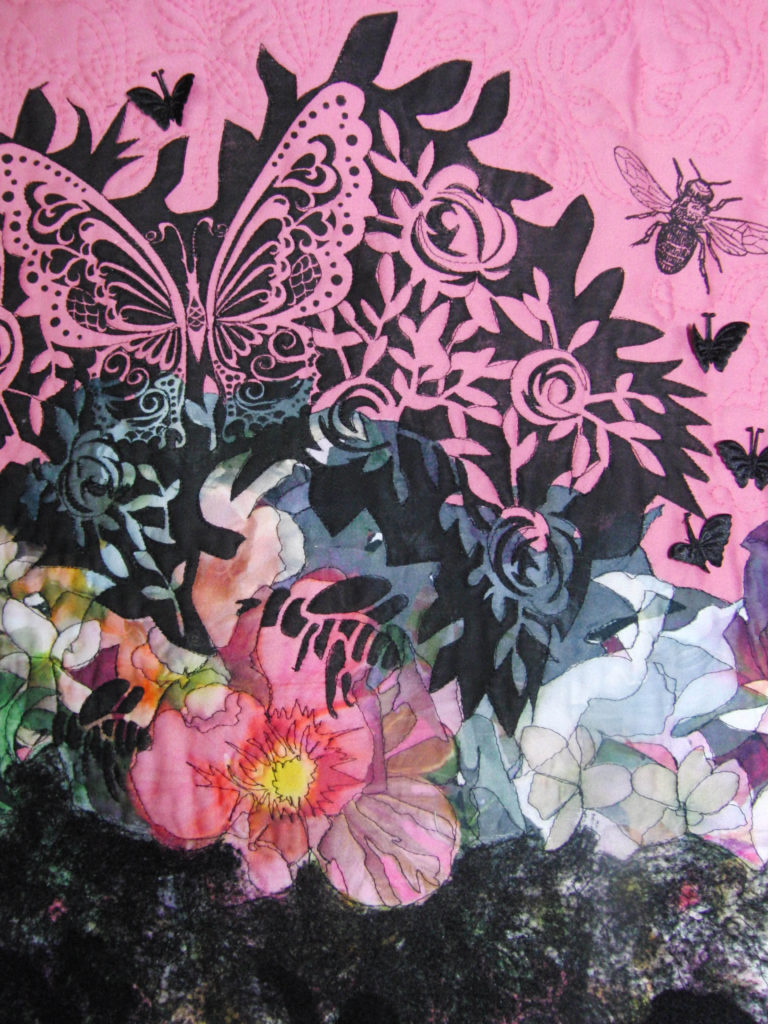
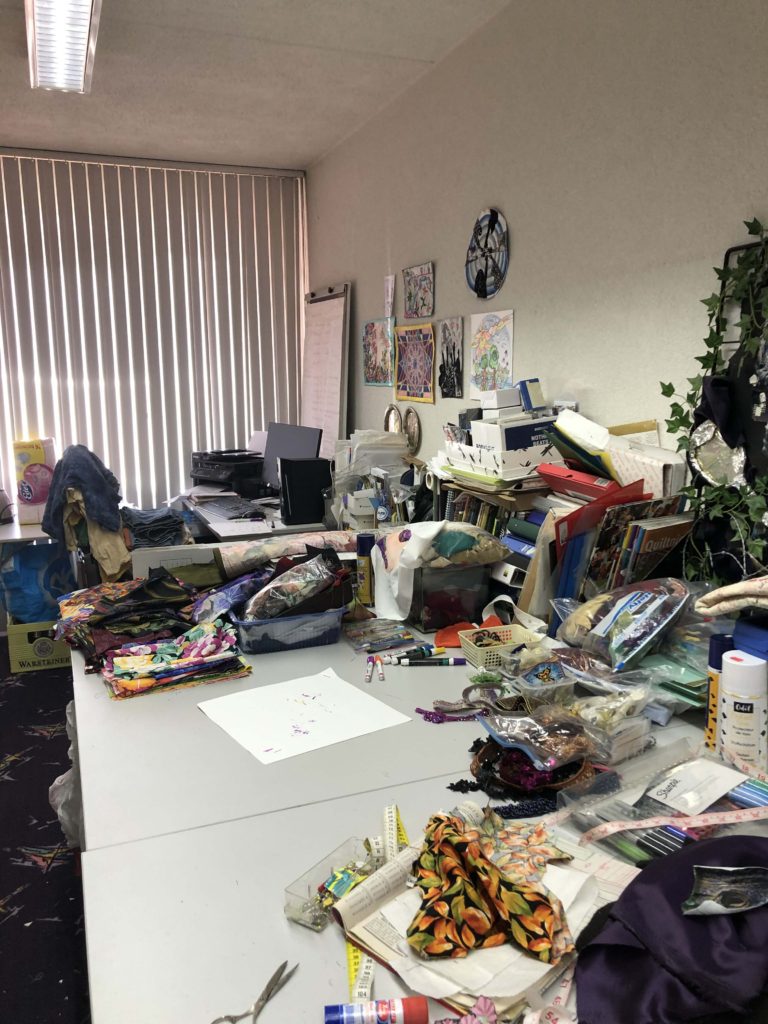
I love to use fabric collage. Using many tiny pieces of commercial fabric prints and colorful machine threads I ‘paint’ my designs.
I usually work very intuitively. I collect fabrics around the theme I want to work on and things like ribbons, lace, buttons, charms, beads and anything else I think I can use.
Sometimes I use stencils or stamps and fabric paint to enhance the piece.
Is there anything you can tell our readers about how to integrate so many different techniques and materials into one piece of finished art?
I work on a base, like interfacing, or thin quilter’s batting. Everything is pinned to that base.
Dutch-language video – to watch with English-captions: 1. Click on the double “CC” button to turn on captions. 2. Click the gear icon settings button & select “Auto-translate” 3. Select your language from the drop-down menu that appears Video credit goes to the late Jacques van Herten – media used with permission
I work on a base, like interfacing, or thin quilter’s batting. Everything is pinned to that base.
I love to use all sorts of materials, mixing and matching cotton,silk, synthetics. Then I stitch it all down. After that come the embellishments.
I like to explore and use other techniques as well for my garments e.g. working with water-soluble fabric to make lace-like effects or using wet and dry felting in combination with the textile collage.
How long does each finished design take to complete?
I work a couple of months on one large coat. I do 1 or 2 large ones a year. In between I make small quilts or other things.
How many have you made in all (or a rough estimate)?
I think around 60 jackets and coats in all in 20 years. And about 20 quilts.
Do you do a lot displaying at fairs?
I try to have expositions regularly. I had solo exhibits in 2019 and 2020 of my coats in the Netherlands and Germany. Many of my pieces are shown in quilt shows and museums worldwide in group exhibits.
I like to take part in calls-for-entry, I find on the World Wide Web. These are calls for exhibitions. The artwork is juried. Sometimes there are prizes to win, sometimes it’s only a ribbon.
I also teach workshops in the techniques I use. We work in small groups, the sewing machines are ready and waiting. On request I teach on location too. I am looking into teaching online, as travelling is not an option now.
What’s the best place for our readers to find and/or contact you?
Being able to showcase unique artists like Marijke is one of the best parts of being Princess YellowBelly Designs. We love discovering new artists, learning about their techniques, and getting to experience their amazing works of art. If you know of someone – or are someone – who practices a unique form of fabric art, please use the form below to let us know!
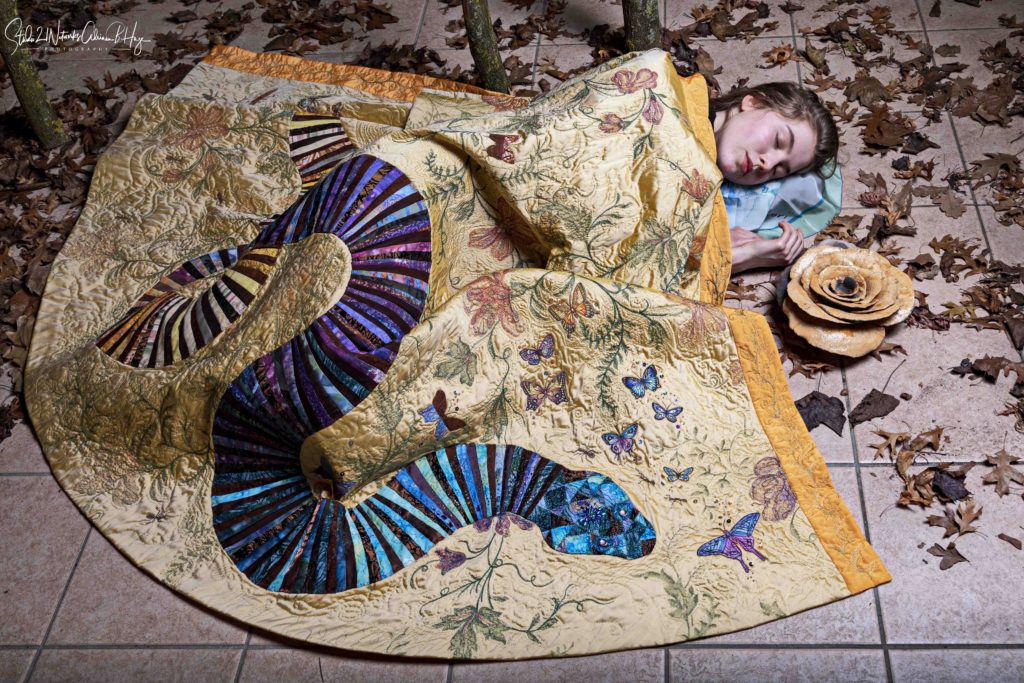
One of the hottest new trends in the quilting world, and the unique realm of fabric art in particular, are fabric panels for quilting. These gorgeous panels can feature anything a digital artist can come up with, from peacocks, to cabins, to double-exposure photography panels like the new rave forest animals collections.
Every time I enter a quilt store or open a quilt magazine there are more of these printed sewing panels available, and they are getting more beautiful and detailed all of the time.
The question is, of course, what do you do with a printed fabric panel?
Have fun with printed fabric panels – after all, how could you not?
As with all the best products in fabric art, there’s actually quite a few things you can do with fabric panels for quilting, and these ideas range in difficulty from great beginner projects to difficult creations suited for confident and experienced quilters.
1.
Add
Outer Borders Only – Beginner Level
Some panels are so
totally gorgeous on their own that to do anything except add a few borders to
finish off the edges would be a shame.
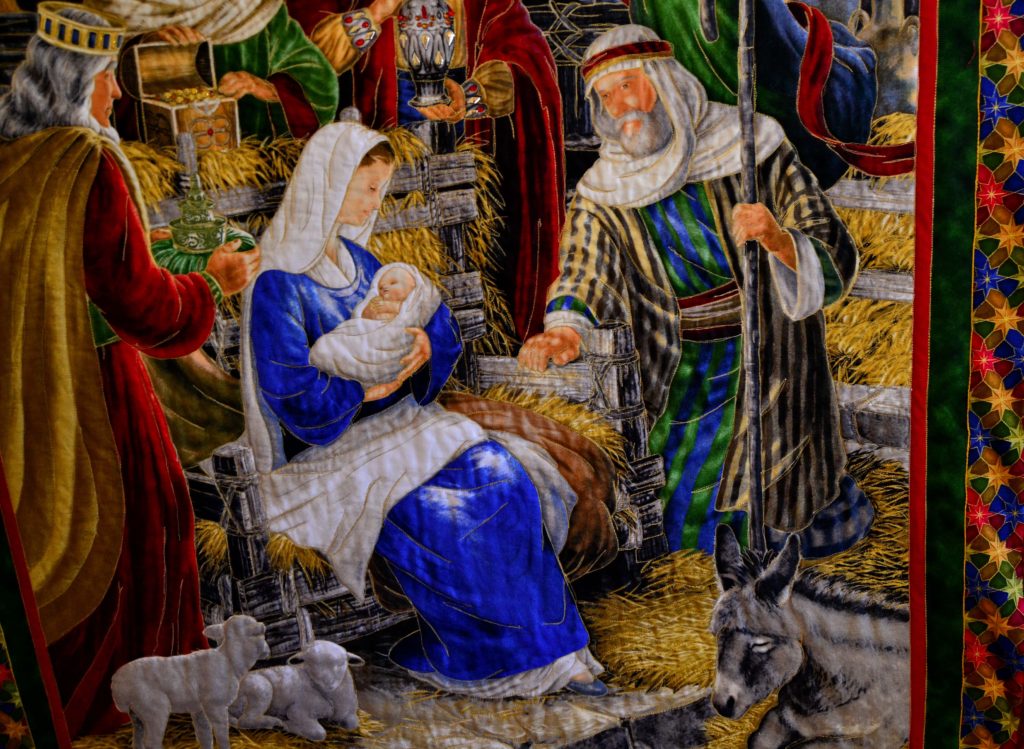
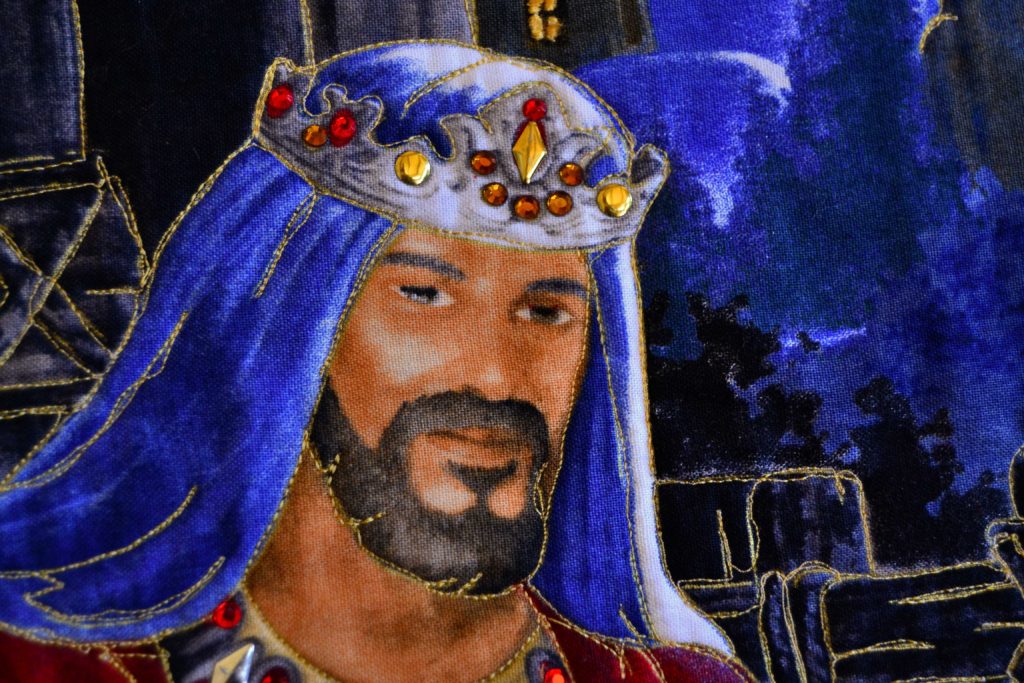
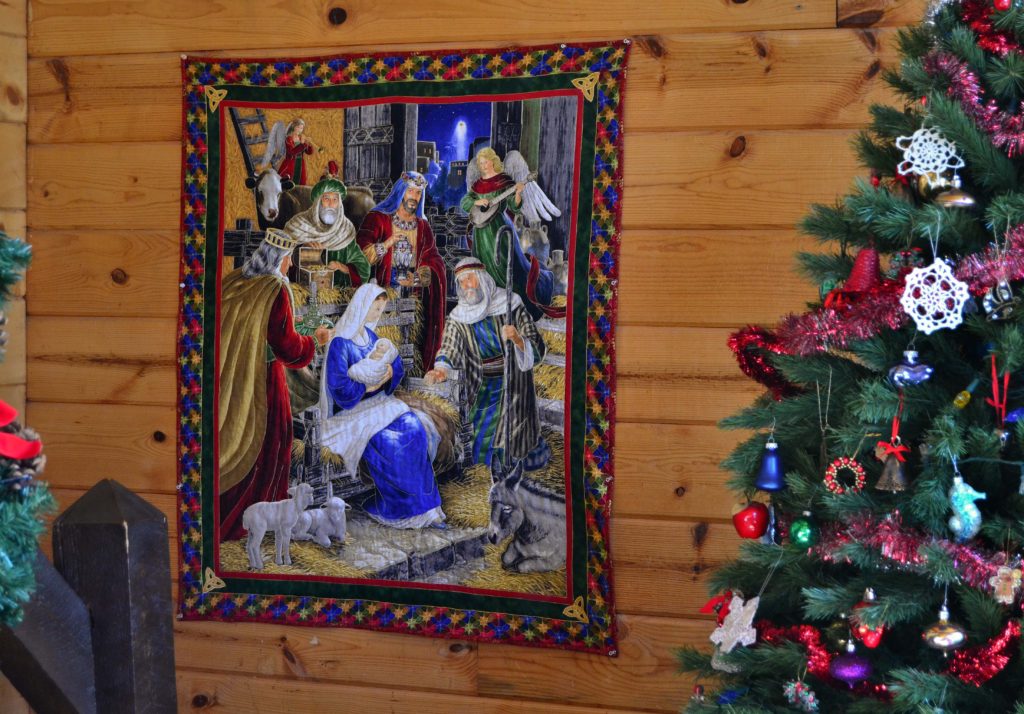
This was the case with my ‘Away in the Manger’ panel. It just speaks for itself. It was gorgeous just the way it came, but when I quilted it the figures literally popped and became very life-like.
Using fabric panels for quilted wall hangings is a great way to “wet your toes” in the quilting world. You’ll get practical experience in:
Layering a quilt sandwich
Quilting either a simple pattern or free-motion quilting
Straightening up a quilted edge
And binding a small, lightweight quilt
Also, if you’re
working up towards the intermediate end of a beginner’s skill level, you can
try adding simple pieced borders instead of just strip borders. You’ll get practice in piecing and measuring,
without a ton of extra work.
Adding borders and
binding to a printed fabric panel is also a great project for quilters who are
too busy for a larger project – or who don’t want to pull a full-sized quilt
through a home sewing machine.
So, if you love a panel just the way it is, add one or two borders, quilt & bind it, and let it shine on your wall.
You can also add
to a panel by using “sparkly” accessories:
2.
Use Printed
Fabric Panels for Quilted Table Runners – Beginner
Level
Another option is
not to add any borders at all.
Simply add batting
and backing, quilt as desired, and finishing with a narrow binding.
Since most printed panels are 22”x44” this makes for a wide runner, but it works fine on a larger table. This can be a good choice for seasonal panels.
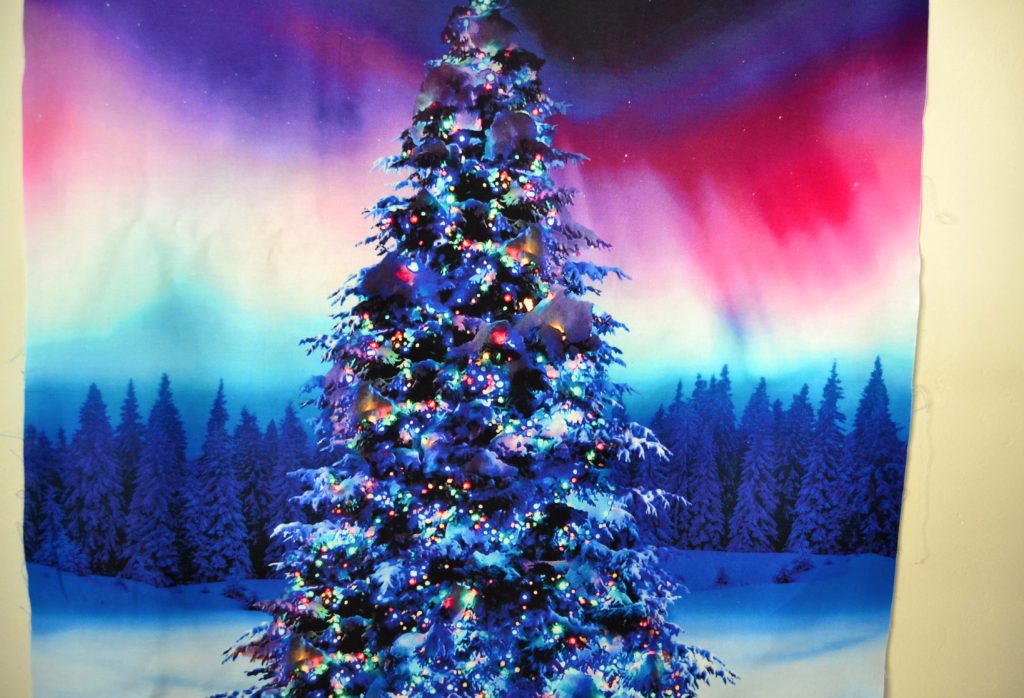
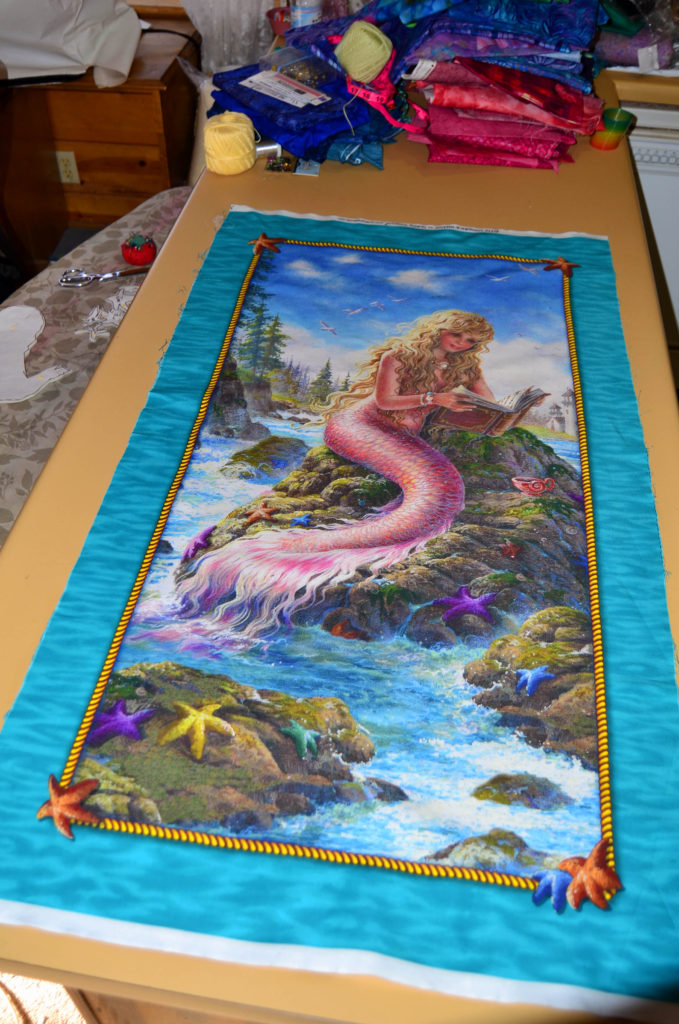
Both of these are examples of printed fabric panels for quilting just before they enter the quilting process. The ‘Northern Lights Christmas Tree’ will become either a large wall hanging, or a twin quilt, and the ‘Mermaid’ was designed from the beginning to be used in a twin quilt for a little girl.
Or, you can use smaller printed photo panels to make up the larger squares in traditional table runner patterns. One of our more recent projects – the Strawberry Farm-to-Table Runner – uses this technique:
3.
Think
of Printed Fabric Panels Like a Blank Canvas – Intermediate Level
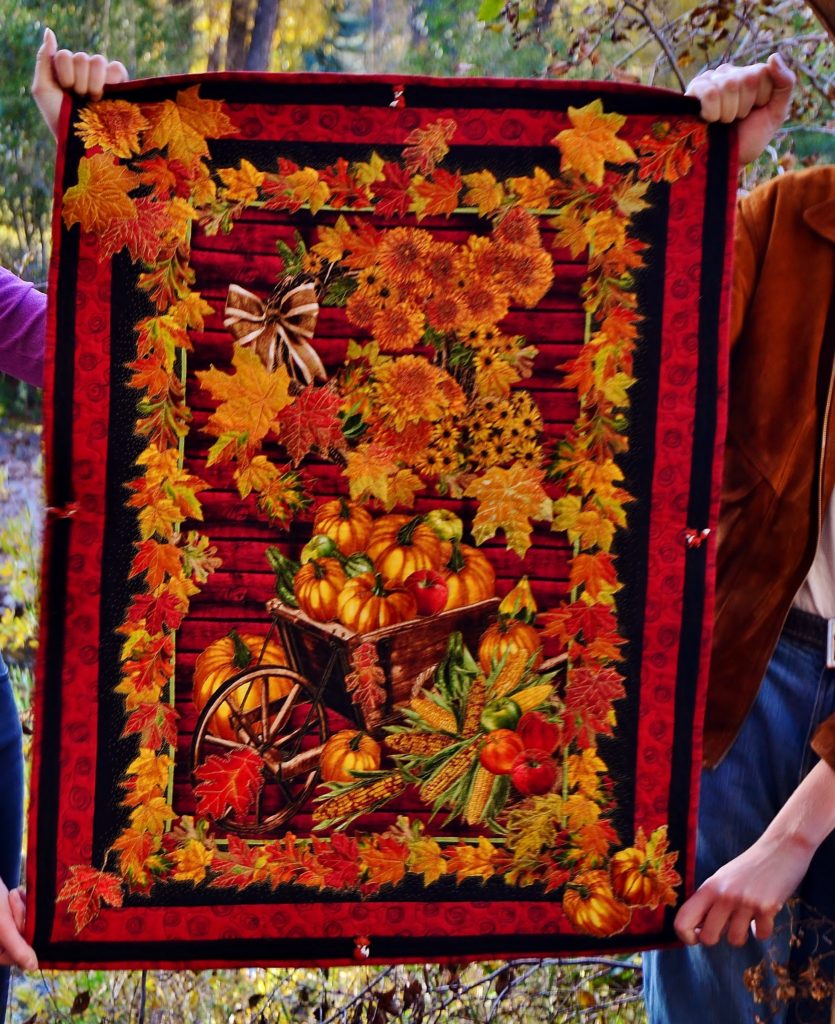
A lot of panels come with a border of images that are already in the main panel. For instance, my ‘Glory of the Harvest’ panel came with a border of printed pumpkins, corncobs, maple leaves, etc.
I cut off this border…
Fused the shapes with wunder-under…
Fussy cut them…
And then appliqued them onto the main panel…
I also found
‘corn-on-the-cob” fabric in the Halloween section and did the same, and then
added a lot of autumn themed fabric leaves.
Then I quilted the entire panel with metallic bronze thread.
The finished piece
was not only prettier, it was also fuller and more 3-Dimensional.
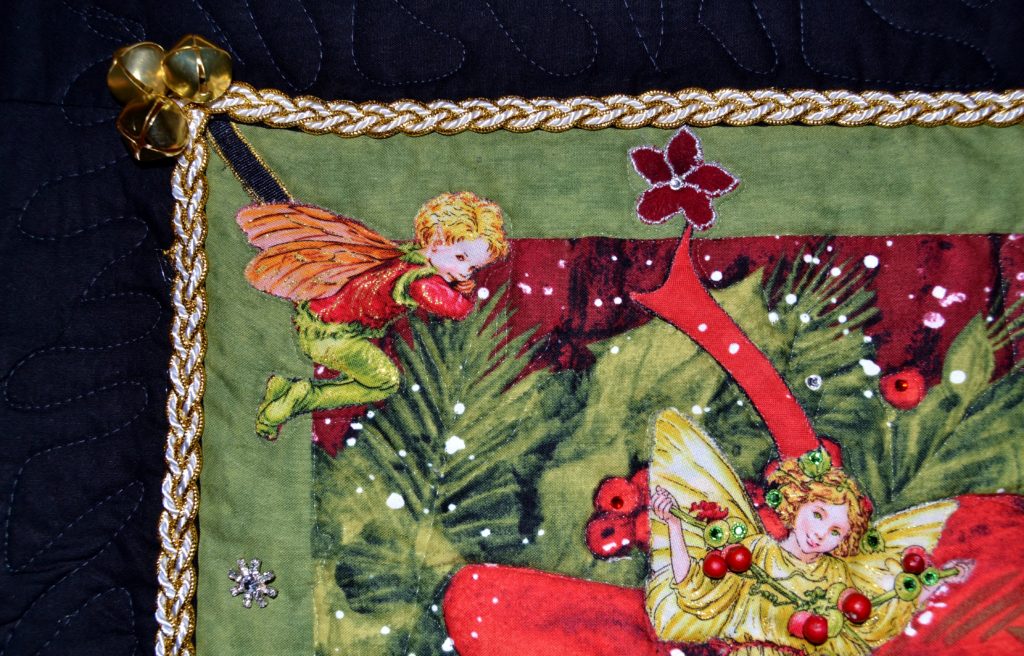
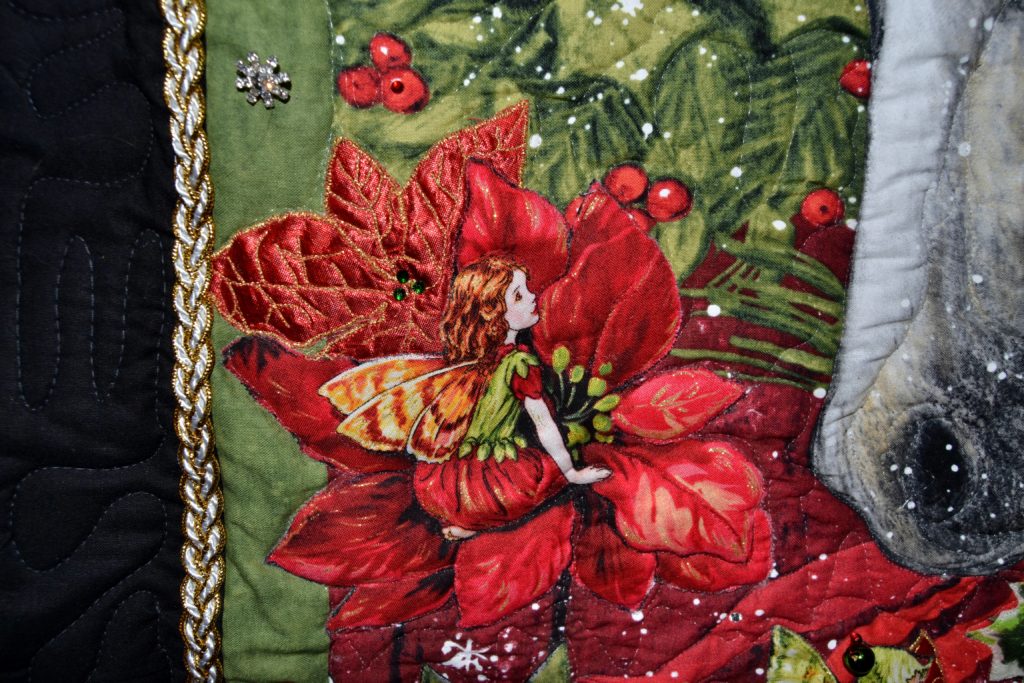
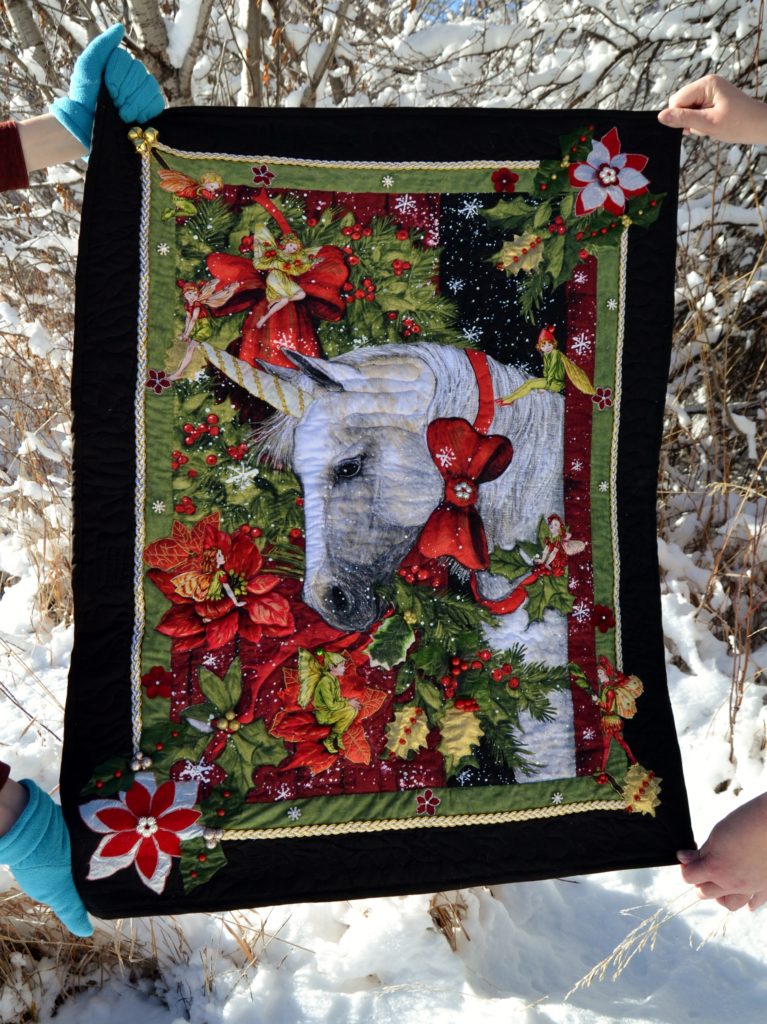
Although I was
primarily drawn to the image of the white horse the outside border included an
extra red ribbon, holly leaves, etc. I
liked the look, but felt that leaving it that way would look childish, rather
than the magical landscape I saw in my head.
So I added a unicorns’ horn to the horse, placed the extra red ribbon around its neck, and added fairies and holly leaves everywhere. I really loved the finished panel.
You can always add
borders to the outsides of panels like this, or even sew them into quilts,
depending upon the level of your personal skill and (more importantly)
ambition. When you begin adding more
images into a printed fabric panel, you’ll learn how to:
Visualize a final
result without seeing anything concrete in the immediate
Understand sizing
and depth – don’t be too surprised if your first panels look just a little too
fantastical, at least to your critical eye.
With practice you’ll intuitively understand size and distance
relationships.
Fussy cut and
applique unique shapes into unexpected places
And don’t just
limit yourself to the shapes that come with some fabric panels for quilting.
Accessorizing a
“blank canvas” can also include buttons, lace, rick-rack, and even permanent
marker. So look carefully at every panel
and see if there’s anything you can add to enhance the overall image you’re
going for.
4.
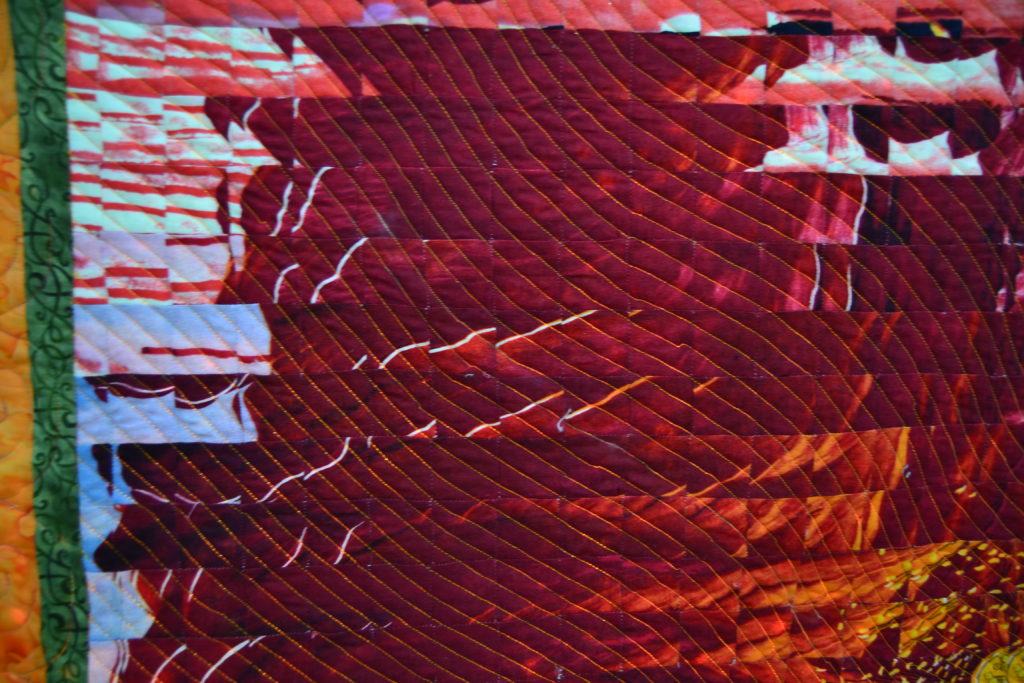
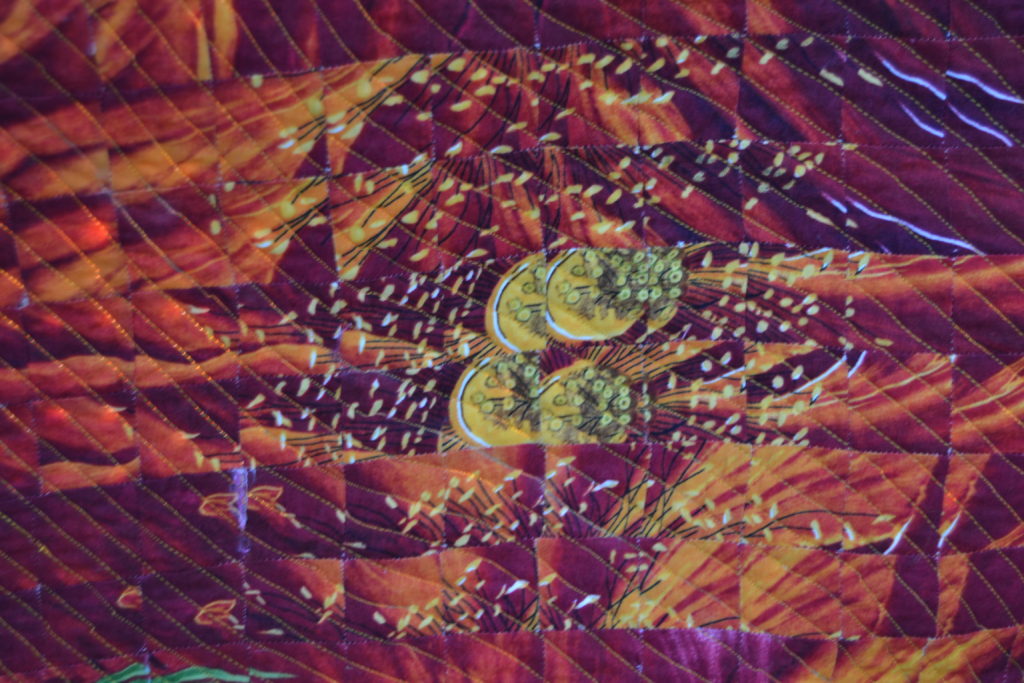
Fracture
Them – Intermediate Level
Fracturing is a
time-consuming and meticulous piecing project, but it’s also a lot of fun.
Despite my general
aversion to anything that smacks of a “precisionist” quilting style, I have
done quite a few fractures, and continue to plan new projects. I think it has something to do with the
abstracted result.
You’ll need 4
exactly identical images to begin with and it’s best not to use images that
have discernable eyes – such as in human and animal faces.
Natural images are
perfect for fracturing:
Flowers
Bridges
Landscapes
Cars
And suchlike
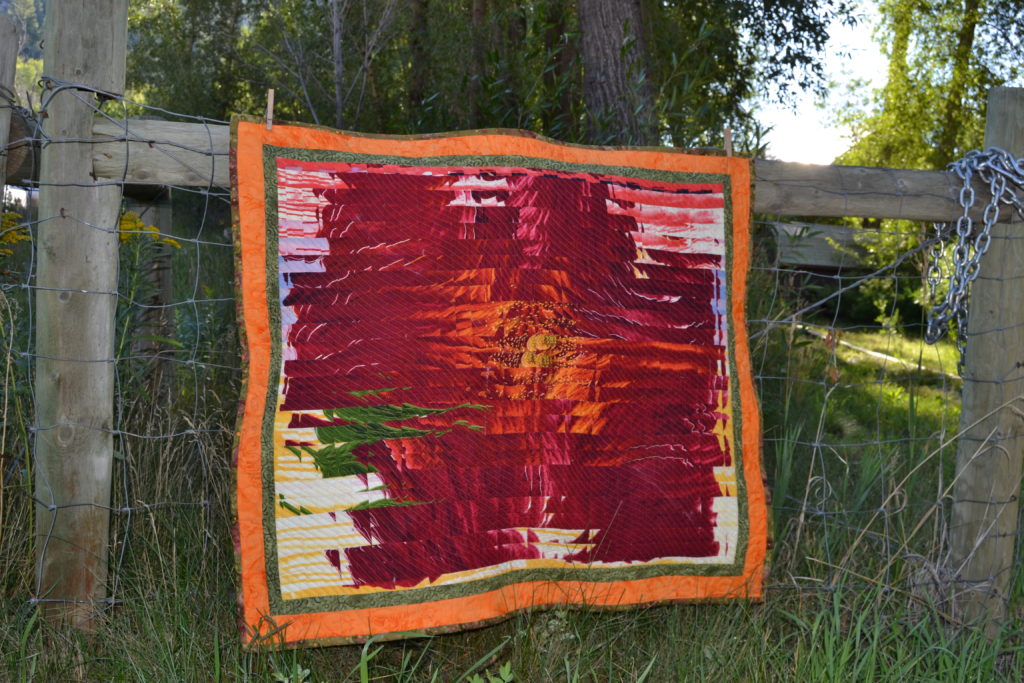
My ‘Poppy Water’ panel was my first fractured panel, and I would definitely recommend starting with something really simple like this.
Fracturing
blurs out precise details and makes the image appear staggered and
rippled. It’s time consuming but well
worth the effort. Fractures are great
for learning how to:
Sew in measured
lines (you’ll have to sew an exact ¼ inch seam)
Keep track of
small, abstracted strips of fabric
Follow a simple
sewing pattern
Rip seams – this
part’s annoying, but fractures are one of those projects where you have to be
ready with the seam ripper and a grin, because odds are you’ll mix up at least
one strip set
I’m going to write a blog and do a video on fracturing soon, so keep posted. In the meantime, you can check out the book that taught us how to do it.
Sometimes there’s
one or two images in a panel that really draw your eye, but you’re not thrilled
with the background, or one of the extra images.
There’s nothing to
stop you from fussy cutting out the images you like and constructing a new
background altogether. I did this with
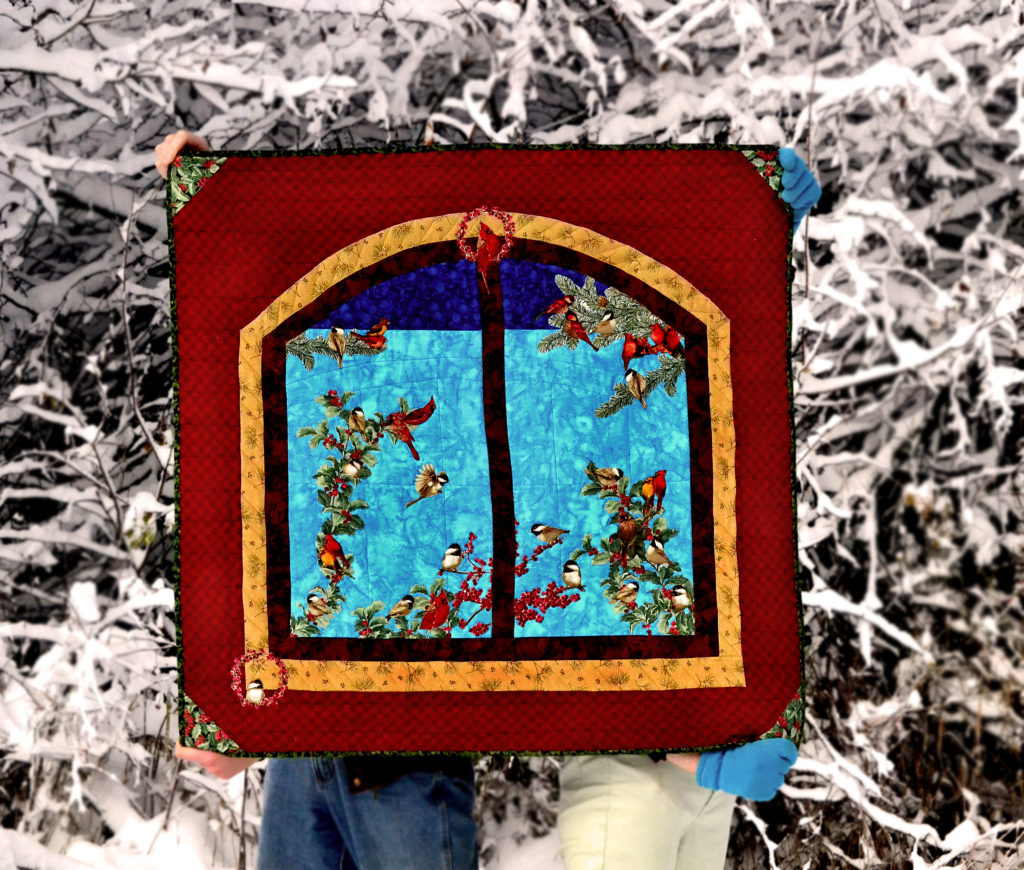
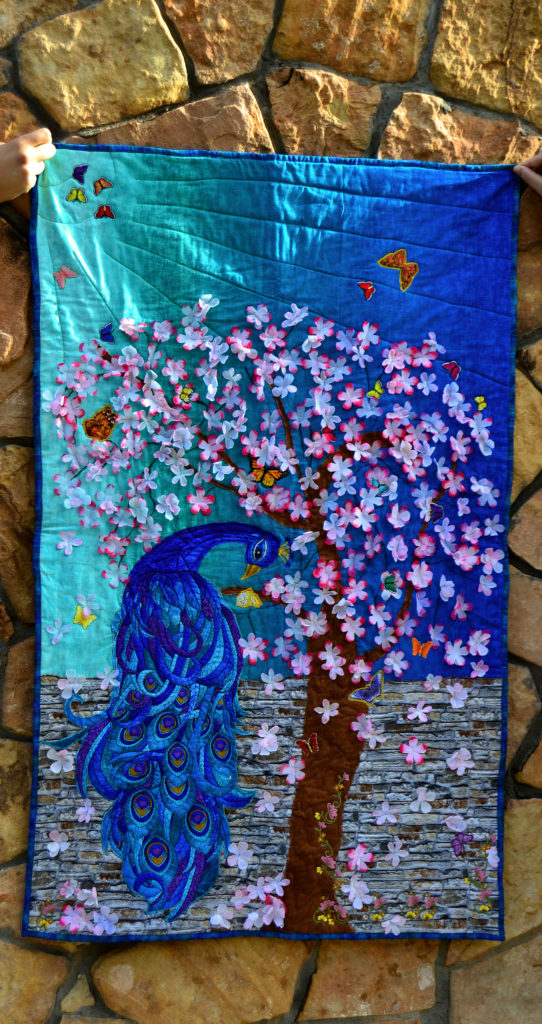
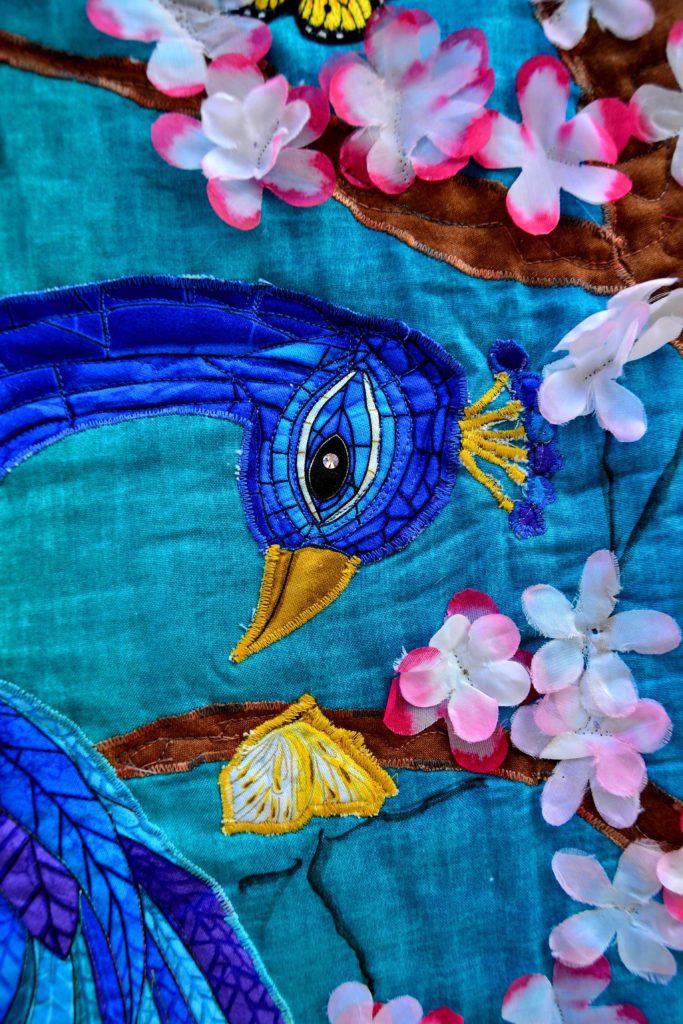
both my ‘Peacock Panel’ and my ‘Wynter Carolers.’
6.
Fabric
Panels for Quilting are…for Quilting! So
Incorporate Them Into Quilts – Advanced
As I said before,
many printed sewing panels are gorgeous and very life-like and much too
beautiful to change in any way.
So don’t change
them, let them shine in a quilt instead.
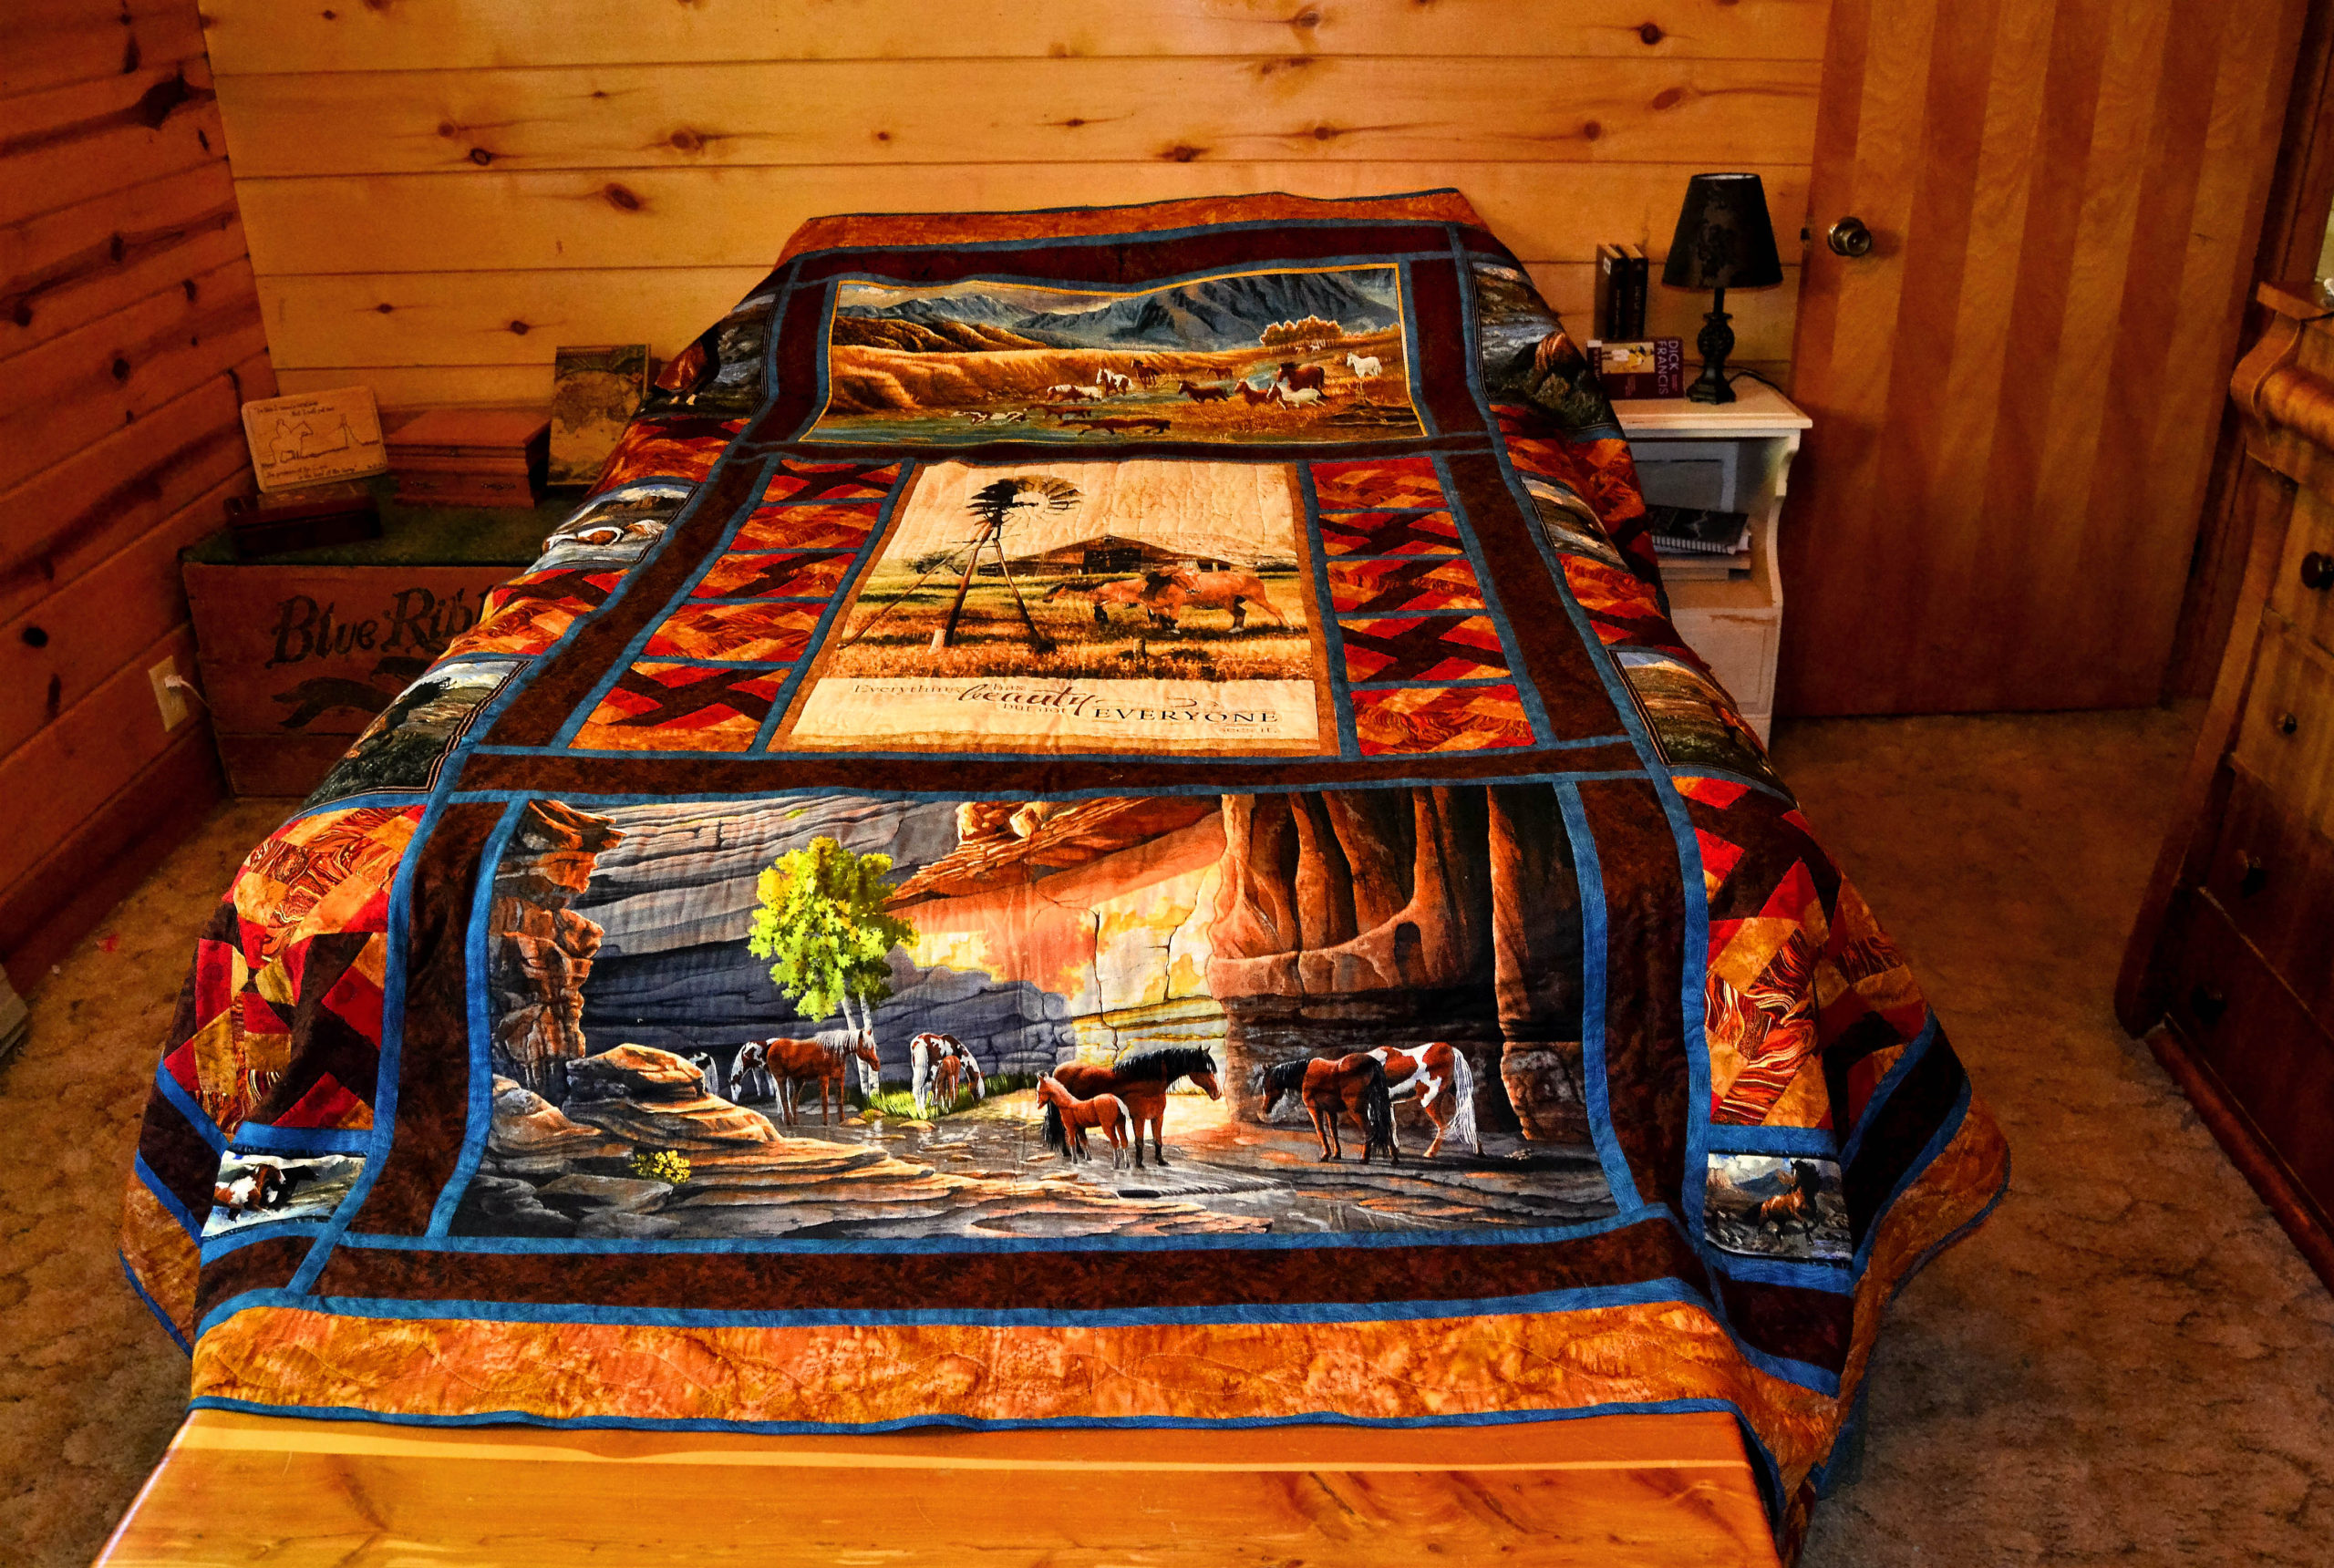
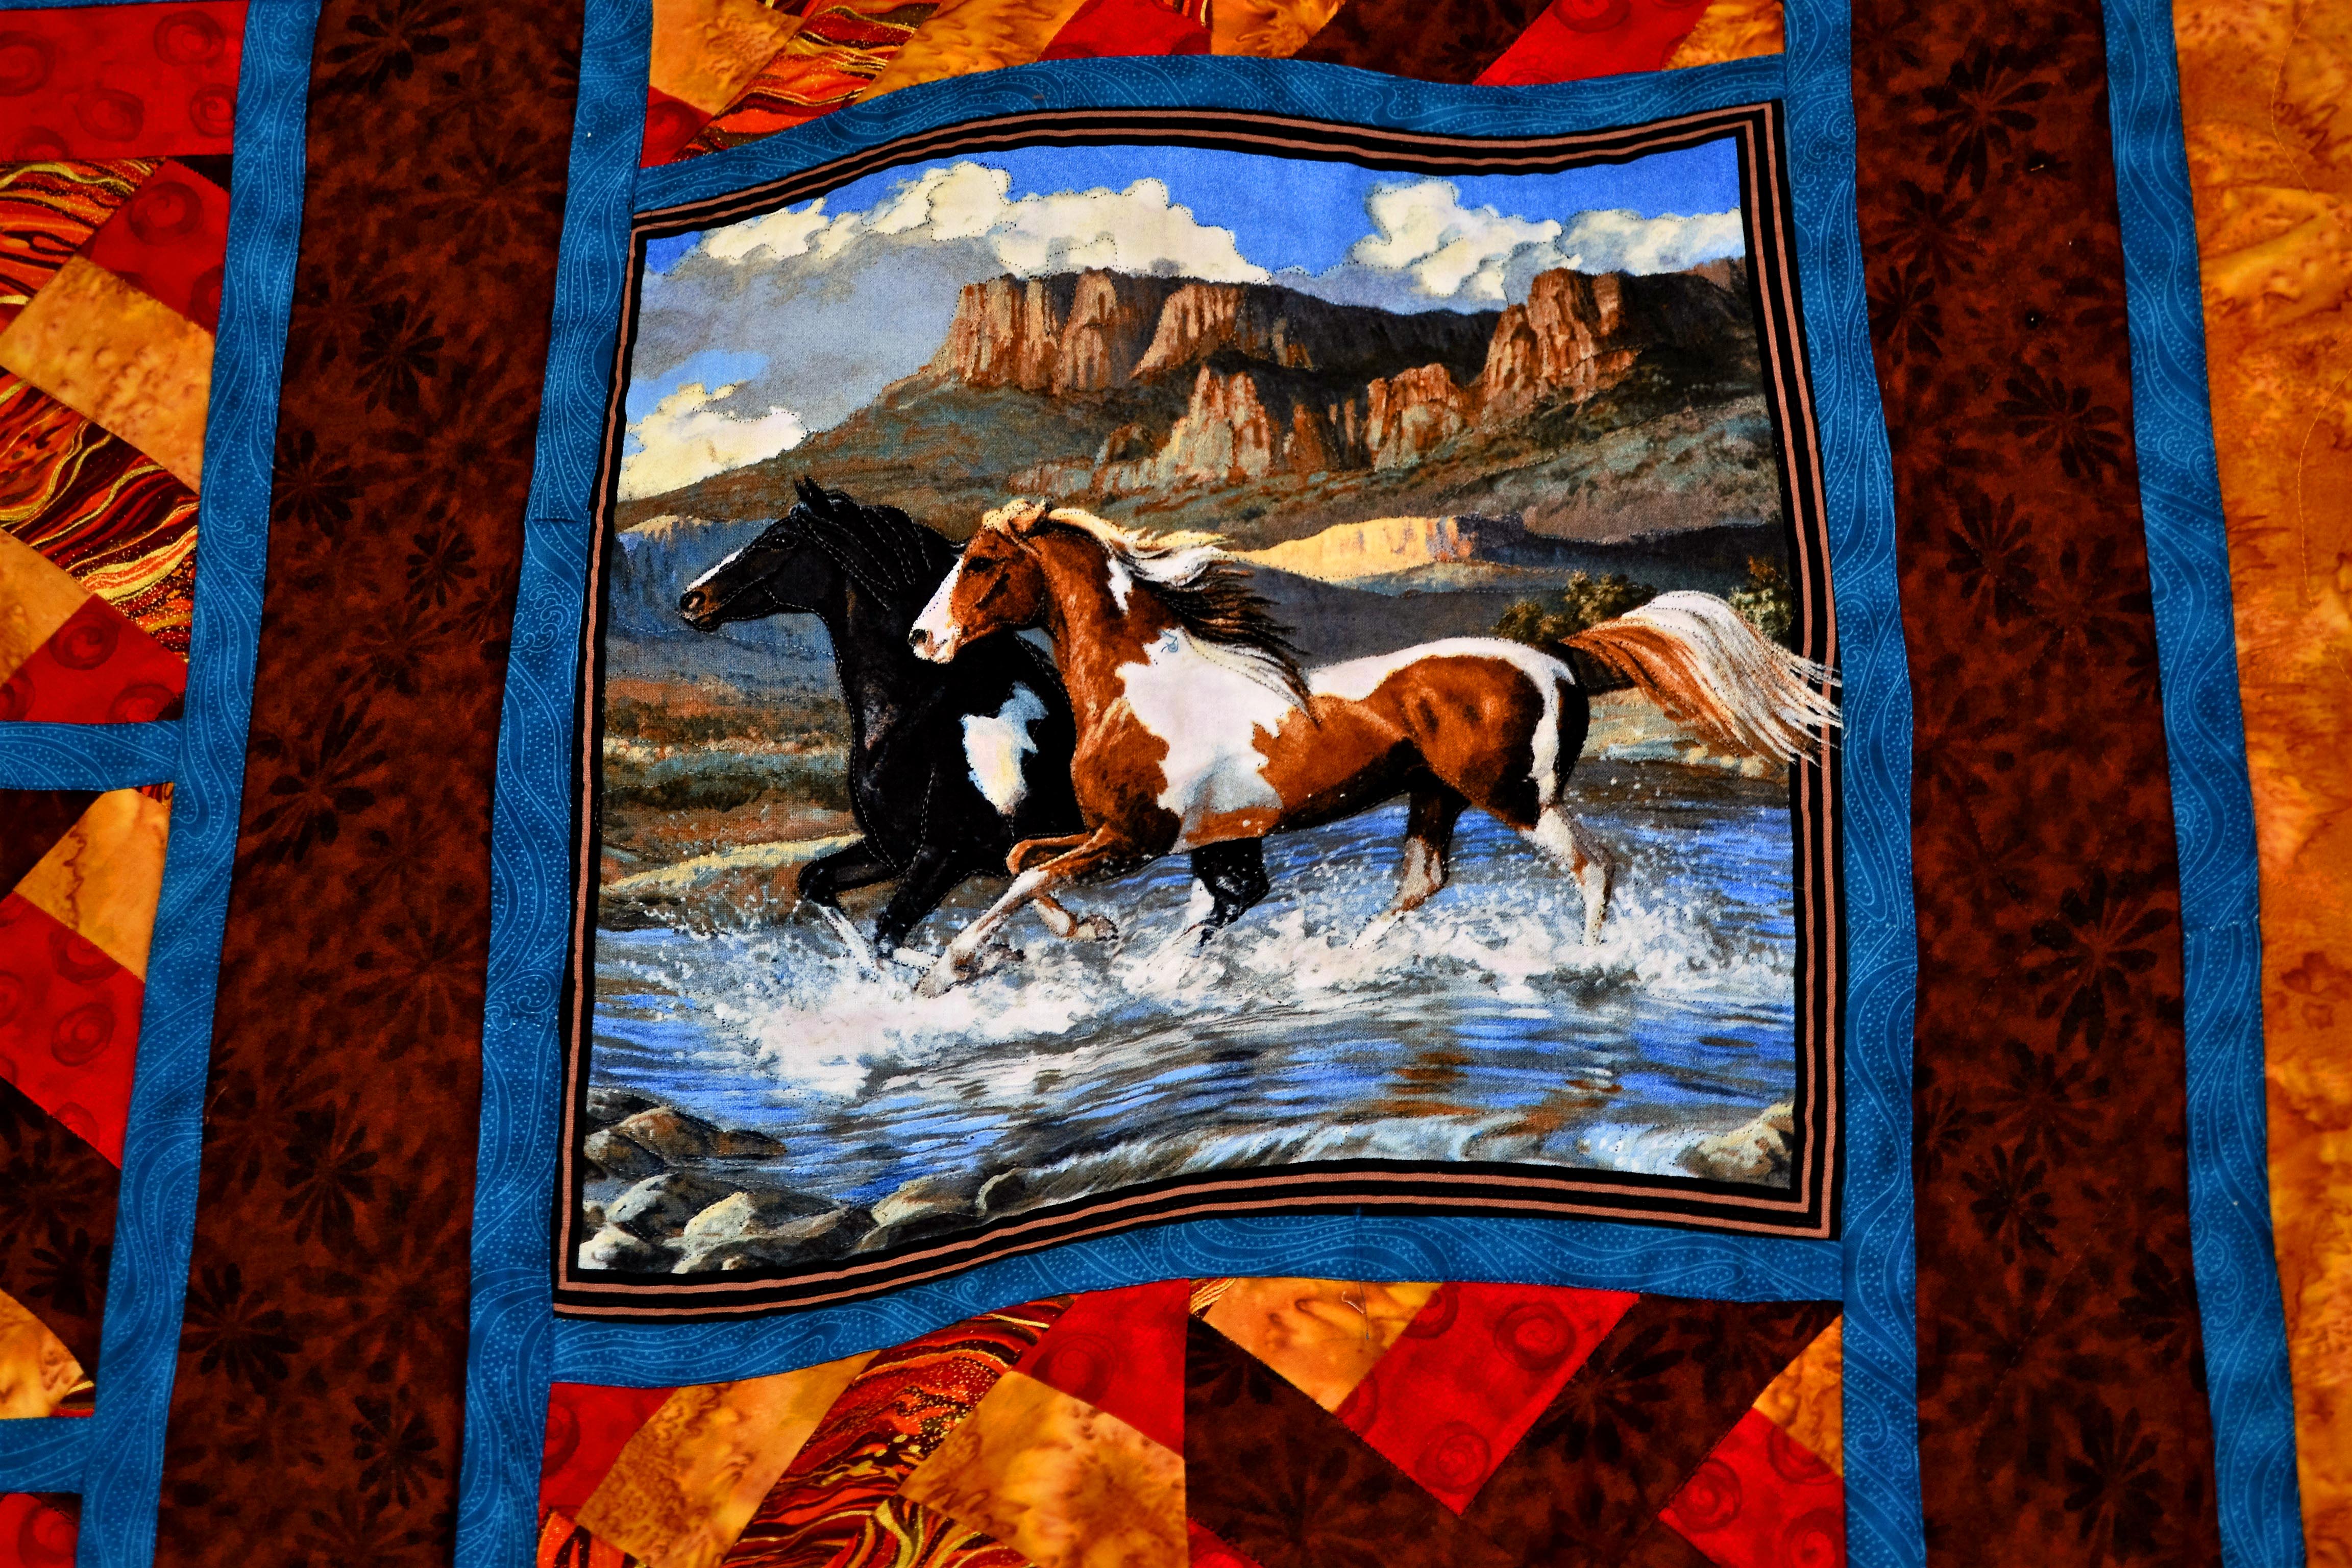
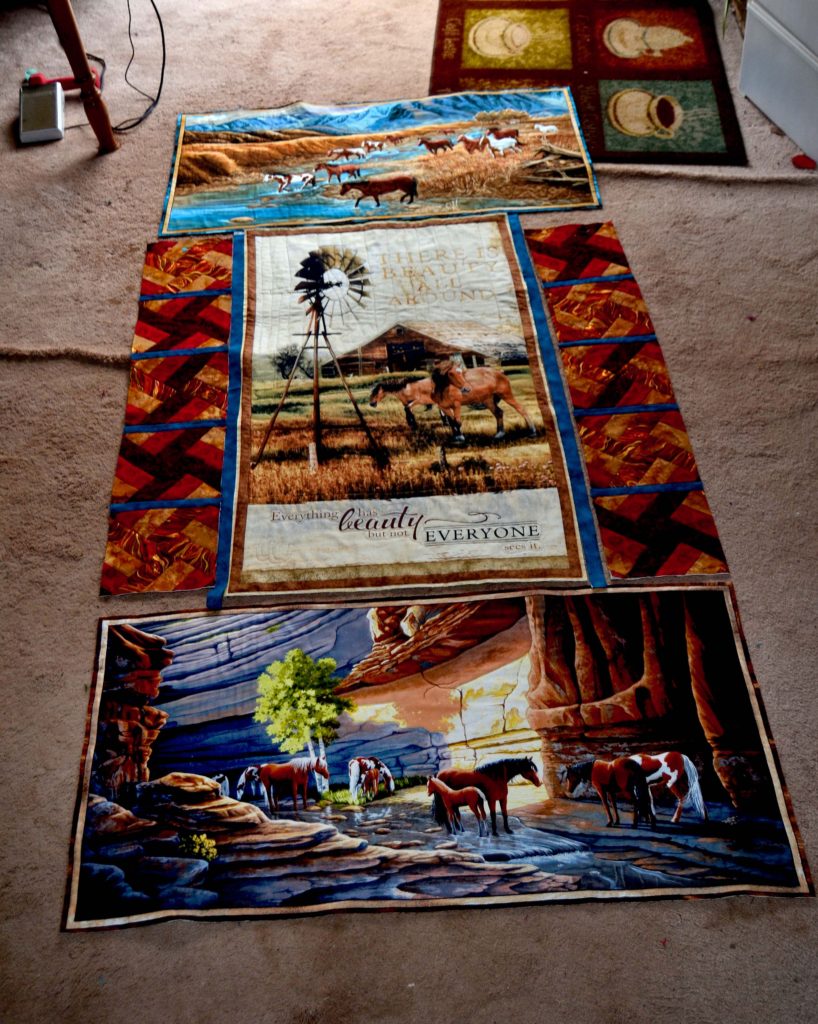
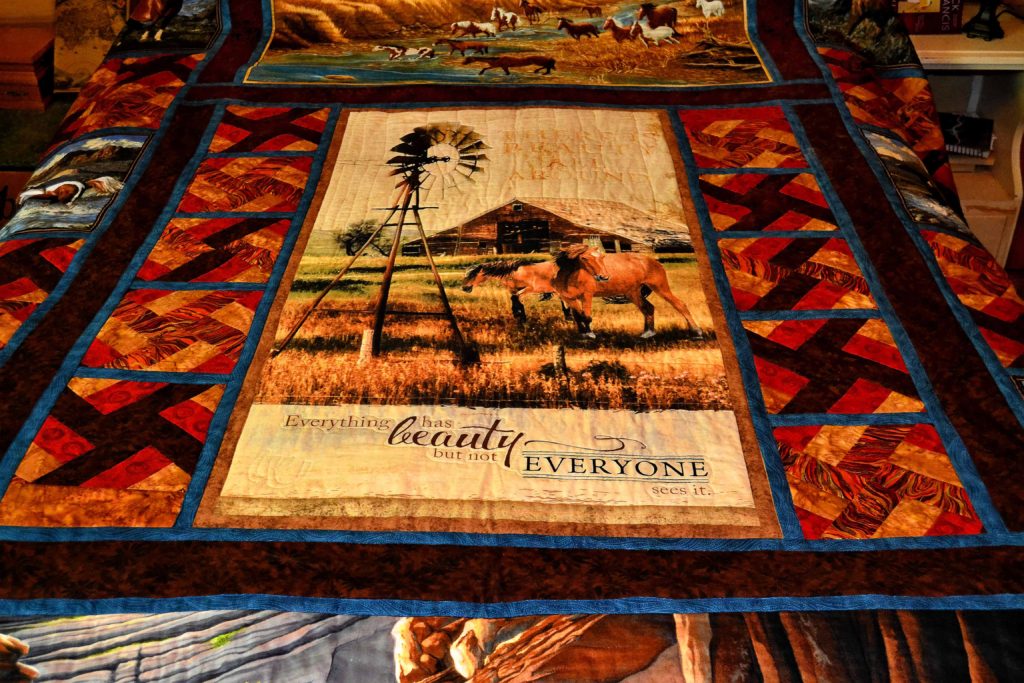
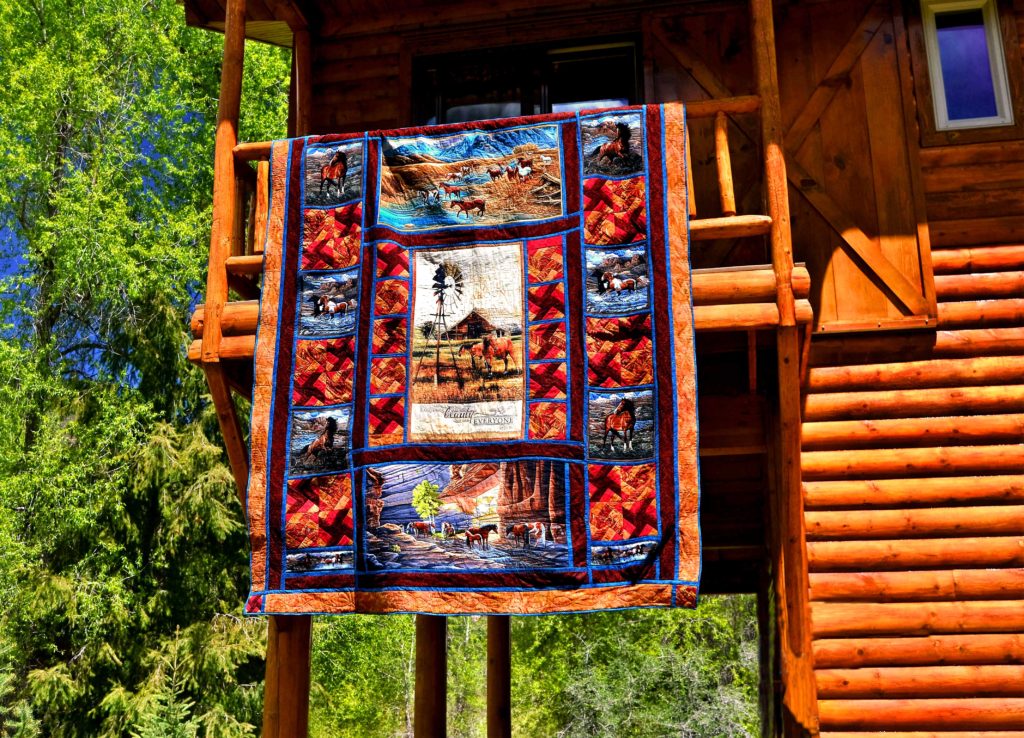
There are panels for every age group and any taste – whatever floats your boat. Last year I had a lady commission me to make a horse quilt for her horse-crazy son. She wanted it to be a queen and that’s a lot of area to cover.
I decided to do it
with 3 regular sized panels (these are 22”x44”) and 6 smaller panels.
I incorporated
colors from the panels into my borders and the result was my ‘Home Pastures’
quilt, which I think is beautiful.
It’s also totally
unique – I know there’s not another one out there just like it.
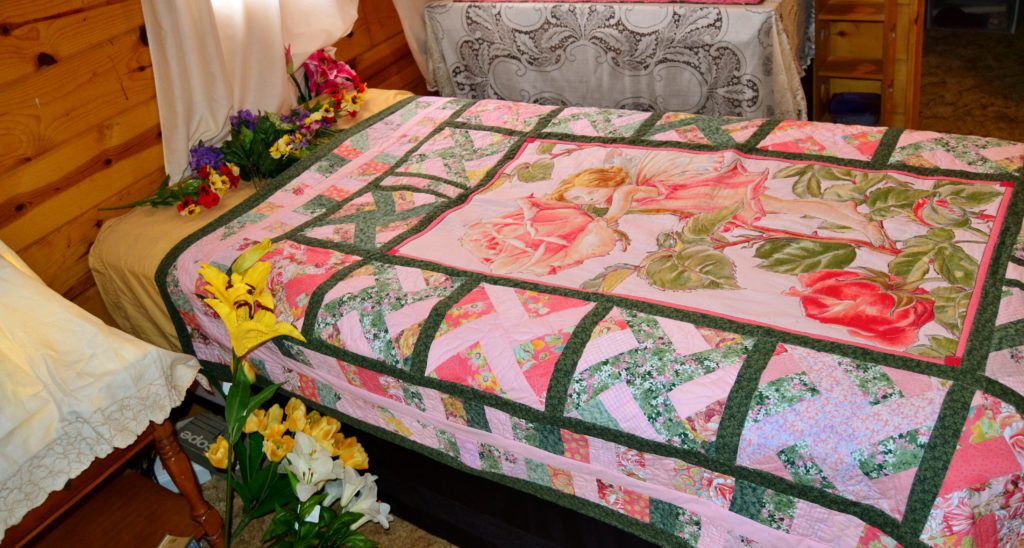
I’m also currently
working on a mermaid quilt that will be perfect for a young girl. Once again it was the gorgeous panel that I
couldn’t resist so I bought it and then I had to think about what to do with
it. I’m pretty sure any young girl will
be thrilled with the result, and once again, it’s a completely unique creation!
This is a pretty advanced technique, however.
You have to be
able to:
Quilt
Straighten a
quilted panel (and I do mean straight!)
Create your own
quilting pattern – for Home Pastures I used a pinwheel design, but I had to
resize each set of blocks and the strip borders as well, plus figure out the
sashing lengths…
Sash a quilt –
this is a great technique, but it can be a little frustrating
Coordinate colors
– not always as easy as it sounds
Quilt
Be ready to get
the seam ripper and the measuring tape and start over again
Quilt some more
Granted, a smaller quilt is less to figure out – but it still requires a thorough understanding of many different quilting and sewing techniques and styles to pull off.
I definitely don’t
recommend this type of project for a beginner, but it might be a good way for
an intermediate level quilter to begin testing her wings, so to speak.
More than Six?
These are just a
few of the ways I’ve sewn with panels in the past. And I’m sure that there’re many other ways to
use printed fabric panels for quilting, and I’m sure you’ll think of them.
Please, if you
find a panel you just can’t resist, let your imagination go and your creative
juices flow!
There’s no right or wrong way to sew with these great additions to the quilting world. Simply feel free to create!