Seam Ripper Championship: How We Set Out to Capture Classical Taj Mahal Architecture…And Ended Up With Cow Udders!

Taj Mahal sandral arch and cow udders for tiger quilt
A knight kneels, holding a seam ripper, before Princess YellowBelly to receive the Seam Ripper Championship for a fracture nightmare

Hello again fellow explorers in the world of quiltivity! Welcome to another issue of “Seam Ripper Championships;” this week featuring how we managed to turn the amazing and beautiful architecture of the one-and-only Taj Mahal into fabric cow udders.  

Deep sigh. 

You know, every time I start a new project: 

The Magic Seam Ripper Formula
  1. I map it out in my head
  2. I remember all the lessons from my previous seam ripper championship entries
  3. I shake my finger at the seam ripper and say “not this time, ducky!”
  4. Then, sooner or later, I scream loudly and start all over again.  

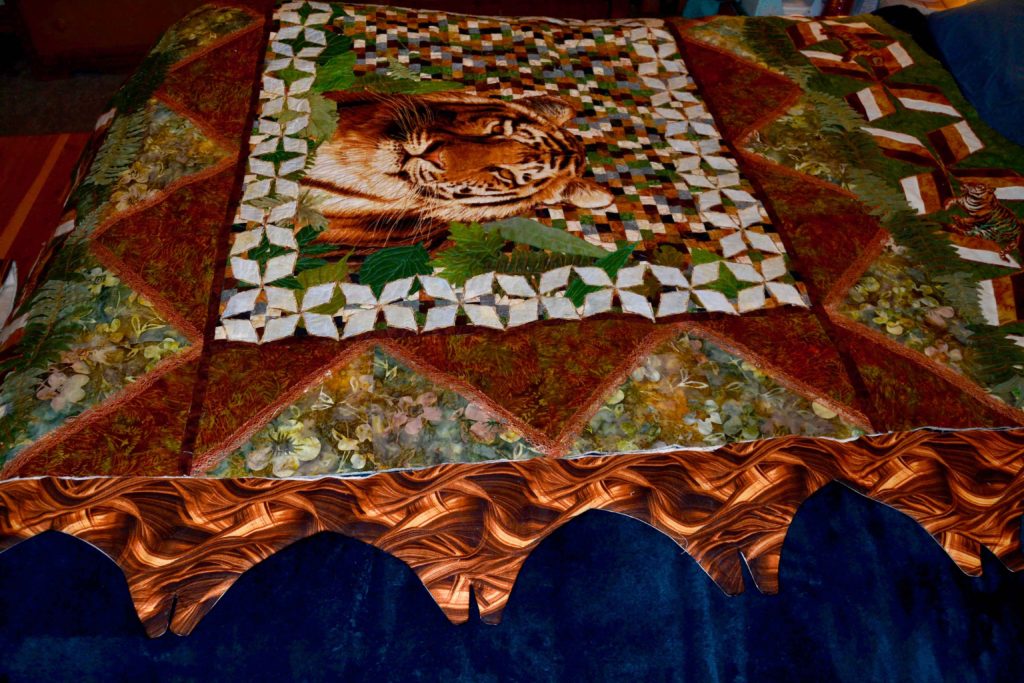
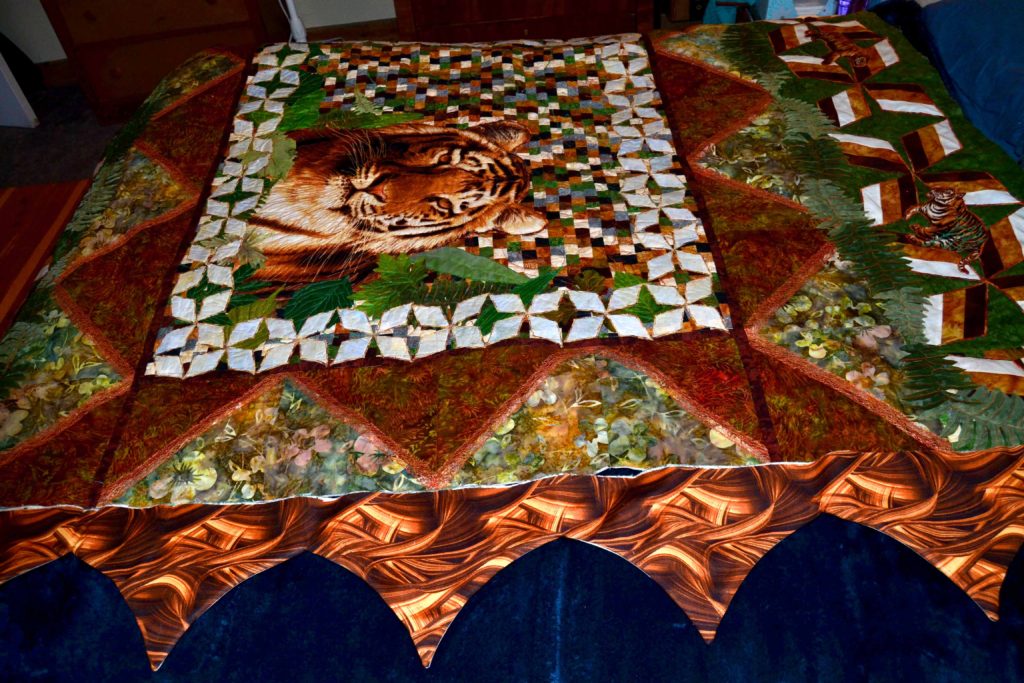
I haven’t written in quite a while because I’ve been exploring around my tiger quilt, and navigating this cat has turned out to be as difficult as escaping a jungle without a guide or a compass!  

And the kicker of it is, it doesn’t even look all that difficult.  

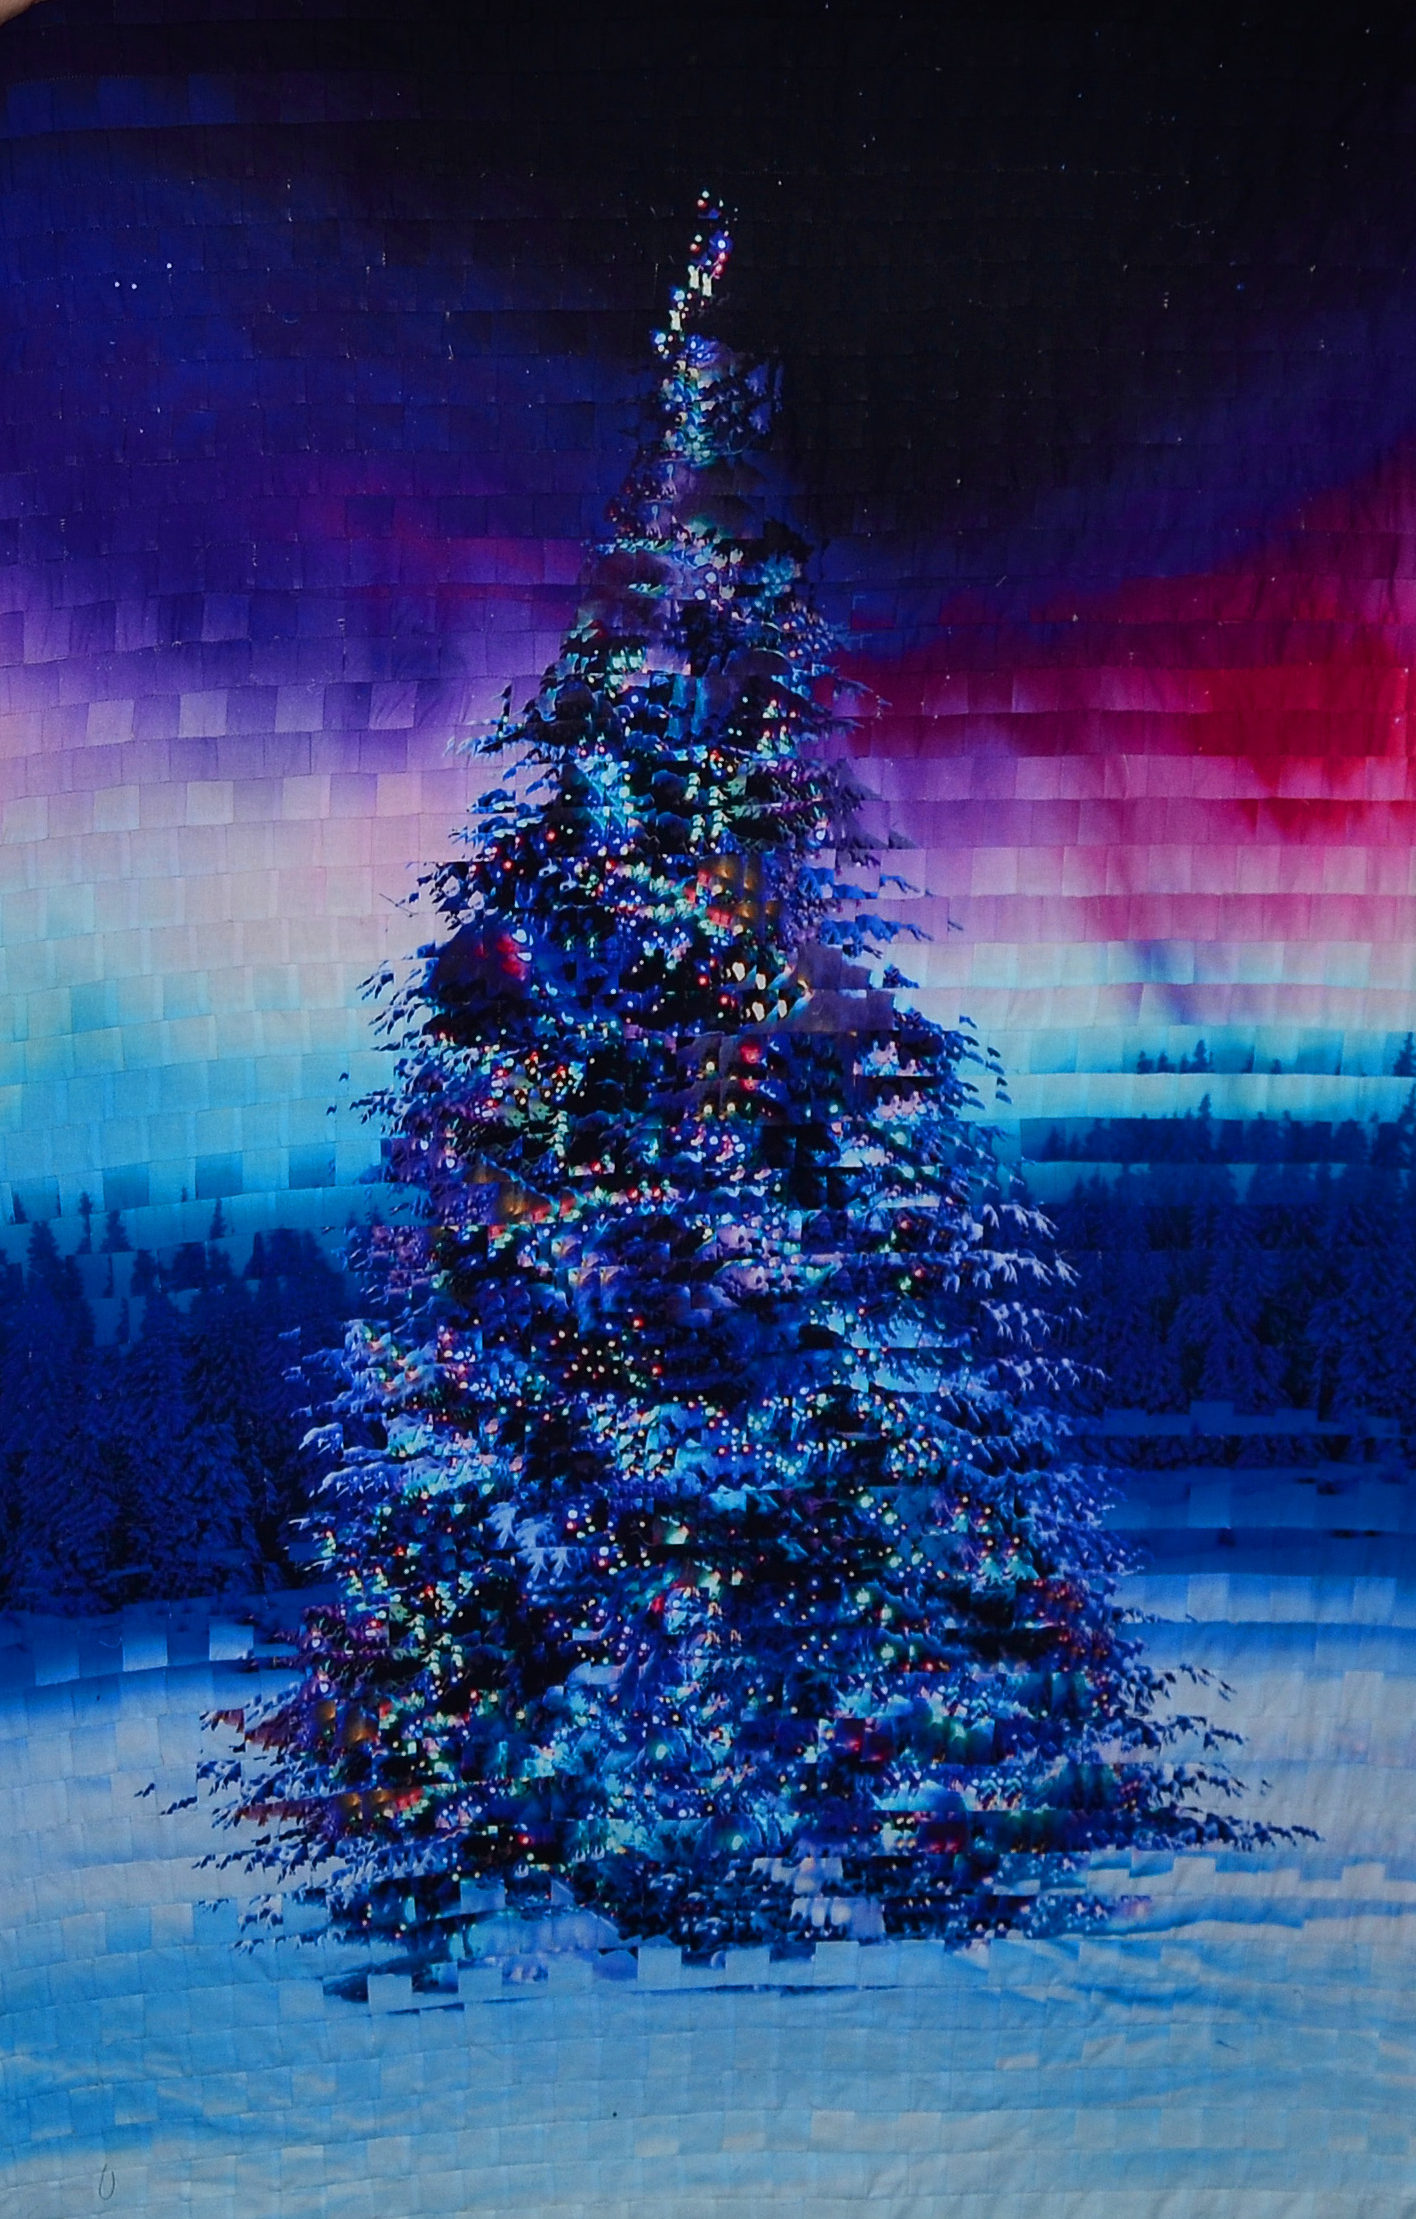
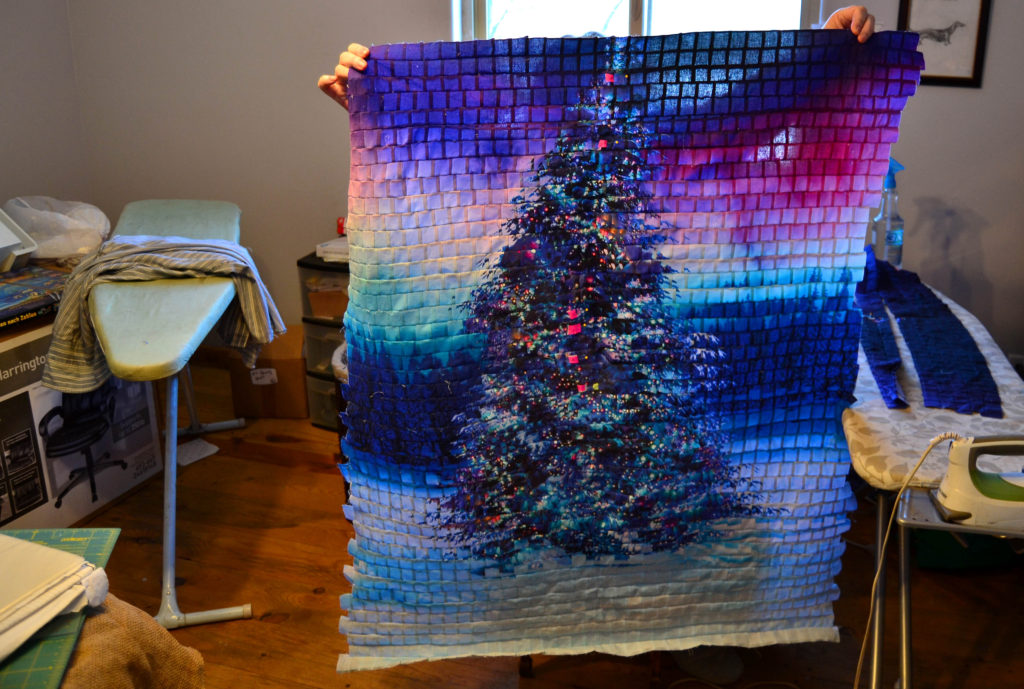
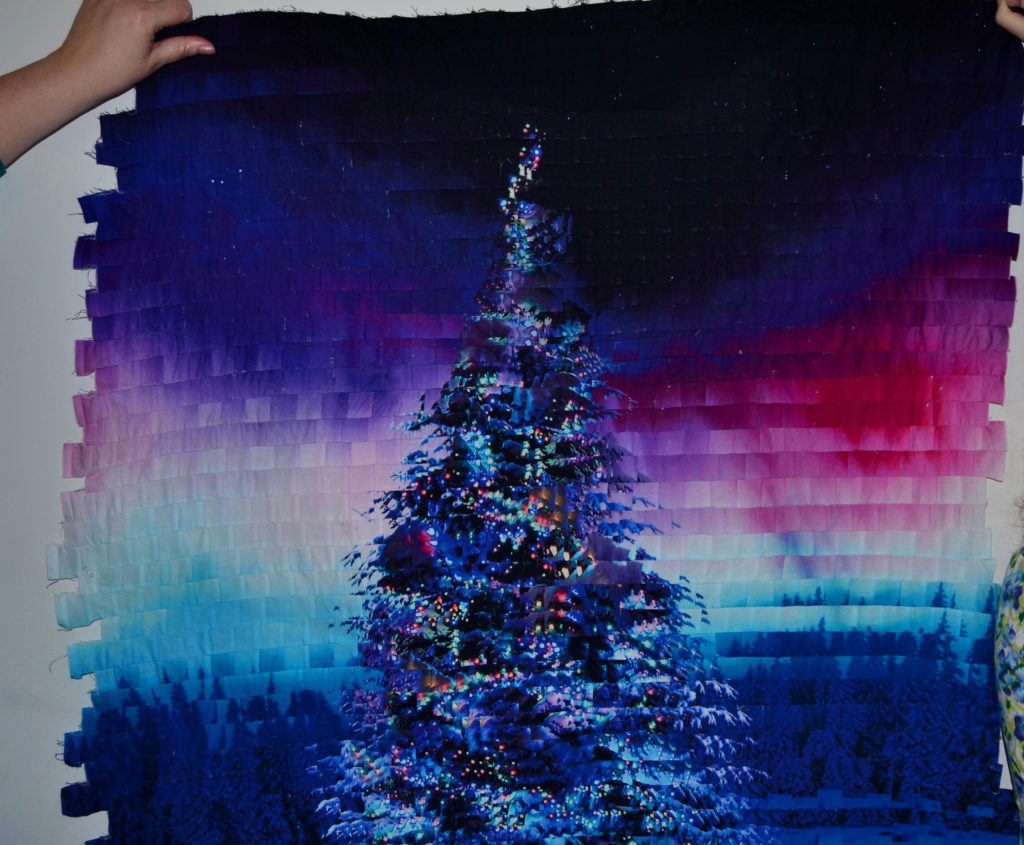
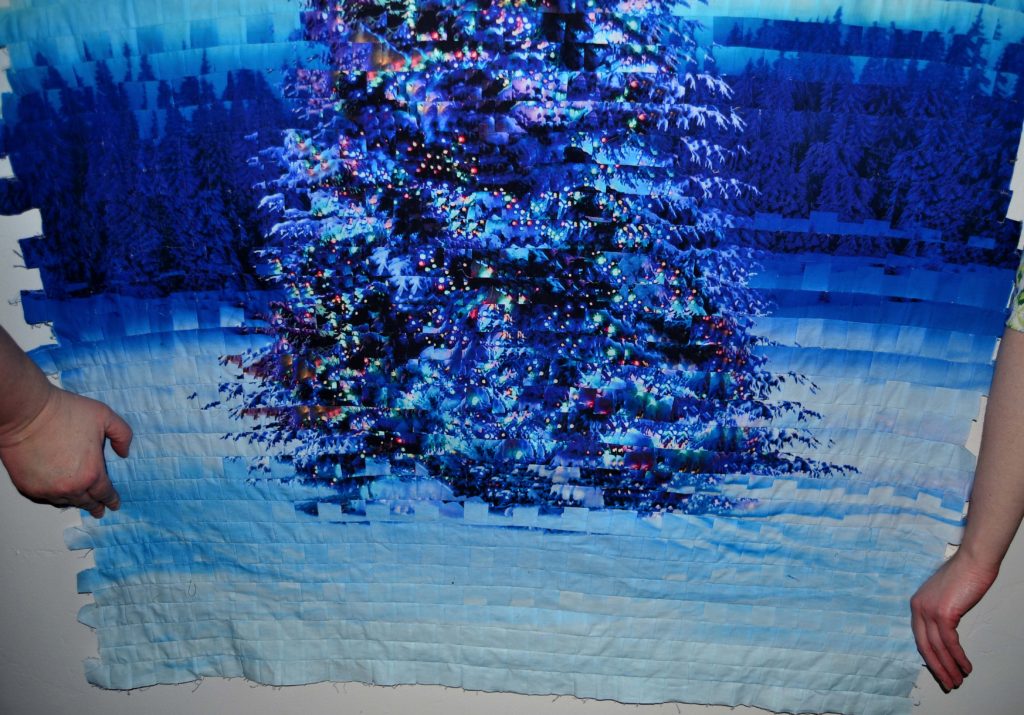
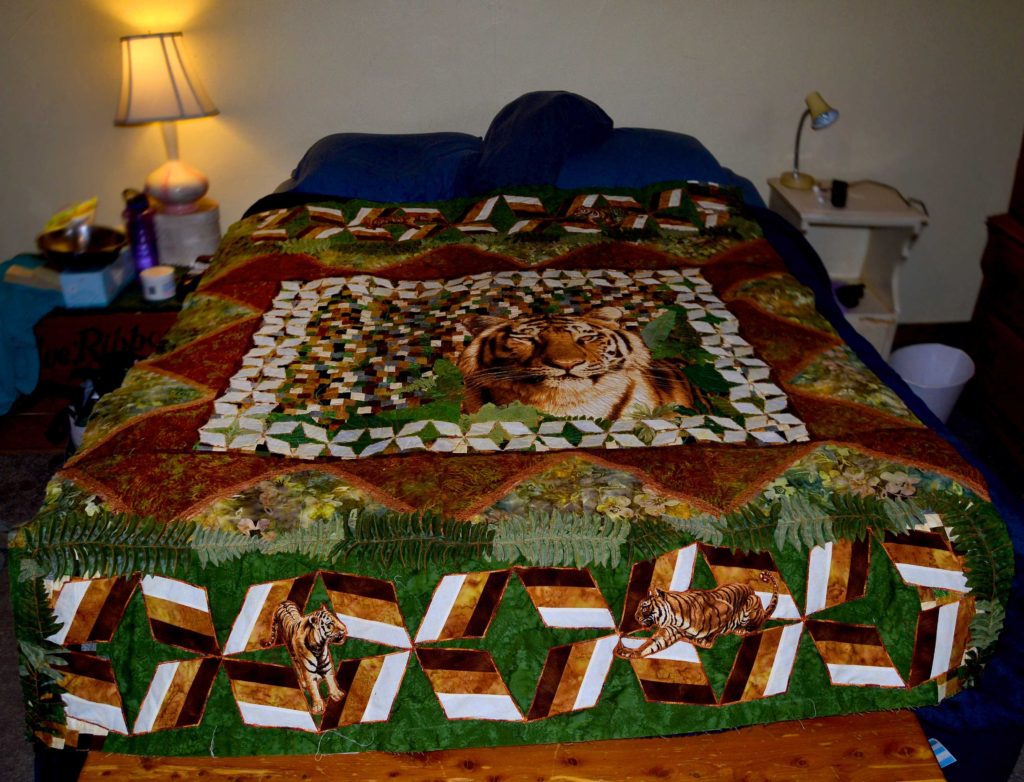
This was the vision – not that hard…right?

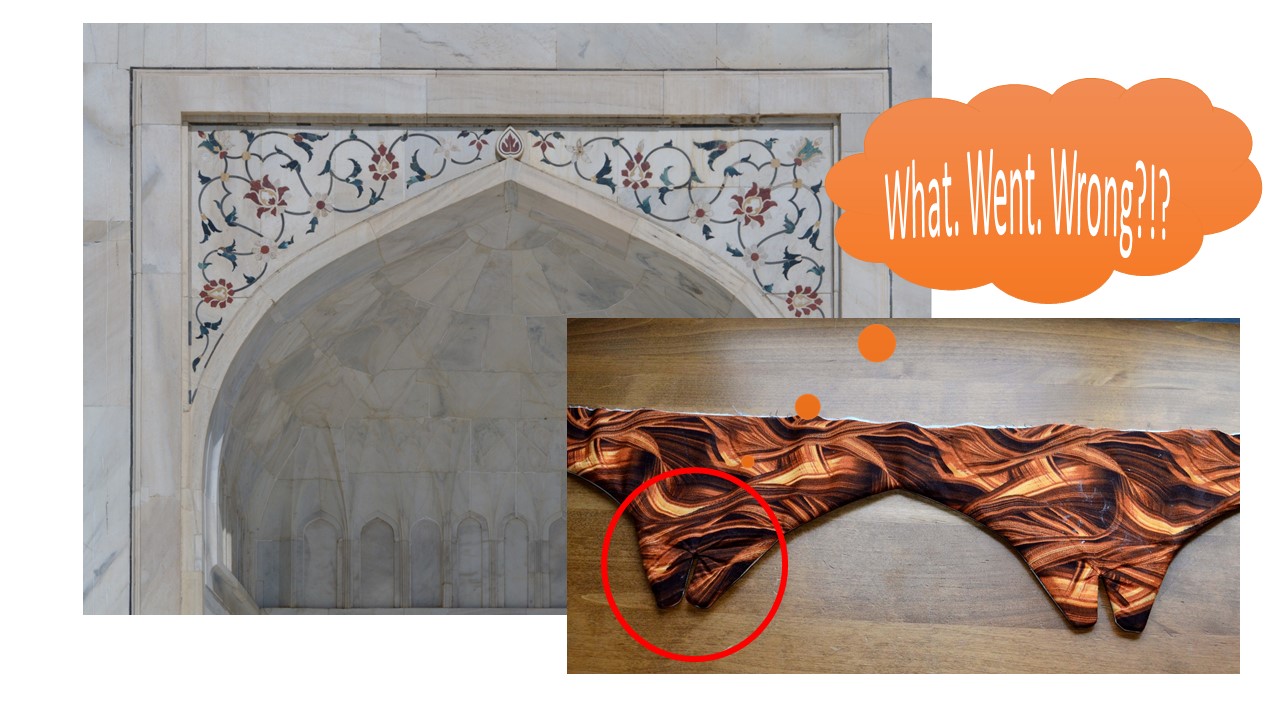
Shere Khan – Ruler of the Taj Mahal

Of course you all know that when you watch a professional perform they make the almost impossible appear effortless, what they’re truly showcasing is the thousands of hours of practice and dedication that they have put into perfecting their craft.  I choose to believe that my tiger quilt ‘Shere Khan’ is in this same league. 

Shere Khan tiger quilt without borders

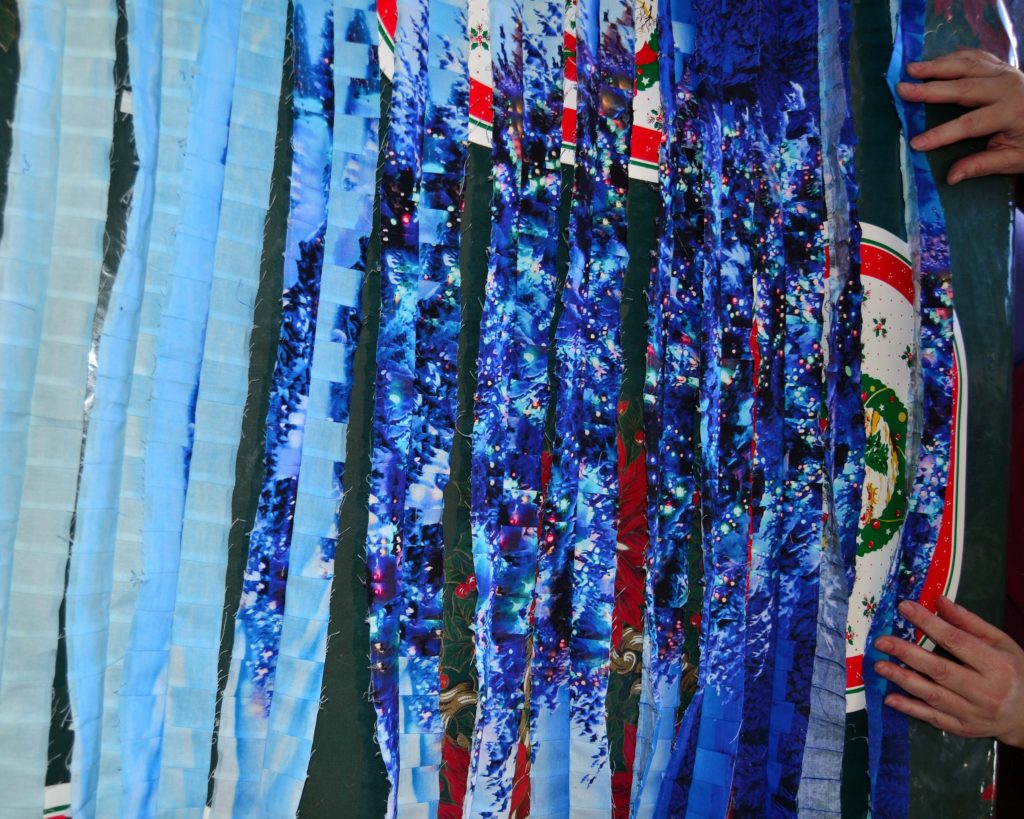
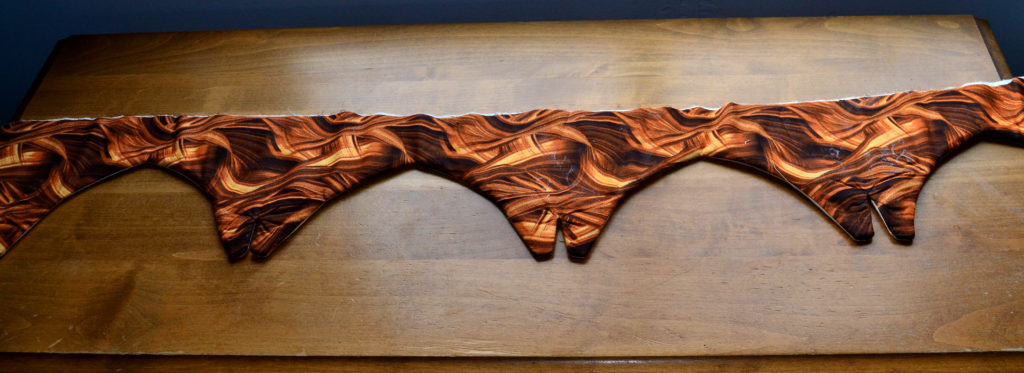
The latest disaster – oops- I mean, the latest architectural design element that falls into this category is the Sandral Border that Suzanna decided would finish off our jungle cat in a jungle temple theme beautifully.  

I’ve always been fascinated by the singular beauty and majesty of the Taj Mahal.  It’s one of the wonders of the world for many reasons.  Not only is it a perfect and stunning design, completed so perfectly that it stands almost unaltered (except for certain plundering) to this day, but it stands at the center of a rich and multi-textured history.  Both I and my children spent many long hours studying the stories of the amazing men and women of India whose lives touched the Taj Mahal.

When we wanted to evoke a “ruined temple” effect for “Shere Khan,” it only seemed natural to draw inspiration from THE Taj Mahal.

The Best Laid Plans of Mice, Men, and Seamstresses 

So we googled Taj Mahal architectural designs and decided that the sandral shape would be perfect for the border.  

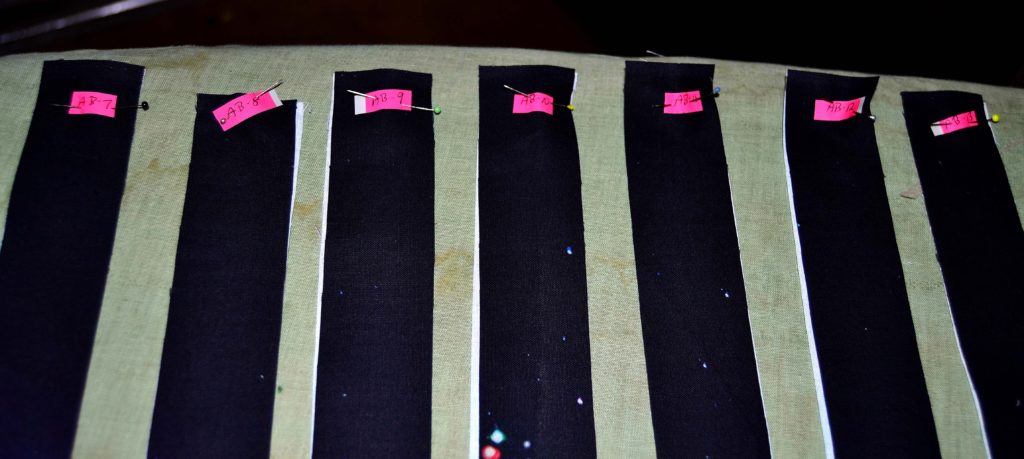
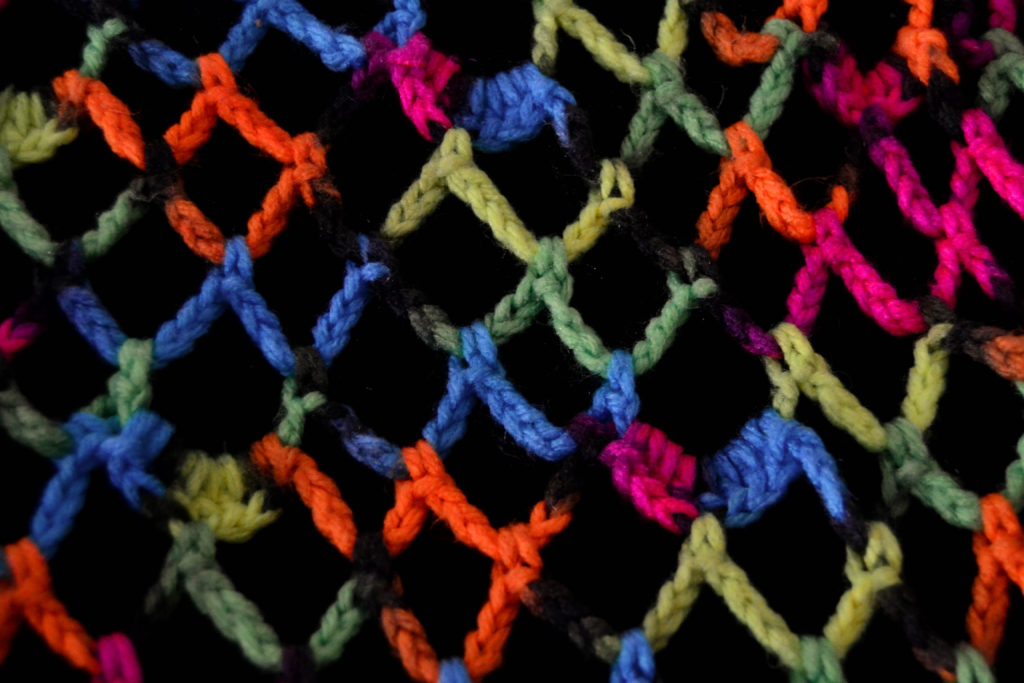
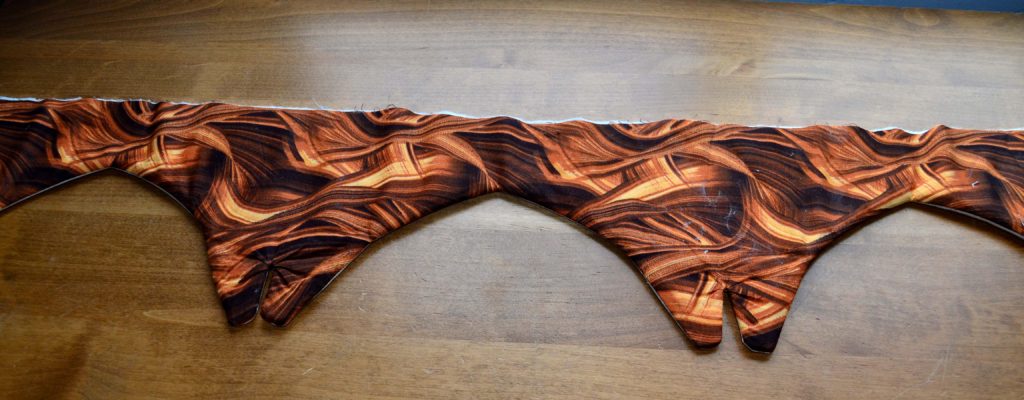
I made a template out of plastic, and because we wanted each sandral to showcase itself, we left a space between the bottoms of each arch.  Which looked a lot like the original design of those signature arched doors and windows.

When I traced this design onto batting it looked perfectly fine, simple and elegant.  Suzanna and I were both thrilled with our creativity! 

Disaster Strikes!

It was only after I had: 

  • Sewn my first long border with these shapes
  • Trimmed all the edges
  • Turned the entire border right-side-out
  • Pushed out all of the corners 
  • And pressed it 

That it became apparent that our beautiful, elegant sandral arches had morphed into cow udders!  

 I felt sick!!!  

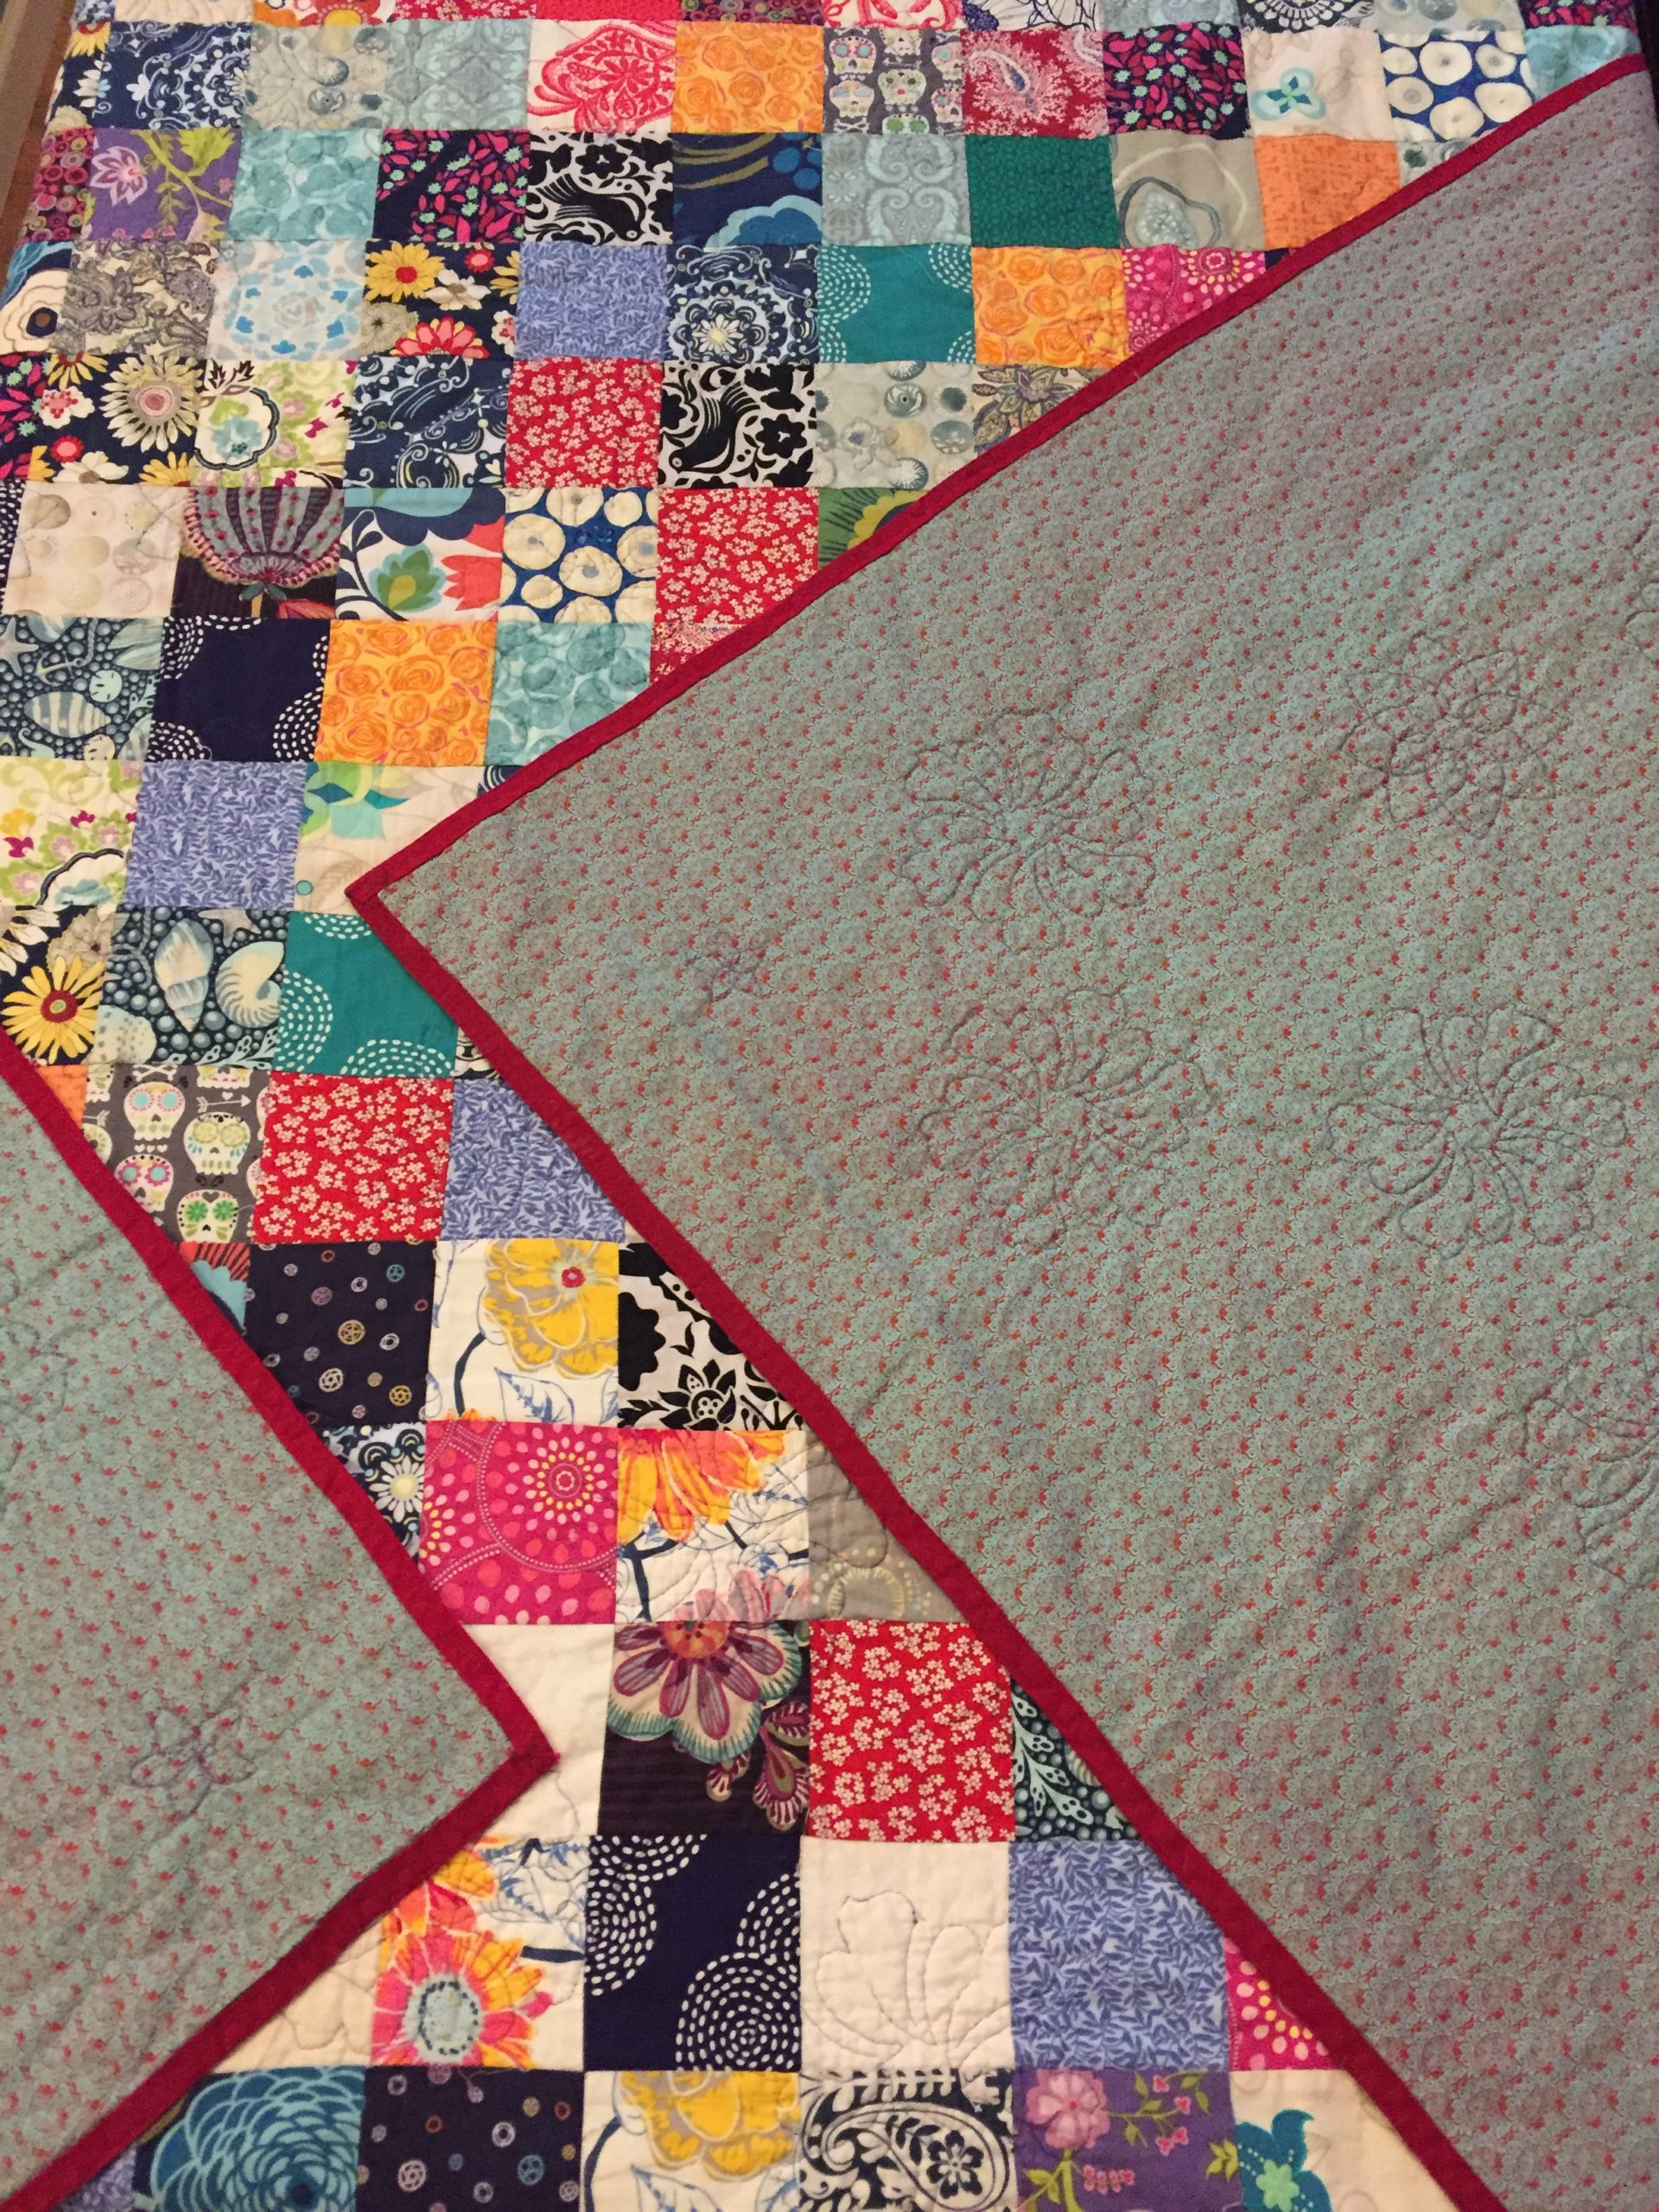
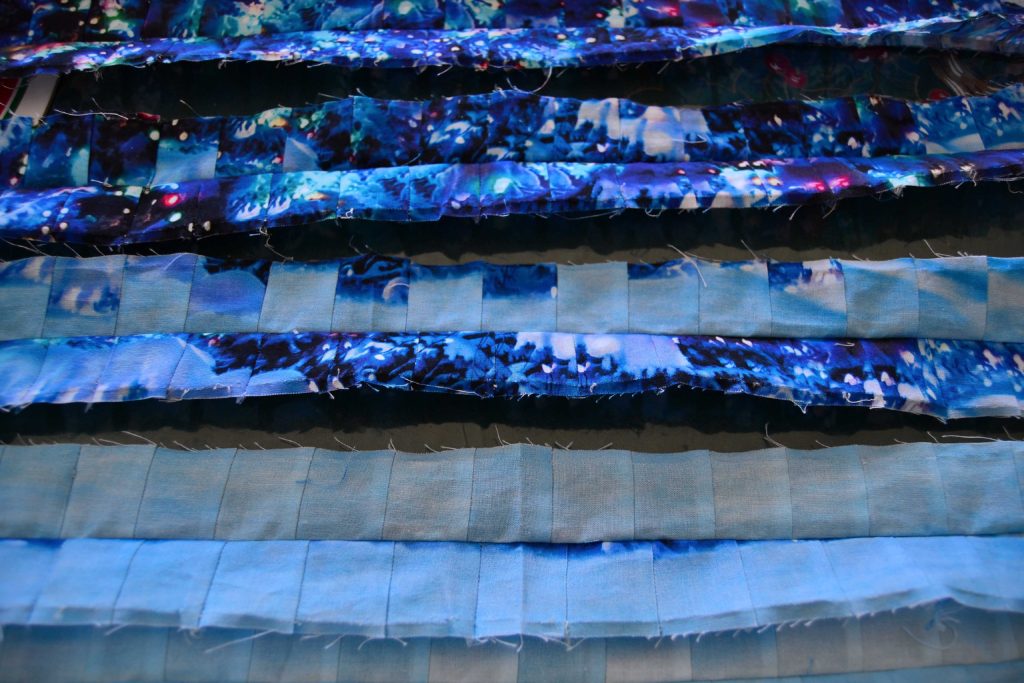
Not only had I spent all that time and energy, but since I had used 2 layers of batting and high dollar backing and front fabric, I was out quite a bit of money.  And using my heavy scissors to trim all around that long border had left my hand half dead.  

Sometimes the Best Projects Require the Most Dedication

This is exactly how this entire quilt has gone!!  I can honestly tell you that I was ready to throw the entire project into the trash.  

But, Suzanna calmed me down and after a few days of detoxing, we decided to try it again, this time bringing both of the bottom edges into one point.  It worked beautifully, and I’ve decided to keep my strip of cow udders as a memento of a fantastically funny failure.  Also, I’m using pieces of it to practice quilting with new threads and designs before I place the entire quilt into my machine.  

So all is not lost!

And “Shere Khan” is a stunning quilt.  Thanks to a new disaster (this time sewing machine mechanical problems that I don’t want to talk about), we still haven’t been able to attach the final border and call it finished, but I think when we do it’ll all have been worth it.  

See – it’s worth it!

Some projects are fun, some are challenging, some will push you to the absolute limits of your endurance and sanity.  But, somewhere in the midst of all that mess – and, yes, the cow udder architecture – lie the seeds of greatness. (I’m not entirely convinced that there weren’t a few disasters during the building of the original Taj Mahal.  I mean, look at it!  It’s too stunningly perfect for a few flaws not to have been wiped clean by a master craftsman or two!)  

Never give up dear quilters!!!  A mistake is only a disaster if you allow it to be!!

Please enter your email, so we can follow up with you.
Don’t forget to leave us a place where we can contact the Seam Ripper! Social media, email, or website will work, thank you 🙂
A knight holding a seam ripper kneels before Princess YellowBelly to receive the championships of horrible fabric art experience and triumph - enter your story today

(Nearly) Fatal Encounters with Home Ec

Please put your hands together, and push your reading glasses a little higher!  It’s time to welcome our newest Seam Ripper Champion – Jolene Noyes!  Jolene’s a unique fabric artist who’s already shared some of her amazing ideas with Princess YellowBelly Designs.  Now she’s kindly shared a horror story that many of us can empathize with – a story of how we were all almost terrified away from the sewing machine, forever… 

In fact, Jolene’s story is so significant in the creation of our Seam Ripper Championships, that I (Karyl Fitzgerald) have added my own similar story to the end of this tale of woeful seam ripping.  But now, without any further ado, let’s hear from Jolene!

The Dangers of Sewing in a Home Economics Class

A knight kneels, holding a seam ripper, before Princess YellowBelly to receive the Seam Ripper Championship for a fracture nightmare

“My story goes back to junior high, another time, another country, and a home economics class which I never have and never will forget. 

Home economics was a combination of cooking, sewing, and homemade-type crafts. I did just fine and still do with the cooking, but it was the sewing that got to me. We were required to make a skirt and vest combo. Vest, very simple. Skirt, elastic waist, very simple.

NOT.

I don’t remember the actual sewing of the pieces, but I do remember the day we tried them on. 

My vest was lopsided. One side was up by my breasts (although I didn’t have any at the time), while the other side was down by my waist. My skirt was ok except for the huge, huge elastic waistline. I was devastated, I cried, I was embarrassed and thought for sure that all the other girls in my class were laughing at me. I am sure that I went home in tears. But, at least I had got it done!

Well, I am sorry to say that was pretty much my last sewing adventure.

Although I did have a couple of other chances to sew, I did not enjoy it and was again, no good at it. Perhaps, that is the curse of having something go, so wrong, when you are so young. If I were to do it now, or had my grandkids doing something like this, I would make sure to sew again, right away and rid myself of any bad feelings about sewing.

Jolene Noyes overcoming with fabric art

Jolene Noyes is a terrific artist & fun storyteller. Whether she’s sharing tips on how to turn plastic trash into hip purses, or waxing eloquent on the trials of home ec classes – she’s got something to tell you.

A resident of the beautiful state of Colorado, a traveler, and a fun person – she’s definitely earned the title of “Seam Ripper Champion!”

The Big Lesson – Get Back on the Sewing Machine Horse

And, that is my lesson in all of this…if you make a mistake, go back and correct it and don’t be afraid of your lack of skills. Sew anyways. I look at this now, and laugh, but I am still sorry that I did not become a better seamstress but I do have other things now that I am talented with so it is alright!”

By the way, Jolene really did become quite the artist on her own.  This is one example of her vibrant, creative personality bursting out – but you can find out all about that over here, in another story.

But, for now, I’d like to jump in and say that Jolene’s experience is, by no means extraordinary.  In fact, something very similar happened to me:

Which is Why Princess YellowBelly Almost Wasn’t

Reading Jolene’s experience with her Home Economics sewing experience, took me straight back to 7th grade.  In my home ec class I had a sewing teacher who was so incredibly picky that she gave me a D-, all because the checks on the backside of the hem on my gingham apron didn’t match the checks on the apron itself. 

She made me rip it out 4 times before I finally gave up.

Next came the potholder assignment.  Which I also was failing at horribly.

What was even worse, was that my Mom, who was a vastly experienced seamstress, took pity on me and helped me put the binding around my potholder, and for the job she did on that I received an F.  

Even after all these decades I can see that teacher clear as day in my mind and hear that nasally-whiny lecturing voice. 

I was so mad at that teacher and loathed her so much, that the loathing transferred straight into the idea of sewing, at all, ever.

So, I was quite amazed at myself when, at 17, I decided to take another home ec class. 

Karyl Fitzgerald - head shot

Karyl Fitzgerald is the head seamstress for Princess YellowBelly Designs. She also comes up with most of our original designs and quilts, and writes a great deal of the helpful content we feature here.

She also has been a Seam Ripper Champion herself. First in 2018, and then again as the second quarter Master of Disaster in 2019. Like Jolene, she’s a late-term survivor of an early home ec disaster class…

Different school, different teacher.  This time, I made a skirt for my little sister.  And not until I had it all put together with no extra fabric left over, did I realize that 2 of the panels were upside down – little angels scampering across the landscape on their heads. 

This teacher didn’t ding me for that, but she did laugh at me. 

I later became a school teacher, by the way, and I know that the worst way to deal with a bad learning experience is by laughing at your struggling student.

Why You Should Try the Horse Again

Those 2 experiences soured me so much on sewing that I didn’t try it again for another 17 years till Suzanna was born and my creative gene started kicking at my brain.  Lo and behold, I could follow a pattern and put together nice things for my kids! 

With these successes under my belt, I gradually got bolder and made them each a baby quilt and then toddler quilts and the more creative I was, the better we all like it. 

So step by step I moved into fabric art. 

It took quite a few years, but now I am practically fearless when it comes to letting my imagination run wild, making up my own patterns, and experimenting with different and new techniques.

I’m still deeply anti-matching-corners, however.

So I would encourage you, dear reader, if you like sewing but don’t like all the rules and picky stuff that comes with sewing clothes or “accepted” quilting patterns, pursue the road less taken.  Try different things, explore, imagine.  Try getting into fabric art, or doll making, or even crocheting and knitting – which is something Jolene turned to – or anything else that strikes your fancy – just don’t stop sewing!

A knight holding a seam ripper kneels before Princess YellowBelly to receive the championships of horrible fabric art experience and triumph - enter your story today

Princess YellowBelly Designs has enjoyed sharing these stories with you – but, as always, in another three months we’ll have another story up to demonstrate how real artists have struggles with fabric art of every breed and variety. If you have a great story for us, you can check out the guidelines and then send us an email at karyl@pybdesigns.com.

Thanks! We’ll see you next week with a new how-to article, and other great content. To the greater good of your quiltivity,

Princess YellowBelly Designs

A Confidence of Errors

Bree Reza is our latest Seam Ripper Champion – the absolute Master of Disaster for July-September 2019 – thanks to her honest, humorous, and true-to-life tale of fabric art inspiration, desperation, miseration, and triumpheration. Please join us in celebrating her for her “never say die” attitude, and her spirited view of life and art!

A knight kneels, holding a seam ripper, before Princess YellowBelly to receive the Seam Ripper Championship for a fracture nightmare

It began innocently enough.  It always does, doesn’t it?

There was the catalog, glossy, fresh, colorful… and so much more appealing than dusting or doing the floors.  And who doesn’t love looking through a spring catalog?  All those bright rooms, with inviting quilts and pillows, and not a dog hair in sight. 

So of course I sat down to flip through the pages.  And there it was, around page 56.  A black quilt, with bright, mismatched appliquéd circles evenly spaced.  Cute enough to be funky, minimalist enough to feel a little modern.  I was in love.

But no way was I $250 in love. 

It looked simple enough.  I’d done quilts before.  It had been a while, and I didn’t have a sewing machine right now, but still.  “I can make that.”

Mistake Number 1

You probably know that this is the first place that things went wrong.  No pattern, no machine, no real plan.  Just a little walk into the wilderness of my clothing donation bag.

I know you’ve got a bag like that in your closet.  It’s a lot of fun, if you can avoid trying things on again.  There were knits and crinkly rayon, silk and cotton, all of it in sizes that were a distant memory.  And somewhere during the regret of trying on a pair of corduroy pants, I remembered that trying to wash and sew together such disparate fabrics was a recipe for disaster. 

Bree Reza is a writer, crazy dog lady, and part time artist who loves wandering through the woods and taking on projects that provide “learning experiences.”  She brings home the bacon by training dogs, writing fundraising copy and grant proposals, and creating custom stained glass panels.  If you’d like to know more, you can check out her website at www.ClearWaterWords.com

So I decided that I’d buy brand new fresh fabrics, all in cotton.  Organic cotton!  And organic batting!  And I’d hand embroider flowers into it so that it could be reversible!  Because if you’re going to do it, you should do it right! 

Mistake Number 2

You might have guessed that is the second step where things started to go sideways.  But I didn’t know that yet.  So I put “fabric store” on my to-do list and went back to my busy routine. 

It was just a lucky coincidence that I happened to walk by an organic fabric store while I was meeting my cousin for lunch one day.  They had cute little pennants hanging in the front window.  Owls made out of yarn.  There was a happy dog tied up out front. 

And inside, there was an astounding array of buttery soft patterns and textures.  I was smitten.  Flowers!  Skulls!  Paisleys!  Dots!  I heaped up yards and yards of quarters and carried them to the register.  As the total soared, I felt a little dizzy.  “It’s funny.  It feels like altitude sickness.  But not funny.” 

Mistake Number 3

Mis-step number three: I gulped and handed them the credit card.    $250 for the catalog was starting to look better, and I still had to buy batting, backing, and thread. 

By this point, I was realizing that cutting out, spacing, and appliquéing a million little circles was going to be a real pain in the neck.  So I decided that I’d just do squares.  A Jacob’s Ladder pattern, maybe, like my grandmother used to love.  Except that during the process of cutting out 6,358,192 squares, I started to get tired.  “Random.  They can be random.  I wonder if that catalog still carries that quilt.”

Over the next two months, I cut a lot of 4-1/2 inch squares.  And a few 3-1/2 inch squares by accident.  And once or twice, my fingers, because working a rolling cutter at 2 am is a dicey business.  I did come to my senses and borrow a sewing machine to sew them into strips and then sew the strips together. 

But I was insistent that no two identical squares would touch.  And as I got closer to connecting all the strips, there were a few times when the seam ripper came out and it all got patched back together.  Eventually, I had a queen-sized topper, and I was pretty happy with it. 

Mistake Number 4 (ish)

Now, to attach the batting and the backing.  The October evenings were getting chilly, and the idea of sitting under a quilt, embroidering through the winter sounded lovely.  “I’ll be done by January!”  I was cheering as I pinned the last patch to anchor the layers together. 

I used acrylic stencil templates as guides for the flowers.  It took about 1.5-2 hours per flower.  It didn’t take long to realize that when you have 13,965,653 four-inch squares, you’ll need more than a dozen flowers to hold it all together.   I called quilting shops and looked online to see how much it would cost to have it quilted by someone else.  Ruefully, I remembered the $250 price tag on the original quilt.  And I went back to stitching flowers.

By now I think you can guess the hours of labor, love, and hate that went into making this “simple-looking” masterpiece!

January came and went.  And June.  And another January.  And another June. 

When I went to visit friends and family, the ragged roll of squares and stray threads trundled along with me.  The stencils started to get a little crooked and wonky.  I started sleeping under the unfinished quilt, dozing off as I finished a flower and crashed out in place.  The edges were starting to look pretty frayed.  The dogs decided that it was their quilt.  And the world’s slowest wildflower bloom worked across the panels. 

And finally, January came again.

Walking into the knitting group with my quilt, I expected the usual teasing.  By this point, everybody was used to seeing my project.  I spread it out in my lap and started stitching.  When out hostess came by to refill my tea, she asked how it was going.  I was so proud to hold it up… until I felt my skirt lift with it.  I grimaced, the circle of ladies laughed, and the seam ripper came out again.  

Mistake Number 47 or So

My stencils died, so I tried free-handing the flowers.  More seam-ripping.  But I made up flower stickers on my vinyl cutter, and those worked fine as templates.  And after 4,238 flowers, I said, “That’s enough!  If it falls apart, I don’t care!”  The catalog had long since retired the quilt that inspired this whole mess, I was way over that budget, and I still didn’t have a finished quilt.  This was craziness.  And I definitely wasn’t in love anymore!

I borrowed a friend’s machine to do the binding, and was so proud to present the completed quilt.  It seemed like there should have been trumpets, or a parade, or at least cake.  It was a beautiful spring day, and at least the birds were celebrating with me.

My two best girlfriends dropped by to see the finished version.  “Huh.  That’s pretty.” they said.  “Here’s a set of reusable fabric sandwich bags I made you.  And a lunch bag.”  And from the other one, “Here’s a couple of hats that I knitted and some cute boot toppers.”  All that, of course, in addition to the other dozen projects they’d done while I was on the great quilt odyssey.

Somehow, I’d expected more than “That’s pretty.”  But the dogs loved it.  And after a washing, I had to admit that it was pretty.  And I liked it.  And that it would be at least another 10-15 years before I made another one. 

I carefully folded it into the trunk for guests and sat down on the couch to rest.  There was a catalog on the coffee table from the same company that started everything.  And there, in the middle, was The Quilt.  Now available with black or white backgrounds. 

I checked the price, and thought, “You know, now that I’m back in practice, I could…” Which is when the angel of my better sense told me that I needed to get off my duff and walk the dog.  And just drop that catalog in the recycling on my way out of the door. 

Tips & Tricks

  1. Pencil it out.  Some kits are overpriced – but some aren’t.  Figuring out how much your supplies (and your time) will cost can save you a lot of time and frustration.
  2. Sewing machines save a lot of time!
  3. Using those acrylic stencils works (that’s how I did most of the quilting), but if the person has a vinyl cutter like a cricut (what I used) or a silhouette, you can make your own stickers to stitch around, and it’s so much easier.  I drew up a quick 5 petal flower, made a pattern for it, printed them in different sizes, and was off to the races. 
  4. Don’t be afraid to go it on your own.  I had a disaster in many ways…but I ended up with a beautiful, unique quilt and a winning article!  And there’s a whole lot of memories woven into the fabric of that quilt, as well. 

Next Championship

We want to thank everyone who showed interest in this special, by-request-only, Seam Ripper Championship. We greatly appreciated the stories, and have enjoyed putting this one up.

A knight holding a seam ripper kneels before Princess YellowBelly to receive the championships of horrible fabric art experience and triumph - enter your story today

Our next championship will be reserved for members only – so please keep watching the page, and the newsletter, for more updates & details.

Speaking of which, please sign-up for our free newsletter, where you’ll receive the latest updates and also get notified in advance when we open up the next Championship

Fracture Nightmare – Seam Ripper Champion!

Karyl Fitzgerald is our latest Seam Ripper Champion – the absolute Master of Disaster, for her humorous take on a fracturing panel project that took her for a wild and crazy ride of mistakes made and overcome. Please join us in celebrating a fabric artist that hasn’t yet heard the words “quit” or “can’t” and keeps on making amazing pieces of quilted magic.

A knight kneels, holding a seam ripper, before Princess YellowBelly to receive the Seam Ripper Championship for a fracture nightmare

When I decided to fracture a Christmas Tree panel, I ended up fracturing more than my fabric; my fracture nightmare also fractured my confidence, composure and enjoyment into tiny little pieces that didn’t know each other anymore!  

Like many of my “worst disasters” however, I learned a lot from my fractured mess nightmare, and I hope it helps ya’ll to have less troublesome quilting in the future. 

Be Careful of Knowing What You’re Doing

Fracturing is when you take a multiple number of identical printed fabric panels – each with the exact same images.  Then you cut each panel into teeny, tiny little strips, starting at different points, and sew them back together. 

Your starting number needs to be an even multiple; 2, 4, or 9. 

You could probably do more, but I have no idea why you’d want to.  Honestly, that’s a lot of strips! 

Fracturing, by the way, is one of the most fun and easiest ways to turn a regular old printed fabric panel into a gorgeous piece of fabric art that’s just right for inclusion into a quilt, or into a large wall hanging. 

I’ve done fracturing before, most notably my “Poppy Water” panel, which worked beautifully.

I also enjoy fracturing, which is a bit of diversion for me since it smacks very strongly of a precisionist style with all those tiny little seams and vaguely matching points.  So when I saw this gorgeous panel of a Christmas Tree out in the snowy woods beneath the northern lights, a light went off in my head.

Karyl Fitzgerald - head shot

Karyl Fitzgerald is the fabric art genius behind Princess YellowBelly Designs. A lifelong seamstress and artist with many mediums, she is spending her time these days making new quilt patterns that make it easier to create amazing quilts with new twists and combining multiple techniques. Of course, creating new techniques “as you go” is one reason she has so many stories of disaster.

Karyl grew up in the bush country of Northern Alberta, has been to the Amazon Jungle, spent a year teaching in South Korea, and married a rancher from Arizona. She’s the mother of three children, and all-around a fun-loving, adventurous gal!

Whenever your project is at this stage – there’s a lot of room for missteps in your near future!

The panel already had a kind of watery, painted quality that made me think it would look even more amazing as a rippled, abstracted beauty. 

So, I ordered the panels and prepared to create fabulous fabric art magic. 

Fabric Art Techniques Can Take You for a Ride

This is, ironically, especially true for a technique that you think you know.  It’s often a case of you knowing just enough to make yourself dangerous.  That being said, there are lots of ways that a project can highjack your best intentions and take you riding off in a strange and bizarre new direction.

Non-Identical Images – A Problem I Couldn’t Control

The first problem we (my daughters and I) ran into was the panels themselves. 

Christmas Tree original panel - un-fractured

Upon unpacking them we found the rich, vibrant Christmas trees were even more beautiful than the pictures had suggested, but they had been cut wildly off-kilter. 

This is, by the way, is a common problem with printed fabric panels. 

I think they are probably printed on long bolts, and then machine cut.  There’s no real attention to squaring up a panel, as long as they look vaguely rectangular, they get stuffed into a plastic bag and shipping off. 

This isn’t a problem I’ve ever run into with panels I’ve purchased from a quilt store, at least not ones that don’t arrive there prepackaged, because quilt ladies cut these panels out by hand. 

This was a big problem for a fracture project, because a basic fracturing principal is to work with identical images.

How do you square up a piece of fabric that doesn’t fit on a cutting board? 

I don’t know.  And, with that, my fracture nightmare was off and running!

We did work out a process and square them up, a little, but the truth is our pretty panels were still a little crooked. 

Working a Pattern from Memory – the Problem I Could Have Controlled

The finished piece might have been a little wonky anyway, thanks to the crooked panels.  However, thanks to “knowing” what I was doing I really created my own fracture nightmare. 

The real problem was that I was lazy. 

We had recently moved from a house we’d lived in for seven years – a very high-stress and pressured move – and the box with all my quilting pattern books had ended up going to storage instead of to our new place. 

It was wintertime, there was a ton of snow on the ground, it was cold and stormy, and I just didn’t want to put out the colossal effort to go find my Fracturing How To book

Besides, I just knew that I remembered how to do it from a previous project. 

Some Changes are Necessary – Just Be Careful

The first thing I changed was to make the first set of cuts vertically, or lengthwise, rather than horizontally since the panels were already longer and you lose a little bit of accuracy every time you fold fabric to fit it on the cutting board.

This first set of lengthwise cuts worked beautifully, it was the second set with the crosswise cuts that ended up in a wreck. 

Now I knew the panels were not perfectly square or equal, but I had a brilliant idea to offset that fact; I ironed in a deep crease down the exact middle of each panel before I cut my strips and re-sewed them. 

I figured the center images, the Christmas Trees themselves, was actually identical, and since there was a lot of expendable background in the panel, I could trim the differences down later.   

Cue the Disaster Music

You know how when the Pink Panther theme music would start on those old movies you leaned forward to the edge of your seat waiting for Inspector Clouseau to fall on his face from a great height?

Strangely poor old Clouseau never heard the warning, and neither did I – even though it must have been on full volume. 

First I sewed the bottom half back together with my tree branches upside down – how, I don’t know, I marked the right ends and sewed them together – so that had to be ripped out and sewed again.  Absolute fracture nightmare!

Upside down branches in a strip set are a true fracture nightmare
As the tree began to show up, it became more and more obvious that the branches were pointing up, instead of down, and that we had our sequence, strip to strip, flipped. Don’t ask how that happened – because I still don’t know!

Then, I lined up each strip using the middle crease.

But since that was somehow off to start with, my Christmas tree ended up looking like it had drunk way too much punch.  Any police officer in his right mind would have charged me with an SUI – Sewing Under the Influence. 

So…I spent days and days ripping out one strip at a time and re-lining them visually.  Of course, in a fracture, once you cut your fabric both length and crosswise you end up with these beautiful little 1” squares – so when I ripped out each row, the stitching would open up on at least half of these squares (both sides of the strip).  And then I would have to re-stitch these before I could re-sew the entire strip back on! 

This was extremely tedious and I hated it!!! 

But, since I don’t like giving up on a project, I set my teeth and plodded on. 

The finished panel is very nice, but I’m going to dig my quilting books out of storage before I try something like this again!

Tips & Tricks to Avoid Your Own Fracture Nightmare

I’m proud of my finished panel, now, and glad that I took the time to figure, and re-figure, each problem and keep on with the keepin’ on until I came up with something beautiful.  And I will share a picture of my Christmas tree when I get it sewn and quilted into a finalized version.

  1. Never assume that you understand a pattern well enough to do it without guidance (go get the book out of storage even if it’s snowing)
  2. If you get a panel that was cut crookedly – take the time to actually make it straight, not just sort-of straight, before you begin the process of incorporating it into a quilt or pattern.
  3. If there’s a possibility that you can get turned around – even with careful labeling – try starting somewhere near the middle, where you’ll see sooner that you’re making a bad mistake.  I started at one end, where any normal person would, and on the white background I couldn’t tell that it was all upside down until I got to the tree, which was like fifteen rows or more of tight stitching on narrow rows. 

Here’s to your success in making great panels better, in using unique and beautiful techniques in new and amazing ways, and in overcoming each challenge on your road to being an even better fabric artist!

Next Championship

You may have noticed that Karyl’s been our Master of Disaster before.  Sadly this time we didn’t receive enough submissions that adhered to our quality guidelines to let us choose a brand-new Champion.

We hope that next time – in just a few months – you’ll help us change this trend. 

A knight holding a seam ripper kneels before Princess YellowBelly to receive the championships of horrible fabric art experience and triumph - enter your story today

After all, there’s no reason to be embarrassed about making mistakes or having struggles.  To err is human, to overcome is the domain of an artist.  We want to hear how our friends struggled, and how they overcame.  We want to figure out mistakes before we make them, and to grow our knowledge and library of beautiful and unique fabric arts. 

Please sign-up for our free newsletter, where you’ll receive the latest updates and also get notified in advance when we open up the next Championship

January-March 2019 Champion – The Amazing Mutating Skirt

Leiajoy Fitzgerald wearing her amazing mutating skirt, a crochet project gone wrong, on the beach at a business conference in Florida

Suzanna Fitzgerald is our January-March 2019 Seam Ripper Champion for her sadly hilarious tale of a simple crochet project gone wrong – or possibly horribly right. We’re not sure, so let us know what you think in the comments below.

It was just a simple crochet project…Gone Wrong!  

A knight holding a seam ripper, kneels before Princess YellowBelly to receive the award of Seam Ripper Champion

My sister Leiajoy had always had a thing for ponchos, and since her birthday was in the fall I thought: “Hey!  I’ll crochet her a poncho in the evenings out of really bright variegated yarn and she’ll have something fun and practical to fit her personality.”

Yeah, right.

Or maybe I’m not as good at crocheting and pattern-reading as I would like to believe.  Hmm…

First Step – Finding a Pattern I Could Handle

I looked on YouTube and found a simple tutorial by an excellent crochet artist.  She made it really easy to understand, and it only involved the most basic of stitches:

  • Chain stitch
  • Single crochet
  • And a double crochet shell set

Second Step – Building the Crochet Project

Suzanna Fitzgerald, seam ripper championship for her crochet project gone wrong writer and managing editor at PYB Designs

Suzanna Fitzgerald writes for a living, but she also enjoys crafts, like quilt designing and crocheting, as her hobbies. Suzanna helps to run Princess YellowBelly Designs with her family. When she’s not in front of the computer she can most often be found behind a camera, or driving down her beloved Colorado highways.

I found some yarn I had been saving for a special occasion.  The specific yarn is from Red Heart, 100% acrylic, color “Black Light.”  It’s a really brilliant yarn in neon shades of orange, green, yellow, pink, dark blue, and black.  Just right to be woven into a complicated-looking pattern.

Sometimes fabric art projects don’t go as planned…

Third Step – Making Sure (Measuring Twice)

I practiced the various stitches in front of the computer until I had them, then I wrote down the pattern in crochet shorthand (pattern formula) and proceeded to stitch away. 

This Is Where Reality Stepped In

I had envisioned sitting in front of the TV of an evening, keeping my hands busy with a crochet hook and string of yarn, enjoying myself royally on a unique project.  Hah!

Instead, after about a week, I realized that I had made a horrible mistake.

Step Four – Tear it Apart and Start Again

I proceeded to pull the anchoring stitches, about three thick, tight lines which would become the shoulder band. 

Having successfully decimated hours of work, I went back to the tutorial.  This time I watched my internet teacher each step of the way – which still looked totally easy when she did it – as I re-measured, and carefully, carefully, re-stitched the shoulder band. 

Step Five – Are We There Yet?

This part of the neon colored waistband got pulled out three times, a simple crochet project gone wrong - really wrong

I set the shoulder band on my sister’s shoulders.

Hurrah and Huzzah!  It fit like a dream, it looked like something that could have come out of the Hippie Gucci line (if Gucci made Hippie garments).

Step Six – The Largest Part

Wildly pleased, I proceeded to stitch the body of the poncho.

Step Seven – Complete and Utter Confusion

This moment can best be described by one word repeated frequently and at various volumes; “huh?”

I looked, I peered, and I measured.  I re-measured.  I pulled out four lines of hard-fought progress, and proceeded, once again watching my tutorial step-by-step.

It didn’t matter. 

While my touched-by-crafting-angels-internet-teacher blithely showed row after row of smoothly draping poncho, my crochet project gone wrong hung in heavy, wrinkled folds.  Obviously I had too many stitches in each row for the design – but how?

*I actually came up with a really great trick for keeping tracks of rows when working in the round – read all the way to the bottom to see it!

Step Eight – Help!  

Admitting defeat, I went to my wise and artsy mother who had taught both me and her own mother to crochet (at different times) and asked her what she thought.

Together we went through the pattern, my style of crocheting, my tension, and the instructional video twice over. 

Finally we determined that – for whatever reason – the original pattern was too loose.  We weren’t sure why; if it was the yarn, the size of my crochet hook, my inability to count properly, or what.

Step Nine – Redesigning the Pattern

Together we worked the rounds of crocheting to be tighter, cutting multiple stitches out of the early rounds and severely diminishing the exponential increase of each succeeding row.

Step Ten – Finally! 

My crochet project hung nicely, slowly expanding out from the shoulder band like it was supposed to. 

It was bright, it was easy, it was beautiful.  I finally had my pattern memorized, and I worked down roughly fifteen rows (which was a lot of yarn!)

Step Eleven – Trying it on

My patient sister tugged the half-finished design over her head, eager to see how much more I had to do. 

We stood and stared, stunned and disbelieving. 

Everything look perfect – it really did.  Except!  Our custom alterations to the pattern had not only taken out those unsightly folds, it had tightened the entire design. 

The project had not only taken a hard right turn from my hopes, the body of the poncho was now so tight that she could not move her arms, at all. 

Step Twelve – Scream Loudly 

This was rather a splendid scream, as the three of us – a loving mother and her two daughters – shared the frustration equally by that point.

Step Thirteen – Accepting Fate

I’d love to be able to say that I persevered until I got the poncho that I originally wanted, and that it was beautiful, and my sister loved it, and that I learned something valuable.

Well, I did learn something valuable, but the rest of it…not so much.

Instead, after the screaming died down, my sister discovered that she could very easily pull the poncho down her arms, and that it fit at her natural waistline. 

We sat and stared, in a good way for the first time through the course of the project. 

Slowly, it dawned on us that the shape our so-called poncho had taken was very similar to an A-frame skirt (which happens to be a very appealing style for my sister’s body shape). 

The Continuing Saga of the Amazing Mutating Skirt

My crochet project gone wrong mutated from a poncho into a skirt.  But!  My project wasn’t done giving me fits. 

I finished the crocheting, and my mother sewed in a black cotton underskirt for modesty and comfort.  My sister wore it as part of a crayon costume at summer camp, and a few years later she proudly wore it to a business conference. 

That skirt has seen a lot of miles, in more ways than one.  It is, after all, the amazing mutating skirt.

The skirt has kept growing!

Even after we sewed the sides to the side seams of the cotton underskirt it kept growing.  Now, every two years or so, I pull out about a half a ball of yarn, shortening the skirt back to just above her ankles. 

I don’t know where all the extra yarn is coming from, because the skirt doesn’t look stretched, or thin, or anything that would indicated the whys and wherefores of all that extra yarn. 


So there it is for you – the saga of a crochet project gone wrong, which turned a poncho into an amazing mutating skirt!

I did learn some things about crocheting, though.

Leiajoy Fitzgerald wearing her amazing mutating skirt, a crochet project gone wrong, on the beach at a business conference in Florida

Maybe my crochet project gone wrong wasn’t such a disaster after all. Here’s Leiajoy wearing the amazing mutating skirt at the beach, moments before walking into our yearly business conference!

Tips:

  1. When working on a round pattern use a safety pin to mark the beginning of the last row.  That way you instantly know when to switch stitches.
  2. Make sure to do the foundation rows (in this case the waistband) when your total concentration is on it.  Don’t begin crocheting in front of the TV until you are on the simple, repeating part of the pattern.
  3. Try to match your tension with the original pattern as much as possible.
  4. Be ready to change your plan.  Crochet can be a bit unpredictable.  An afghan that you sized for a twin may grow into a queen or even a king.  Or a garment may become something totally different.  Being ready to adapt can save you a lot of frustration and time spent pulling those hard-won stitches.
  5. After finishing a project, go in and put a drop of fabric glue into each knot where you tied in a new skein of yarn (either for continuing or for changing colors).  This will help to preserve your beautiful creation in the long run!

Final Thoughts

Remember to have fun with your crochet projects.  You will run into snags, but you’ll learn something from them, every time.  And, with a little faith and perseverance, you may create something even more beautiful, and useful, out of your mistakes than you could have imagined!

You Could Be Our Next Champion

Suzanna had a lot of fun – and gave us a lot of laughs – and we’re going to enjoy having her as our champion for the next three months.

BUT! 3 months goes by awfully fast, and we’re already looking for our next Seam Ripper Champion. Will our next Master of Disaster be you? We hope so.

Please submit your story after reading our simple guidelines.

A knight holding a seam ripper, kneels before Princess YellowBelly to receive the award of Seam Ripper Champion